Let’s Build a Model-Driven App in D365 Customer Engagement (CRM)
If you’re using Dynamics 365 Customer Engagement (CRM) on the Unified Interface, you’re already using Model-Driven Apps. Sales Hub, Customer Service Hub, and Field Service are all examples of Model-Driven Apps that come pre-built depending on your license.
Model-driven apps provide users with a responsive design whether you’re on your desktop computer or mobile device and can be customized with your choice of dashboards, views, entities, forms, and business processes. The best part is, you can design and build your own Model-Driven App with no-code in a matter of minutes.
There are many reasons why it may make great business sense for you to modify an existing or even add a new Model-Driven App, here are just a few.
Existing Applications for Model-Driven Apps:
• Remove unnecessary dashboards, forms, or views
• Add custom entities to the site map
• Re-arrange the site map to better fit your teams
New Applications for Model-Driven Apps:
• Design an app-specific to a team (e.g., Sales Team, Inventory Team)
• Create an app for use on mobile devices
Let’s go through the quick process of creating your own new application.
Step #1
Go to https://make.powerapps.com , the Power Apps Maker Portal is where you’ll find all of your Model-Driven Applications, as well as the location, to start creating your own apps.
Step #2
Be sure you’re creating an app in the correct environment. Your environment will be listed in the upper-right corner of your screen.
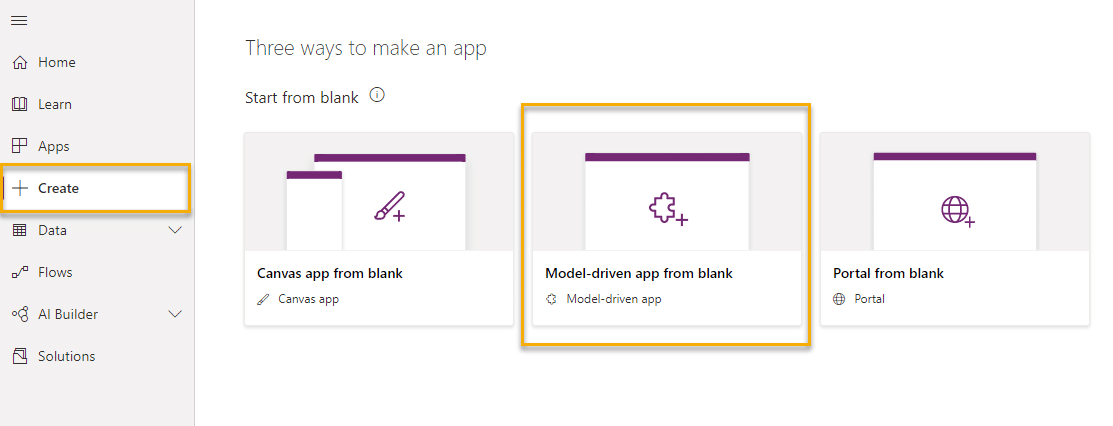
Click the +Create option in the left site map, then select a Model-driven app from blank, and finally click Create on the next window.
Step #3
• Now it’s time to give your new app a name.
• Once you fill in the Name field, the Unique Name field will also populate.
• Optional:
- You can give it a description. This will tell anyone that is viewing the main applications page what your new app is set up for.
- You can also choose to use the Default Image for an icon, or uncheck this box to select an image that is already available in your environment.
- Use an existing solution to create the App. This will give you the option of starting from a template by selecting a solution from your environment and building the app using that data. If that solution contains an app, you can also use that site map for your own app.
- Choose a welcome page for the app. You will need to have a page already loaded into your environment to add.
Enable Mobile Offline

Step #4
In our scenario, we are starting with a blank canvas. The first thing we will want to do after the App Designer loads is to create our site map. Select the Site Map icon and a new Site Map Designer page will load.
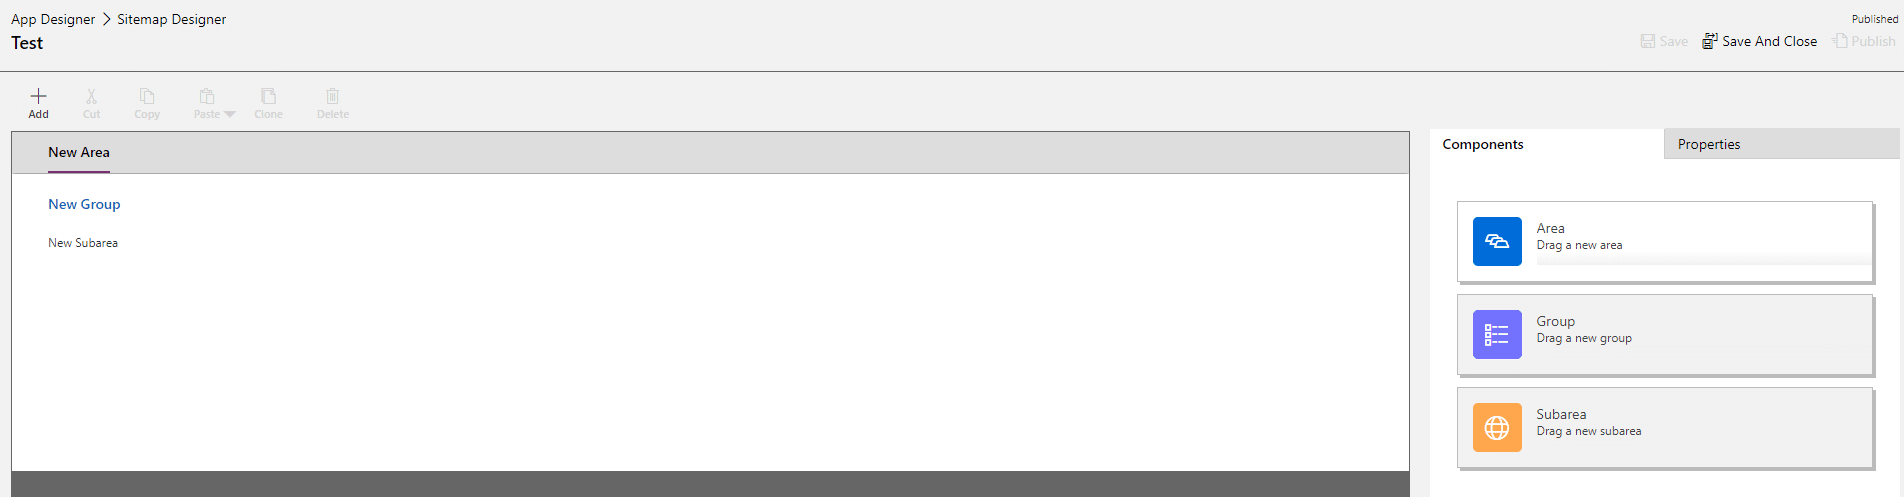
Your site map is made up of 3 components: Area, Group, and Subarea. The best way to put this into perspective is to compare it one of the existing applications:

In the example above, the Group’s are My Work, Customers, Service, Activity Types, and Knowledge. The Subarea’s are all below each Group, for example, Dashboards and Activities. And we have our Area at the bottom of the app, Service. You can have multiple Areas, each with its own set of Groups and Subareas. By clicking on Service, it brings up the rest of the areas available (Service Management, Scheduling, Help, and Support).

Our new app is set up with an Area already, so let’s click on it and rename it. Then we can do the same for the Group.
The next step is to decide what we want for the Subarea. We can add a dashboard, entity, web resource, or URL here. I’ll add a dashboard to start. Once you have highlighted New Subarea on the left, you can go to the right of your screen and select a Type, then choose the options below to finish.
Continue to add Subarea’s until your site map is complete. To add additional Groups or Subareas to your site map, just use the +Add button on the upper left. Quick tip, you can drag and drop them after you’ve added them if you don’t like the order they are in.

Now click Save And Close
Step #5
Now it’s time to make choose the forms, views, charts, and dashboards for each entity. It will default to select all. To modify these options, select your asset and then on the right you can uncheck All and narrow down your choices.
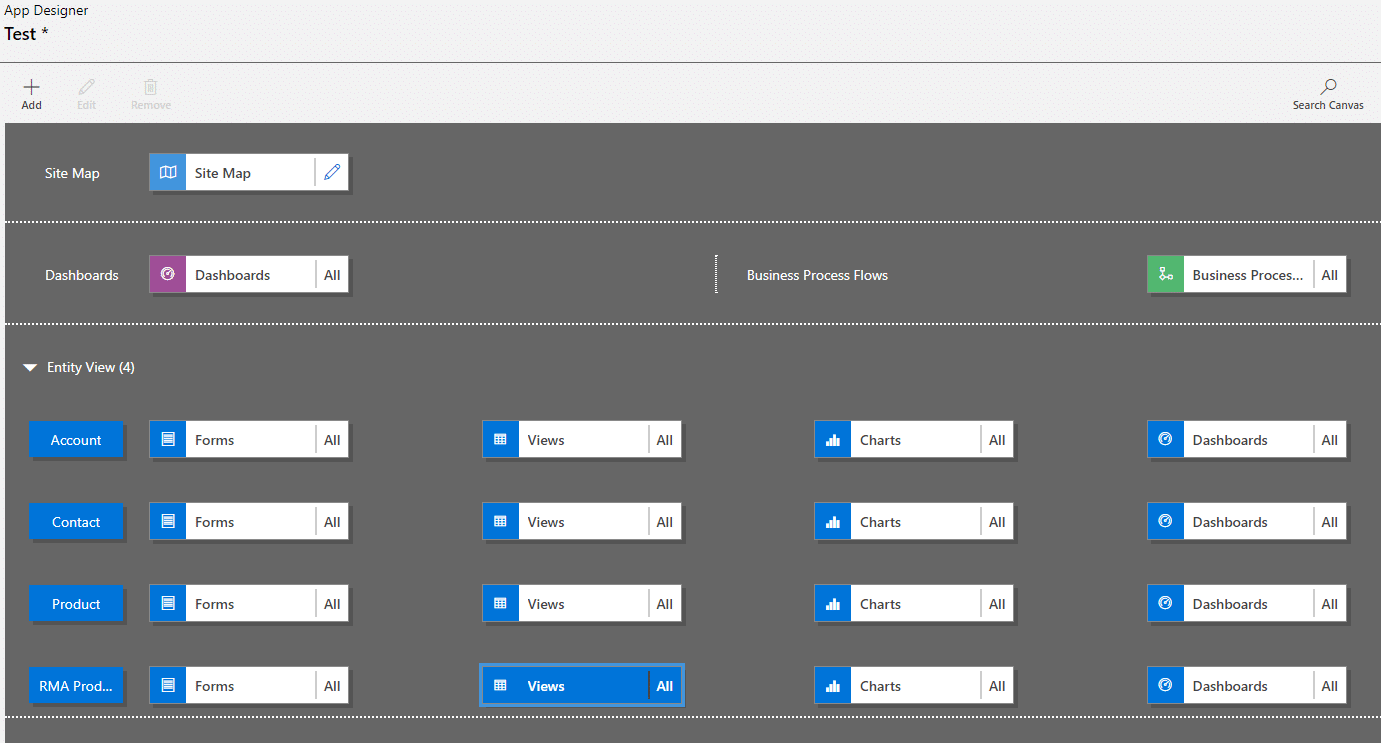
Once you are satisfied with your selections, click Save, then Publish.
Step #6
Now that you’ve created your app, the last step is to share it with your team. If you return to the Maker Portal, select Apps from the left site map. Now put a checkmark next to your app and click the Share button on the top command bar.

A Share window will open up. Select your app, then put a checkmark next to each security role you want to be able to access the app and finally click the Share button on the bottom of your window.
That’s it, we just built a new app with no code in a pretty short amount of time.
If you’d like to learn more about Power Apps be sure to subscribe to our blog or contact us!
Under the terms of this license, you are authorized to share and redistribute the content across various mediums, subject to adherence to the specified conditions: you must provide proper attribution to Stoneridge as the original creator in a manner that does not imply their endorsement of your use, the material is to be utilized solely for non-commercial purposes, and alterations, modifications, or derivative works based on the original material are strictly prohibited.
Responsibility rests with the licensee to ensure that their use of the material does not violate any other rights.