How to Use Approvals in Dynamics 365 Business Central
Understanding how to deploy approvals in Dynamics 365 Business Central streamlines permissions management and the implementation of formal approval workflows.
In this blog, we will discuss why gaining a deep understanding of approvals in Business Central is important and how that can help your business run more efficiently.
Why Use Approvals in Dynamics 365 Business Central?
Even if your organization hasn't formally embedded approvals in your system, they are still happening. Employees ask managers for permission to purchase necessary items or access certain workspaces. This often happens informally and without proper tracking. Unorganized processes like that can lead to inefficiencies and potential compliance issues.
Examples of inefficient approval methods include informal emails or lackadaisical approval tools outside of your system.
When you implement a proper approval process through Business Central, you ensure better tracking and management in several key areas:
- No Requests are Forgotten: The system prompts for approvals, eliminating the risk of someone forgetting to ask for permission.
- Correct Approvers are Contacted: The system ensures that requests are sent to the right people, avoiding miscommunications
- Compliance and Security: A formal system enforces compliance with company policies and enhances security
- Streamlined Processes: Automating approvals reduces manual effort and streamlines workflows
- Effective Tracking and Reporting: You gain visibility into where approvals are in the process, which improves tracking and reporting
- Improved Collaboration and Communication: Clear visibility into the approval process enhances teamwork and communication within your organization
- Risk Management: A robust approval system helps prevent costly mistakes and reduces organizational risks.
This is why more organizations seek to implement formal approval workflows and why Microsoft continues investing in these modules.
How to Set Up Approvals in Business Central with Power Automate
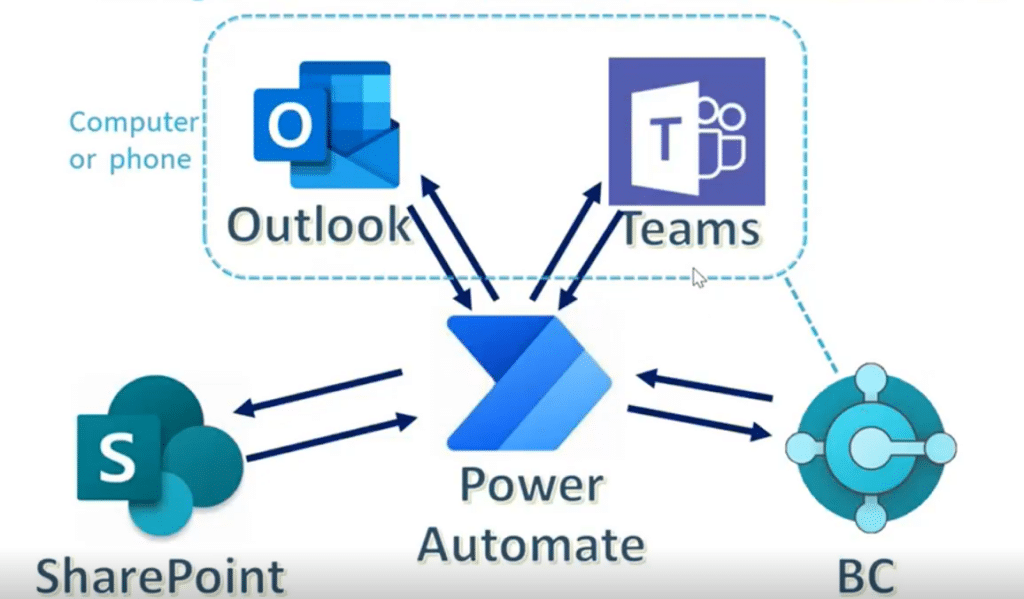
Setting up approvals in Business Central is streamlined through an integration with Power Automate. It allows you to create workflows between your favorite business apps and services to synchronize files, receive notifications, collect data, and more.
For example, suppose an employee submits a purchase request in Business Central. In that case, you can set up Power Automate to trigger a workflow that sends the request to the appropriate manager for approval. The manager will receive a notification – usually via email or in Teams – on their phone or computer and can review the details before approving or rejecting the request with a single click.
While you can set up workflows solely through Business Central, depending on the complexity of the approvals, the process for that can be much more complicated.
To setup an Approval workflow through Power Automate, follow these steps:
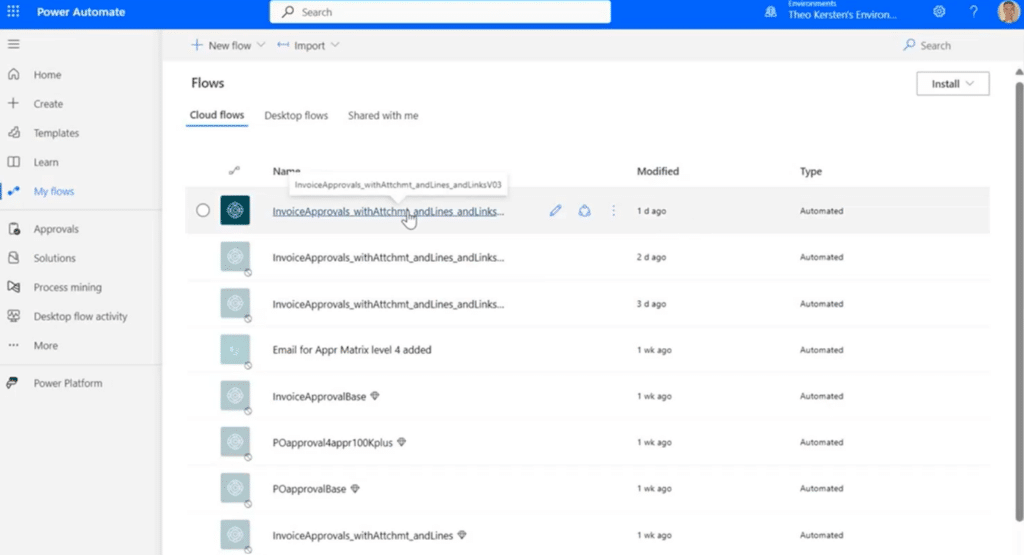
1. Create the Workflow in Power Automate
In Power Automate, select “New flow” to create one or select an existing flow. You can use out-of-the-box templates or create one specific to your needs.
Here is where you can structure your approval workflow and configure notifications such as approvers getting an email to their Outlook or a Teams message
2 - Integrate with SharePoint
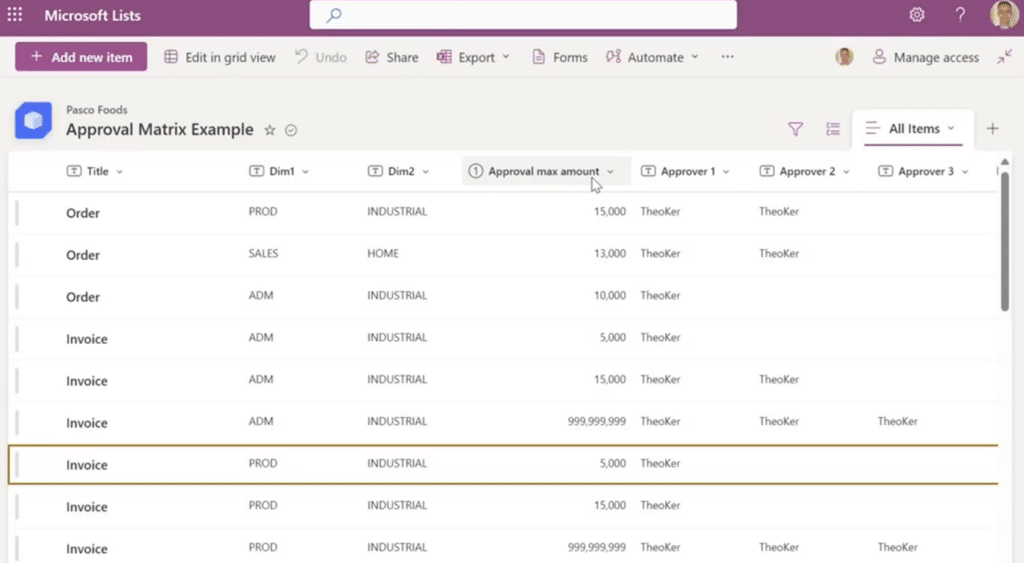
Creating a list in SharePoint – also known as an approval matrix, in this example. Doing this allows you to designate who approves what. This helps you track approvals and denials in your system more effectively and flows better with Business Central and Power Automate, which makes setup and testing easier.
You can also do this in Excel if you prefer to work there.
3. Test Your Approval Workflow in the Business Central
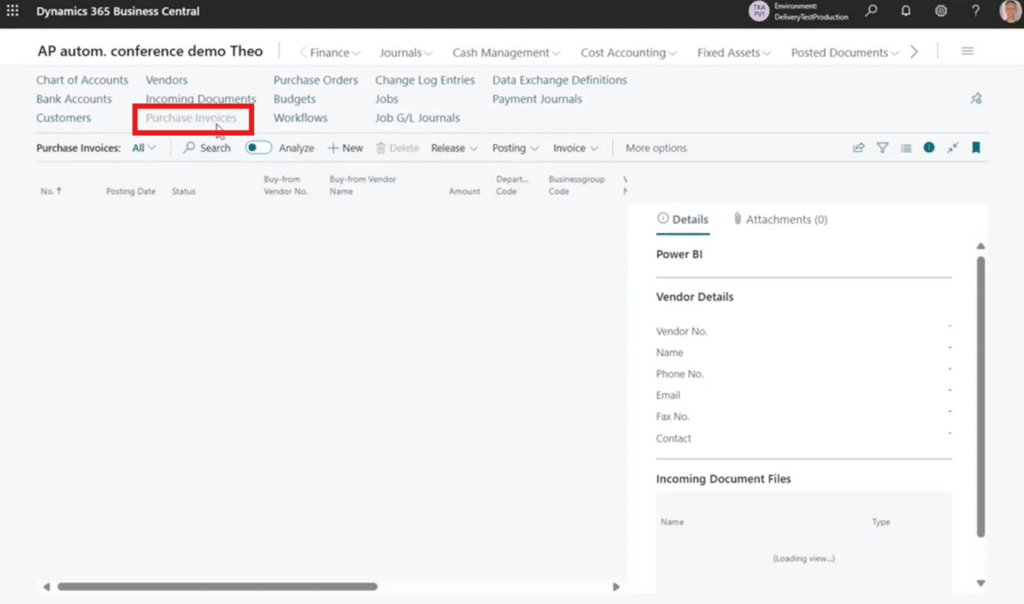
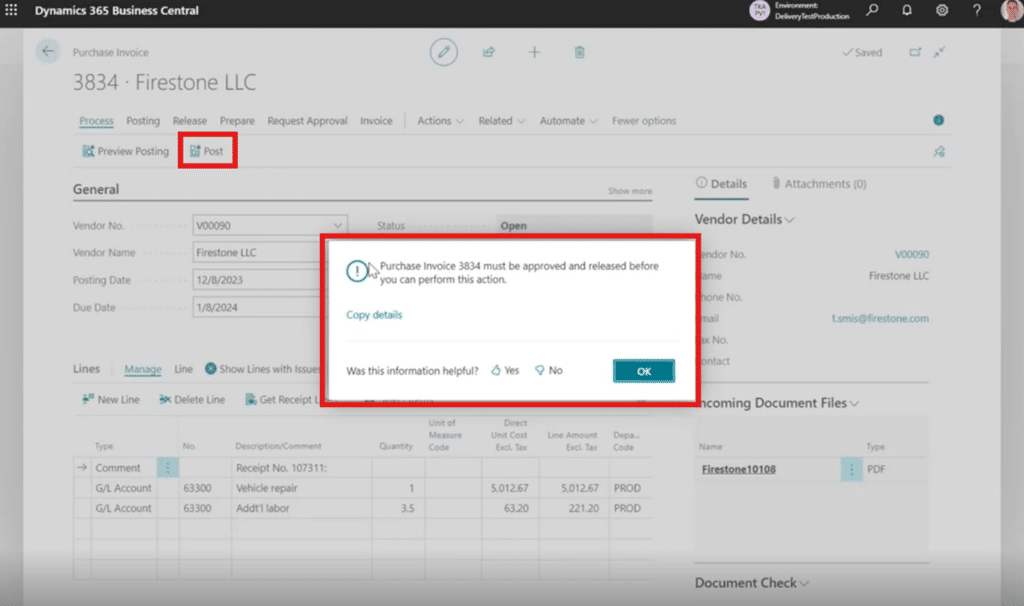
In the example above, we are testing the approval workflow for a team member who wants their manager to approve a business purchase. If you are in a test environment and want to ensure your approval works properly, you can go to “Purchase Invoices” in Business Central.
A list of purchases will come up. Select one and go to the next screen. You can see the effectiveness of setting up approvals here. If the user tries to post something without getting approval first, they will receive a popup reminding them about the approval process. This means there is no way for users to force things through the system.
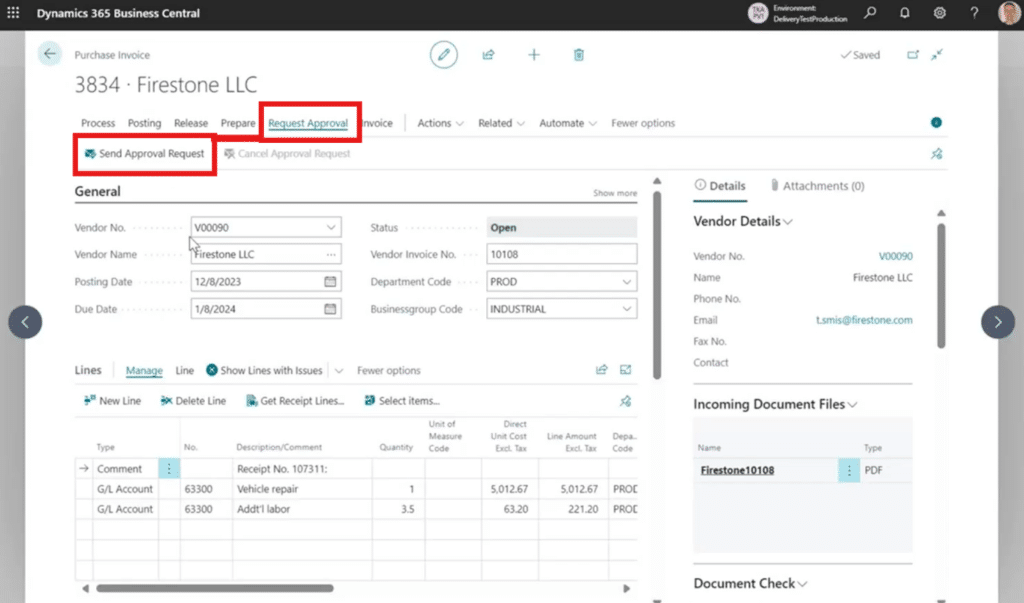
The user will then go back and select “Request Approval”. In the submenu, click “Send Approval Request”.
The status in the General section will change to “Pending Approval” after you do this. The workflow is now running through the structure you set up in Power Automate and looking through the approval matrix to identify the approver.
Here are some other interesting notes for the purchase invoice screen:
- You can specify the Vendor Name, Department Code, and Businessgroup Code here to ensure that your purchase invoice goes to the correct approver.
- If the Purchase invoices are tied to Receipts and Purchase orders in Business Central, it allows approvers to see the difference between the initial purchase order amount and the invoice amount (3-way match).
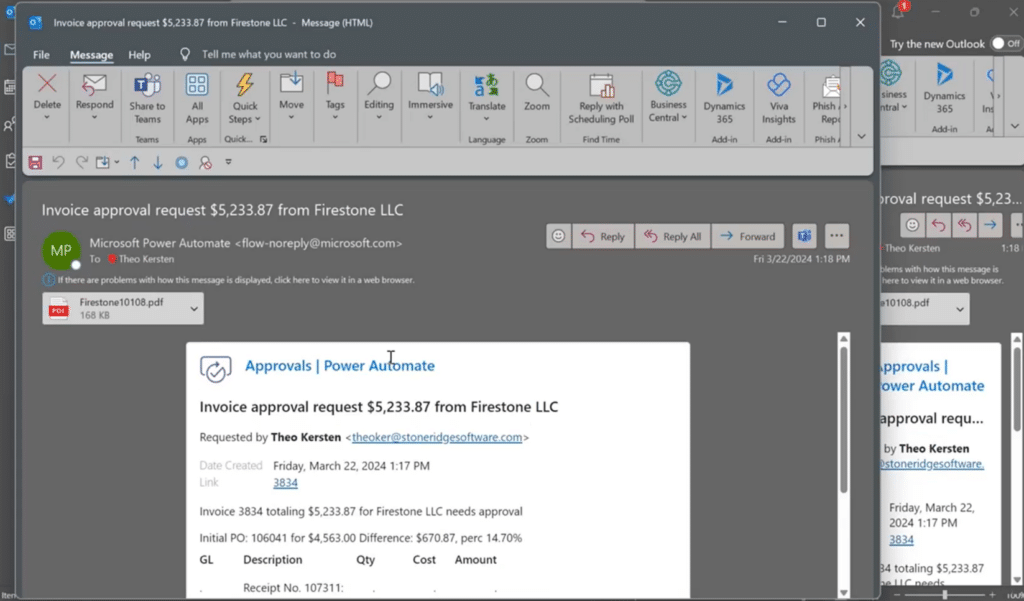
- You can attach a PDF – such as the vendor’s invoice – on this screen as well. This PDF will automatically attach to the approval notification, so the approver doesn’t have to search for it themselves or ask you for it.
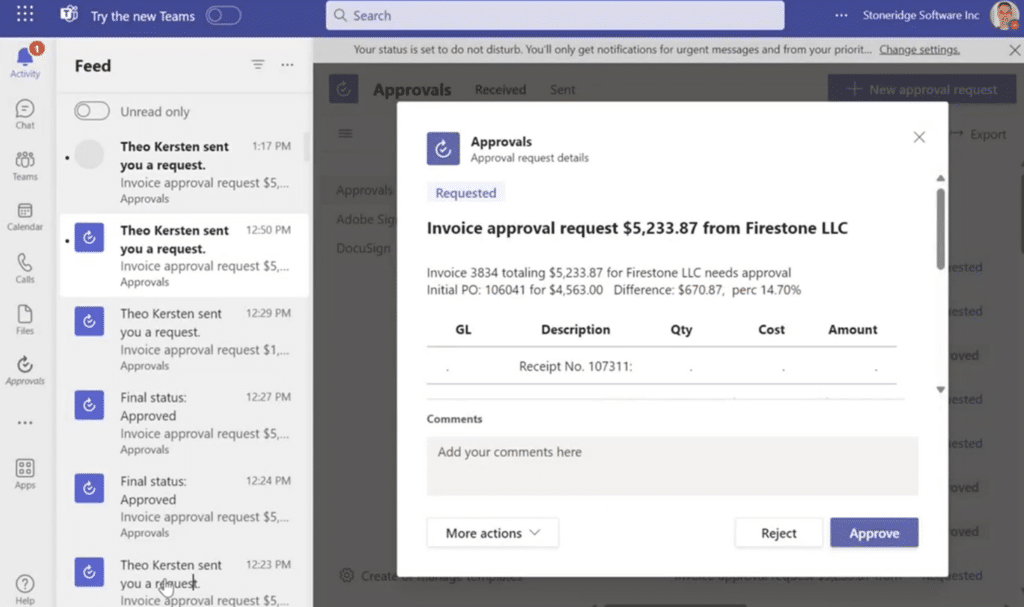
Finish your test by going to Outlook or Teams to make sure the notification goes through.
From here, the approver can review the details of that request, including:
- The Purchase order number and vendor name
- What exactly is being approved
- Any relevant document attachments (the PDF mentioned above)
- The actual Business Central purchase invoice (if the approver has a BC license)
- Note: One of the benefits of building approvals through Power Automate is that the approver doesn’t need a Business Central license. They will not be able to access the Business Central record if they don’t, but they will have the PDF attachments.
- A comments box where the approver can send notes to the person requesting approval if they need to reject the purchase invoice for any reason. This allows the requestor to make amendments before asking for approval again.
Embedding Power BI into Business Central
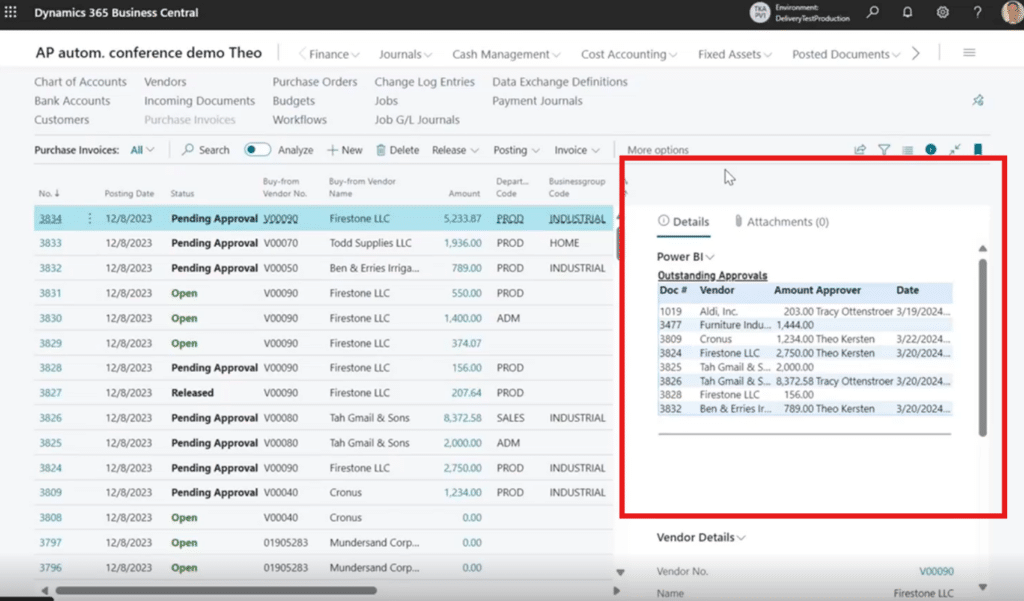
This is an optional part of managing approvals but it is highly recommended. Power BI is a powerful tool that allows you to create dashboards and visualizations that provide real-time insights into the approval process. While you can upload this information to Power BI and view it there, it’s much easier to embed it into Business Central.
You can view a list of all of the approvals in your system to streamline management.
Advantages of Setting Approvals Up Yourself
One of the standout features of this solution is its simplicity in setup and use. A single user can configure and test the entire workflow. This includes creating requests in Business Central, setting up themselves as an approver, and testing the process from start to finish. This easy setup makes it accessible for organizations of all sizes, without the need for extensive IT resources.
Improve Business Efficiency with Approvals in Dynamics 365 Business Central
At a high level, there are three important benefits to configuring and using Power Automate approval workflows in Dynamics 365 Business Central:
- Single Source of Truth: The approver sees all relevant information in one place, eliminating the need to check multiple sources.
- Speed and Accuracy: Automated notifications reduce the time spent on manual checks and improve the accuracy of approvals.
- Scalability: Whether you have a small team or a large organization, the workflow can scale to meet your needs.
Want to Learn More About How to Optimize Your Use of Dynamics 365 Business Central?
Get in touch with Stoneridge. Our team of Business Central experts can help you take advantage of this feature and identify additional features that can help you streamline work for you and your team members.
Under the terms of this license, you are authorized to share and redistribute the content across various mediums, subject to adherence to the specified conditions: you must provide proper attribution to Stoneridge as the original creator in a manner that does not imply their endorsement of your use, the material is to be utilized solely for non-commercial purposes, and alterations, modifications, or derivative works based on the original material are strictly prohibited.
Responsibility rests with the licensee to ensure that their use of the material does not violate any other rights.


