General Ledger Budgeting in Business Central – Master the Basics
The out-of-box functionality within Dynamics 365 Business Central allows you to have multiple versions of budgets – whether a new version due to changes or various versions based on other parameters such as dimensions.
You can manually update the columns within D365 Business Central or Export to Excel to update the file and import.
Manually Update New Budget in D365 Business Central
First, let’s walk through the manual update using a new budget.
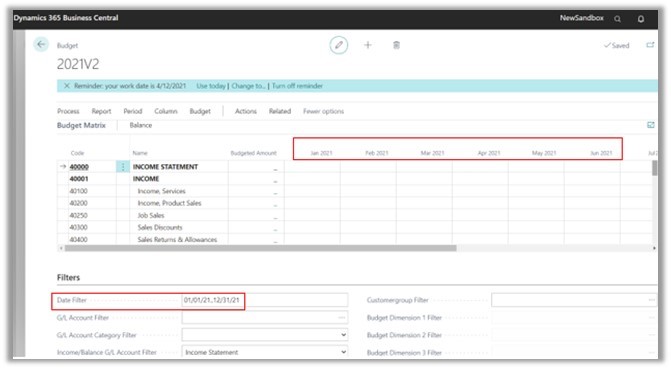
To create a new budget - by going to G/L Budgets and clicking +NEW. Add the Budget Name, Description, and Dimensions for the newly created budget (Global 1 and 2 are predefined based on the General Ledger Setup). Then go to Process -> Edit Budget.
Please pay close attention to the Period, making sure that the correct Date Filter is selected in the Filters FastTab Section.
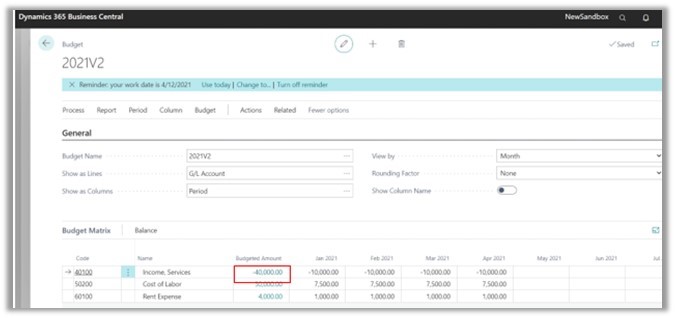
The Budget Matrix can be edited within the application by adding the amount to the cell for the correct G/L Account and Period. Please keep in mind that Income accounts need to be entered as a credit amount where COGS and Expense accounts need to be entered as a debit amount. Once the amounts are manually entered, the Budgeted Amount will populate with the sum of the columns. Like other places within Business Central, the blue link allows you to drill into the amount for further review/analysis of the G/L Budget Entries.
If you notice an issue or a change that is needed, go ahead and update that cell for the G/L Account and Period. When you drill into that Budgeted Amount, you'll see the original entry and the adjusted amount. Both lines are on the G/L Budget Entries with a different entry number.
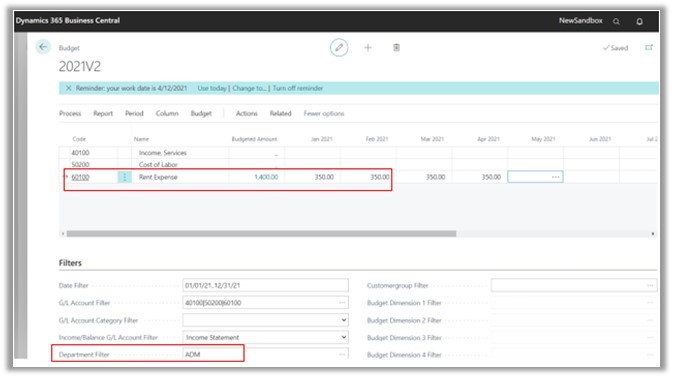
By default, the dimension values aren’t recorded by adding the amount into the column. To apply the dimension value to the amount, you must first include the value in the Filters section. Then, when adding the amount, the dimension value is also registered for the amount.
Exporting and Importing Budgets in D365 Business Central
Now let’s walk through the exporting and importing budgets.
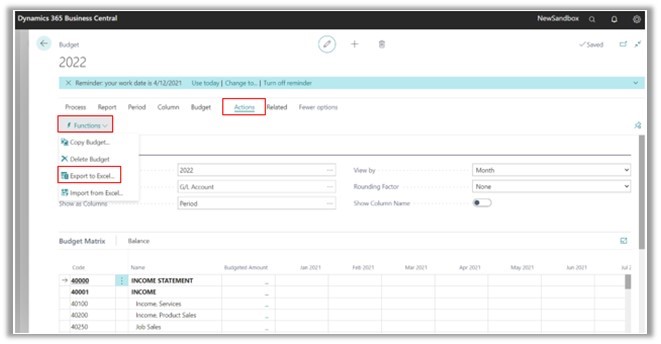
To Export to Excel, go to Actions -> Functions -> Export to Excel. This will allow you to export all or part of the budget.
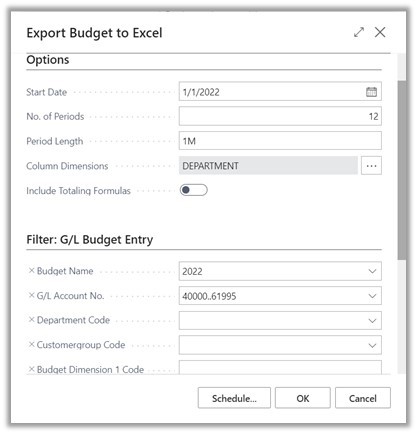
When exporting to excel, you will complete the option section by determining the start date, number of periods, period length, whether to include the column dimensions, and totaling formulas.
Also, you can filter the G/L Budget Entries based on fields. A few examples of fields that are used for filtering include G/L Account No or Dimensions. To filter by G/L Account No., use the filter criteria format.
In my example, I’m including exporting the budget by the Department dimension for Income Statement Accounts starting at 40000 and ending at 61995.
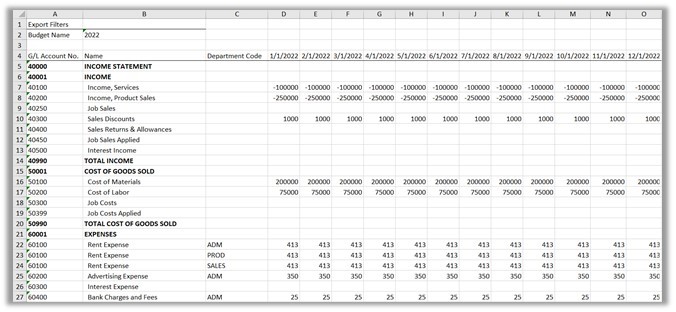
When you export to excel using column dimensions, you can add multiple lines for each of the values or have a separate file for the dimension values. Below, you should see the rent expense is divided out by the three departments.
It is very important to consider the debit/credit amount when importing the budget. Income should be a credit amount and COGS/Expenses should be a debit amount. Discounts in either of the sections will be the opposite.
Once you have all of the amounts added to the file, save and close the file.
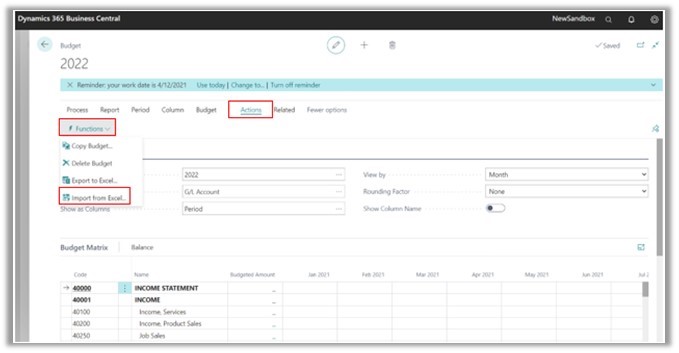
From the G/L Budget card back in Business Central, go to Actions -> Functions -> Import from Excel. This will allow you to replace or add to existing entries.
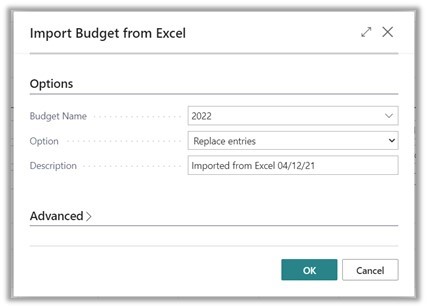
When importing the file, you have the options to select the Budget Name, Replace Entries or Add Entries, and the Budget Ledger Description. The default description will be Imported from Excel on XX/XX/XX (work date).
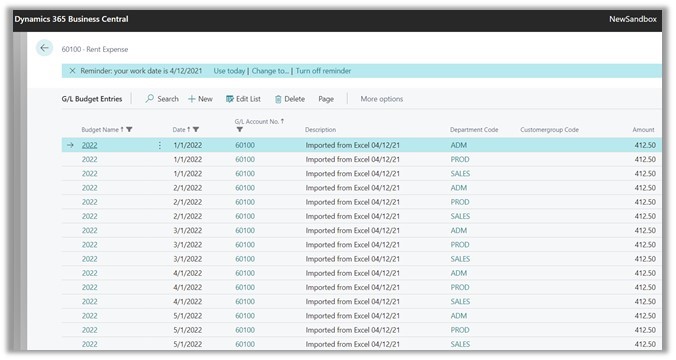
Once the excel file is imported, you will need to refresh your page, go out and back into the budget. If nothing is displayed, look at your date filter. Drill into the Budgeted Amounts in BC to see the date, description, dimension code, and amount. The below screenshot is for rent expense that was 3 lines on the import.
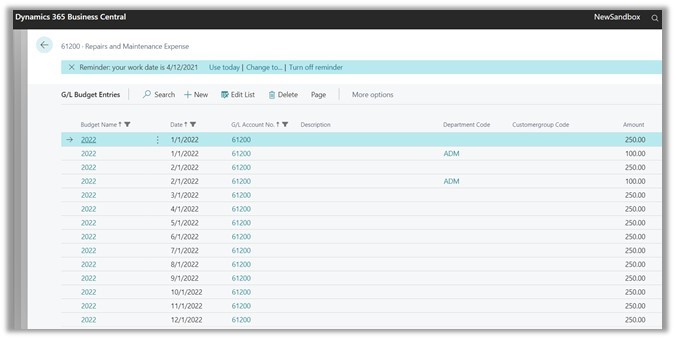
Whether you import the budget or manually enter the amounts, you can see the total Budgeted Amount. You can drill into the amounts in BC to see the date, dimension code (if included in the filters section), and amount. When manually entering the amounts, there is no description applied to the budget ledger entries. The below screenshot will show you the above entries that were manually entered into BC
Copying an Existing Budget in D365 Business Central
Finally, let’s walk through copying an existing budget.
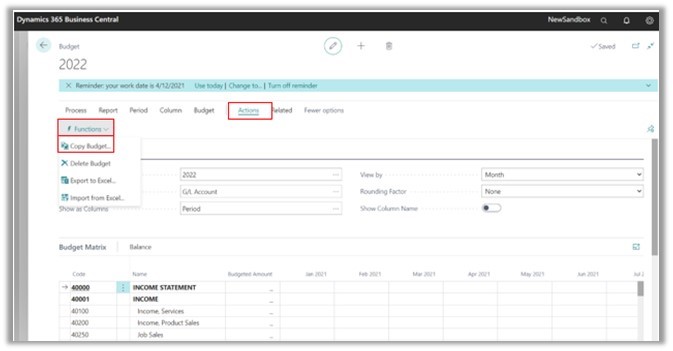
Business Central allows you to copy an existing budget from year to year. You can create a copy with the exact amount or use the adjusted factor to increase/decrease the amount. From the Budget card, go to Actions -> Functions -> Copy Budget.
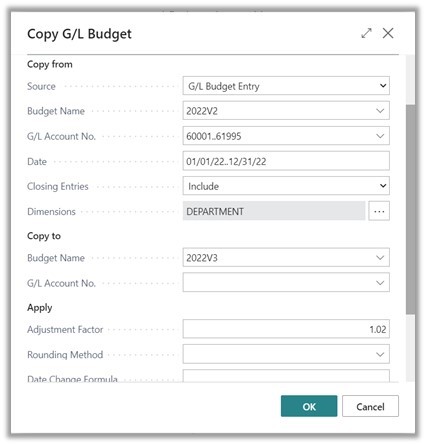
The Copy G/L Budget page will indicate what you’re copying from, copying to, and apply.
The Copy from section is the existing budget name, G/L Account numbers, date range, and dimensions.
The Copy to section is the new budget name and G/L Account numbers.
The Apply section is where you can determine if the budget is copied at exact amount or increased/decreased by a percentage. By default, the value is one. Meaning that you're copying the budget for the exact amount. If you want to increase your budget by 2%, you will enter 1.02. If you wanted to decrease your budget by 2% the adjustment factor would be .98. Please keep in mind the adjustment factor applies to all accounts that are included in your copy from period. If you were only wanting to copy expense accounts, make sure to only include those G/L Account Nos.
The various ways within Business Central to compare actuals to budget. These include:
- G/L Account Balance Budget by Period
- Trial Balance/Budget
- G/L Account Balance/Budget
- G/L Balance/Budget
- Cash Flow Forecast by Budget and Account Schedules
Keep in mind with various budget versions, you will need to select the correct Budget Name to ensure you are comparing actuals to the correct budget.
Under the terms of this license, you are authorized to share and redistribute the content across various mediums, subject to adherence to the specified conditions: you must provide proper attribution to Stoneridge as the original creator in a manner that does not imply their endorsement of your use, the material is to be utilized solely for non-commercial purposes, and alterations, modifications, or derivative works based on the original material are strictly prohibited.
Responsibility rests with the licensee to ensure that their use of the material does not violate any other rights.


