


How Effective Business Relationship Management in Dynamics 365 Business Central Can Boost Your Sales
Microsoft Dynamics 365 Business Central comes with a powerful tool that you can use to optimize your business relationship management.
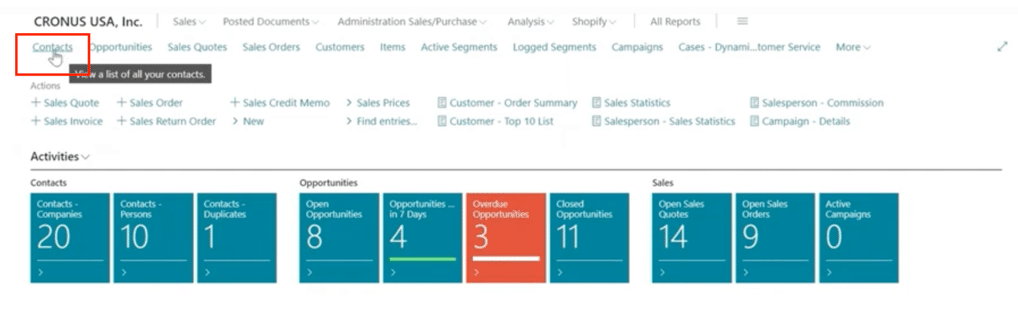
One of the key features is the Sales and Relationship Manager Role Center, available to Business Central and Dynamics NAV users.
This role center streamlines how you manage your sales pipelines, nurture customer relationships, and drive business growth. Unlike standalone CRM systems, the Relationship Management module in D365 BC is built directly into the platform, offering seamless integration with other business processes.
Additionally, it allows you to create Contact records instead of customer records. We often see organizations that create a Customer record for every lead that comes through and then have to clean up records for people who don't end up buying anything. The system allows you to manage this by creating Contact records instead. From there, the system will automatically convert that to a Customer record once the customer purchases something from you and you turn their Sales Quote into a Sales Order.
Whether you are a small business or a large enterprise, these features provide the flexibility and functionality needed to support your sales and relationship management efforts.
What is Business Relationship Management?
Business relationship management is a strategic approach aimed at fostering and maintaining productive relationships between businesses and the people they interact with, such as:
- Customers
- Suppliers
- Partners
- Departments/employees; and
- Other key stakeholders
The integrated Relationship Management module in Business Central ensures users have easy access to essential tools for tracking opportunities, managing customer interactions, and optimizing sales workflows. This accessibility makes it an invaluable resource for businesses looking to improve their sales efficiency and customer relationship strategies.
In this blog, we will walk through how this module works, including how to set up a sales cycle, create and review opportunities with quote requirements, and other general best practices.
Setting Up Sales Cycles
To effectively manage and track your sales process, you need to set up your sales cycles properly. This allows you to define, monitor, and optimize each stage of the customer journey, ensuring that no opportunities are missed and that your team can work efficiently towards closing deals. To do this, follow these steps:
Step 1: Initial Setup
To begin, you need to set up your unique sales cycle. In your environment, you can search for “sales cycles” and then navigate to the "stages" section to view the various steps involved in an opportunity.


Then click “New” to create a new sales cycle.

Step 2: Creating a Sales Cycle
At this stage, you can create a sales cycle with the appropriate and customizable stages for your needs. For example, you can create a simple sales cycle consisting of three stages:
- Qualification: This stage would ensure the opportunity is legitimate and worth pursuing.
- Quoting: This stage would be when you provide the customer with a quote. Note: you can choose if a quote is required at this step to move forward by clicking the “quote required” option.
- Win or Lose: The final stage tracks if the deal is won or lost, marking the completion of the opportunity.

Creating an Opportunity
Setting up opportunities effectively is crucial for maintaining a streamlined and organized sales process. By following the steps below, you can ensure that your sales team operates efficiently and that each potential sale is tracked accurately from start to finish.
Step 1: Understanding Contacts
As mentioned earlier, everything revolves around contacts, not customers. When creating an opportunity, create a contact instead of a customer. This keeps your database clean by separating leads from actual customers. Within your contacts, you will note that company contacts are bolded and contacts that are individuals are not bolded.

Step 2: Adding a New Contact
To create a new company contact, navigate to "New" and fill out the basic information necessary to complete the opportunity. While you can capture a wide variety of information by scrolling down within the contact card, only the basic information is required to move forward.

Step 3: Creating the Opportunity and Initiating the Sales Cycle
To create an opportunity associated with a specific contact, click on the “Create Opportunity” button within the contact card.

Then, select the appropriate sales cycle and set yourself or the relevant sales person as the owner.


Finally, activate the first stage, by clicking “activate first stage” in the upper right-hand corner of the opportunity card.

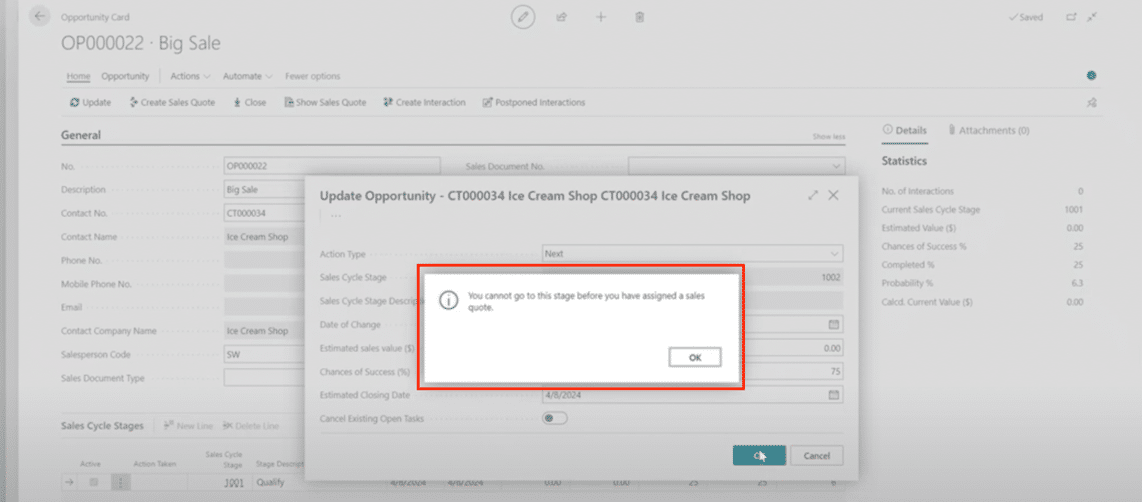
Step 4: Quoting Stage
Before proceeding to the next stage, you must create a quote, as this step is now required based on your earlier selection in the sales cycle. If you do not create a quote, clicking "Update" will not allow you to move forward to the next stage.
Click on "Create Sales Quote" to begin. You'll then be prompted to decide whether to create a contact as a customer using a customer template. Select "No" to avoid creating a customer record. Alternatively, choose "Yes" when asked if you want to update the sales quote with a customer template, and proceed to input the necessary details for the quote.


Once you're in the template, you'll see that the customer's name is filled in but not the number, as the customer hasn't been created yet. You only need the contact number to complete the quote. Proceed to create the quote and move on to the next stage by clicking "Update."

Step 5: Completing the Sales Cycle
You can now move through the stages, updating the estimated sales value and marking the opportunity as won if applicable. This will create the customer record and allow the sales quote to be converted into an order.
Reviewing the Opportunity
Once you have created the opportunity and moved through the sales cycle stages, the next important step is to review and analyze the progress and outcomes.
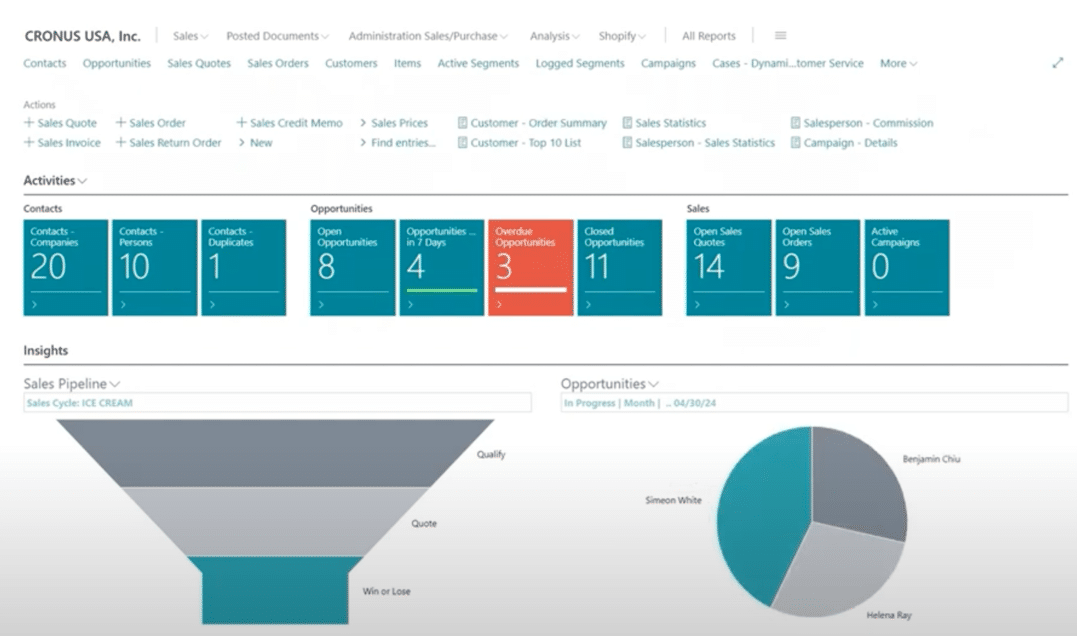
Step 1: Checking the Pipeline
You can now return to the role center and review your pipeline to see the status of the opportunity. This provides valuable data for analysis.
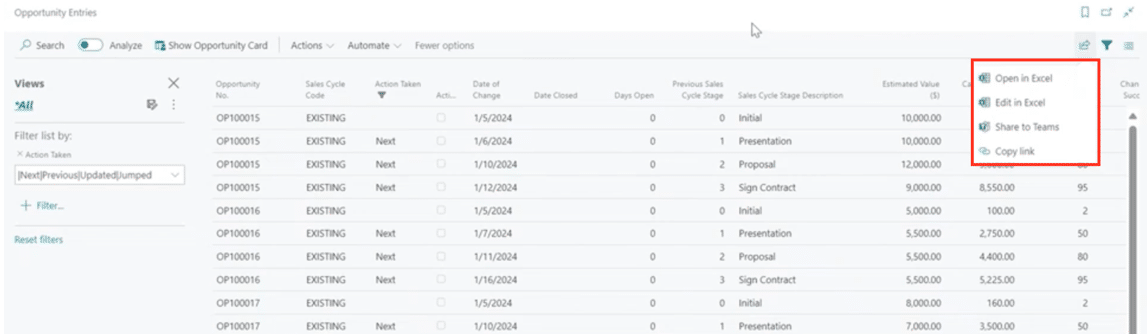
Step 2: Analyzing Sales Cycle Statistics
You can utilize the sales cycle statistics to view opportunities and their estimated values. You can filter the data and export it to Excel or print it for detailed analysis.

Step 3: Closing the Opportunity
To finalize the opportunity, indicate whether it was won or lost. This completes the process and creates the customer record. Additionally, you can create opportunity codes relevant to your company.

Best Practices and Tips for Effective Business Relationship Management
Implementing effective strategies in Business Central can significantly enhance your sales cycle management. Here are some tips to optimize your approach:
- Start Small: Begin by creating simple sales cycles. Involve your sales team to ensure they understand and utilize the system correctly from the outset.
- Customize as Needed: As you and your users get better at using Business Central, customize your sales cycles to better align with your business needs. This might involve enabling features like multiple quotes or utilizing opportunities to track high-value samples effectively.
- Experiment and Learn: Take advantage of demo environments to experiment with different configurations of opportunities. This allows you to learn the system thoroughly and identify the most effective practices for your business without financial risk.
These practices will help you streamline your sales processes and maximize the benefits of using Business Central for sales cycle management.
Want to Learn More Ways to Enhance Business Processes with Business Central?
For more in-depth guidance on enhancing your sales processes through effective relationship management in Business Central, please reach out to us at Stoneridge Software. We can provide personalized insights and solutions tailored to your business needs, helping you leverage Business Central's capabilities to maximize sales efficiency and customer relationship strategies.

Under the terms of this license, you are authorized to share and redistribute the content across various mediums, subject to adherence to the specified conditions: you must provide proper attribution to Stoneridge as the original creator in a manner that does not imply their endorsement of your use, the material is to be utilized solely for non-commercial purposes, and alterations, modifications, or derivative works based on the original material are strictly prohibited.
Responsibility rests with the licensee to ensure that their use of the material does not violate any other rights.