


Run Reconcile Utilities in Microsoft Dynamics GP
There are many scenarios that can occur in Microsoft Dynamics GP where the numbers just don’t line up quite right, or there are transactions that lead to one value while the summary amounts show another. The Reconcile feature can make sure that your summary information is accurate. This is not a function that you will have to run on a regular basis but should run before completing year-end close.
The Reconcile utility is seen across most modules in GP, but each area offers its own unique functionality. Running one of the reconcile utilities will update summary information in GP based on the details that are saved, so it is important to understand exactly what is being changed before running the process.
NOTE: It is strongly recommended that you have a current backup of your database available before processing the reconcile, as the changes made during this process cannot be reversed (easily).
Reconciling in GP
- Financial (Tools > Utilities > Financial > Reconcile). The options to reconcile in the General Ledger are fairly straightforward, as listed below.

- Allocation Accounts - Mark this option to verify that all allocation accounts, distribution accounts, and account types are valid.
- Year – Select this option to review the transaction detail for each general ledger account and update the Summary totals for the selected year. You would run this reconcile if the information in the Summary Inquiry (Inquiry > Financial > Summary) or History Summary Inquiry (Inquiry > Financial > History Summary) is incorrect when compared to the transaction totals. NOTE: Only reconcile your historical years if you keep account and transaction history
- Batches – Choose this option to review the transactions that are assigned to a batch in general ledger and update the batch header information. Use this reconcile if your batch total is not correct, or if there are transactions that are not appearing in a batch.
- Payables (Tools > Utilities > Purchasing > Reconcile). The payables reconcile gives you the option on which vendor accounts will be affected. Choose “All” vendors, or restrict to a certain range based on Vendor ID, Vendor Name, Vendor Class, Type, or Payment Priority. You can also choose to preview the differences and changes that GP finds by unmarking the “Reconcile” option at the bottom of the page and just choosing to “Print report.” I definitely recommend just printing the report the first time to verify the changes that will be made before actually running reconcile.
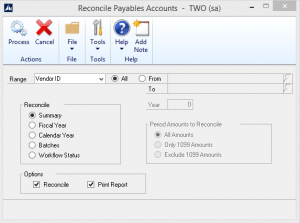
- Summary – Use this option to update unapplied payment amounts, unpaid finance charges, current balance totals, and on-order amounts.
- Fiscal year – Using the transaction details, this reconcile will recalculate the vendor balances and summary information for the selected fiscal year.
- Calendar year – Similar to the Fiscal year reconcile, this option will update vendor summary information for the selected calendar year. With this option, you can also choose to update just 1099 amounts, everything except 1099 amounts, or all amounts.
- Batches – This option will update the batch header and totals based on the unposted transactions saved in the system. This can be helpful if there are batches that are “missing” transactions.
- Workflow Status - If you mark this option, the workflow status and priority are reconciled for active and inactive vendor records. This option is available if Workflow for SharePoint is activated and you have marked the Reconcile option. This feature is not available for the Microsoft Dynamics GP Web Client.
- Receivables (Tools > Utilities > Purchasing > Reconcile). As we saw with the Payables reconciliation, you can choose a range of customers to process the reconciliation for. You can also choose to just print the Reconcile Report, which allows you to preview the changes that the system finds before you commit them.
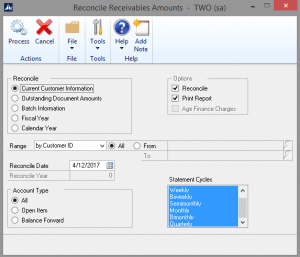
- Current Customer Information – This option updates the current customer balances based on the aging period definitions. Use this option to ensure that the amounts for each aging period are correct and that the transactions are affecting the correct buckets.
- Outstanding Document Amounts – Use this option when the “Applied Amount” or “Amount remaining” is incorrect for a transaction. This option balances the apply information with the current remaining amounts and adjusts the figures as needed. This is a good tool to use if the apply amount is showing double, which can happen if there are connection issues.
- Batch Information – This option is used to verify the transactions assigned to a batch, and the totals associated with the batch header. Batches may also be created if there are unposted transactions with a Batch ID but the batch does not exist.
- Fiscal Year – Verify and update summary information for the selected fiscal year. Transactions for the year selected and reviewed and the Summary amounts are changed based on the new calculations.
- Calendar Year - Verifies the summary information for the selected calendar year with the detail transaction information, for customers who are keeping calendar history and are included in the range. If the amounts don’t match, the period summary amounts are adjusted based on the posted detail transactions.
- Fixed Assets (Tools > Utilities > Fixed Assets > Reconcile) – The reconcile options in Fixed Assets are fairly straightforward and provide a lot of similar functionalities to what we saw in previous modules. The tools aren’t used very often but can provide a lot of assistance when they are needed.
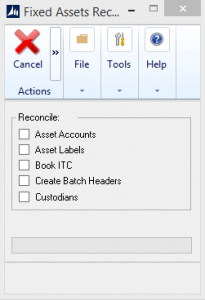
- Asset Accounts – This option allows you to verify that all assets in the system have account numbers assigned. If an asset is missing an account, the default accounts from the Fixed Assets Company Setup are used.
- Asset Labels – Use this option to update assets that have a blank asset label. The asset ID and suffix will be defaulted in for any blank values.
- Book ITC – Selecting this option will ensure that the Net Cost Basis field in the Asset Book ITC window matches with the Cost Basis field on the asset book. This will not create new ITC records.
- Create Batch Headers – This reconcile is primarily used as a tool for troubleshooting issues with the batch numbers that are created with GL Posting, or if there are errors with FA Batch headers. This process recreates any missing batch headers based on the financial detail records listed for asset depreciation.
- Custodians – If you have custodians listed on your fixed assets, you can run this process to ensure that the listed custodian is also an employee in GP. The report that prints will list the custodians that are missing from the employee setup, but will not actually create any new employees.
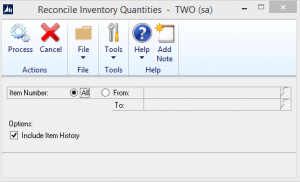
- Inventory (Tools > Utilities > Inventory > Reconcile) – There is only one option for the inventory reconcile, but it is very useful. You can choose to run this utility for a range of items. The process will update the current item quantities in the summary windows based on the available transactions. Use this tool if you suspect your inventory quantities are incorrect (Inquiry > Inventory > Item), or if you see an amount on-hand or available that does not match with your transaction history.
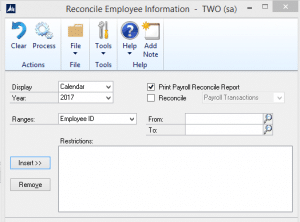
- Payroll (Tools > Utilities > Payroll > Reconcile) – This utility is used to update employee summary information based on the transaction history for an employee. Run this process if there are figures in the Employee Summary card (Cards > Payroll > Summary) that don’t match up with other reports, such as W-2s or Payroll Summary. It’s important to note that this reconcile will override any manual changes you have made to employee totals if you did not process a transaction (manual or computer check). As with other windows, choose the year and ranges that you want to reconcile. This windows also brings back the options to just Print the reconcile report before you actually run it so that you can verify the results.
- Human Resources (Tools > Utilities > Human Resources > Reconcile) – HR has a lot of reconciling options, but there are a few key ones that I will focus on. For more details on options not covered below, I would recommend reviewing the GP Help documentation.
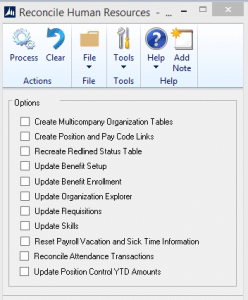
- Update Benefit Setup – This option is used for updating Human Resource benefits with the codes that are defined in Payroll. Most often you will use this tool during your initial implementation of HR, as it rolls up all of your existing benefit and deduction codes in Payroll into HR benefits. You can also use this if you have set up a benefit or deduction in Payroll but forgot to create it in HR (You should always create new benefits in HR when this module is in use).
- Update Benefit Enrollment – Similar to the Benefit Setup reconcile above, this option will enroll employees in the HR benefits that have been set up based on the information that is currently in Payroll. Since not all of the details for the HR enrollment are stored in HR, you will have to complete the enrollment process for any incomplete records.
- Reset Payroll Vacation and Sick Time – Use this tool if you are encountering issues with vacation balances during a pay run, but can see in HR that the hours available are correct. There are settings in Payroll that can linger after the conversion to HR for attendance accruals, and this option clears those settings and balances.
- Reconcile Attendance Transactions – This option is available for when you are importing payroll transaction directly into payroll, but are running your attendance accruals through HR. This will update the HR module with the appropriate hours worked and balances used from payroll so that the HR accruals can take place. This is usually run after importing transactions for a pay run but before accruals are calculated.
For additional information or assistance on how to run reconcile utilities in Microsoft Dynamics GP, contact Stoneridge Software.

Under the terms of this license, you are authorized to share and redistribute the content across various mediums, subject to adherence to the specified conditions: you must provide proper attribution to Stoneridge as the original creator in a manner that does not imply their endorsement of your use, the material is to be utilized solely for non-commercial purposes, and alterations, modifications, or derivative works based on the original material are strictly prohibited.
Responsibility rests with the licensee to ensure that their use of the material does not violate any other rights.