The Basics of Dynamics GP Workflows
Knowing how to optimize workflows in Dynamics GP can help your staff stay on task and meet and exceed your diverse business goals.
In this blog post, I will show you how to create a workflow in Dynamics GP and discuss the individual parts involved. We will also delve into why workflows are important and go over the types of out-of-the-box workflows your business can use.
This is Part 1 of a 2-part series. In the second part, we will cover the more advanced aspects of Dynamics GP workflows.
How to Create a Workflow
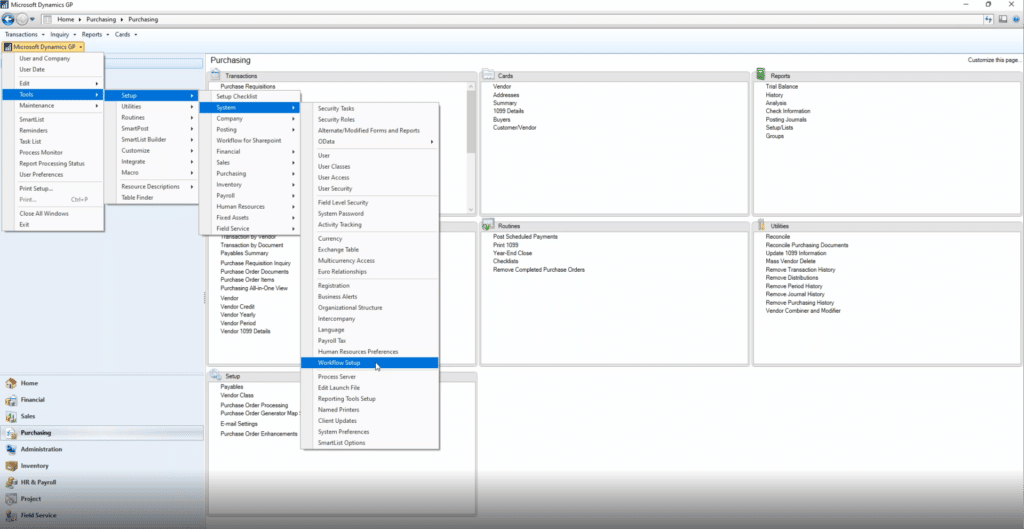
Navigate to the left-hand corner and select Microsoft Dynamics GP -> Setup -> System -> Workflow Setup.
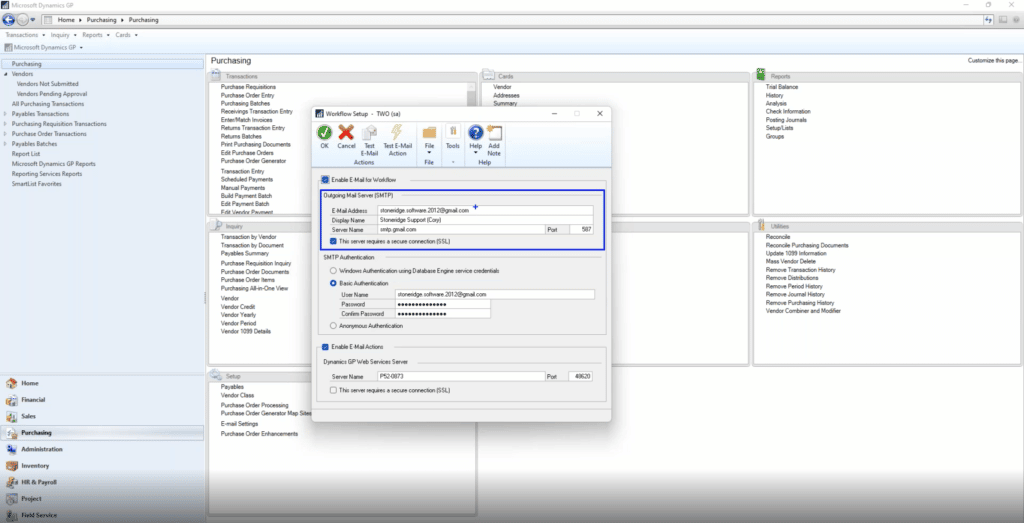
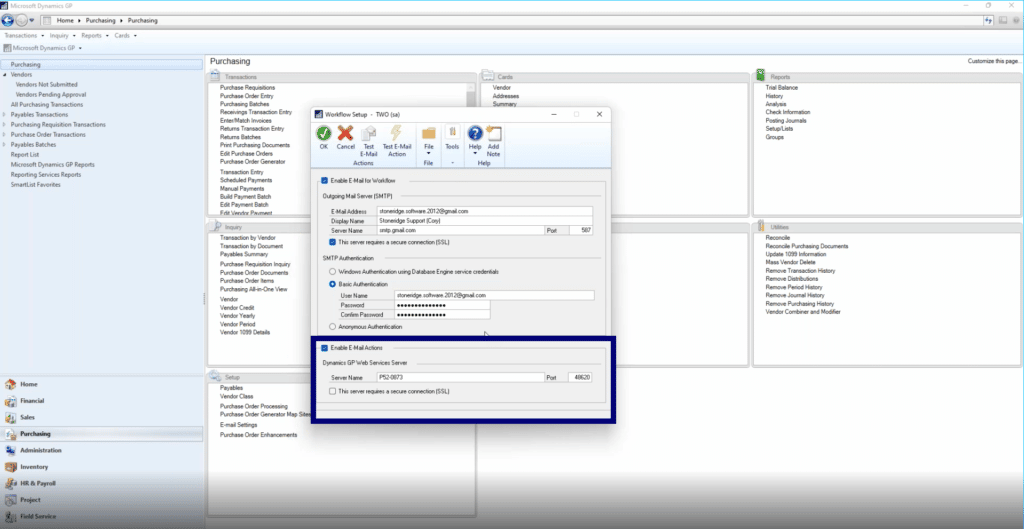
Once you move on to the next screen, you can set everything up so that your team members receive emails related to your workflow task.
They can respond to and interact with those emails in their Outlook. To set this up, follow these steps:
1. Check “Enable E-Mail for Workflow” and “This server requires a secure connection” and fill out the necessary information
This includes the send E-Mail Address, Display Name, and Server Name.
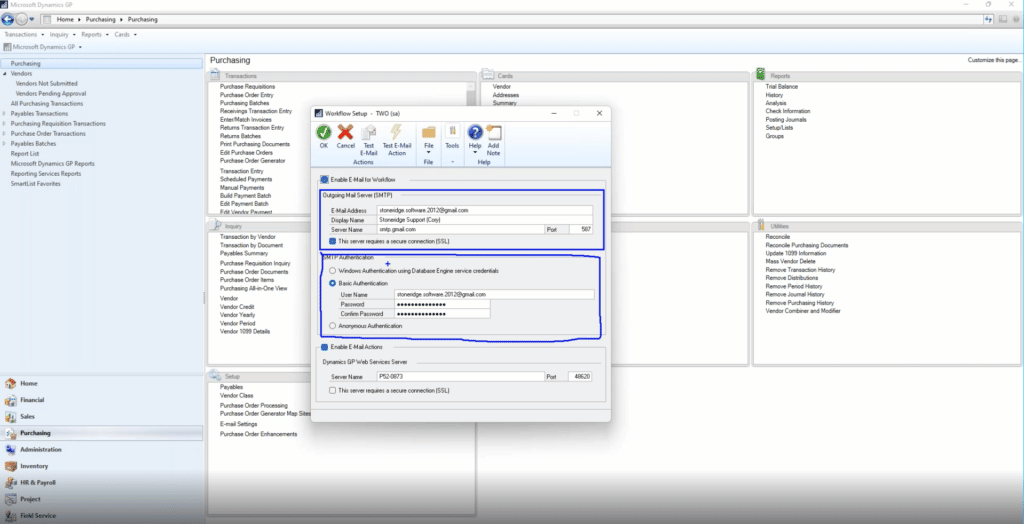
2. Set up your SMTP Authentication
In this example, I am using a Gmail option which requires you to authenticate the SMTP server. If your SMTP server allows you to use either “Windows Authentication using Database service credentials” or “Anonymous Authentication”, you can do that.
3. In the third section, make sure to check Enable E-Mail Actions
This is set up from GP web services, which is an additional install. (Instructions on that are below)
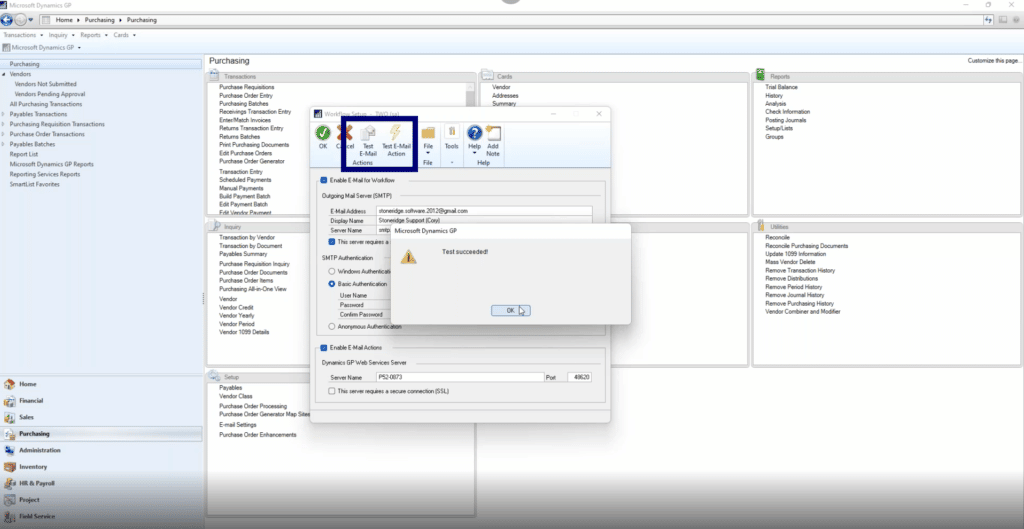
4. Once you are done, Click the "Test E-Mail" button in the top ribbon to send a test Workflow Email to make sure it is working.
You can also check to see if workflow is communicating with GP Web Services by clicking on the "Test Email Action Button". If you get a message that says “Test Succeeded” then you know it worked with your webservice.
You can also use some additional tools to optimize your workflow function:
- Calendar – This considers a schedule setup for how long someone has before they need to approve or work with one of the things assigned to them. You can organize based on your work schedule, and the work schedules of your team, and schedule around holidays and days off as well
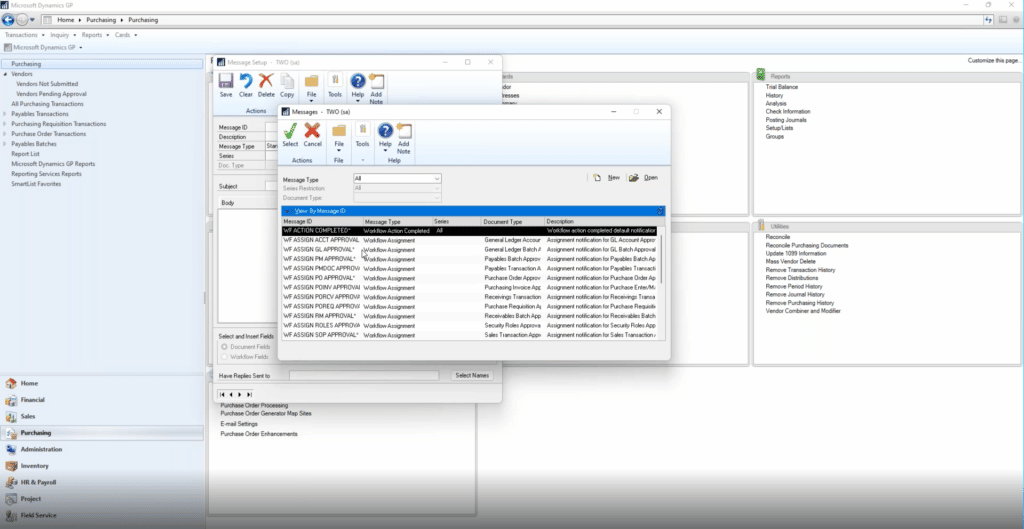
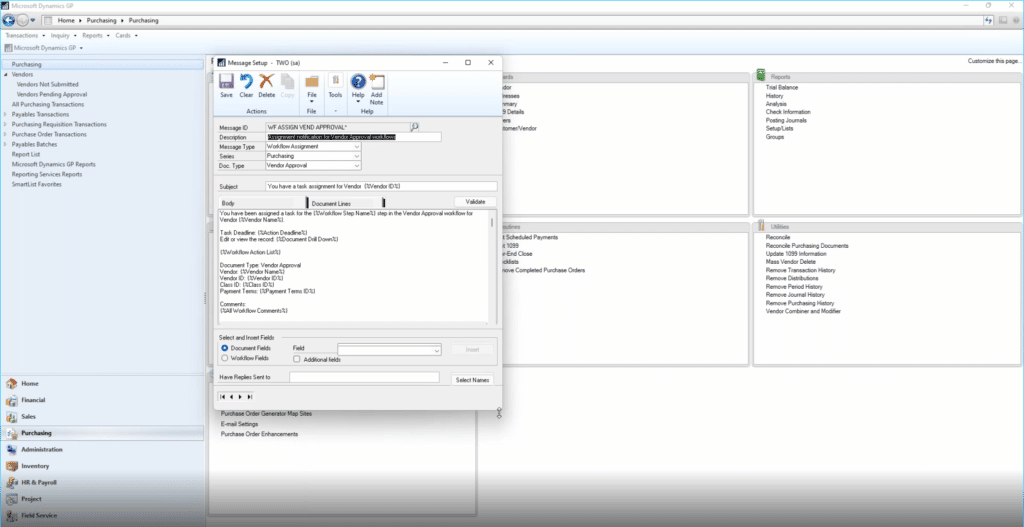
- Email Messages – You can navigate to this by going to Microsoft Dynamics GP -> Tools -> Setup Company -> Workflow -> Email Message Setup. Once you are there you can click the lookup button and a list of your workflows will come up. The ones with an asterisk by them are out-of-the-box and ready to go, and most of them should be good enough. However, you can create one from scratch if you want.
From here you can fill out all the details you need for your Email message as seen in the picture below:
Side note: Webservice Install
This is part of the Dynamics GP DVD and is updated every year. That means you will have to uninstall and reinstall webservice every year. Luckily, it’s easy!
You just run the download, set it up, go through the configuration wizard, then deploy webservices to whichever companies you want to use workflow for.
Why Use GP Workflows?
Workflows allow you to hold yourself and your team accountable for their work. It gives you a tangible trail you can follow to make sure everyone is accomplishing their tasks on time. If something goes wrong during the process, you can track who was working on what so you can talk to the right people to troubleshoot as soon as possible.
It lets you be proactive with your Dynamics GP business process, instead of reactive.
Workflows for All of Your Business Needs
Out-of-the-box workflows should be able to cover most of your business needs. They are broken down into six main categories:
- Financial
- General Ledger Account Approval
- General Ledger Batch Approval
- Sales
- Receivables Batch Approval
- Sales Transaction Approval
- Purchasing
- Payables Batch Approval
- Payables Transaction Approval
- Purchase Order Approval
- Purchase Requisition Approval
- Purchasing Invoice Approval
- Receivings Transaction Approval
- Vendor Approval
- Payroll
- Employee Profile Approval
- Employee Skills Approval
- Payroll Direct Deposit Approval
- Payroll Timecard Approval
- Payroll W4 Approval
- Project
- Expense Report Approval
- Timesheet Approval
- Administration
- Security Roles Approval
- Security Task Approval
- Smartlist Designer View Approval
- User Approval
- User Security Approval
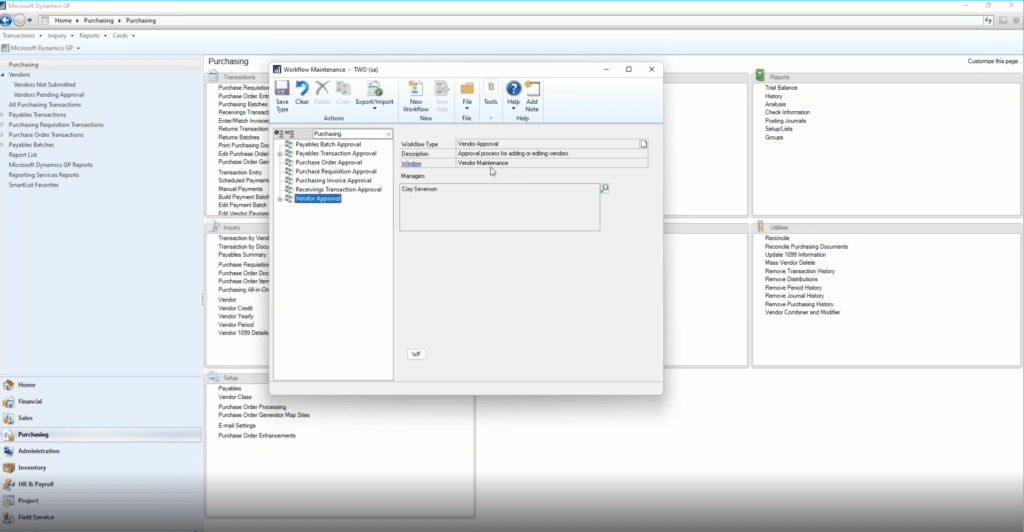
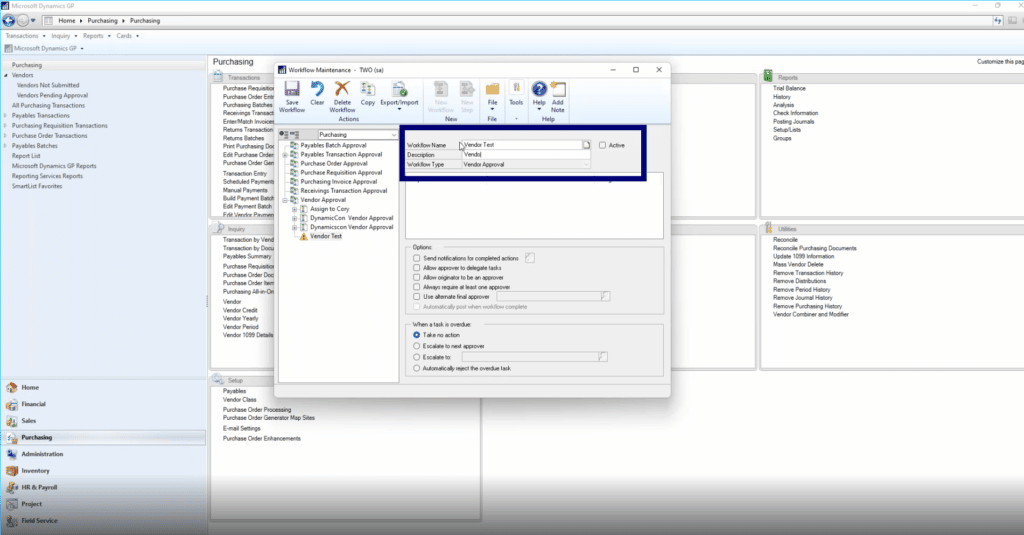
For this example, we are going to create a Vendor Approval under the Purchasing tab called "Vendor Test."
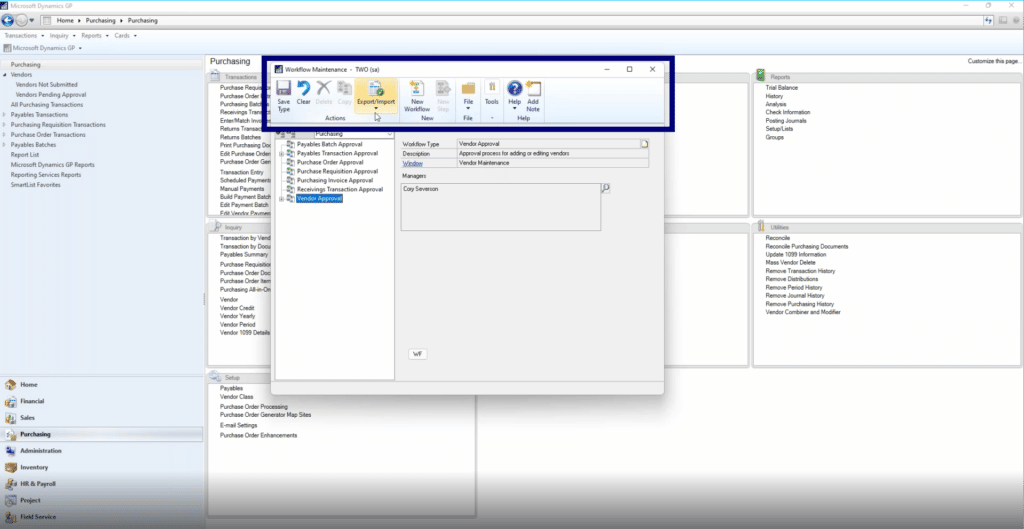
Once you have created your workflow, you can work with it by navigating across the top ribbon.
There are traditional buttons like Save, Export/Import, and others. From here you can go through the core fields and customize them to your workflow.
Give the workflow a name and description and click “Active.”
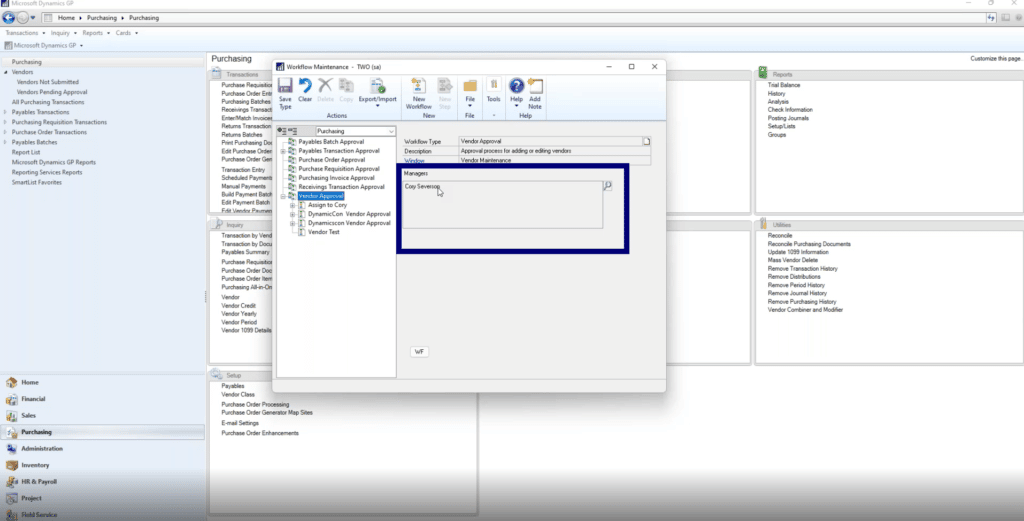
Next, save the workflow then go back and assign a manager. Note that you need to list a manager before you can publish or activate your workflow. You can type in a name or use the lookup button on the left hand side.
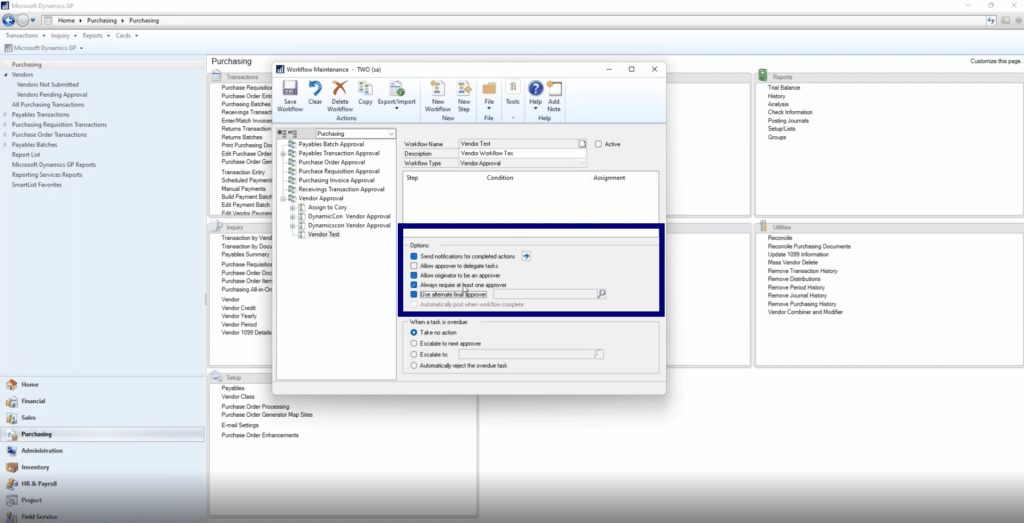
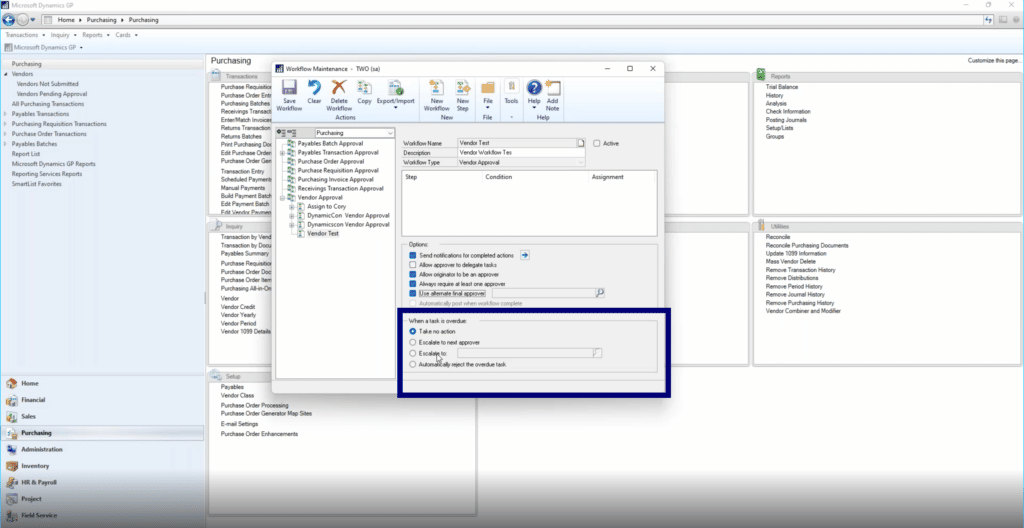
Then you go back to your Vendor test and fill out the two bottom sections. The first asks you to select your options:
- You can select emails to go out for each step of the workflow that occurs
- You can let the originator be the approver
- You can allow the approver to delegate tasks
- You can select to always require an approver
- You can require at least one approver
- You can use an alternate final approver and search who that is in the bar next to this option
The second section sets the parameters for an overdue task:
- You can select to take no action – this will send email reminders to the person responsible for the task but nobody else
- You can escalate to the next approver
- You can escalate to a specific approver
- You can automatically reject the overdue task
What you select here will vary from business to business and even workflow to workflow. Stoneridge Software can help you navigate how you should set up your workflows.
Creating a Step
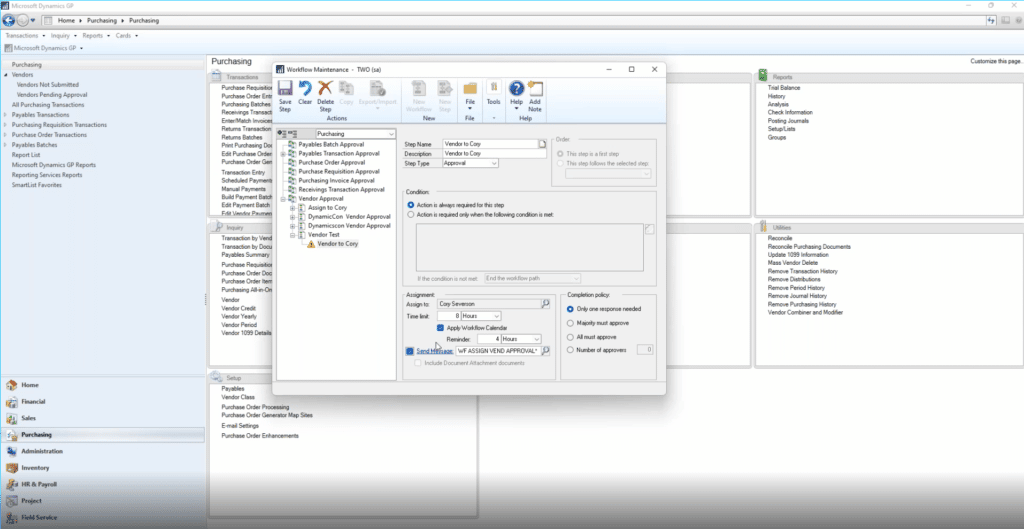
Another thing you can do is add steps to your workflow. To do that you simply click on the "New Step" button in the top ribbon and then follow these steps:
1. Give the step a name
2. Add a description
3. Name the step type (approval or task)
4. If you need to, assign a condition to the step
5. Go to the Assignment section and click the lookup button
6. Search for your approver (in this example, myself)
7. Set your other parameters there (set a time limit, apply a workflow calendar, set reminders, send messages when a task is due, etc.)
8. Click Save Step.
Once you’re back on your main workflow screen, mark it as active in the checkbox in the upper right-hand corner and save it. After it’s done, go to your main Dynamics GP screen and click on Vendor under the Cards section.
Once you are editing or creating a new vendor, you fill out the necessary information and then click on “Submit” in the top ribbon. From there you can add a comment and then hit Submit.
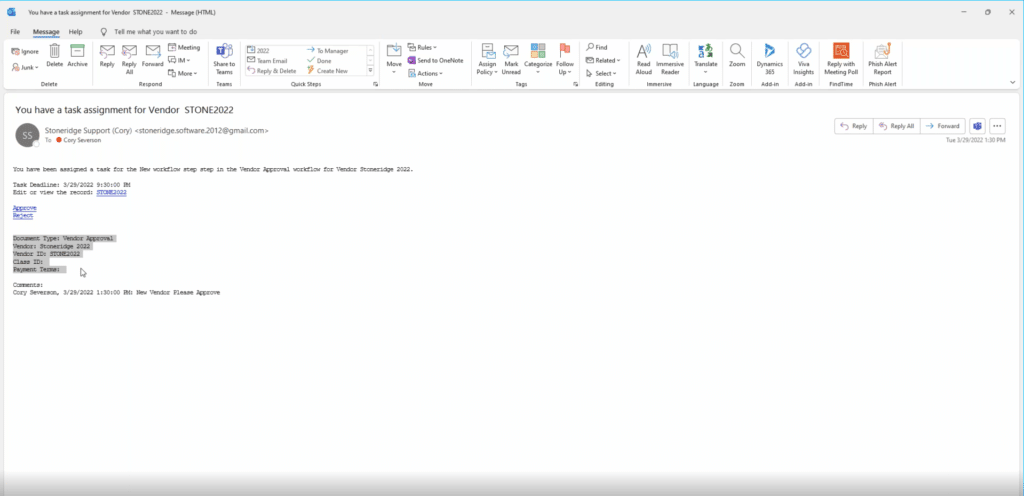
Seeing as this is a test and you are sending an email to yourself, you - or the approver if this is a live workflow - should get an email message after the Vendor goes through the Workflow process that looks like this:
The approver can then approve or reject the Vendor in Dynamics GP. This reply will interact with your webservice and all of the steps taken and messages sent as part of this workflow should appear in the Workflow history.
Questions?
Please contact us! We want to help improve your Dynamics GP experience and workflows are a great way to do that.
Under the terms of this license, you are authorized to share and redistribute the content across various mediums, subject to adherence to the specified conditions: you must provide proper attribution to Stoneridge as the original creator in a manner that does not imply their endorsement of your use, the material is to be utilized solely for non-commercial purposes, and alterations, modifications, or derivative works based on the original material are strictly prohibited.
Responsibility rests with the licensee to ensure that their use of the material does not violate any other rights.


