5 Ways to Process the Payments From Your Bank Statement in Dynamics GP
A question usually arises for Dynamics GP users sometime during the month-end close process – “How should I process the different kinds of payments found from our Bank Statement so that I can complete my Bank Reconciliation?” Within Dynamics GP, there are several ways to process payments to the system which will then form reconcilable payment lines in the Bank Reconciliation screen.
Before you start, you need to ask yourself the following:
- What am I trying to achieve?
- Which Ledger does this payment relate to?
- What are the timescales for this?
- What level of traceability do I want to have?
Below are 5 ways to process payments, which will then be reconcilable to your bank statement in Dynamics GP.
Method 1
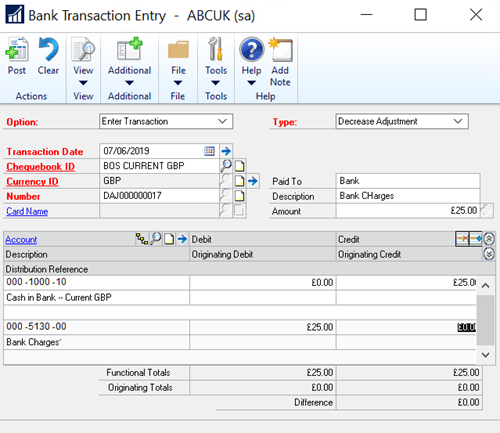
If the payment does not relate to a Purchase Ledger invoice or a Sales Ledger refund, then you will normally use one of the 3 payment options in the Bank Transaction Entry screen: Go to ‘Financial’ followed by ‘Transactions’ then click on ‘Bank Transactions’.
The Payment Options include a Check, Withdrawal and a Decrease Adjustment. A check could be used if you physically write a Check for a payee who is not set up as a supplier. A withdrawal represents an electronic withdrawal of cash from your bank e.g. a non-Purchase Ledger Direct Debit or Chaps Payment. A Decrease Adjustment would typically be used for bank charges or bank interest paid.
Once you have entered a transaction date, Checkbook, payment number and payee details/amount, you will find that the cash book journal starts to be created automatically, by default in the associated cash account GL code and the correct credit amount. You then manually enter the GL code(s) to be debited and then Post.
Method 2
Purchase ledger payments are mainly produced using EFT Payment Batch Processing within GP, so these transactions will already have been instigated from within GP before reaching your Bank Statement. Unfortunately, the individual EFT payments show in the GP Bank Reconciliation screen rather than the total value of the EFT batch, which is often the amount shown on the Bank Statement.
Other Purchase Ledger payments will tend to be either Direct Debit, Credit Card and occasionally cash. You will need to use the Manual Payments screen to achieve this unless you are importing such transactions using either the Integration Manager or SmartConnect integration tools. Simply go to ‘Purchasing’ followed by ‘Transactions’ then ‘Manual Payments’.
Ensure you have the correct Date, Creditor, Currency, Checkbook and Amount.
Once you have entered the payment, unless it is foreign, you will be able to match it to the invoice(s) to which it relates, via the Apply button at the bottom. You can part apply, spread the payment across multiple invoices and write off invoice amounts within this screen.
Method 3
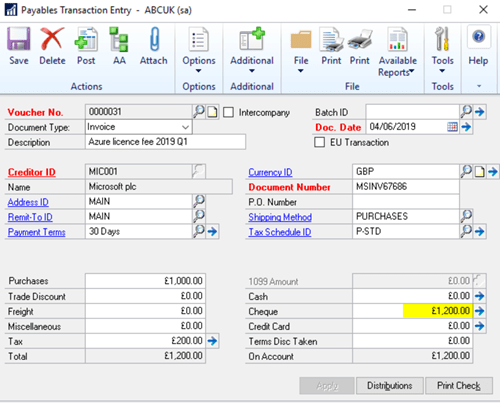
If the payment relates to a purchase ledger invoice which has not yet been processed, you can enter the payment on the invoice as you process it. Go to ‘Purchasing’ followed by ‘Transactions’ then ‘Transaction Entry’.
Enter the Invoice as normal and then enter the payment details at the bottom on the right-hand side. The payment will automatically apply to the invoice and send the payment information to the Bank Rec screen.
Method 4
If the payment is for an immaterial financial value or does not need traceability within the purchase ledger, you can then enter it quickly within the Bank Reconciliation Screen.
Go to ‘Financial’ followed by ‘Transactions’ then ‘Reconcile Bank Statement’. Choose the Checkbook and enter the Bank Statement Ending Balance and Date and then click on the Transactions button at the bottom. This will open the ‘Select Bank Transactions’ screen which displays all currently unreconciled payments and receipts. At the bottom of the screen there is an ‘Adjustments’ button. Here you can select 4 transaction types including 2 payments: Other Expense and Service Fees. Choose one of these, enter the GL code to which it refers and the payment amount as a positive value. The Bank Journal entry will adjust the reconciliation figures and post at the point at which you ‘Reconcile’ the Bank Statement. This screen is typically used for bank charges and interest payable and small clearing differences.
Method 5
If the payment relates to a Sales Ledger Refund, it can be entered as a Receivables Management ‘Return’ transaction. Go to ‘Sales’ followed by ‘Transactions’ then ‘Transaction Entry’. Having selected the Return transaction type, also enter the value of the payment in the bottom right hand box as Cash, Check or Credit Card.
Under the terms of this license, you are authorized to share and redistribute the content across various mediums, subject to adherence to the specified conditions: you must provide proper attribution to Stoneridge as the original creator in a manner that does not imply their endorsement of your use, the material is to be utilized solely for non-commercial purposes, and alterations, modifications, or derivative works based on the original material are strictly prohibited.
Responsibility rests with the licensee to ensure that their use of the material does not violate any other rights.


