


Going Beyond Advanced Find, Views, and XRMToolbox: Using View Designer and FetchXML Builder with Dynamics CRM
In part one of this topic, we discussed using the “FetchXML Tester” in the XRMToolbox to type in and test FetchXML, beyond what the Advanced Find in CRM is able to generate. In this article, we will discuss a couple of other tools within the XRM toolbox that will let you create FetchXML apart from what the Advanced Find can do, and deploy this new query to a View in CRM.
We'll discuss using View Designer and FetchXML Builder in Dynamics CRM.
View Designer
The View Designer allows you to connect to your CRM instance and download the current FetchXML that is utilized by a view within CRM. In my example from Part 1, I needed to get a customer’s view called “All Opportunities Without an Open Activity” working properly.
NOTE: It is important to remember that you will have to create the view you would like to customize in CRM before you use the “View Designer”. In addition, it would not be advisable to update the out of the box views that come with CRM.
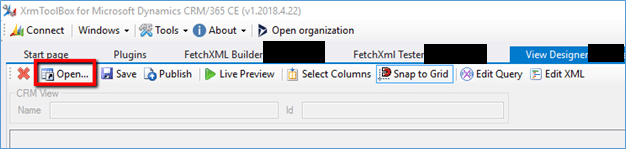
In the “View Designer” click Open.
Select the entity associated with the view you wish to update. This will populate the “View” pulldown allowing you to select the view you wish to update.
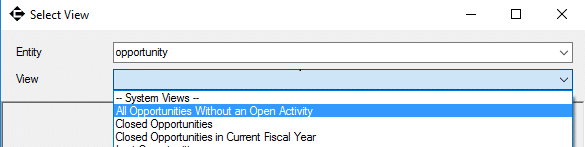
After you select the view, you will see the XML of the grid associated with the view (columns, column sizes, etc). Click OK on the Select View form and we will be able to start working with this View.
Some of the buttons on the “View Designer”:
- Live Preview – clicking this will fetch the data returned by the view and display it
- Select Columns – allows selection of the attributes in the FetchXML query and display the data as columns in your grid
- Edit XML – edit the grid associated with the view
- Edit Query – Edit the FetchXML associated with the view. This actually opens up a new tab with the “FetchXML Builder”
- Save – save your changes
- Publish – publish your view changes to your CRM org
In this example, we are going to want to update the FetchXML so we are going to click on Edit Query and add our FetchXML from Part 1.

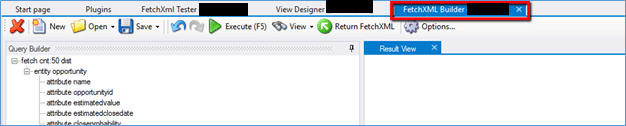
FetchXML Builder
The Edit Query button will open the “FetxhXML Builder” tab as you can see below. “FetchXML Builder” is another tool that allows you to update or create FetchXML queries much like the “FetchXRM Tester” that we discussed in the first part of this series.
This tool gives a few more options on how to create your query. If you don’t like (or don’t feel comfortable) just typing in your FetchXML query like we did previously you can use the panel on the left to create or update your query.
Right-clicking on the various lines in the Query Builder panel gives you options on what you can add to your query. For example, if you want to add another attribute to your query you can:
- Right click on the entity that contains the data you want to add
- Select Add
- Then select attribute

4. In the Attribute Name field select the attribute to add
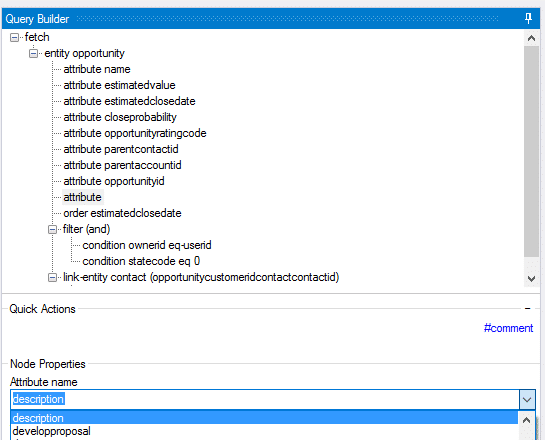
5. Then click OK in the lower right-hand corner to see your attribute added to the FetchXML window.
(OR)
- Right Click on the entity that contains the data you want to add
- Choose “Select Attributes”
- From the list shown, select the attributes that you want to add to the FetchXML.
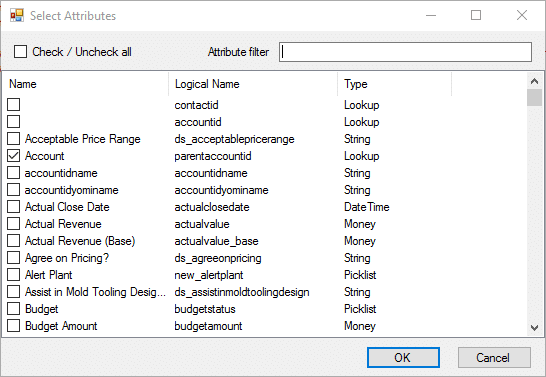
4. Click OK to see your selections added to the FetchXML
As you can see, the Query Builder has many options to help you with your fetch syntax and it is worth playing around with to see what it can do.
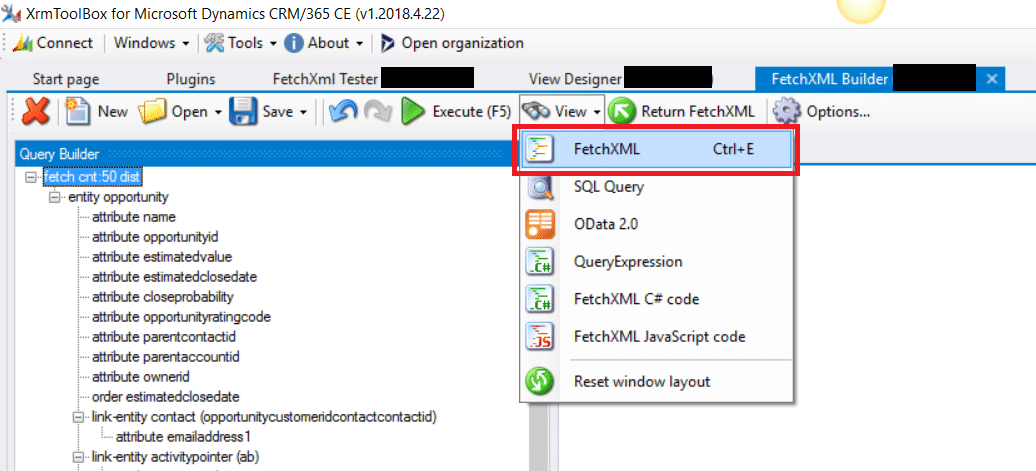
In our example, we already have the FetchXML that we want to use in the CRM view so instead of using the Query Builder pane, we are just going to paste our query into the “FetchXML Builder”. To do this we are going to have to view the XML. To do this click the “View” button and select FetchXML from the pulldown.
This will open the FetchXML view. All we have to do now is paste our query from Part 1 and click OK in the bottom right-hand corner. The query builder will update to reflect the new XML.
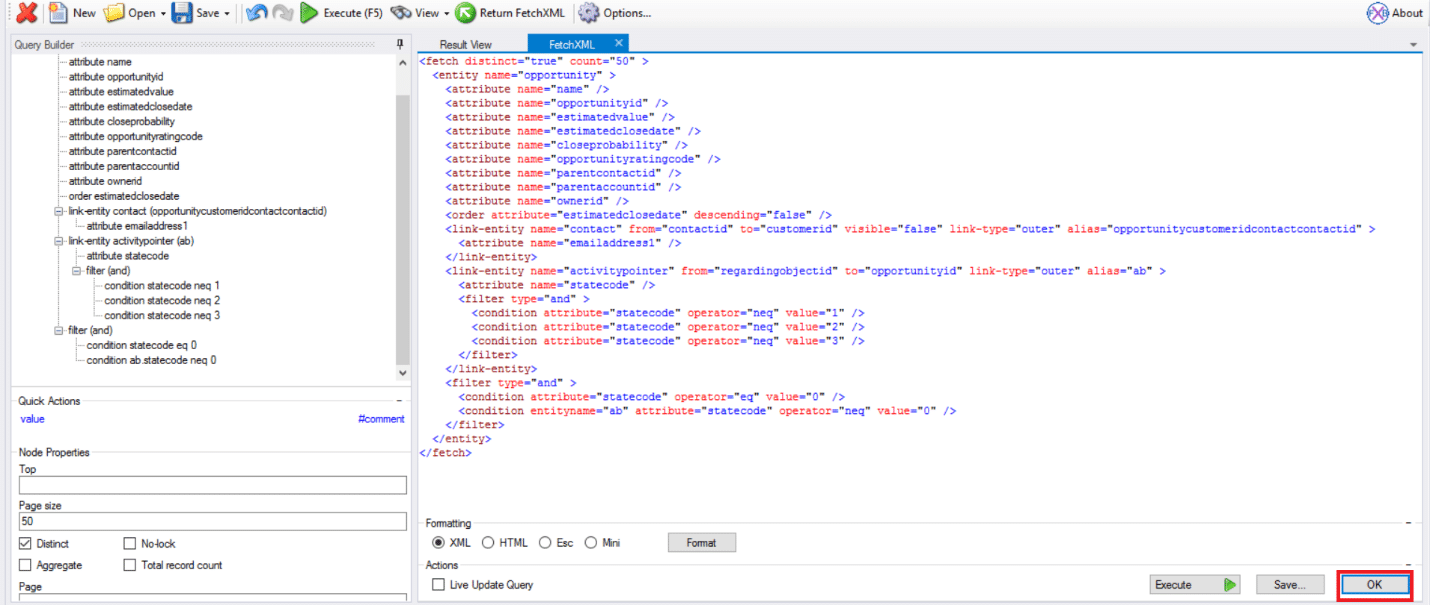
At this point, we can click “Execute” and test our query to make sure we get the results we are expecting. Once we are satisfied with our query, we would like to get these changes back to the “View Designer”. This is one button click away with the “Return FetchXML” button.
![]()
This moves our query changes to the “View Designer” tab and sets our focus back in the “View Designer”. You can click “Live Preview” to confirm your query changes.
Moving the query changes to your view in CRM is very easy at this point.
- Click Save
- Click Publish
This will move your FetchXML to the view that you have selected within your CRM org. You now have a view utilizing an outer join and retrieving Opportunites without an open Activity.

If you'd like to learn more about extending your CRM instance through these tools, let us know!

Under the terms of this license, you are authorized to share and redistribute the content across various mediums, subject to adherence to the specified conditions: you must provide proper attribution to Stoneridge as the original creator in a manner that does not imply their endorsement of your use, the material is to be utilized solely for non-commercial purposes, and alterations, modifications, or derivative works based on the original material are strictly prohibited.
Responsibility rests with the licensee to ensure that their use of the material does not violate any other rights.