


How to Import a Bank Statement File for Bank Reconciliation in Dynamics NAV
*This post was written for Dynamics NAV but the content directly applies to Dynamics 365 Business Central, which is the cloud product based on Dynamics NAV. You may notice some slight differences in the screenshots, but the information and steps are directly applicable to Dynamics 365 Business Central.
Bank Reconciliation is an important step in ensuring that your General Ledger and associated accounts are accurate, configured properly, and up-to-date. It can be tedious to manage if done manually. However, today I’ll show you how to import a CSV file from the bank into Dynamics NAV for easy comparison between the bank statement and your company’s accounts.
1. Data Exchange Definitions
First, go to the Data Exchange Definitions page. Here, you can define multiple mappings when importing or exporting files. We’ll create a new Data Exchange Definition for our Bank Statement Import. Click New on the toolbar.
Enter in Code and Name to define your new definition.
Here are some of the other setups you will need:
File Type= Variable Text
Type= Bank Statement Import
File Encoding = WINDOWS
Column Separator = Comma
Click “Show more fields”
Reading/Writing XMLport = 1220
Ext. Data Handling Codeunit = 1240

2. Data Exchange Definitions – Line Definitions Tab
In the Line Definitions tab below, keep the Line Type, Code, and Name fields. Enter the correct value for Column Count that matches the number of columns in the CSV you will be importing.

3. Data Exchange Definitions – Column Definitions Tab
In the Column Definitions tab, match each line you plan to import to a corresponding column in the CSV.
Column No. = Which column number in the CSV this line refers to
Name = Pick a name for the column in the CSV
Data Type =
Data Format = You can leave this blank, but for data types like date, there may need to be formatting (e.g. dd/mm/yyyy)
Data Formatting = For data types of date and decimal, enter “en-US”

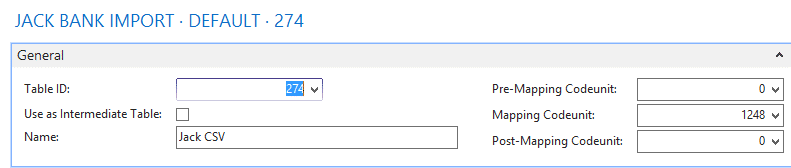
4. Field Mapping – General Tab
Go back to the Line Definitions tab, and click Field Mapping. Click the New button on the toolbar. We will be mapping our created columns to the correct columns in NAV. To do that we need to tell it which table we’ll be comparing our import to.
Table= 274
Name = Jack CSV
Mapping Codeunit = 1248
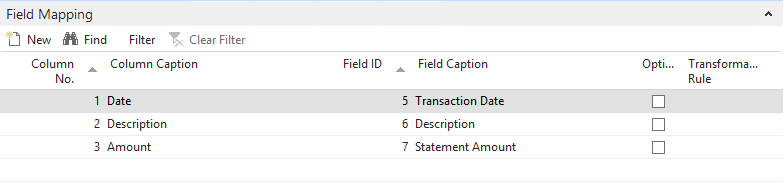
5. Field Mapping – Field Mapping Tab
Go down to the Field Mapping tab. Here, we will map our columns to the correct table columns. In the first line, select the first created column. Then, in the Field ID column, find the corresponding column in the Bank Acct. Reconciliation Line table. Do this for all of your columns.
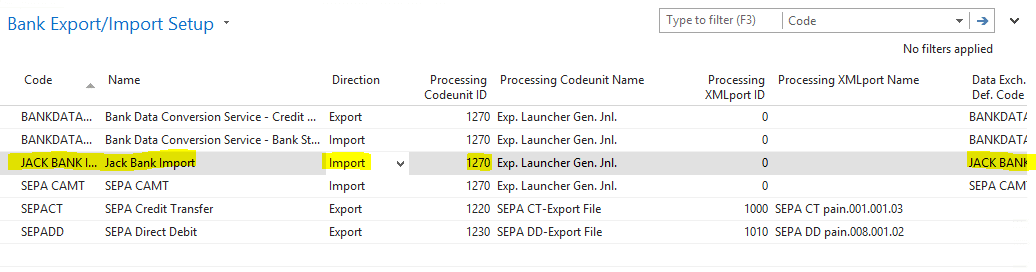
6. Bank Export/Import Setup
Next, go Bank Export/Import Setup and click New in the toolbar. Enter a Code and Name.
Direction = Import
Processing Codeunit Id= 1270
Data Exchange Definition Code = <The name of your Data Exchange Definition>
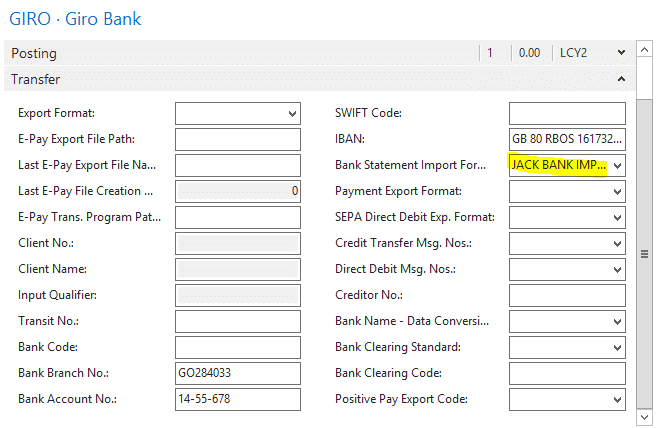
7. Bank Accounts
Go to Bank Accounts and select the card of the Bank Account you would like to use. Under the Transfer tab, enter in your import name in the Bank Statement Import Format field.
8. Bank Account Reconciliation Page
Go to Bank Account Reconciliations and click New on the toolbar. Select the Bank Account you’d like to use to open a new Bank Acc. Reconciliation window. Click the Import Bank Statement button on the toolbar and select the CSV of the statement you would like to import. In the Bank Statement Lines tab, you will see your data imported correctly into NAV for convenient bank account reconciliation matching.
NOTE:
Here is an example of a CSV format that will successfully import. Copy the table below, paste into Excel, and save it off as a CSV file. Be aware that there are no column headers:
11/23/2016 Ahornby Hvidevare A/S -85.73
11/23/2016 American Wood Exports -2977.19
11/23/2016 AR Day Property Management -139.56
11/23/2016 Aranteaux Aliments -2007.57
11/23/2016 Beekhuysen BV -770.21

Under the terms of this license, you are authorized to share and redistribute the content across various mediums, subject to adherence to the specified conditions: you must provide proper attribution to Stoneridge as the original creator in a manner that does not imply their endorsement of your use, the material is to be utilized solely for non-commercial purposes, and alterations, modifications, or derivative works based on the original material are strictly prohibited.
Responsibility rests with the licensee to ensure that their use of the material does not violate any other rights.