


How to Set up Required Dimensions in Dynamics 365 Business Central
Dimensions are a powerful tool in Dynamics 365 Business Central and Dynamics NAV. In this post, I specifically want to focus on how to set up Dimension Requirements – which is a way to ensure that you are enforcing the use of the desired dimensions on any given transaction.
About: Default Dimensions
Default Dimensions have two fundamental purposes:
- Default Dimensions can be assigned to master records (e.g. G/L Account, Customer, Item, Salesperson) and when those records are used in a transaction, it will be posted with those dimensions. For example, a Salesperson can have a Default Dimension AREA: Central. Any Sales Orders that have that Salesperson will inherit a Dimension AREA: Central. This will carry to the posted data (sales, shipment, invoice, G/L, et cetera) and can be used for reporting.
- In addition to setting defaults, the other thing Default Dimensions can do is require specific dimensions and even specific dimension values to be used. An example might be that all transactions that hit a Revenue G/L Account must include a DEPARTMENT dimension.
Walkthrough: Require DEPARTMENT Dimension on all Revenue G/L Accounts
- Open the Chart of Accounts
- Single or Multiple Accounts
- Single Account: Click on the individual G/L Account you wish to update. In the Ribbon click Dimensions > Dimensions-Single
- Use the ellipsis to “Select More”, then use the Checkbox to select multiple accounts. In the Ribbon click Dimensions > Dimensions-Multiple
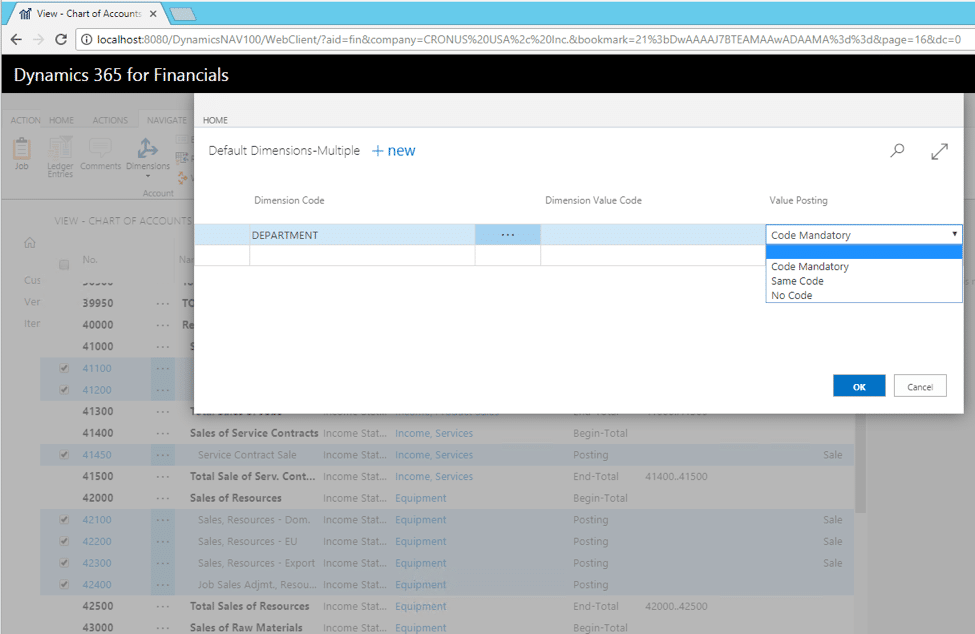
- Click +new to create new Default Dimension requirement.
- Select the Dimension Code that you want to be required. (In this example, DEPARTMENT)
- Leave Dimensions Value Code blank.
- Change Value Posting to Code Mandatory.
- Same Code is used if you only wanted a single Dimension Value Code to be allowed for the G/L Account(s). If you choose Same Code you would also select a specific Dimension Value Code.
- No Code is used if you wanted to prevent a particular dimension from being used with that G/L Account. One example is an expense-specific dimension to be prevented from use with revenue accounts.
- Click OK
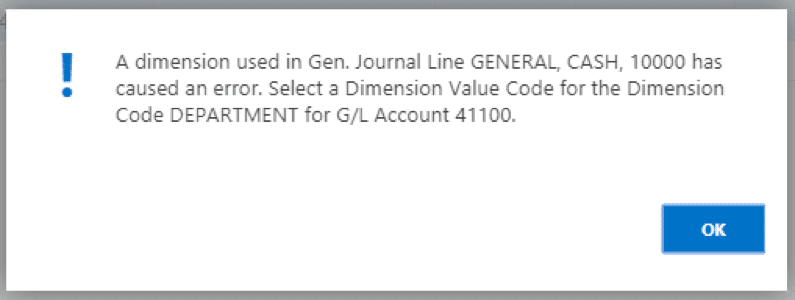
You’ve now required the DEPARTMENT dimension to be used on any posting to the selected G/L Accounts. You can verify this setup by creating a General Journal (or document, if preferred) and attempting to post without setting a Department Code. Dynamics should stop you with an message similar to this:
Walkthrough: Require AREA Dimension on the Salesperson
- Open the Salespeople/Purchasers list
- Single or Multiple Accounts
- Single Account: Click on the individual G/L Account you wish to update. In the Ribbon click Dimensions > Dimensions-Single
- Use the ellipsis to “Select More”, then use the Checkbox to select multiple accounts. In the Ribbon click Dimensions > Dimensions-Multiple
- Click +new to create new Default Dimension requirement.
- Select the Dimension Code that you want to be required. (In this example, AREA)
- Select a Dimensions Value Code that should always be used with this salesperson.
- Change Value Posting to Same Code.
- Click OK
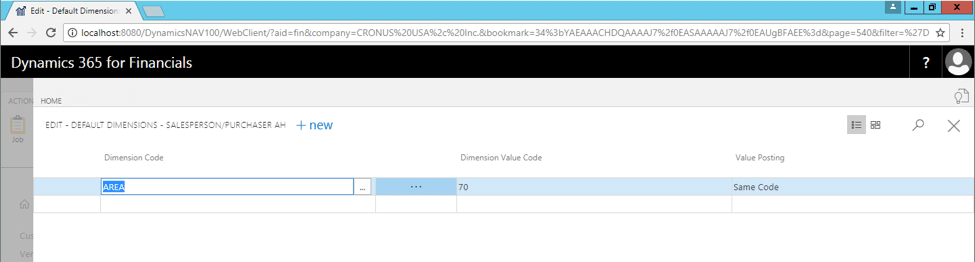
You’ve now required that whenever this Salesperson is used, the AREA dimension will default to 70 on any transaction, but additionally, during posting the value will be tested to ensure that it is 70. (Manual changes or other records with their own defaults won’t override.)
If two master records each have different values for the same Default Dimension (e.g. Both the Salesperson and Customer have a default AREA dimension), then the Default Dimension Priorities is the setup you want to use to dictate which should take priority. We’ll save that topic for next time…
More Information
- Dimensions (About) - Microsoft

Under the terms of this license, you are authorized to share and redistribute the content across various mediums, subject to adherence to the specified conditions: you must provide proper attribution to Stoneridge as the original creator in a manner that does not imply their endorsement of your use, the material is to be utilized solely for non-commercial purposes, and alterations, modifications, or derivative works based on the original material are strictly prohibited.
Responsibility rests with the licensee to ensure that their use of the material does not violate any other rights.