Sorting in Microsoft Dynamics NAV 2016
Over the past several versions of Microsoft Dynamics NAV, we’ve seen improvements in the application’s sorting functionality. In older versions of NAV, you were limited to a pre-defined set of sorting options. Adding an additional sorting key was possible but not something an end-user could accomplish from the front end. In Microsoft Dynamics NAV 2016, the user has complete control over data sorting. The role tailored client allows each user to create and store their preferred sortings for each list page.
Sorting Data in NAV 2016:
With the exception of flowfield columns, NAV allows the user to sort on any column of data presented in a list page.
Sorting on a single column
Let’s say that we want to see our customers sorted by zip code. To do so, simply click on the “zip code” column’s header and NAV will automatically sort the list based on zip code. You can click on the column header again to toggle between ascending and descending order. You also have the ability to set the ascending/descending order by right-clicking on the column’s header.
Sorting on multiple columns
Sometimes, we may have a need to sort our data based on multiple columns. Take for instance a case where we’d like to see our customers sorted by “location code” per salesperson. To achieve these results, click on the “salesperson code” column (to sort the list by salesperson code), then shift/left click on the “location code” column. NAV will then sort the customer list by salesperson, then per salesperson, by location. If you then decided that you’d like to see the list sorted by salesperson, location, and then by zip code, you’d simply shift/left click on the “zip code” column’s header.
Saving Sorting Criteria in NAV 2016:
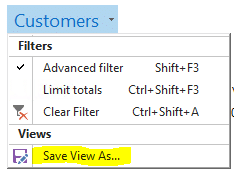
For situations where you know that you’ll be needing to use the same sort repeatedly, NAV allows you to save the filters/sorting that you’ve applied to a list for use in the future. This feature exists on every list page in Dynamics NAV. In the example below, the customer list page has been adjusted to sort the data by “salesperson code”, then by “location code”. Next, click “Save View As…” to save the view.
Once the view has been saved, it becomes visible from the navigation pane. In the example below, I’ve saved two views. One that opens the customer list filtered to only customers with an open balance and another that opens the list sorted by salesperson code, then by location code.
Under the terms of this license, you are authorized to share and redistribute the content across various mediums, subject to adherence to the specified conditions: you must provide proper attribution to Stoneridge as the original creator in a manner that does not imply their endorsement of your use, the material is to be utilized solely for non-commercial purposes, and alterations, modifications, or derivative works based on the original material are strictly prohibited.
Responsibility rests with the licensee to ensure that their use of the material does not violate any other rights.


