The OData endpoint is a new REST-based service that allows for integrating with Dynamics 365 for Operations. Below are some tips to help with using an OData client to authenticate and use methods to read and write data in the system.
Data Entities
Data Entities that are marked ‘Yes’ for the ‘Is Public’ property will be available as an OData endpoint. You can consume this OData endpoint in your external application such as a .Net application for integration scenarios.
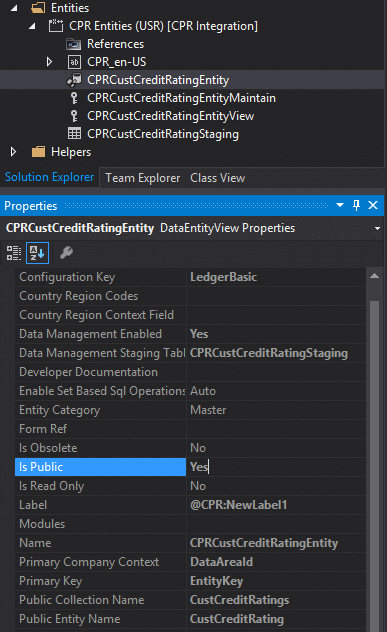
In the screenshot below, I have created a custom data entity called CPRCustCreditRatingEntity. Note the Is Public, Public Collection Name and Public Entity Name properties:
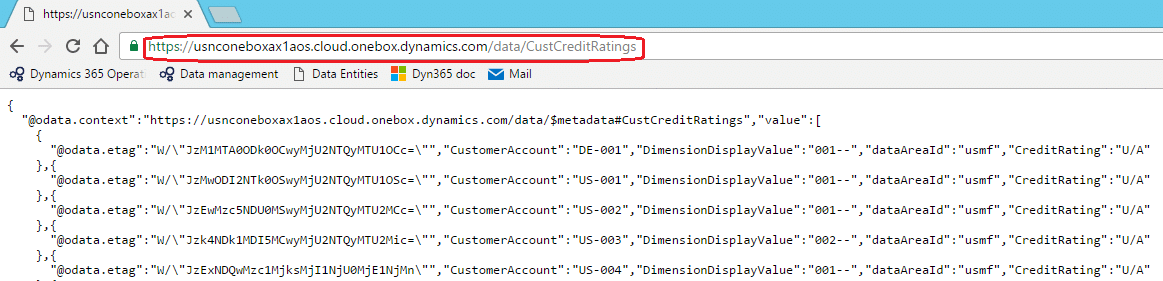
When viewed using the Chrome browser, I can see my custom Data entity is available:
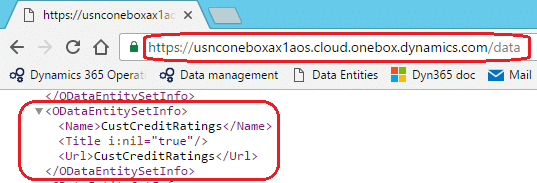
Tip: If using IE to view the OData endpoint, you might have to open the JSON results in a separate file download. Chrome will automatically show the JSON results in the browser.
Creating a OData Client Application
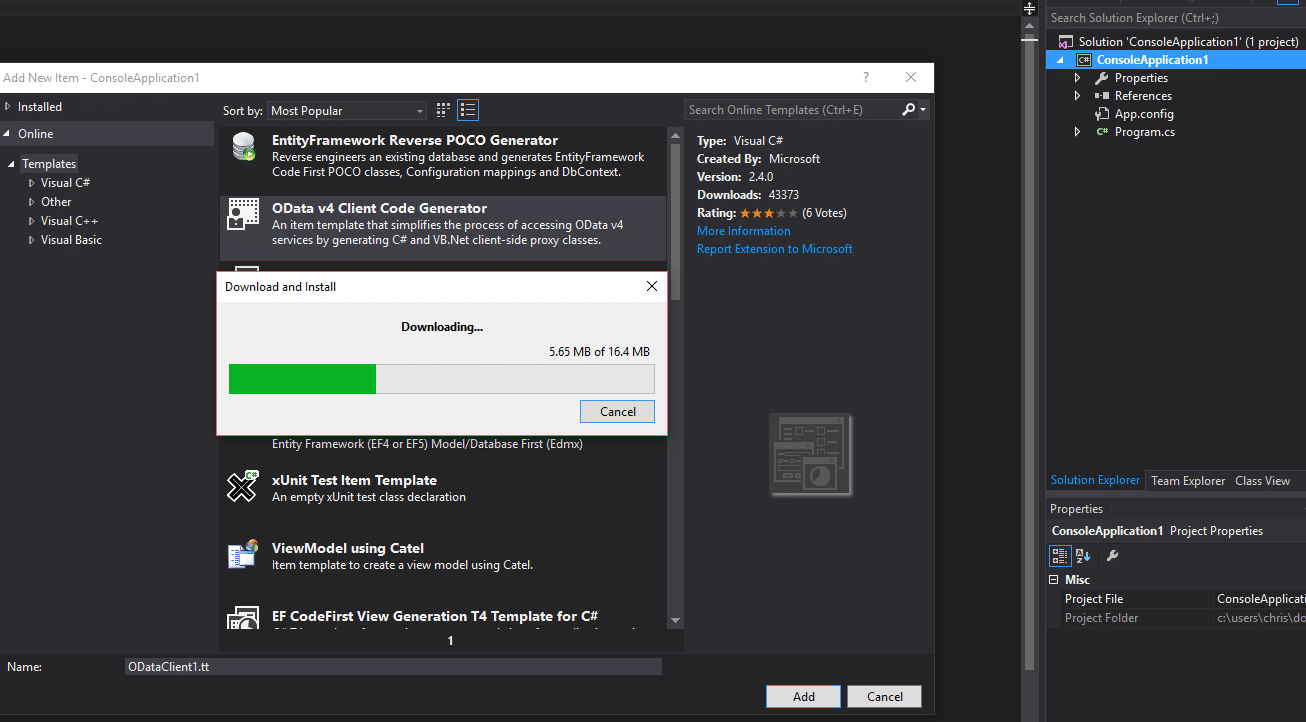
Use the OData v4 Client Code Generator in your Visual Studio application to build the OData entity proxy classes. This can be downloaded and installed from with Visual Studio. Once it is installed, you can add the OData client to the application. In the following screenshots, I downloaded it and then added it to my C# Console application project:
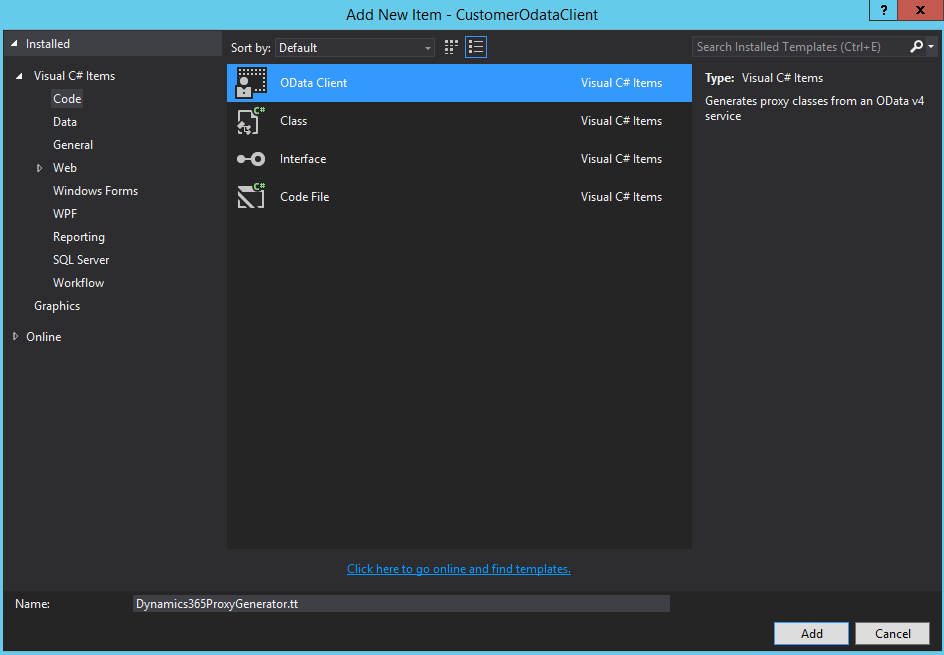
This will create a file with an extension of tt which stands for Text Template. Update the MetadataDocumentUri string value in the tt file so it contains your OData metadata endpoint. For example, mine is:
public const string MetadataDocumentUri = “https://usnconeboxax1aos.cloud.onebox.dynamics.com/data/$metadata”;
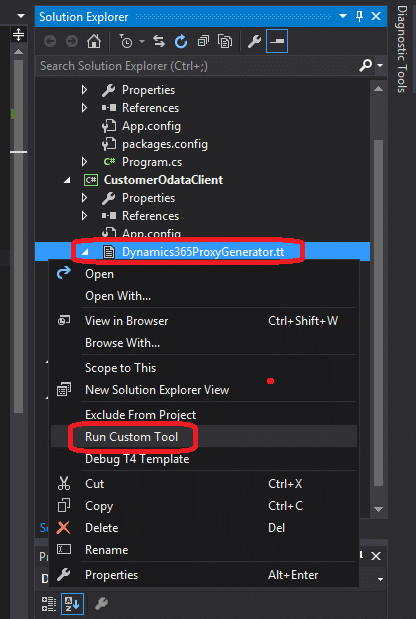
Lastly, right click on the tt file and choose to ‘Run custom tool’. This will read the metadata and build a large class file (45+ MB). It may take several minutes to complete. You can explore the CS file when it completes.
Using the generated proxy classes
The generated proxy classes let you instantiate the data entity objects, set properties, and call methods to interact with the OData endpoint. The following is an example of reading a CustCreditRating record using a LINQ (System.Linq) query pattern:
1 2 3 4 5 6 7 8 9 10 11 12 13 14 15 16 17 18 19 20 21 22 23 24 25 26 27 28 29 30 31 32 33 34 35 36 37 38 39 40 41 42 43 44 45 46 47 48 49 50 51 52 53 54 55 56 57 58 59 60 61 62 63 64 65 66 67 68 69 70 71 72 73 74 75 76 77 78 79 80 81 82 83 84 85 86 87 88 89 90 91 |
//Get Single CustCreditRating Console.WriteLine("Get a single CustCreditRating instance..."); CustCreditRating existCustCreditRating = GetCustCreditRating("USMF", "US-010"); Console.WriteLine("Credit Rating for {0} is {1}. Press Enter.", existCustCreditRating.CustomerAccount, existCustCreditRating.CreditRating); Console.ReadLine(); The GetCustCreditRating method: #region Get Single CustCreditRating private static CustCreditRating GetCustCreditRating(string targetAXLegalEntity, string customerAccount) { context.SendingRequest2 += new EventHandler<SendingRequest2EventArgs>(delegate (object sender, SendingRequest2EventArgs e) { var authenticationHeader = OAuthHelper.GetAuthenticationHeader(); e.RequestMessage.SetHeader(OAuthHelper.OAuthHeader, authenticationHeader); }); var custCreditRatingQuery = from entity in context.CustCreditRatings where entity.DataAreaId == targetAXLegalEntity && entity.CustomerAccount == customerAccount select entity; return (custCreditRatingQuery.Count() > 0) ? custCreditRatingQuery.First() : null; } #endregion The following code is a complete example of creating multiple Customer records using the OData endpoint: using System; using AuthenticationUtility; using Microsoft.OData.Client; using CustomerOdataClient.Microsoft.Dynamics.DataEntities; namespace CustomerOdataClient { class Program { private static string ODataEntityPath = ClientConfiguration.Default.ODataEndpointUri; private static Uri oDataUri = new Uri(ODataEntityPath, UriKind.Absolute); private static Resources context = new Resources(oDataUri); static void Main(string[] args) { Console.WriteLine("Set HTTP header..."); context.SendingRequest2 += new EventHandler<SendingRequest2EventArgs>(delegate (object sender, SendingRequest2EventArgs e) { var authenticationHeader = OAuthHelper.GetAuthenticationHeader(); e.RequestMessage.SetHeader(OAuthHelper.OAuthHeader, authenticationHeader); }); Console.WriteLine("Creating new customer using Data Entity OData..."); Customer myCustomer = new Customer(); DataServiceCollection<Customer> customersCollection = new DataServiceCollection<Customer>(context); customersCollection.Add(myCustomer); myCustomer.CustomerAccount = "US-X11111"; myCustomer.Name = "ABC Trees 111"; myCustomer.CustomerGroupId = "10"; myCustomer.SalesCurrencyCode = "USD"; myCustomer.CreditRating = "Excellent"; myCustomer.AddressCountryRegionId = "USA"; #region Create multiple customers Customer myCustomer2 = new Customer(); customersCollection.Add(myCustomer2); myCustomer2.CustomerAccount = "US-X22222"; myCustomer2.Name = "ABC Rains vb"; myCustomer2.CustomerGroupId = "10"; //myCustomer2.SalesCurrencyCode = "USD"; myCustomer2.CreditRating = "Excellent"; myCustomer2.AddressCountryRegionId = "USA"; #endregion DataServiceResponse response = null; try { response = context.SaveChanges(SaveChangesOptions.PostOnlySetProperties | SaveChangesOptions.BatchWithSingleChangeset); Console.WriteLine("created ok"); } catch (Exception ex) { Console.WriteLine(ex.Message + ex.InnerException); } Console.ReadLine(); } } } |
In the code above, two Customer objects are being created and passed into a DataServiceCollection named customersCollection. I am using the optional SaveChangesOptions.BatchWithSingleChangeset enum in the SaveChanges method. This means if one of the Customer objects fails validation then neither of the Customer objects are created. Since both Customers run under one batch in the HTTP call to the OData endpoint if one fails then they both do.
Lastly, the Resources object that has been instantiated as ‘context’, is using objects from the AuthenticationUtility project to help with authentication. This is a C# library project made of two classes to help in setting up the authentication to the OData endpoint and retrieving the authorization token. This AuthenticationUtility project can be found in Microsoft’s Dynamics AX Github repository at https://github.com/Microsoft/Dynamics-AX-Integration/tree/master/ServiceSamples/AuthenticationUtility.
Hopefully, this post can steer you in the right direction on how to successfully interact with the OData entities in Microsoft Dynamics 365 for Operations.
More on Dynamics 365 for Operations Development
Learn more about OData and the essentials of Dynamics 365 for Operations Development at our online training course! Check out the course agenda and registration information here.
Hi Chris,
Nice article! I was wondering in which company your two customers are being created? I don’t see any DataAreaId or Company being specified in the code. Would be great to hear how you specify the company !
Regards,
Riccardo
Hello Riccardo,
Each company aware Data Entity will have a DataAreaId property you can set using the Microsoft .Net OData Client pattern I discussed in the post. US-CPR111 will go into USRT and US-CPR222 will go into USMF since it is the default company of the credentials being used:
using System;
using System.Collections.Generic;
using System.Linq;
using System.Text;
using System.Threading.Tasks;
using AuthenticationUtility;
using Microsoft.OData.Client;
using CustomerOdataClient.Microsoft.Dynamics.DataEntities;
namespace CustomerOdataClient
{
class Program
{
private static string ODataEntityPath = ClientConfiguration.Default.ODataEndpointUri;
private static Uri oDataUri = new Uri(ODataEntityPath, UriKind.Absolute);
private static Resources context = new Resources(oDataUri);
static void Main(string[] args)(delegate (object sender, SendingRequest2EventArgs e)
{
Console.WriteLine(“Set HTTP header…”);
context.SendingRequest2 += new EventHandler
{
var authenticationHeader = OAuthHelper.GetAuthenticationHeader();
e.RequestMessage.SetHeader(OAuthHelper.OAuthHeader, authenticationHeader);
});
Console.WriteLine(“Creating new customer using Data Entity OData…”); customersCollection = new DataServiceCollection (context);
Customer myCustomer = new Customer();
DataServiceCollection
customersCollection.Add(myCustomer);
myCustomer.CustomerAccount = “US-CPR111”;
myCustomer.Name = “CPR 111”;
myCustomer.CustomerGroupId = “30”;
myCustomer.SalesCurrencyCode = “USD”;
myCustomer.CreditRating = “Excellent”;
myCustomer.AddressCountryRegionId = “USA”;
myCustomer.DataAreaId = “USRT”;
#region Create multiple customers
Customer myCustomer2 = new Customer();
customersCollection.Add(myCustomer2);
myCustomer2.CustomerAccount = “US-CPR222”;
myCustomer2.Name = “CPR 222”;
myCustomer2.CustomerGroupId = “30”;
myCustomer2.SalesCurrencyCode = “USD”;
myCustomer2.CreditRating = “Excellent”;
myCustomer2.AddressCountryRegionId = “USA”;
#endregion
DataServiceResponse response = null;
try
{
response = context.SaveChanges(SaveChangesOptions.PostOnlySetProperties | SaveChangesOptions.BatchWithSingleChangeset);
Console.WriteLine(“created ok”);
}
catch (Exception ex)
{
Console.WriteLine(ex.Message + ex.InnerException);
}
Console.ReadLine();
}
}
}
Thank you,
Brandon
Hi Chris and Brandon –
I am following your example to setup a client to consume Odata service from D365 for Operations. I am wondering where I can get the following details to set in client configuration from my D365 cloud app.
ActiveDirectoryTenant = “https://login.windows-ppe.net/TAEOfficial.ccsctp.net”,
ActiveDirectoryClientAppId = “d8a9a121-b463-41f6-a86c-041272bdb340”,
ActiveDirectoryClientAppSecret = “”,
Also the latet c# code of Authentication utility doens’t contain this property. I think its a data entity path prefixed with Base URI?
ClientConfiguration.Default.ODataEndpointUri
Thanks
Hello Fahad,
In regards to the Authentication Utility update, unfortunately Chris and I don’t feel comfortable commenting on how to use it if there are changes as we haven’t worked with it much.
Despite this, I would still like to help as much as I can – there is information about the AD Client App Id at https://ax.help.dynamics.com/en/wiki/dynamics-ax-7-services-technical-concepts-guide/ in the Authentication section.
Hope this helps,
Brandon
Hi,
I have created one Composite Data Entity Called SalesOrder which is composed of SalesHeader & SalesLine data entity. After created I have realized that I forgot to make IsPublic property to YES. Now When I right click on my composite Data Enity in Solution Explorer I cant see property isPublic but When I see composite Data Entity on ApplicationExplorer then IsPublic property is visible and not editable. How can I edit IsPublic property ?
I have to expose composite data entity into Power BI to create SSRS Report. Please give me any suggestion.
Thanks,
Parag
Hello Parag,
This behavior is possibly because Composite Entities are only designed for the Data Management platform with XML files (you can’t consume them via ODATA scenarios – using the .Net OData client for example)
The above is from https://docs.microsoft.com/en-us/dynamics365/operations/dev-itpro/data-entities/develop-composite-data-entities
Thanks,
Brandon
Hi Chris,
Thanks for this nice article which explained all required details.
I am also trying to consume one of my data entity through .NET application. I have almost completed all the steps but facing issues while assigning the values in ClientConfiguration class. Can you please provide examples of same, so it will help troubleshooting my issue.
My Details for your reference:
public static ClientConfiguration OneBox = new ClientConfiguration()
{
UriString = “https://usnconeboxax1aos.cloud.onebox.dynamics.com/”,
UserName = “abc@xyz.com”,
Password = “password”,
ActiveDirectoryResource = “https://usnconeboxax1aos.cloud.onebox.dynamics.com”,
ActiveDirectoryTenant = “https://login.windows.net/myCompany.com”,
ActiveDirectoryClientAppId = “4f05e2ad-0cba-4461-8f72-xxxx0a7dxxxx”,
ActiveDirectoryClientAppSecret = “xxxxLG9RoC8tabcb0xxxxHnaTl0NR1kckgQR5lPXxxxx”,
};
Thanks In Advance.
Avinash
Hello Avinash,
I’m hoping the following will help.
Here is Chris’s edited ClientConfiguration.cs file:
using System;
namespace AuthenticationUtility
{
public partial class ClientConfiguration
{
public static ClientConfiguration Default { get { return ClientConfiguration.OneBox; } }
public static ClientConfiguration OneBox = new ClientConfiguration()
{
ODataEndpointUri = “https://learning01ce8e89487e5be4devaos.cloudax.dynamics.com/data”, // NEEDS TO BE UPDATED
UserName = “user@domain.com”,
Password = “()MyPassword”,
ActiveDirectoryResource = “https://learning01ce8e89487e5be4devaos.cloudax.dynamics.com”, // NEEDS TO BE UPDATED deployment URL
ActiveDirectoryTenant = “https://login.windows.net/companytenant.com”,
ActiveDirectoryClientAppId = “3cabd434-2a47-4beb-xxxx-xxxxxxxxxxxx”, // APP ID from Azure AD
};
public string ODataEndpointUri { get; set; }
public string UserName { get; set; }
public string Password { get; set; }
public string ActiveDirectoryResource { get; set; }
public String ActiveDirectoryTenant { get; set; }
public String ActiveDirectoryClientAppId { get; set; }
}
}
Here is his OAuthHelper.cs file:
using Microsoft.IdentityModel.Clients.ActiveDirectory;
using System;
namespace AuthenticationUtility
{
public class OAuthHelper
{
///
///
public const string OAuthHeader = “Authorization”;
///
///
///The authentication header for the Web API call.
public static string GetAuthenticationHeader()
{
string aadTenant = ClientConfiguration.Default.ActiveDirectoryTenant;
string aadClientAppId = ClientConfiguration.Default.ActiveDirectoryClientAppId;
string aadResource = ClientConfiguration.Default.ActiveDirectoryResource;
AuthenticationContext authenticationContext = new AuthenticationContext(aadTenant);
// OAuth through username and password.
string username = ClientConfiguration.Default.UserName;
string password = ClientConfiguration.Default.Password;
// Get token object
AuthenticationResult authenticationResult = authenticationContext.AcquireToken(aadResource, aadClientAppId, new UserCredential(username, password));
// Create and get JWT token
return authenticationResult.CreateAuthorizationHeader();
}
}
}
Thanks,
Brandon
Hi Brandon,
thanks for the great post. Do you know if there is a way to get the metadata only for some services. https://usnconeboxax1aos.cloud.onebox.dynamics.com/data/$metadata leads to a really huge file.
Hey Thomas,
Do you access to Yammer? If so take a look at: https://www.yammer.com/dynamicsaxfeedbackprograms/#/threads/show?threadId=982246336. Honestly, I don’t know, but I am certainly curious and would like to know more.
Thanks,
Brandon
Yes, Curl sound like an idea that we can try, but still it is resulting in a file with a lot of data that is not really needed.
Thanks,
Thomas
Could you post an example that doesn’t depend upon the OData v4 Client Code Generator? I used this on our AX365 instance and the generated code file contained 970 thousand lines of code. Not only is this a bear to work with, it also causes a lot of Visual Studio crashes.
Hi Jeff,
I reached out to the author of this post about your question.
Unfortunately, they followed the Microsoft example of using the OData client code generator and do not have another example.
Sorry about that.
Thanks,
Michael
I am getting the following error in Visual Studio when I run the custom tool for OdataClientGenerator:
Error “Running transformation: System.Net.WebException: The remote server returned an error: (500) Internal Server Error”.
After a while I went to Event Log to see the detailed description about the Error it shows the following Log,
“Could not load file or assembly ‘Microsoft.Dynamics.Framework.Services’ or one of its dependencies. The system cannot find the file specified”.
Please help me to figure out the issue.
Thanks in Advance.
Hi Sanjay,
This isn’t an error we’ve seen before. You should confirm the OData entities can be viewed in the browser correctly at https://.cloudax.dynamics.com/data it seems like something is not running right with the D365FO instance. If that is ok then binding issues can be debugged using https://docs.microsoft.com/en-us/dotnet/framework/tools/fuslogvw-exe-assembly-binding-log-viewer maybe that will provide clues.
Regards,
Taylor
Great Article!
Everything is working, howeve the insert goes directly to AX Customer Entity as oppose for CustomerStaging entity. Customer entity Data Management Enabed property is set to Yes, and Data Management Staging Table is set to the Staging table name. However, data is by passing Staging and being written directly Customer table.
Appreciate any assistance.
Hello Anthony,
We believe that is designed behavior because you are not going through the DMF framework of using a data package. We are not 100% sure on that though. If you want it to show in staging then use the UI to run a data package import job or we believe there is an API you can call that MSFT recommends for large data imports that’s allows you run a data package. OData API is best for small transactions and there is no mention from MSFT that staging tables are impacted.
Regards,
Taylor
Thanks for the respond Taylor – was thinking the same thing – OData for real-time interfacing as oppose to bulk loads. Looks like AX “pull” (import) as oppose to “push-to-AX” is optimal approach for Bulk Loads to AX scenarios.
Thanks again Taylor!
Hello Anthony,
You’re welcome. I also wanted to let you know the author of the blog has also given me the following information as well, and advised as a source of information for this topic.
There is a data management API for imports here and documentation for recurring integrations here. There is also a yammer group.
Regards,
Taylor