Adaptive Cards in Teams and Outlook: Keep Your Business Processes Moving Quickly
Do you know how you get those boring emails or chat messages with a wall of text about a new lead or deal update? Adaptive Cards in Microsoft Teams and Outlook are here to fix that.
Think of them as digital sticky notes on steroids. They turn plain messages into interactive, eye-catching alerts inside Teams or Outlook. Instead of just reading info, you can take action instantly—like approving a discount, checking a customer’s details, or logging a call—without opening another app.
In this blog, we will walk you through what Adaptive Cards are and how they function within the Microsoft ecosystem. Additionally, we will outline the steps for creating cards for your business today.
This is Part 1 of a series on Adaptive Cards. In Part 2, I will show you how to use them for Approvals.
What Are Adaptive Cards and How Do They Work?
Imagine getting a digital note that automatically fits perfectly into your email, chat app, or phone—like a smart sticky note. That’s an Adaptive Card. It’s a simple, interactive box that shows text, images, buttons, or even forms, adjusting its look to match whatever app you’re using (like Teams or Outlook). For example, you might get one to approve a request, answer a quick survey, or see a summary of a customer’s details—all without opening another system. It’s designed to save time by putting tasks and info right where you already are.
Adaptive Cards are reusable, open-source UI snippets (in JSON format) that allow developers to display interactive content consistently across multiple platforms and apps, including Microsoft Teams, Outlook, Windows, and more.
Key Features:
- Cross-Platform – Work in multiple apps (Teams, Outlook, Bot Framework, etc.).
- JSON-Based – Defined via a simple schema for easy integration.
- Adaptive Design – Automatically adjust to host app styling (e.g., dark/light mode).
- Interactive Elements – Support buttons, inputs, images, text, and actions (like submit/open URL).
- Open Standard – Community-driven and extensible.
Tools You'll Need to Start Using Adaptive Cards
- Design & Create Adaptive Cards
- Adaptive Cards Designer (Web tool) – Visually build cards and generate JSON.
- JSON Editor (Optional) – For manual tweaks (e.g., VS Code, Notepad++).
- Host & Send Cards
- Power Automate – Send cards via Teams/Outlook based on triggers.
- Azure Bot Service – For chatbots that serve Adaptive Cards.
- Teams – Post cards in chats/channels.
- Outlook – Embed cards in emails.
- Integrate with Business Apps
- Dynamics 365 – Show CRM data or trigger workflows.
- Power Apps – Embed cards in custom apps.
- Power BI – Interactive reports via cards.
- Developer Tools (For Advanced Use)
- Bot Framework SDK – Build bots that use cards.
- APIs (Graph API, Teams API) – For custom integrations.
- Testing & Debugging
- Adaptive Cards Explorer – Test how cards render.
What You Don’t Need
- Heavy coding skills (Power Automate + Designer are low-code).
- Expensive licenses (many tools are free or part of Microsoft 365).
What Adaptive Cards Look Like: Practical Examples
While Adaptive Cards may seem like a great feature on paper, it's also important to know what they can do. Here are some common ways companies are using them today:
- A high-probability deal hits 70%
- The deal name, value, and close date
- A "Fast-Track Approval" button (click to approve without emails)]
- A link to the CRM (one-click access)
- A new high-value lead comes in
- Their company and budget
- A"Call Now" button (that logs the call automatically)
- A "Assign to Rep" dropdown (no more forwarding emails)
- A customer misses a payment
- Overdue amount and days late
- A "Send Reminder" button (pre-written email, just hit send)
- Quick Approval Requests
- Send adaptive cards via Teams or Outlook for managers to approve invoices, PTO requests, or sales discounts directly from the cloud
- Update records in Dynamics 365 Sales/Finance upon approval
- Incident Reporting
- Field workers submit safety/equipment issues via a card in Teams, attaching photos
- Auto-create cases in Dynamics 365 Field Service
- Customer Feedback Collection
- Send post-service surveys via Adaptive Cards (For example, star rating, comments, etc.)
- Log responses in D365 Customer Voice or Marketing
Why You'll Fall in Love with Adaptive Cards
There are several reasons why using Adaptive Cards within your Microsoft environment is an effective way to manage alerts and keep your team focused, including:
- No more app-switching: Everything happens in Teams.
- Faster decisions: Buttons replace back-and-forth emails.
- Hard to miss: Colorful, compact, and impossible to ignore in chats.
Adaptive Cards turn boring sales alerts into one-click action centers inside Teams or Outlook. They show key deal info plus buttons (approve, call, remind) so you can move faster—no tech skills needed. For example, if a salesperson in your team is working on a case and the prospect fills out a form asking for more information on a product, you can configure an Adaptive Card to notify that salesperson about what happened and what the next steps should be. The salesperson could then get right to work generating a follow-up with all the relevant information they need.
Now that you have a sense of what Adaptive Cards are, let's take a look at how you can create them.
How to Create Adaptive Cards Using Power Automate
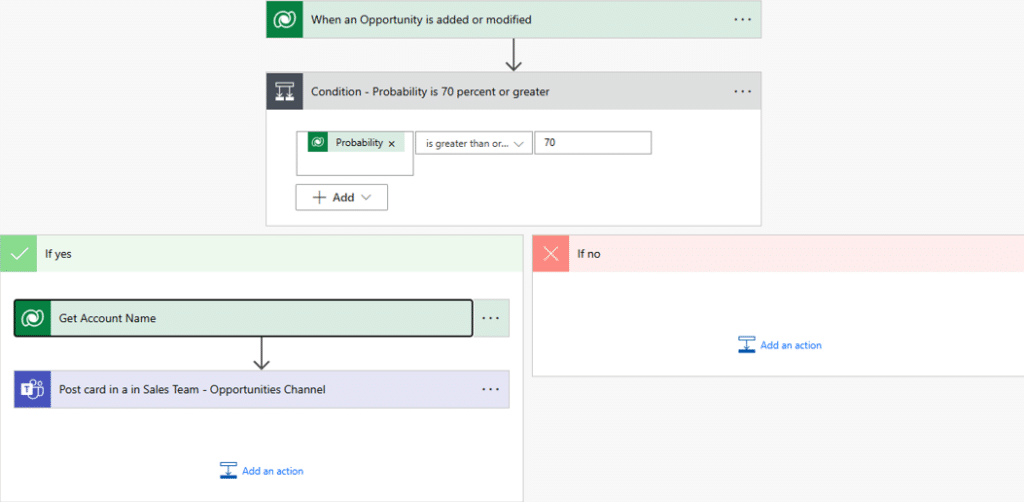
For this blog, we will show you how to use Power Automate to create an Adaptive Card in Teams. In this scenario, the Card will be triggered to alert a seller when a sales Opportunity hits 70 percent or greater probability. Here are the steps of our flow:
Here’s a step-by-step guide on how you can create this Adaptive Card:
Step 1: Set Up the Trigger
- Create a new Power Automate flow
- Go to https://make.powerapps.com then to an existing solution → Create → Automation → Cloud flow → Automated.
- Name it (e.g., "Send Adaptive Card to Teams When Opp =>70%").
- Choose a Trigger
- Use "When a row is added, modified or deleted" (Microsoft Dataverse)
- Change Type: Added or Modified
- Table Name: Opportunities
- Scope: Organization
Step 2: Add a Condition action to Check the Probability
- Add a Condition action
- Check if the Opportunity Probability field equals (or exceeds) 70%
- Example:
- Choose a value: @triggerOutputs()?['body/closeprobability']
- Criteria: is greater than or equal to
- Choose a value: 70
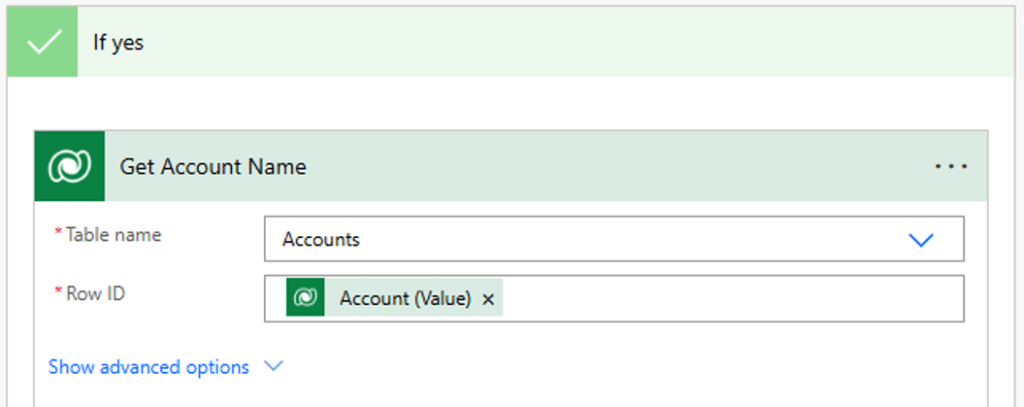
Step 3: If the condition is met then get the Account name to populate the Adaptive Card
- Add an action to Get a row by ID
- Example:
- Table name: Accounts
- Row ID: @{triggerOutputs()?['body/_parentaccountid_value']}
Step 4: Create the Adaptive Card output that will be seen in a specific Team’s channel
- Add the “Post adaptive card in a chat or channel” action to create the output
- Example:
- Post as: Flow Bot
- Post in: Channel
- Team: Sales (in my example I have a Team called Sales, you should select an existing Team that exists within your organization)
- Channel: Opportunities (in my example there was a Channel called Opportunities in my Sales Team you should select an existing Channel that exists in your organization)
- Adaptive Card is where we add the JSON that will bring in the data and other elements that we want to display in Teams. For my example, I wanted to show the following elements:
- An image from our website
- A captivating title for our Adaptive Card
- The Opportunity Name
- The Probability of the Opportunity
- The Account associated with the Opportunity
- The Estimated Value of the Opportunity
- I also wanted to allow the recipient to be able to click on a link to bring them directly to the record in Dynamics
- Adaptive Card is where we add the JSON that will bring in the data and other elements that we want to display in Teams. For my example, I wanted to show the following elements:
- This is the JSON I used:
{
"type": "AdaptiveCard",
"version": "1.2",
"body": [
{
"type": "Image",
"url": "https://<an image you host>
},
{
"type": "TextBlock",
"text": "🚀 High-Probability Opportunity Alert",
"weight": "bolder",
"size": "large"
},
{
"type": "TextBlock",
"text": "Opportunity ** @{triggerOutputs()?['body/name']} ** has reached ** @{triggerOutputs()?['body/closeprobability']}% probability! **",
"wrap": true
},
{
"type": "FactSet",
"facts": [
{
"title": "Account",
"value": "@{outputs('Get_Account_Name')?['body/name']}"
},
{
"title": "Estimated Value",
"value": "$@{triggerOutputs()?['body/estimatedvalue']}"
},
{
"title": "Close Date",
"value": "@{triggerOutputs()?['body/estimatedclosedate']}"
}
]
}
],
"actions": [
{
"type": "Action.OpenUrl",
"title": "View in CRM",
"url": "https://<your org>.dynamics.com/opportunities/@{triggerOutputs()?['body/opportunityid']}"
}
]
}
That's it! While this is a relatively basic use case, it should still give you a solid foundation to build on when developing your Adaptive Cards that fit your unique business needs. Some additional enhancements you could add to this card include:
- Add approval buttons (e.g., "Approve Discount") using Action.Submit.
- Include real-time data (e.g., pulling latest forecast from Excel).
- Send email notifications in parallel (using Outlook connector).
Talk to Stoneridge Today to Get Started with Adaptive Cards!
Reach out to our team of experts today to start using this powerful new feature to streamline work and keep your team focused on important tasks! We can help you create and configure Adaptive Cards
Under the terms of this license, you are authorized to share and redistribute the content across various mediums, subject to adherence to the specified conditions: you must provide proper attribution to Stoneridge as the original creator in a manner that does not imply their endorsement of your use, the material is to be utilized solely for non-commercial purposes, and alterations, modifications, or derivative works based on the original material are strictly prohibited.
Responsibility rests with the licensee to ensure that their use of the material does not violate any other rights.


