









Copilot Studio Explained – Part 3: Knowledge Sources and Topics
Your AI agent is up and running. But does it know where to find the information your employees need? And how do you make sure it handles specific requests consistently?
Creating and publishing an AI agent is only the beginning. To make it genuinely useful, you need to give it access to relevant business information and establish how it should handle different interactions. That's where Knowledge Sources and Topics in Microsoft Copilot Studio come into play.
Welcome to Part 3 of our Copilot Studio blog series! In Part 1, we explored the platform's settings and configuration options. Part 2 walked you through creating an agent, publishing it, and tracking its activity. Now, we'll show you how to connect knowledge sources, create custom topics, and build structured conversation paths that give you greater control over your agent's behavior.
Knowledge sources and topics solve two different problems: knowledge sources determine what information your agent can use, while topics determine how it handles specific interactions. This article walks through both capabilities, from connecting and testing a website to building and directing users through a custom topic.
What Are Knowledge Sources in Microsoft Copilot Studio?
Think about how your employees find information throughout the workday. They might visit your company website, search through documents, or access information stored in a business application.
Knowledge sources allow your agent to reference business information when responding to questions. By connecting resources relevant to your organization, you reduce its reliance on the AI model's general knowledge and help it produce answers grounded in your content.
For example, you could build an agent that:
- Answers employee questions using your company's HR handbook.
- Retrieves information about your products and services from your website.
- References internal documentation to answer common questions.
- Uses information from supported business data connections.
The goal isn't simply to give your agent more information. It's to give it access to the right information for the tasks it's expected to perform.

How to Add a Knowledge Source in Copilot Studio
Let's walk through a practical example using the email inquiry agent we've been building throughout this series. In this example, we're creating the agent for Stoneridge Software.
We've already enabled Microsoft Work IQ so our agent can access supported Microsoft 365 information. Now, we'll expand its capabilities by connecting the Stoneridge Software website as a knowledge source.
Step 1: Open the Knowledge Tab
- Sign in to Microsoft Copilot Studio.
- Navigate to Agents and open your existing agent.
- Select the Knowledge tab.
- Click Add Knowledge.
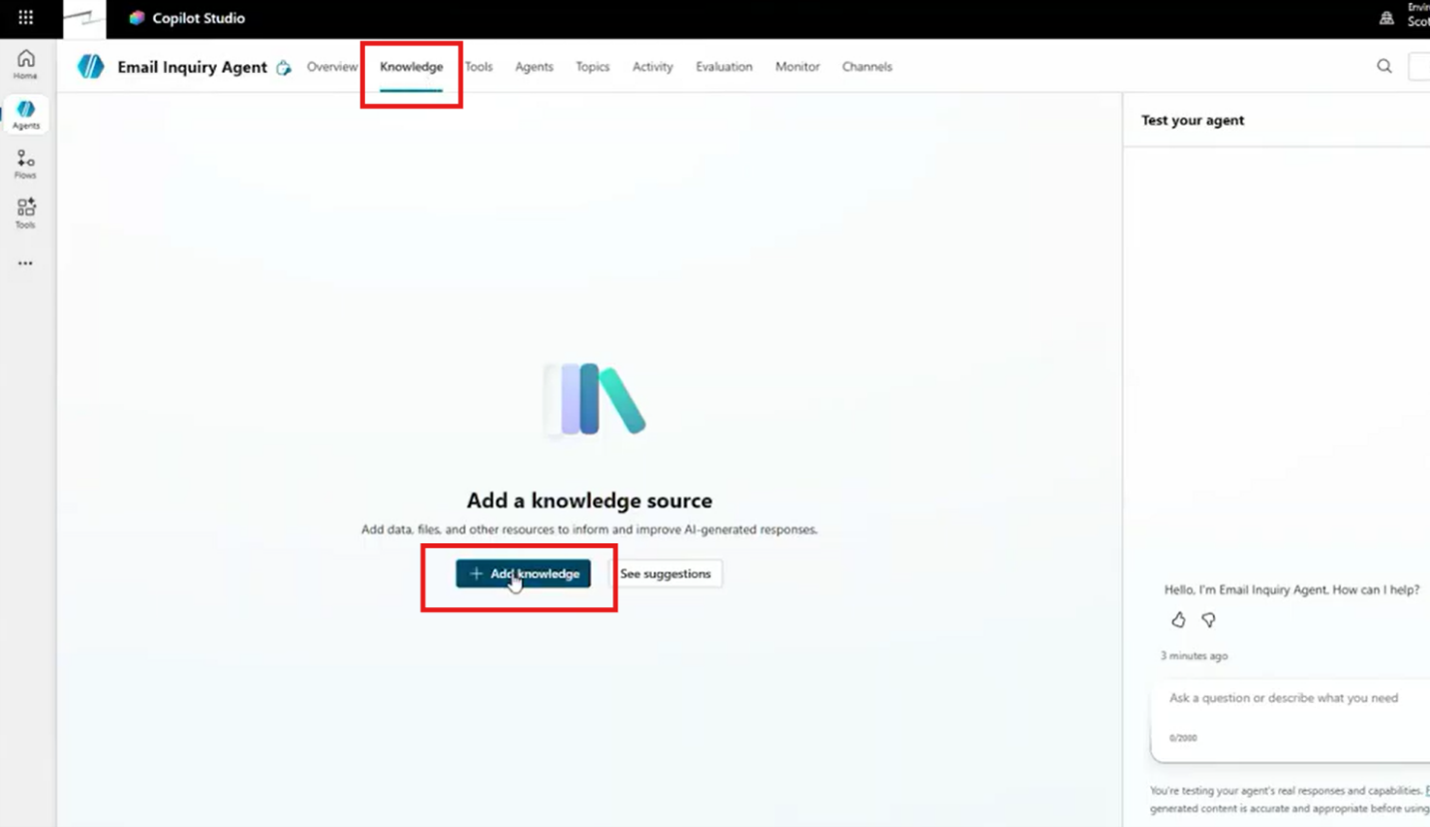
Copilot Studio will display the available knowledge source options. For this demonstration, we'll use a public website.
Step 2: Add Your Website
- Select the option to add a public website.
- Enter your company's website.
- Click Add.
- Name the source Stoneridge Software Knowledge Source – or something related to your business.
- Enter a description explaining what information it contains.
- Select Add to Agent.
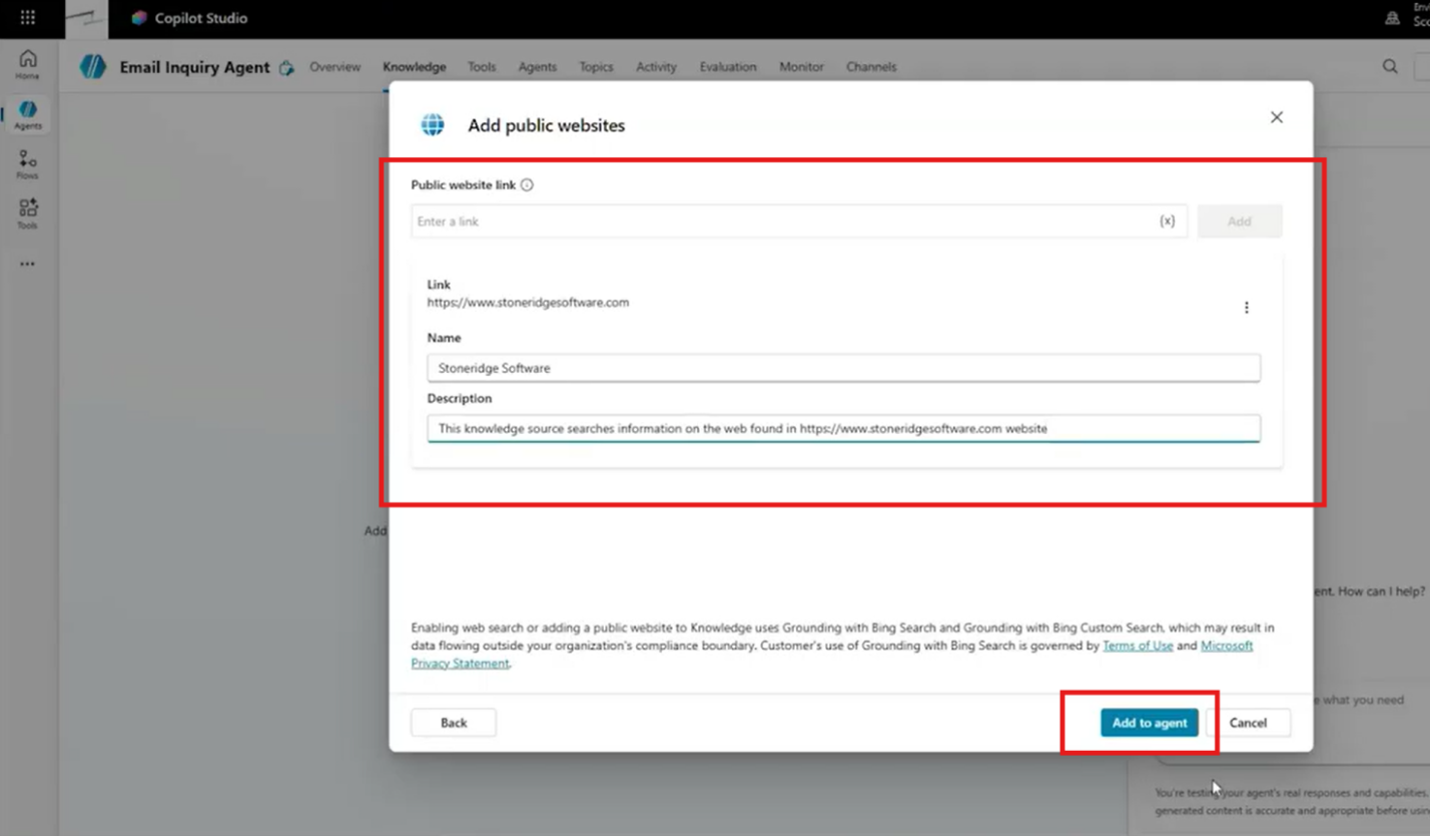
Give the knowledge source a clear, specific description that explains what information it contains. Copilot Studio uses this description to determine when the source is relevant to a user's question, so precise wording is especially important when an agent has access to multiple sources. Distinct descriptions help the agent choose among different types of information.
For example, describing your source as containing information about Stoneridge Software helps the agent understand when to reference that website.
Step 3: Update Your Agent's Instructions
Adding a knowledge source makes the information available, but you can also provide instructions about when it should be used.
For our email inquiry agent, we want questions about Stoneridge Software to reference the website rather than unrelated Microsoft 365 information.
- Return to the agent's Overview tab.
- Locate Instructions and select Edit.
- Add an instruction directing the agent to use a company-specific knowledge source for company-related questions.
- Save your changes.
For example:
When responding to questions about Stoneridge Software, use the Stoneridge Software Knowledge Source to retrieve relevant information.
This gives the agent additional guidance about which source to use for different requests.
Step 4: Test Your Knowledge Source
Now let's make sure the connection works.
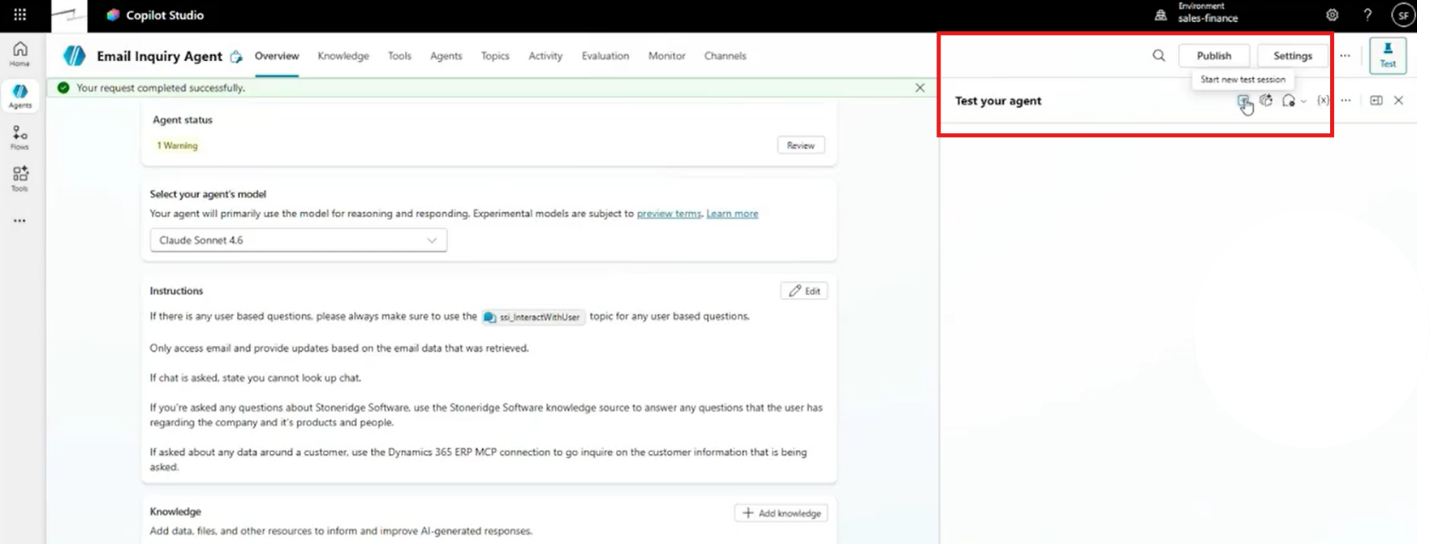
- Open the agent's testing interface.
- Start a new test session.
- Enter: "How long has Stoneridge Software been in business, and who founded the company?"
- Submit the prompt.
- Review the response and the information sources referenced.
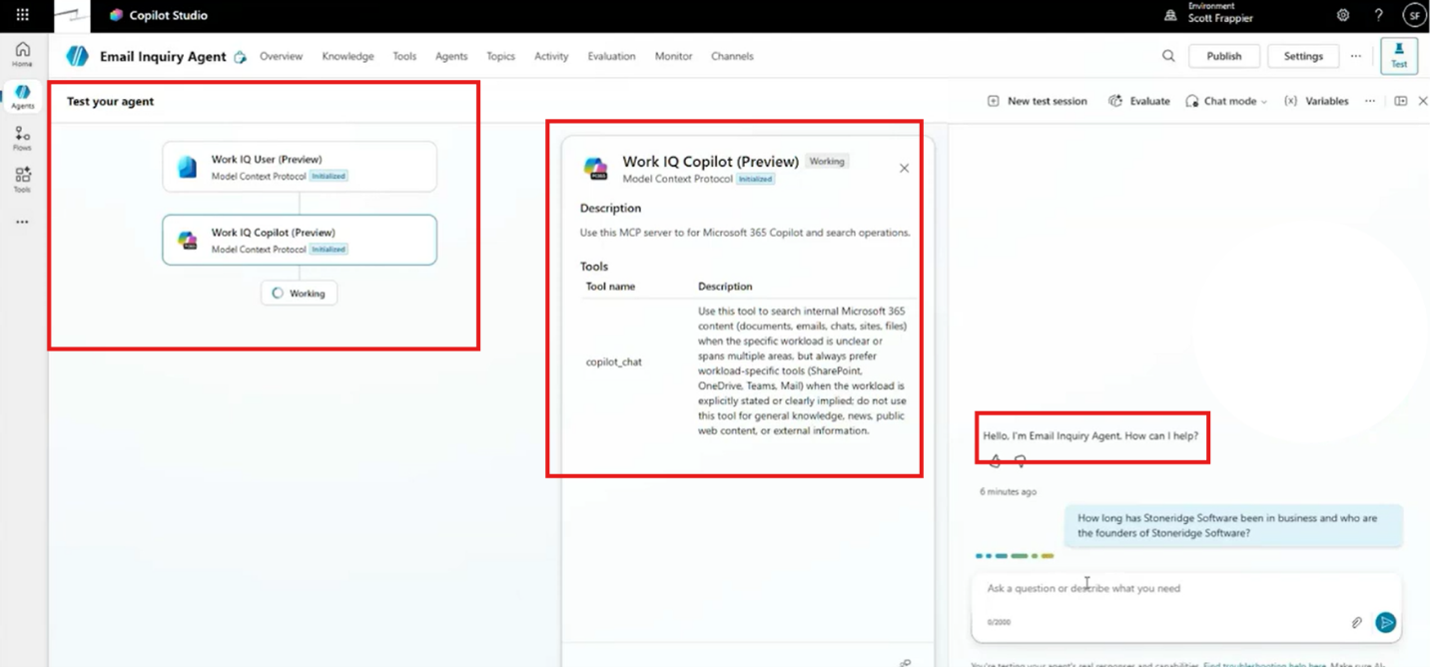
The agent evaluates its available connections, including Work IQ, and selects the Stoneridge Software website as the appropriate source. It then retrieves information about the company's founding and returns the relevant details.
The important takeaway is how the agent identifies and uses an appropriate knowledge source to answer the question.
You've expanded its capabilities without building a complicated integration.
Other Knowledge Sources and Considerations
Public websites are only one option. Depending on your environment, Copilot Studio also supports additional knowledge sources, including:
- Uploaded files: Documents such as PDFs containing information your agent should reference.
- SharePoint: Organizational content stored in supported SharePoint locations.
- Business data connections: Information from supported applications and data sources.
- Advanced knowledge options: Additional connections and configurations available within your environment.
Administrative controls can also determine which knowledge sources are available to users. However, keep in mind that knowledge sources have limitations. For example, public website connections may only navigate a limited number of levels within a site.
Connecting a website doesn't necessarily make every page accessible. It’s always important to test your agent with realistic questions to verify that it can retrieve the information you expect.
What Are Topics in Microsoft Copilot Studio?
Knowledge Sources determine what information your agent can access. But what happens when you need more control over how it interacts with employees or customers? That's where Topics come into play.
Topics allow you to establish structured conversation paths that guide an agent through interactions.
Instead of relying entirely on general instructions, you can define how your agent should handle specific requests. This is particularly valuable when a process requires multiple questions, conditions, or different responses depending on what a user selects.
For example, topics can help your agent:
- Ask users specific questions.
- Store responses as variables.
- Follow different conversation paths based on user selections.
- Display messages or perform additional actions.
- Interact with connected tools or other agents.
Topics add structure and consistency to conversations that might otherwise be left entirely to the agent's discretion.
System Topics vs. Custom Topics
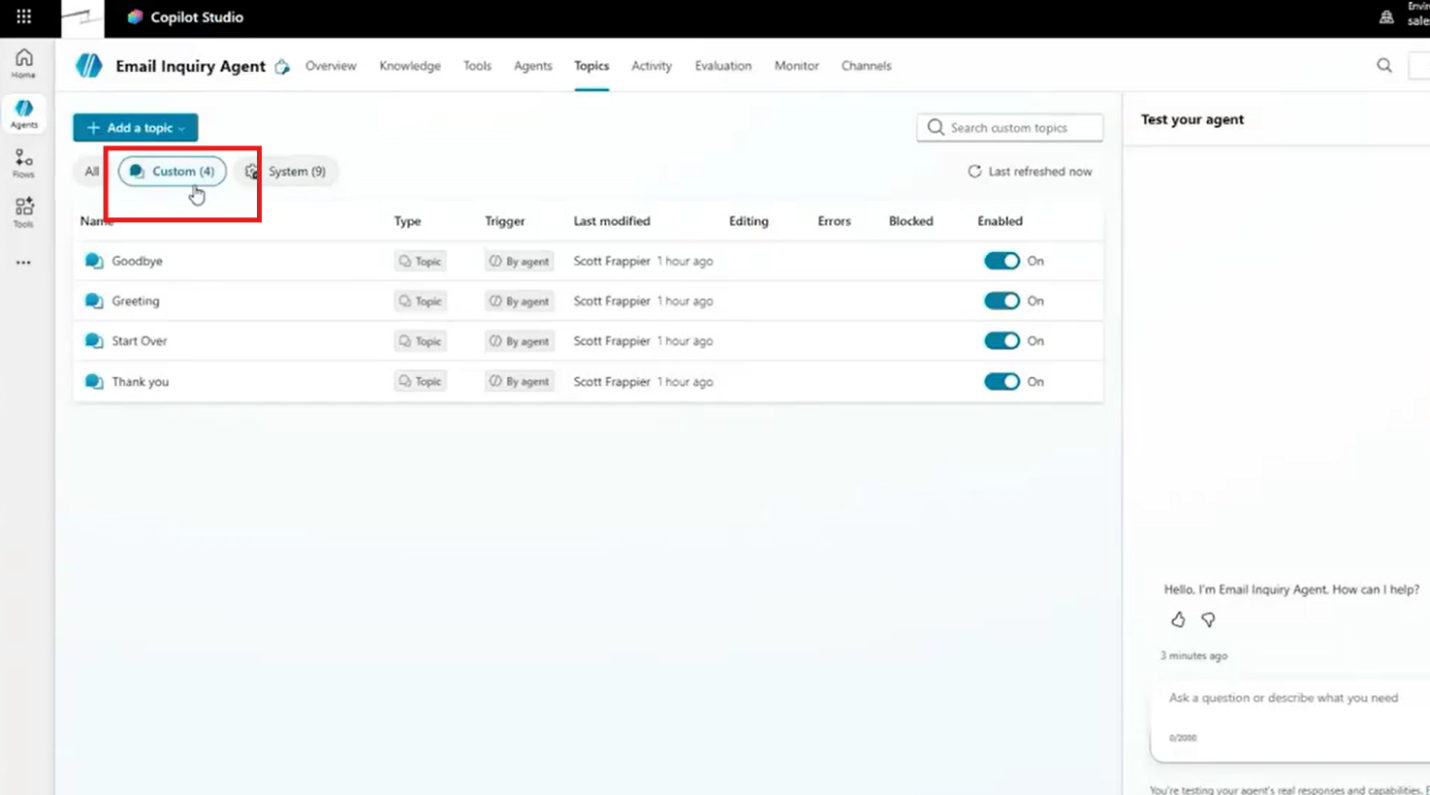
When you create an agent, Copilot Studio automatically provisions several topics. These system topics handle built-in interactions, including the start of a conversation and error conditions. Custom topics, by contrast, let you design interactions for specific business requirements.
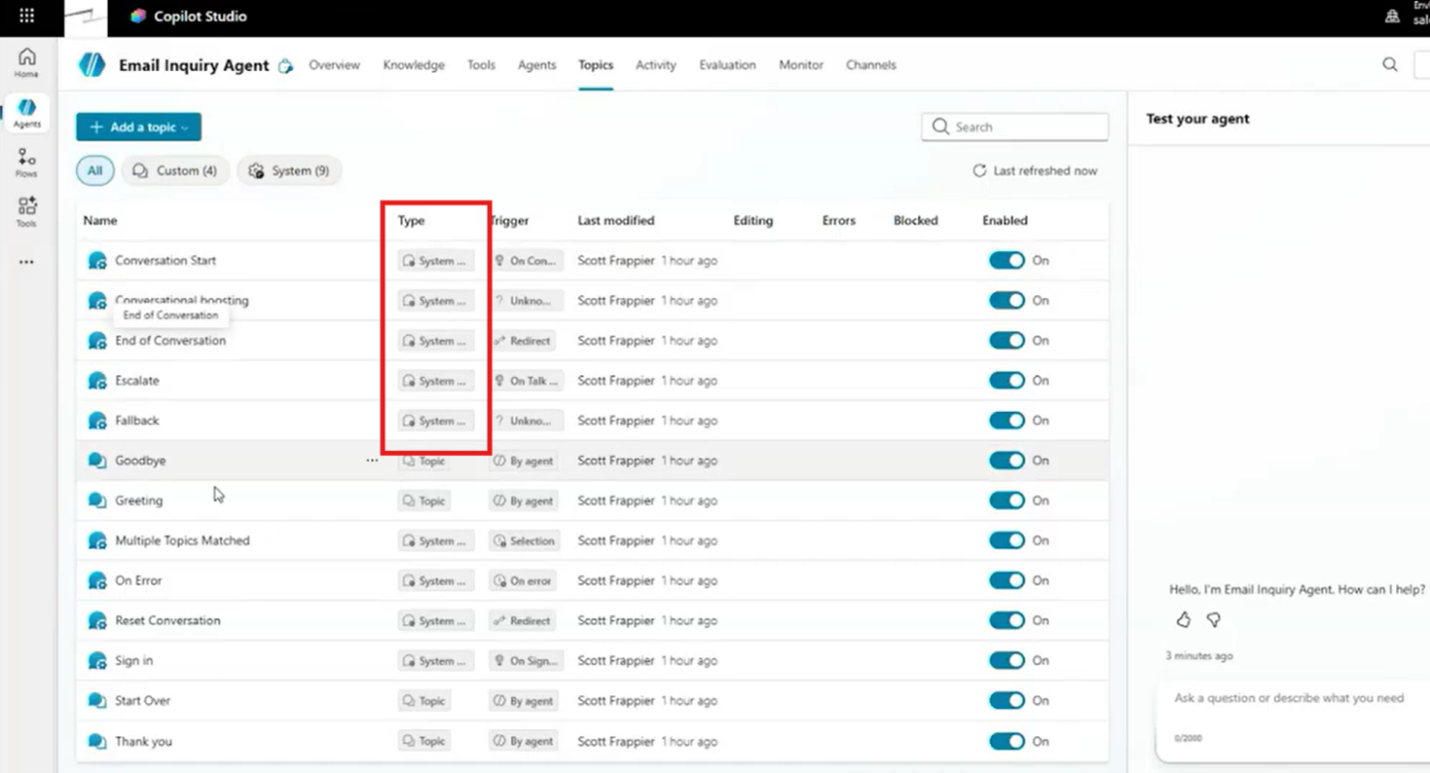
For example, the Conversation Start topic controls what happens when someone begins interacting with your agent. You can modify it to change the introductory message.
You can also create custom topics to address specific business requirements, which give you the flexibility to define your own questions, conditions, and conversation paths.
How to Create a Custom Topic in Copilot Studio
For this demonstration, we'll continue using our email inquiry agent.
We want to create a topic that handles questions about user information. Instead of immediately retrieving information through Work IQ, the agent will ask users which details they're interested in.
Step 1: Create a Blank Topic
- Open your agent and navigate to Topics.
- Review the existing system topics.
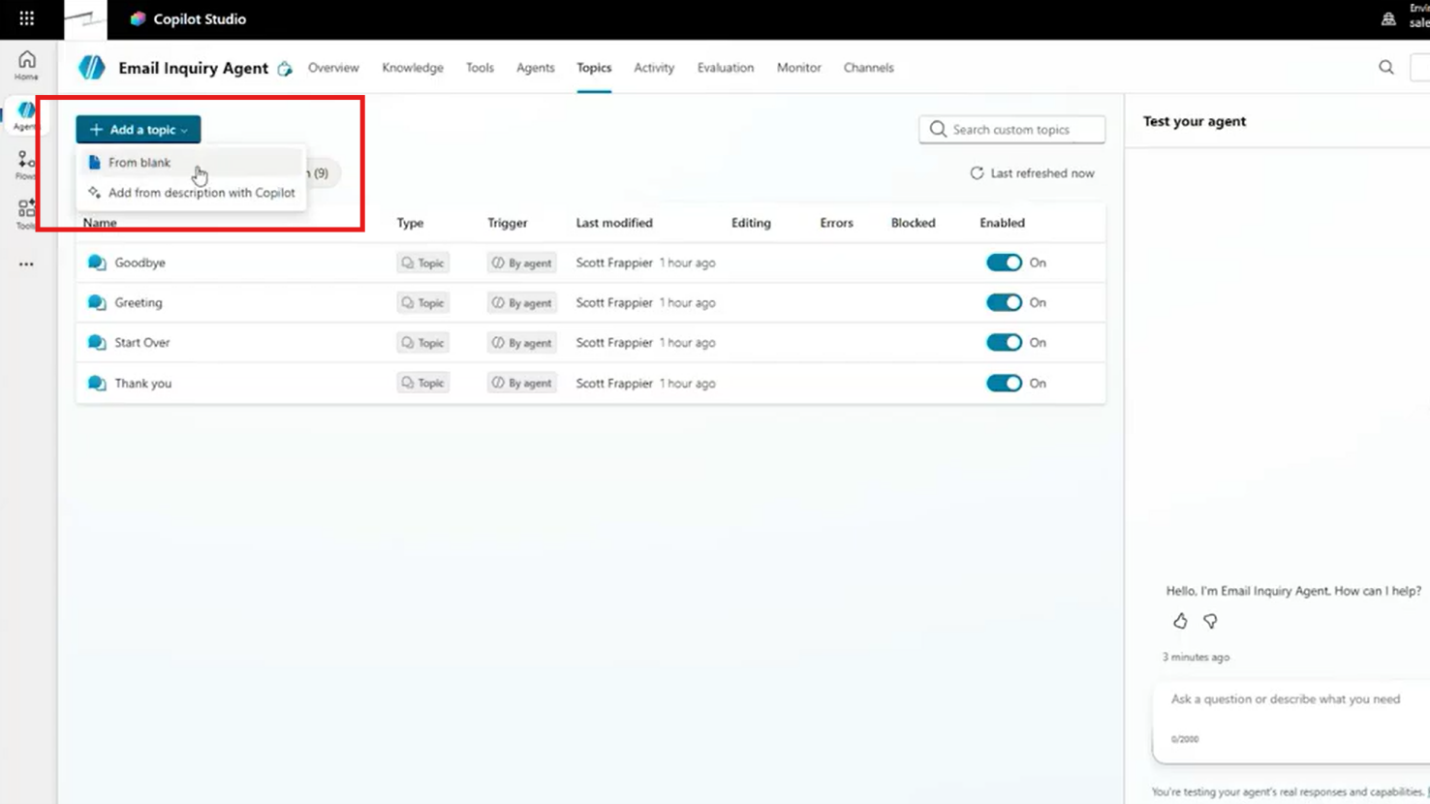
- Select Add a Topic.
- Choose Create from Blank.

- Name the topic SSI Interact with User, or choose another name that clearly reflects its purpose.
- Add a description explaining when it should be used.
- Save the topic.
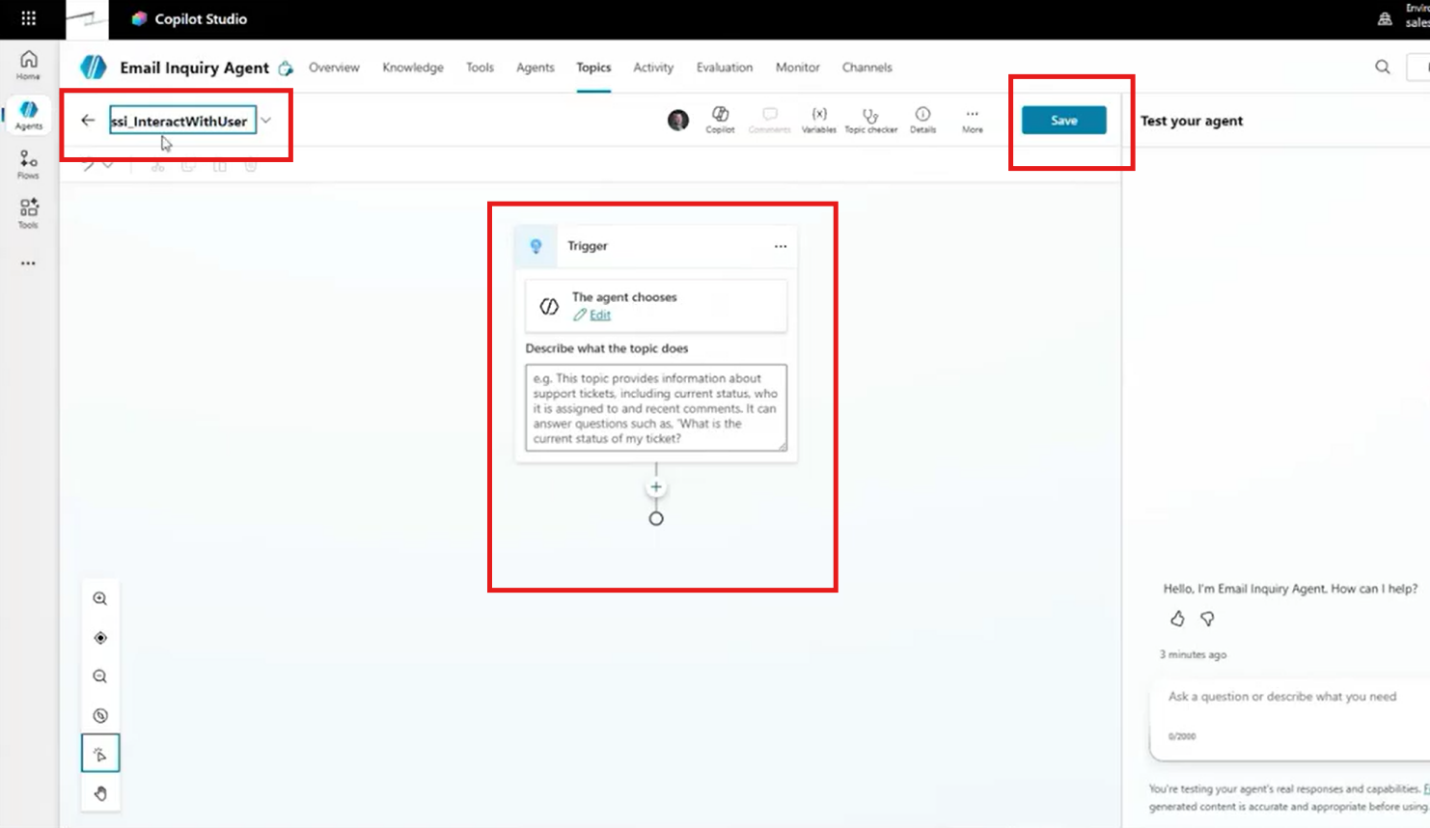
For example, your description could read:
Choose this topic whenever a user asks about their user details.
This helps the agent recognize relevant requests, such as questions about usernames or personal information.
Step 2: Add a Question
Next, we'll establish how the conversation should proceed.
- Open your new topic.
- Add a Question node.
- Enter: "What additional details do you want?"
- Configure the question to use multiple-choice responses.
- Add two options: User First Name and User Last Name.
- Save your changes.
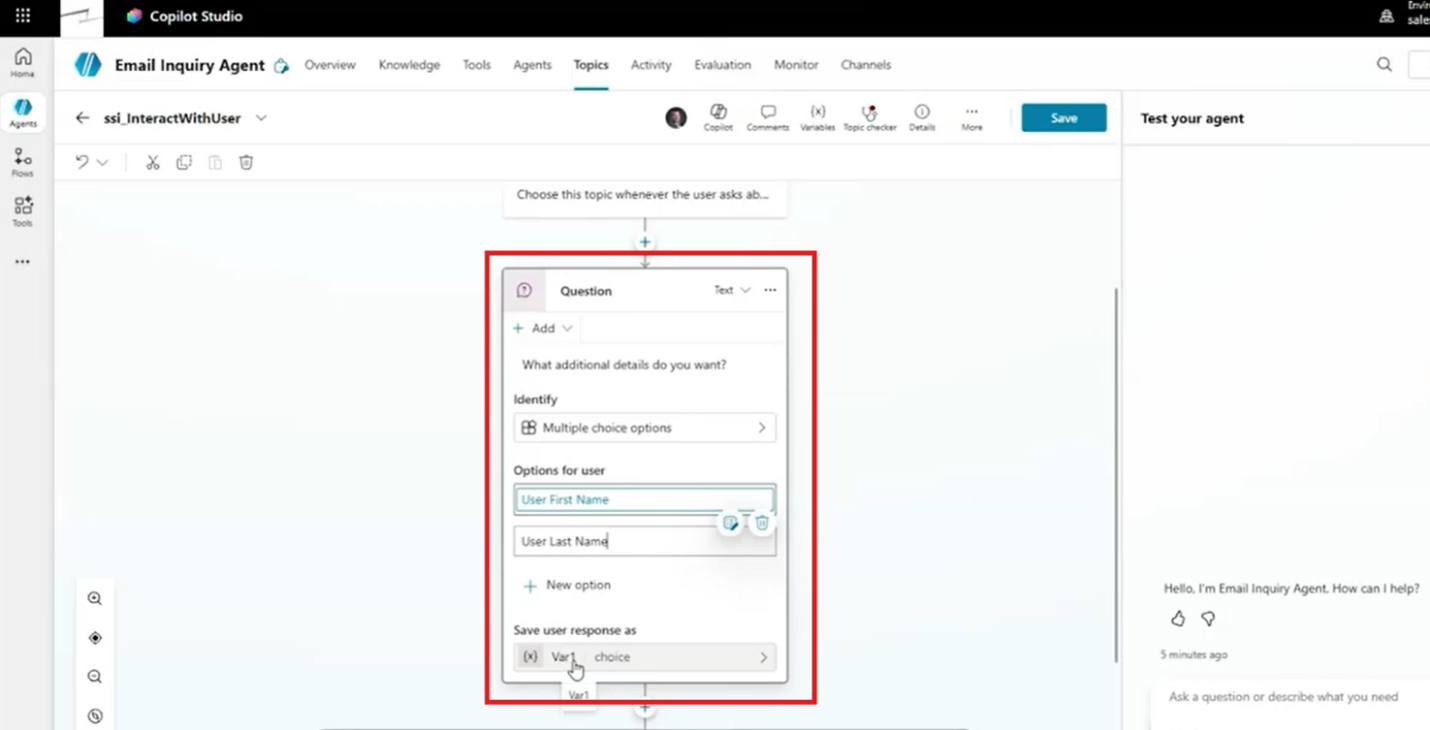
Now, when the topic is activated, the agent asks users which information they want.
This creates a more structured interaction than simply interpreting the original request and selecting an action independently.
Step 3: Add Variables and Conditions
Copilot Studio can store a user's response as a variable and use conditions to determine the next step. For this demonstration, we'll use those capabilities to create two conversation paths.
For our demonstration, we'll create two conversation paths.
- Review the variable associated with the multiple-choice question.
- Add a condition that checks the selected response.
- Create one path for User First Name.
- Create another path for User Last Name.
- Add a message to each path.
If the user selects their first name, the agent responds:
User first name selected.
If they select their last name, it responds:
User last name selected.
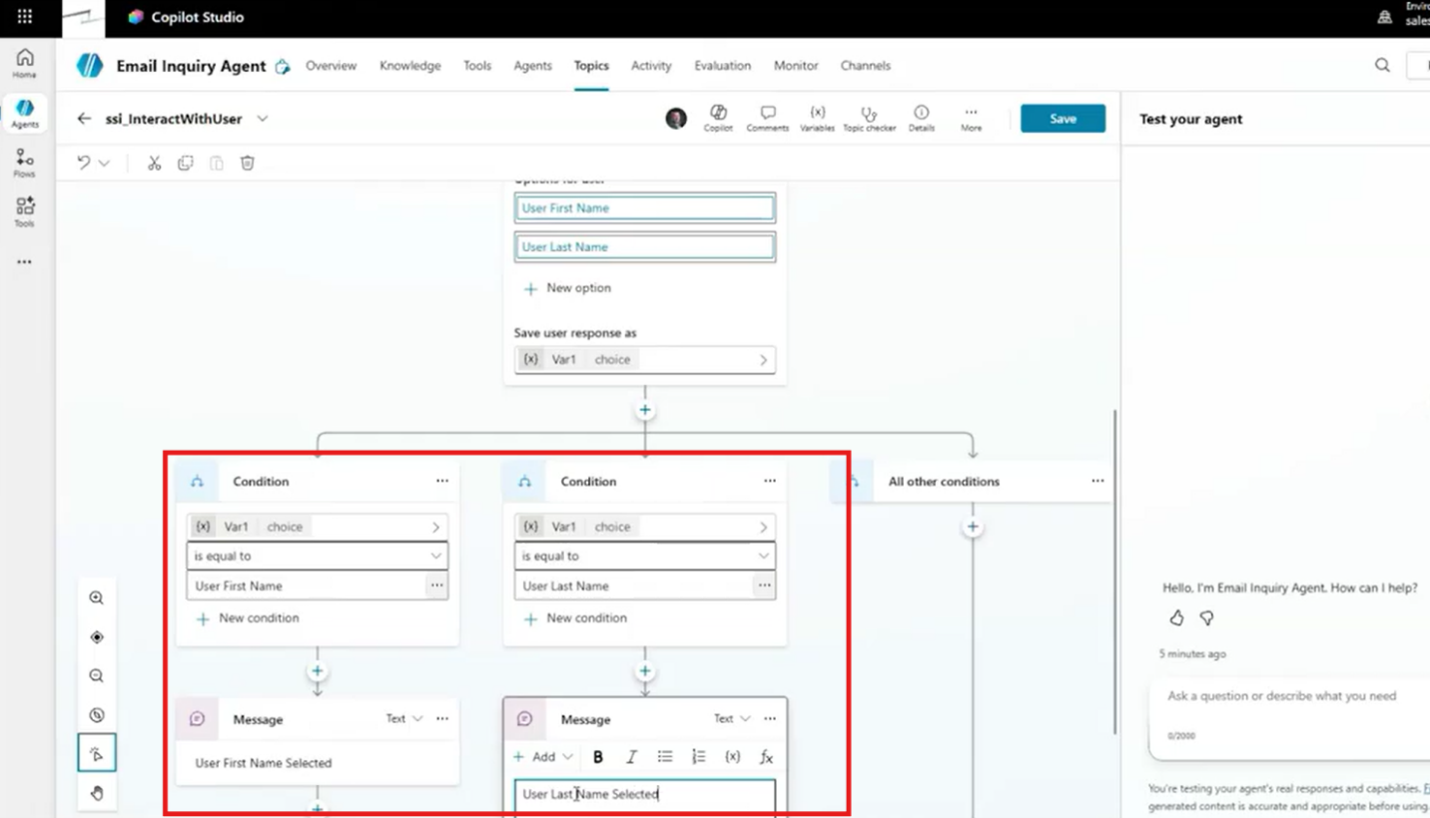
These messages are intentionally simple. We're demonstrating how the topic follows different paths based on user input, not retrieving actual personal information.
You can build on this foundation to create more advanced interactions.
Step 4: Explore Additional Topic Capabilities
Once you've created a topic, you'll notice several options for expanding its functionality.
You can configure topics to:
- Send messages or ask additional questions.
- Add conditions and set variables.
- Redirect users to another topic.
- Interact with connected tools.
- Call another agent.
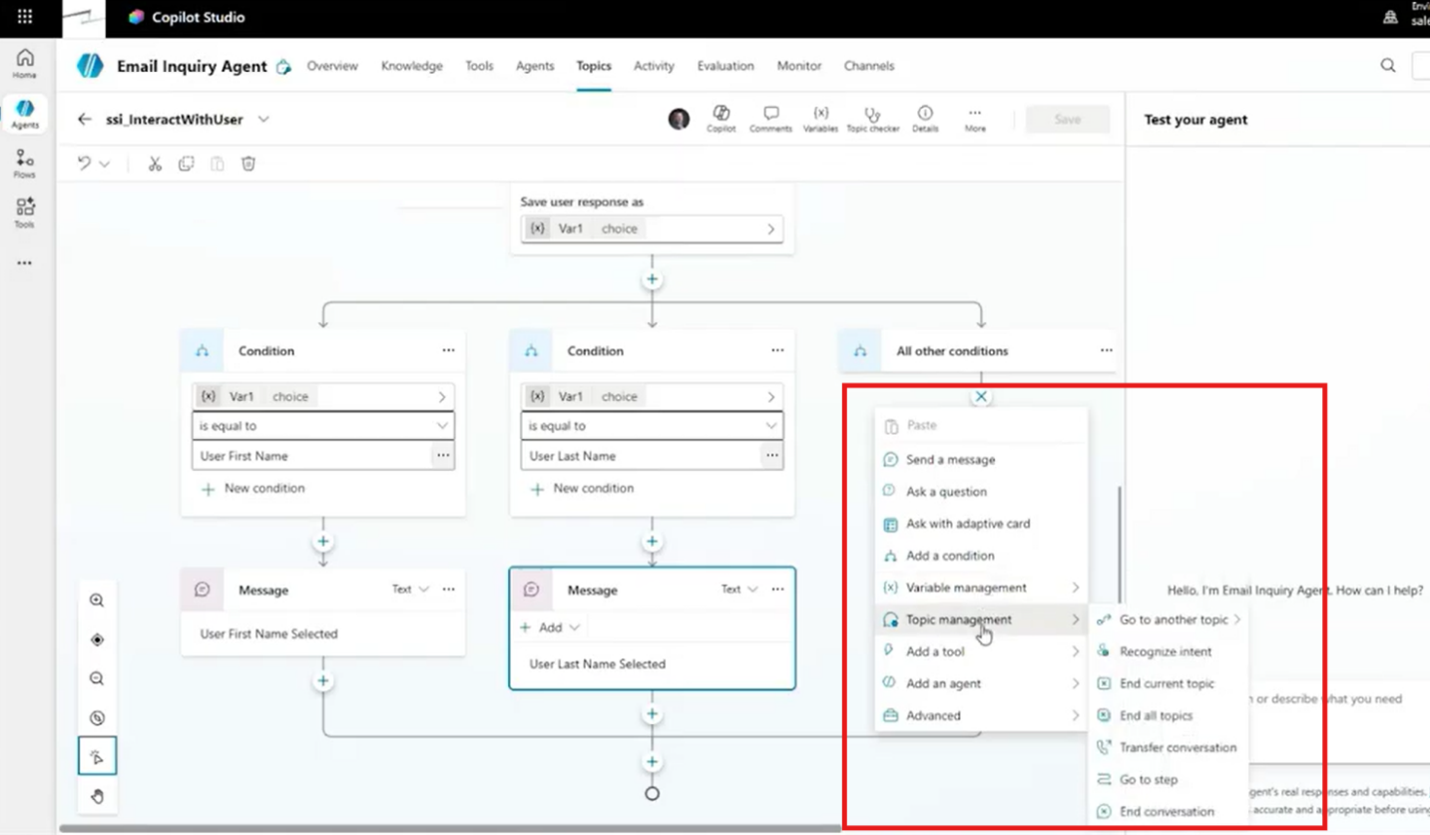
These options provide a framework for building more sophisticated business processes, allowing you to combine structured conversations with other Copilot Studio capabilities.
For example, you could create a topic that collects information from a user before calling a tool to retrieve additional details from a connected application.

How to Make Your Agent Use a Specific Topic
Creating the custom topic defines the conversation path, but it does not guarantee that the agent will choose that path. Because the email inquiry agent can also use Work IQ and other capabilities, it may retrieve user information through an existing connection instead of activating the new topic. To make the behaviour predictable, add explicit guidance to the agent's instructions.
Remember, our email inquiry agent already has access to Work IQ and other capabilities. But without additional guidance, it might decide to retrieve user information through an existing connection instead of following our new topic.
We can address this through the agent's instructions.
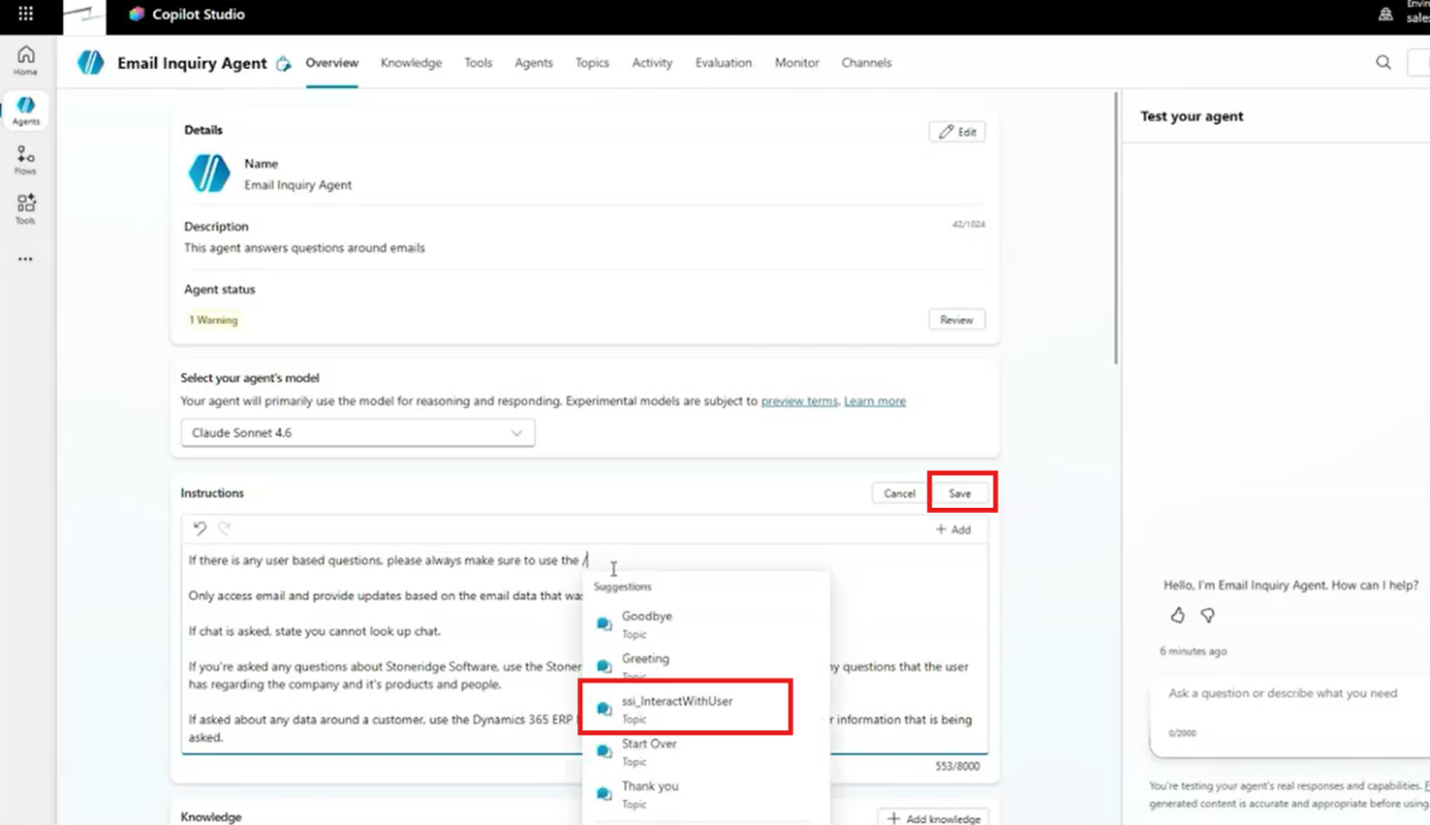
Step 5: Reference the Topic in Your Instructions
- Return to your agent's Overview tab.
- Open Instructions and select Edit.
- Add an instruction directing the agent to use your custom topic for user-related questions.
- Type a forward slash (/) to reference the topic directly.
- Select SSI Interact with User from the available options.
- Save your changes.
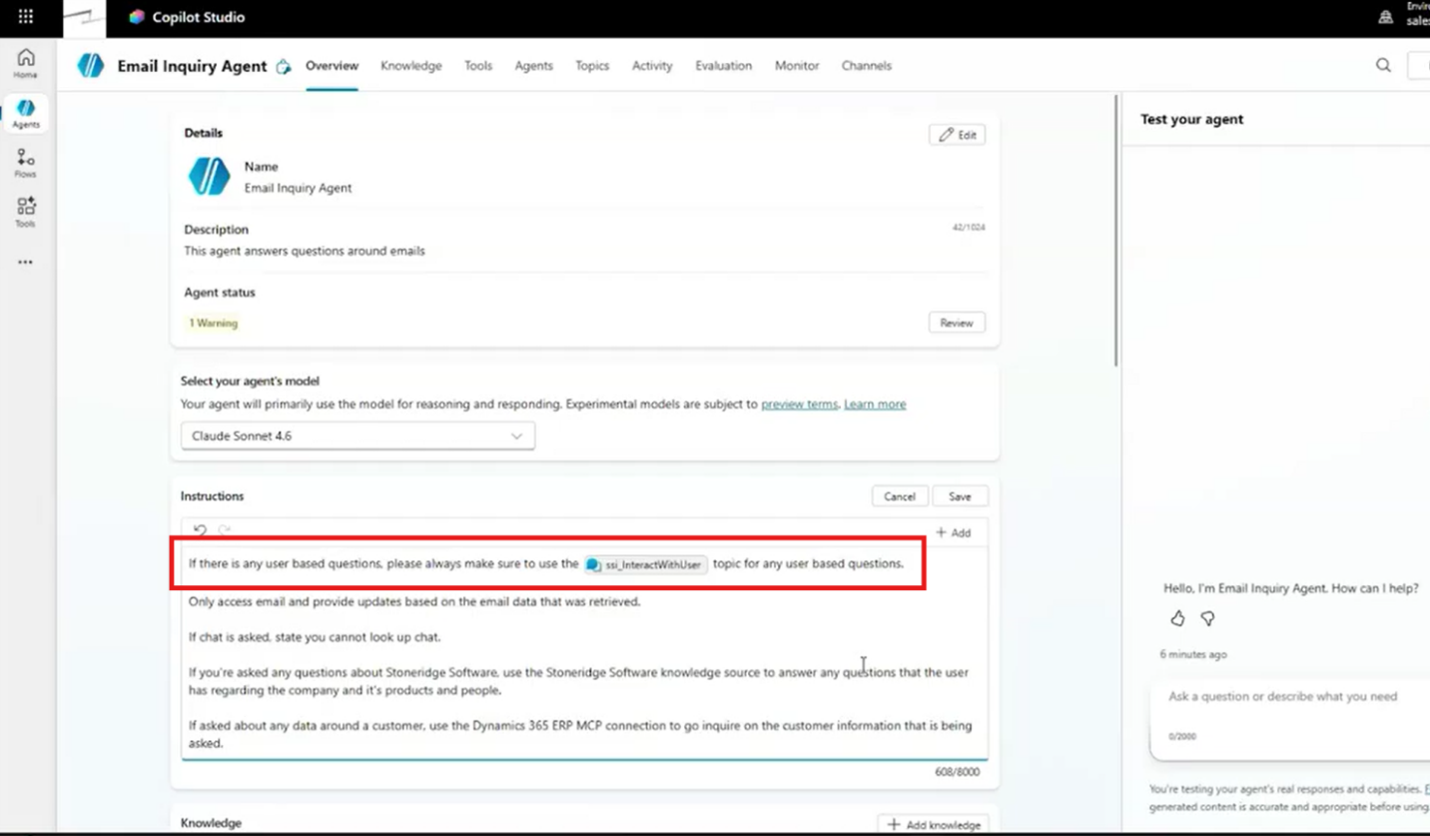
For example:
For any questions involving user information, always use the SSI Interact with User topic.
The forward slash is an important feature, as it allows you to reference configured topics, tools, and agents. You can direct your agent toward specific capabilities rather than relying exclusively on general descriptions.
How to Test Your Custom Topic
Now let's see whether our agent follows the conversation path we've created.
Step 6: Start a New Test Session
- Open the testing interface.
- Start a new test session.

- Enter: "Can you give me the user-based information that I need?"
- Submit the prompt.
- Observe how the agent processes the request.
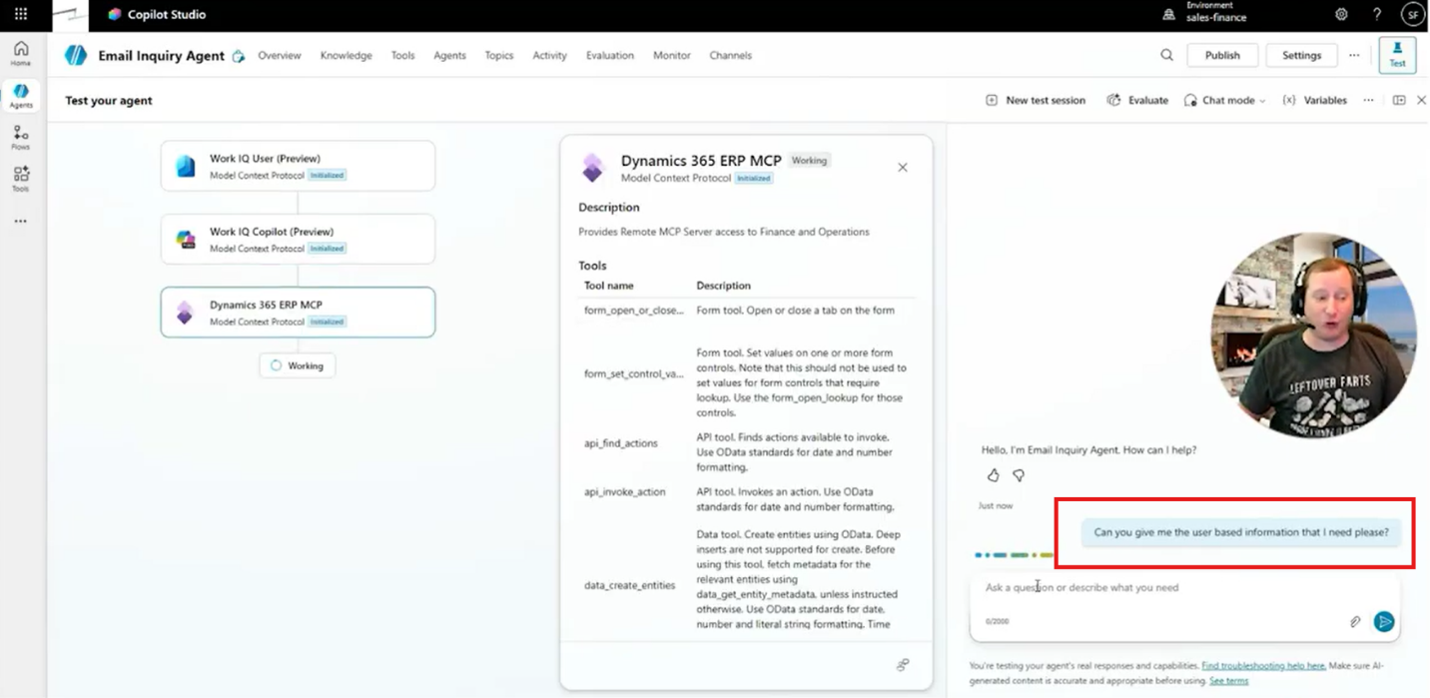
In the demonstration, the agent evaluates its available capabilities and activates the custom topic instead of retrieving information through Work IQ or Dynamics 365. This confirms that the instruction successfully directs the request to the intended conversation path.
That's exactly what we wanted.
Step 7: Follow and Review the Conversation Path
Once the topic is activated, the agent asks:
What additional details do you want?
Select User First Name.
The agent follows the corresponding condition and responds:
User first name selected.
This confirms that the topic is working as intended.
You can also inspect the interaction within the Copilot Studio development environment to see:
- Which topic was selected.
- Which conversation path was followed.
- Which variable was assigned.
- What message was returned.
This visibility is useful when troubleshooting more complex topics.
If your agent isn't following the expected path, you can examine the interaction and adjust your configuration.
The result is a more predictable experience for users and greater control over how your agent handles specific requests.
Knowledge Sources and Topics: Better Together
Although knowledge sources and topics serve different purposes, they complement each other as core components of Microsoft Copilot Studio.
Knowledge Sources provide the information your agent needs to answer questions.
Topics establish structured interactions that guide how particular requests are handled.
The key is to start with a specific business need and build the appropriate functionality around it.
As you continue exploring the platform, remember:
- Knowledge Sources provide relevant information. Connect websites, documents, and supported business information.
- Descriptions guide source selection. Clearly explain what each knowledge source contains.
- Topics introduce structure. Use them for interactions requiring questions, conditions, and defined conversation paths.
- Variables and conditions provide flexibility. They allow your agent to respond differently based on user selections.
- Instructions connect everything. Reference specific topics and capabilities when needed.
- Testing is essential. Review how your agent processes requests and refine its configuration.
You don't need to build a complex agent from the beginning. Start with a specific use case, connect the right information, and establish the structure needed to handle requests effectively.
Coming up in Part 4: We'll explore how to extend your agents using connectors, Power Automate flows, and Model Context Protocol (MCP) servers. We'll also demonstrate how to connect an agent directly to Dynamics 365 Finance and Operations to retrieve customer information.
Build Smarter AI Agents with Stoneridge Software
Your AI agents are only as effective as the information and guidance behind them. Whether you're connecting Copilot Studio to organizational knowledge sources, creating structured conversation paths, or developing agents that support your business processes, Stoneridge Software is the partner you can count on.
Our team can help you plan, build, implement, and optimize AI agents that connect employees with the information they need while supporting your organization's processes and goals. If you're ready to build smarter AI agents with Copilot Studio, contact our team today!

Under the terms of this license, you are authorized to share and redistribute the content across various mediums, subject to adherence to the specified conditions: you must provide proper attribution to Stoneridge as the original creator in a manner that does not imply their endorsement of your use, the material is to be utilized solely for non-commercial purposes, and alterations, modifications, or derivative works based on the original material are strictly prohibited.
Responsibility rests with the licensee to ensure that their use of the material does not violate any other rights.