Creating a Color Coded Calendar in SharePoint Online
To help support our Dynamics implementations for our customers, we create a SharePoint site for each customer so we can track all of the documents, requirements, team members, budgets/contracts, processes, project plan, etc. One of the most important things we do with this site is to track the project team's availability by using a calendar. We started using the default calendar, and that was working fine, but we always wanted a way to be able to show a difference between certain calendar events. For example, we want to differentiate between a holiday and a day off, so we'd like the holiday to show up with a different color on the calendar.
I started looking around for ways to do this and I messed around with a few code samples that never ultimately worked. I'm not a developer, so I can only go so far down that road before I run out of options. It turns out, there is a great way of accomplishing this that doesn't require any code, thanks to a feature called "Calendar Overlay" that's available in SharePoint 2010 and 2013. The overlay function was designed to allow you to see multiple calendars in one calendar view. If you set it up correctly, you can actually use it to color code categories in one calendar. Here's how you do it:
Using Calendar Overlay to Color Code Categories on a Calendar on SharePoint 2013/Online
- Use the "Add an app" function to create a Calendar application. For this example, mine is called "Team Calendar"
- Go to List Settings and click on the Category column. You're going to want to rename these categories to whatever you want to color code. I also recommend making it a required field otherwise the appointment may not show up on your overlay calendar.
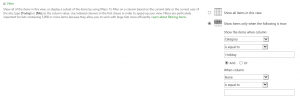
- Now that you have the Categories set up, you need to create separate view for each category. This is the part that isn't terribly obvious and took me a while to figure out. For example, one of my categories is called "Holiday", so I need to create a new view for my calendar that has a filter on the Category "Holiday"
- Once you have set up a view for category, you need to set up a new calendar view that will pull all your custom calendars together. I call this view "Overlay" and make it the default calendar view. You can accept the defaults when creating this calendar, but in the filter area, be sure to create a filter that's not going to happen. You don't want to have anything show up on this calendar by default because you are going to overlay the other calendars on top of it. If you don't create the filter, every calendar event will be duplicated. For example, I create a filter that only shows the calendar when "Location" equals Hawaii. .
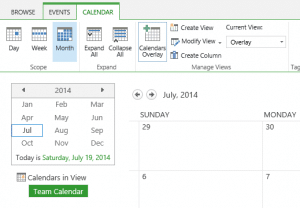
- Next you need to begin overlaying the calendars. To do this, go to your Overlay calendar view. Click on the Calendars Overlay button on the Calendar ribbon bar
- At this point, you'll be at the Calendar Overlay page, and you'll need to click on "New Calendar" at the top of the page. .
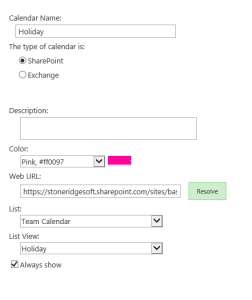
- On the Calendar Overlay Settings page, give the overlay a name (this is what the user will see on the side of the calendar view) and choose the color you'd like. On the Web URL, you'll need to click the "Resolve" button for the system to pull in calendars from this SharePoint site. Then choose a list of "Team Calendar" and a list view of "Holiday" so it overlays the Holiday calendar view on top of your Overlay calendar view.
- Follow this step for each of the calendar views until you have them all overlaying the overlay calendar.
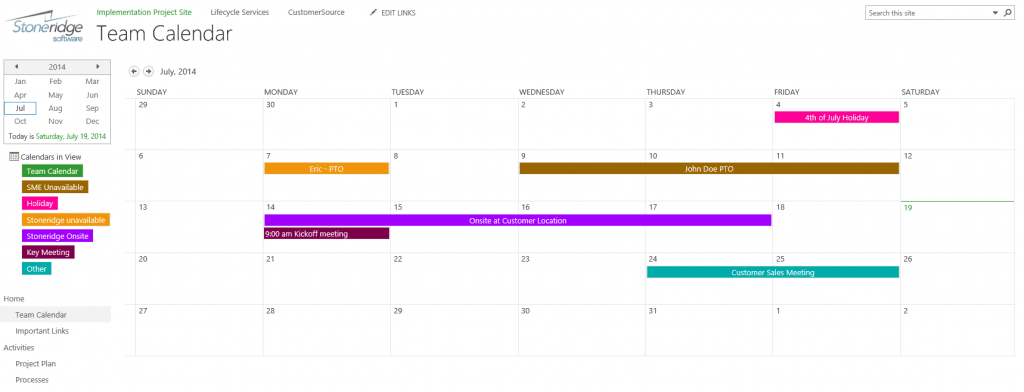
- The final result shows you the team calendar with all of the different colors for each category you selected.
This color-coded calendar has been a great addition to our SharePoint implementation site. There are lots of different ways you can use this feature - it's great that we can do this without any custom code. Good luck and let me know if you run into any challenges.
Under the terms of this license, you are authorized to share and redistribute the content across various mediums, subject to adherence to the specified conditions: you must provide proper attribution to Stoneridge as the original creator in a manner that does not imply their endorsement of your use, the material is to be utilized solely for non-commercial purposes, and alterations, modifications, or derivative works based on the original material are strictly prohibited.
Responsibility rests with the licensee to ensure that their use of the material does not violate any other rights.


