Dynamics 365 Business Central Contact Management Part 2: Contact Cards
In Part 1 of this Dynamics 365 Business Central Contact Management series, we explored Contacts. In Part 2, we'll cover The Contact Card. The Contact Card is a record that contains information specific to the Contact, such as communication details, Interactions, and Tasks. To view the Contact card from the Contact List, click on the value in the No. column of the Contact you wish to view.
Part 3 has been published as well and focuses on Marketing setup.
Users have the option to expand or collapse FastTabs within the card and to show more fields in a FastTab. To expand or collapse, select the title of the FastTab of the desired section. To show additional fields, select Show more. The application will remember the most recent configuration, and Contact cards will display accordingly until the next configuration change.
Editing the Contact Card
When a Contact card is opened from the list it will be defaulted to edit mode. To view a card in read-only mode, or to toggle between edit and read-only, select the pencil icon at the top of the screen.
In Edit mode, the editable fields in the Contact card will appear white, and data can be updated. Changes to fields are automatically saved when you move to another field. When the changes are complete, click the back arrow to exit out of the Contact record.
Contact Card Details
Type
There are two types of Contacts: Company and Person. The Type of Contact can determine many factors such as required fields, available segments, and data inheritance. Customers or Vendors can only have one associated Contact where Type = Company.
Company No.
This field is a lookup to the Contact List where Type = Company. On a Company Contact, the Company No. field is required and automatically equals the Contact No. On a Person Contact, the Company No. field is not required. However, the Company No. is how Person Contacts are linked to a Company Contact and, by extension, a Customer or Vendor.
Communication FastTab
For Company Contacts associated with Customers or Vendors, this data is kept in sync with the Customer/Vendor record. For Person Contacts, some of this data may be inherited from the Company Contact (depending on Marketing Setup) but can be changed.
Profile Questionnaire
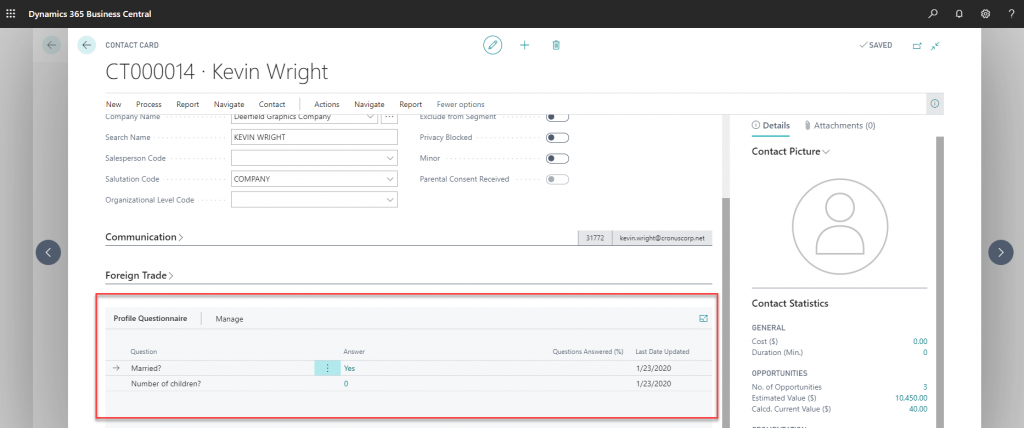
The Profile Questionnaire stores the Contact’s answers to a pre-defined set of questions. To populate answers, go to Navigate > Profiles.
If a Questionnaire Profile is setup for the Contact, questions will display.
Answer the questions using the checkboxes and close the page.
The results now display on the Contact card.
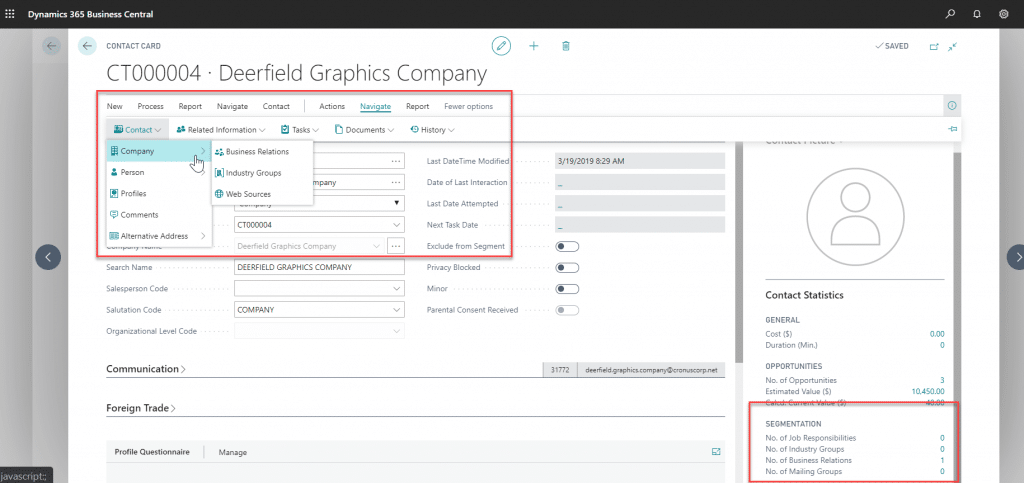
Segmentation
The Segmentation section is displayed in the panel on the right of the Contact card. The following fields are flow fields, meaning the user can drill down into them to view more details. The user can also navigate to these pages from the ribbon by going to More Options > Navigate > Contact > Company/Person.
- No. of Job Responsibilities
- No. of Industry Groups
- No. of Business Relations
- No. of Mailing Groups
Alternative Addresses
If the Contact has multiple addresses or a different address for specific times of the year, Alternative Address cards can be used to store the information. The Alternative Address card is used to capture the address details, while the Date Ranges page can be used in conjunction to control when the alternative address(es) should be used.
Interactions
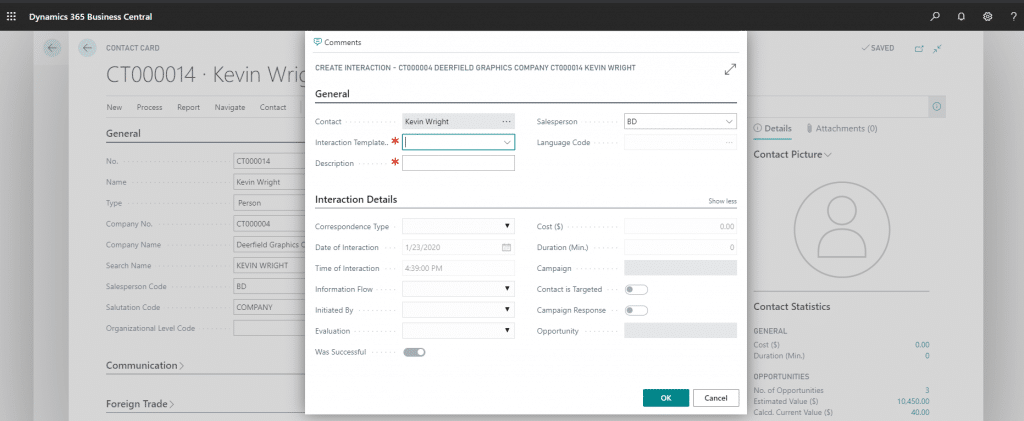
The user can create an Interaction to record different types of interactions with the Contact, such as emails or meetings. To create an Interaction from the Contact card, navigate to New > Create Interaction.
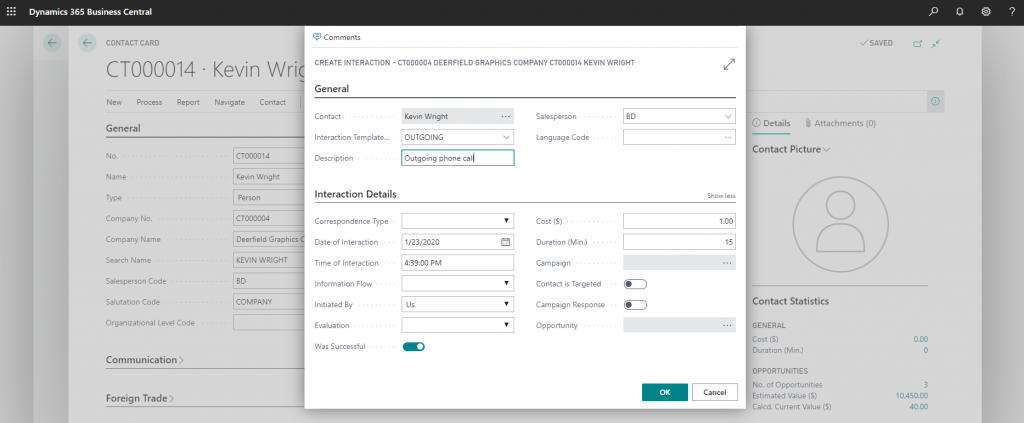
On the new Interaction page, some data will default from the Contact record. Populate the necessary details and select OK to record the interaction.
View all past Interaction entries for a Contact by going to More Options > Navigate > History > Interaction Log Entries.
Tasks
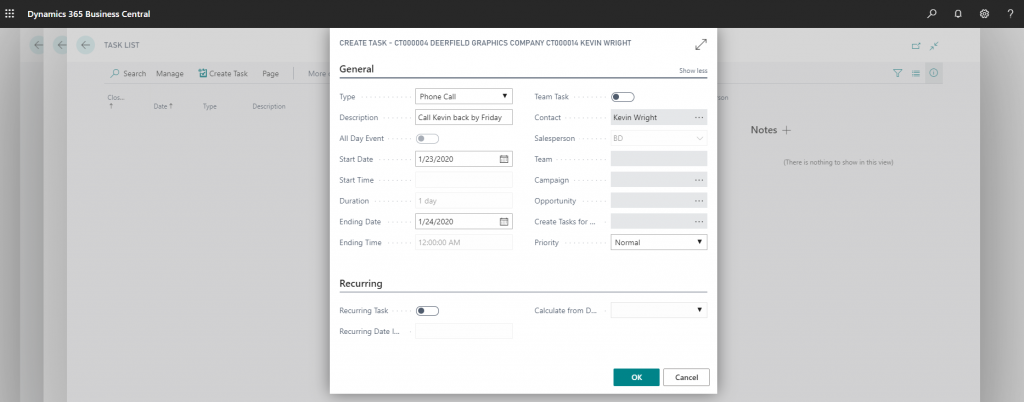
Tasks can be used to keep track of to-dos or follow-up items related to a Contact. To create a Task or view existing ones, navigate to Task List from the ribbon on the Contact card. Select Create Task to open a new Task page.
Enter the relevant information and select OK to save the Task.
All Tasks are available from the Task List. Select Manage to open, update, or complete a Task.
Questions?
Please reach out to our team of experts if you need help with this or other solutions.
Under the terms of this license, you are authorized to share and redistribute the content across various mediums, subject to adherence to the specified conditions: you must provide proper attribution to Stoneridge as the original creator in a manner that does not imply their endorsement of your use, the material is to be utilized solely for non-commercial purposes, and alterations, modifications, or derivative works based on the original material are strictly prohibited.
Responsibility rests with the licensee to ensure that their use of the material does not violate any other rights.


