Setting up Email Functionality in Dynamics GP
Email functionality for documents such as Quotes, Sales Orders, Invoices, and Purchase Orders is available throughout Dynamics GP and can also extend out to everyday reports such as Trial Balances as well. It uses Word Templates by default, so you will need to ensure those are enabled and created before you start.
This article is in follow-up to the April 2019 article regarding creating Word Templates for use with Dynamics GP.
There are a few tricks to getting everything working and the following outlines requirements and setup steps.
Setup a generic return address account
Rather than having responses from Emails go to your direct Email address, set up a generic Email address in order to have responses go to an address that is monitored by more than one person. This could be something such as ‘receivables@yourcompany.ca’.
Enable Email functionality in Dynamics GP
You will need to set up Email document options and enable Email for the documents we wish to send:
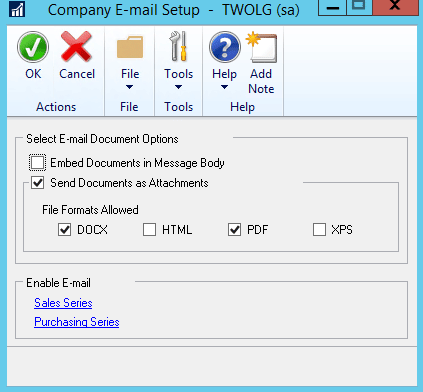
i. Go to: Administration > Setup > Company > Email Settings
ii. Click the checkbox to send documents as attachments and allow the desired file format you wish to use when sending reports by Email. We recommend allowing ‘PDF’ as this type is more secure and most recipients will be able to open a pdf, whereas some may not have access to open a ‘DOCX’ file.
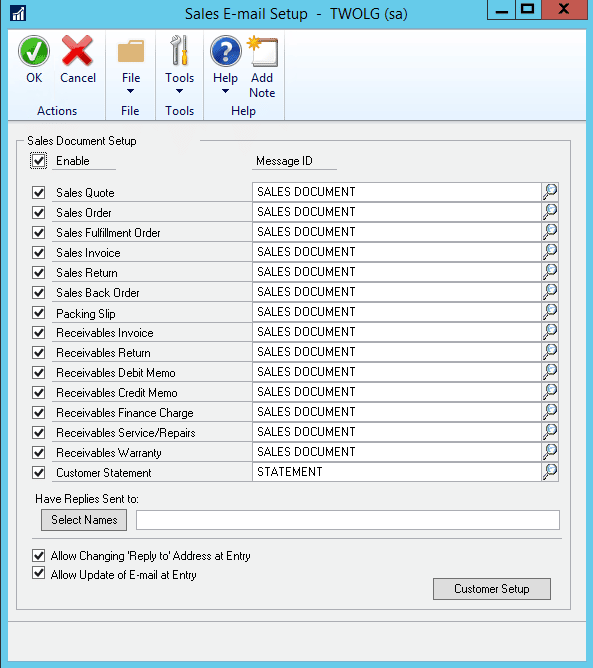
iii. From the ‘Enable Email’ box, select the option to enable Email for the ‘Sales Series’ and/or the ‘Purchasing Series’. Depending on the templates enabled, you will see documents available to enable Email. Use the checkboxes to select which documents you wish to send and the message template (See Step #2) that you wish to use.
You will also need to setup Email messages to accompany the documents for customers and/or vendors:
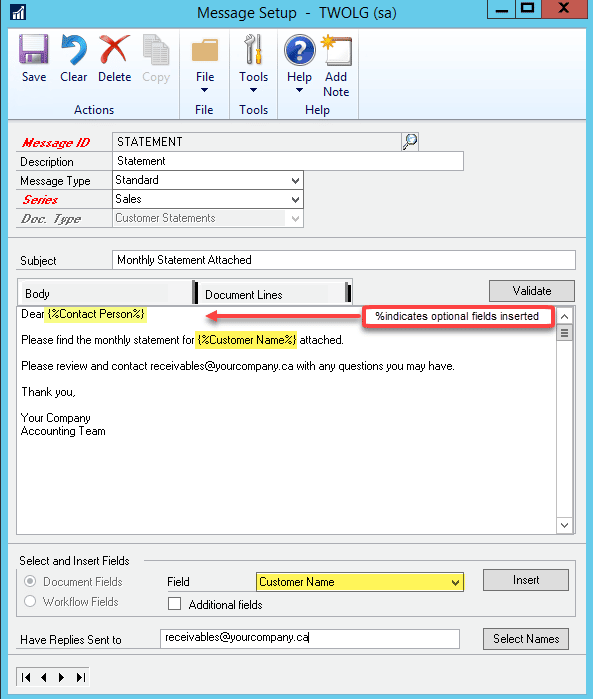
i. Go to: Administration > Setup > Email Message Setup
ii. Enter a Message ID for your message, select the appropriate series (e.g. Sales, Purchasing), and choose the appropriate document type.
iii. Enter a subject and body for your message as desired. There are optional fields available to include, but not everything is available for every document type. If using fields, ensure you click the ‘Validate’ button to ensure the message is valid for use with the document type selected.
iv. The Email message is not based strictly on the document type. You may choose which message to use for your individual customers/vendors.
v. Currently, only text is supported in Email messages so you will likely want to include contact information in the message. Signature lines will not appear.
Ensure Customers/Vendors are Setup for Email
Before you can enable the customer/vendor for Email, you will need to confirm that their account is setup with the appropriate Email address assigned:
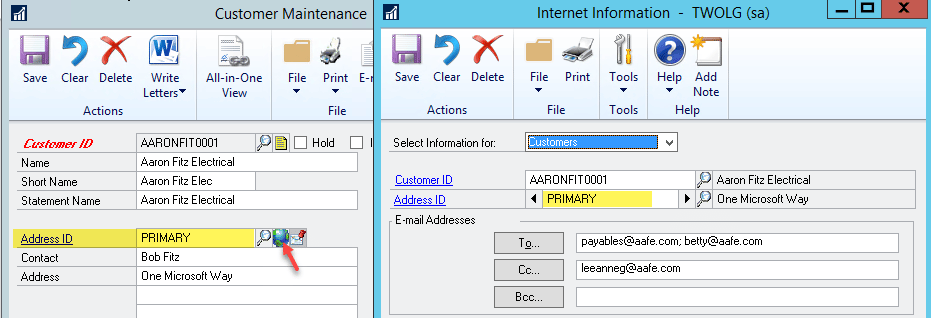
a. The key point to remember is that a customer or vendor may have multiple addresses depending on location or business function. So you will want to ensure that you have the correct Email address associated with the proper address depending on the document being sent.
b. You can drill to the proper address from the customer/vendor card, then select the ‘Internet Addresses’ icon (looks like a globe). Enter the Email address(es) in the ‘To…’, ‘Cc…’, or ‘Bcc…’ fields. Use a semi-colon to separate multiple addresses, if necessary.
c. Once you’ve enabled the templates for Email, they should appear visible in the Customer Email Options or Vendor Email Options windows.
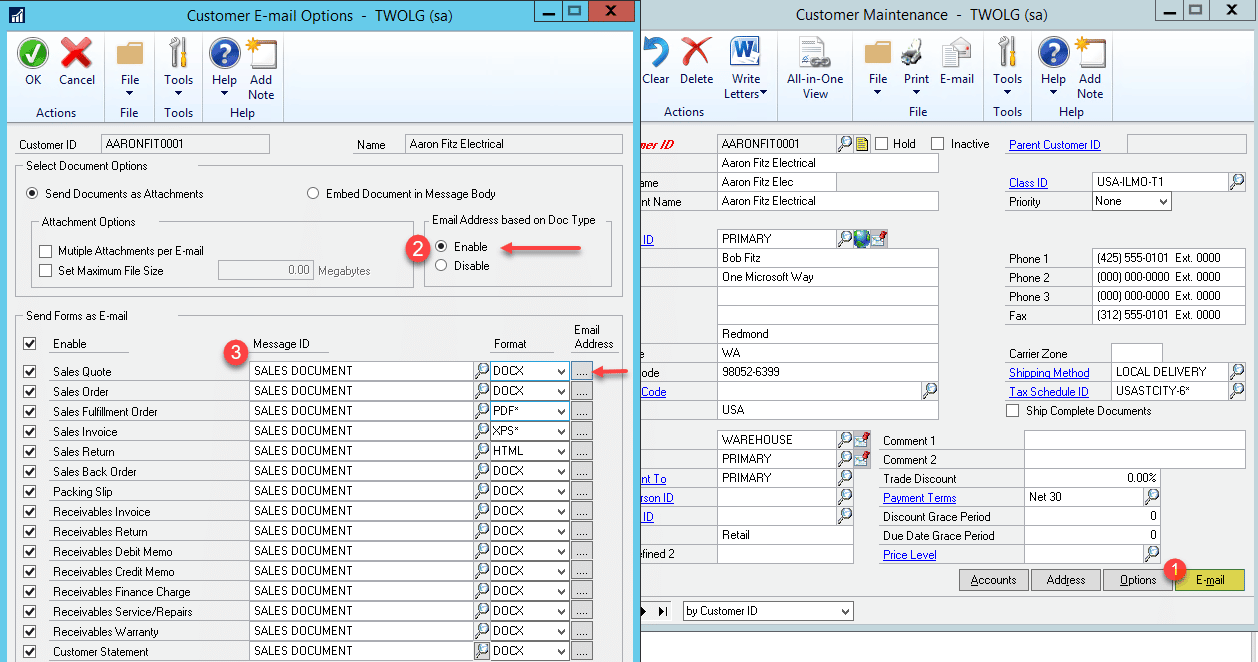
d. From the customer or vendor card, simply click the ‘Email (1)’ button to open these windows.
e. Mark the checkbox next to the documents you wish to send via Email and select the desired Email Message ID you wish to use. You may also select the desired format based on the Company Email Settings marked as available.
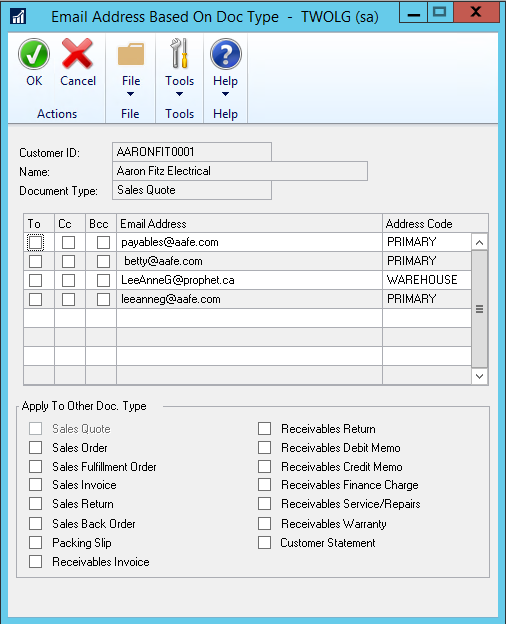
f. One of the new features added in GP 2013 R2 and up is the ability to send documents to different Email addresses based on the document type.
g. In the Customer Email Options window or the Vendor Email Options window, mark the radio button to enable ‘Email Address based on Doc Type (2)’.
h. When this is marked you will see an ellipsis next to the document where you can specify a different Email address specifically for that document. (3)
Emailing Documents
Now that the setup is complete and you want to actually Email the documents from Dynamics GP.
a) First you want to ensure that your Email is open before you try to send any documents.
b) For most things, you can send the documents directly from the transaction entry window as long as the customer/vendor is enabled for Email and the document type.
c) In the transaction entry windows, you’re able to open the ‘Email Detail Entry’ window by clicking the icon that resembles an open envelope with a pencil next to the customer/vendor ID field.
d) It allows you to change the Email address of the recipient and the Email message that is being used for that document.
Batch Emailing/Printing Documents
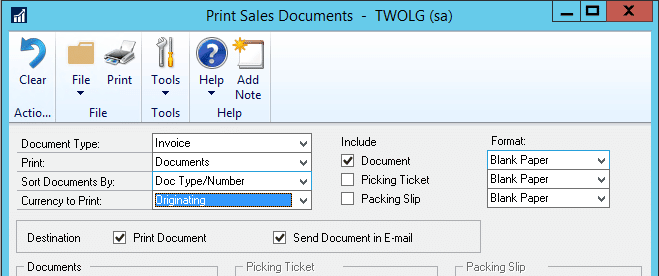
Go to: Sales>Transactions>Print Sales Documents
The print options that are available depending on the document you are printing or sending in an e-mail.
Print Remaining Documents is available in GP 2013 R2 and up. If you have marked to print and send sales documents in an email at the same time, the documents that are set up to be sent an email will be sent an email while the documents that cannot be sent in the email will be printed.
Questions?
If you would like to learn more about setting up Email Functionality in Dynamics GP reach out to the GP support team.
Under the terms of this license, you are authorized to share and redistribute the content across various mediums, subject to adherence to the specified conditions: you must provide proper attribution to Stoneridge as the original creator in a manner that does not imply their endorsement of your use, the material is to be utilized solely for non-commercial purposes, and alterations, modifications, or derivative works based on the original material are strictly prohibited.
Responsibility rests with the licensee to ensure that their use of the material does not violate any other rights.

