


Expedite Security Role Testing Assignments After a Code Move in Dynamics AX
It is common throughout an ERP migration for the need to perform many code promotions and environment refreshes to a TEST or UAT system for eventual installation to Production. Not only is testing being performed on code, data, and functionality, but security roles and settings may also require validation. This can introduce a level of complexity in your testing scenarios because the users testing the roles may not necessarily “live” them or be representative of what they have in Production. Therefore, manual IT administration is needed after each data refresh to reassign users into their needed testing roles, as they will inherently match the system the data originated from. This can be especially problematic and time consuming if there are large numbers of people testing security roles.
There is a shortcut to addressing this however and it involves setting up your desired “testing” security role assignments in one environment, exporting them, and further importing them into the target environment. The following steps can be taken to accomplish this.
How to set up security role assignments, export, and import for testing in Dynamics AX:
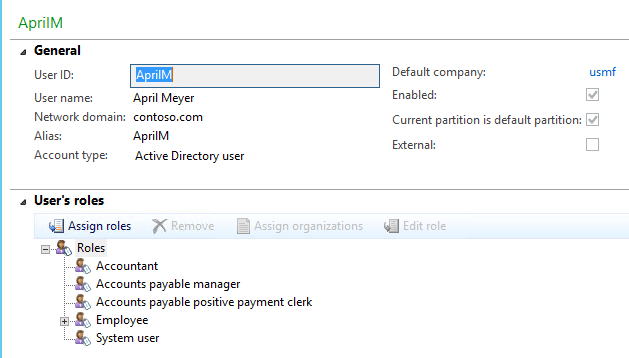
In our scenario, April Meyer is an accounts payable manager at Contoso Ltd. She is working on testing the security roles for her employees, one of which includes the accounts payable clerk role. In Production, the source of the data refresh, her security role assignments are as follows:
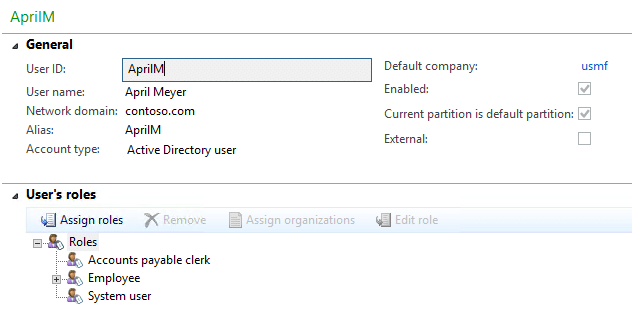
In TEST, where the security role testing will occur, she needs to have the following security role assignments in order to test and validate functionality:
Set up security role assignment
The first step is to set up the desired security role assignment. This should ideally be performed in an environment that closely resembles the target, such as a development system that was copied from production. In our scenario, we are going to be performing the desired assignments in our TEST environment.
- Navigate to System Administration > Common > Users > Users
- Create your desired security role assignments for each user that will be affected.
- Navigate to System Administration > Common > Data export/import > Definition groups
- Click the New button to create a new definition group.
- Enter in the name “SecRoles” for the Definition group name, and a description of your liking.
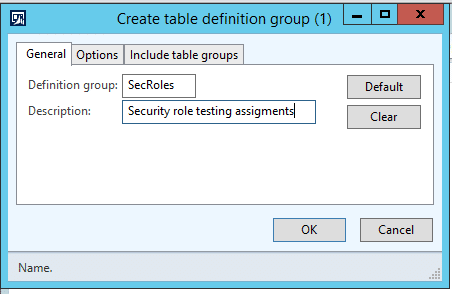
- Click the Clear button to remove any current saved parameters, and then click OK.
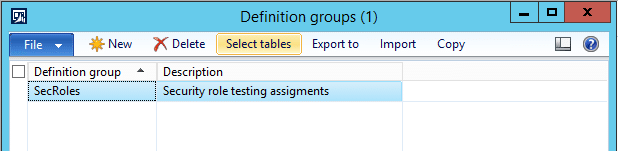
- The new definition group is now listed. Click the Select tables button.
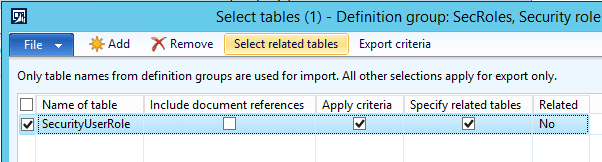
- In the Name of table column, find and add the SecurityUserRole Check the box marked Apply criteria and Specify related tables on the row.
- Click the Select related tables button:
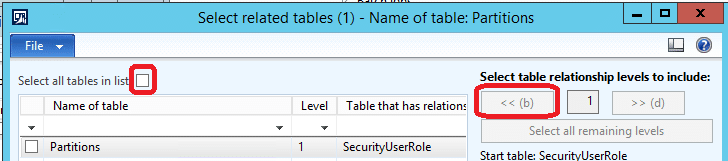
- The Select related tables form will appear. Uncheck the Select all tables in list checkbox and under the Select table relationship levels to include: section, click the < < (b) button until the level reaches 1:
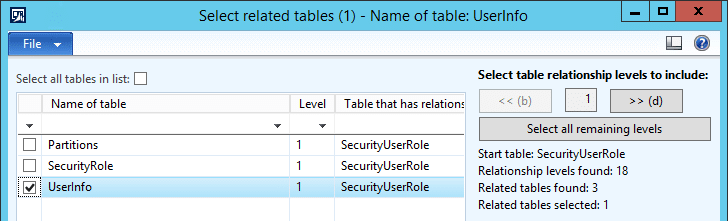
- You should now have a listing of three tables. Click the checkbox next to the UserInfo table and click Close.
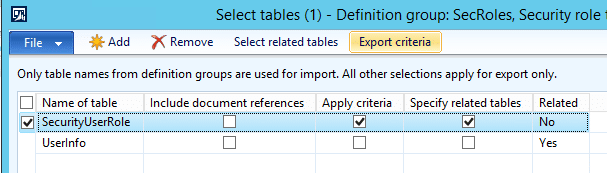
- With the SecurityUserRole row selected, click the Export criteria button:
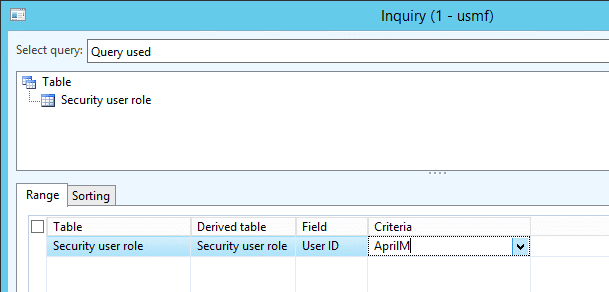
- We are now going to create a query in which we select which users to export. This can be one user, or many users. In our scenario, we will click the Add button to create a new query, choose the Security user role table, with the field User ID, and the criteria of our AprilM user. If you have multiple users that you want to export, you can do so by comma-separating the users. Click OK when done.
- Click Close
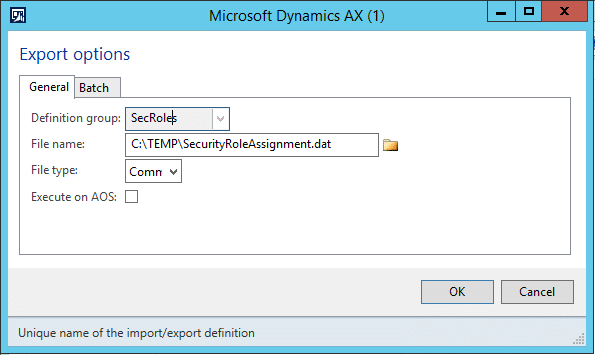
- Now it is time to export our user role assignments. Click the Export to Select a save location, and change the File type to Comma, and click OK.
Export user role assignments
- Click OK if prompted to export or import-related tables.
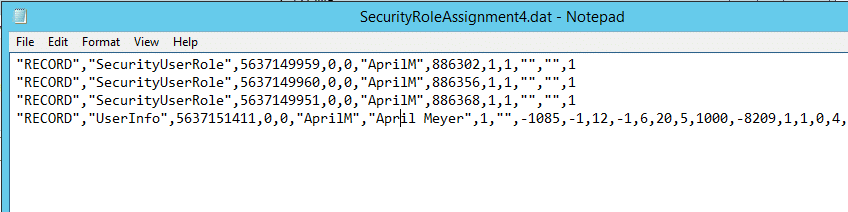
- You’ll now find there is a .dat and a.def file created at the path you specified earlier. If you open the .dat file, you’ll find a listing of all users within AX and their associated security role mappings that we defined in our query.
Moving into TEST
Next, we’re now assuming that our TEST environment has been refreshed from Production and we need to update the security assignments for our testing users.
- In the TEST Dynamics AX environment, navigate to System Administration > Common > Data export/import > Import
- Browse and find the .dat file we created earlier
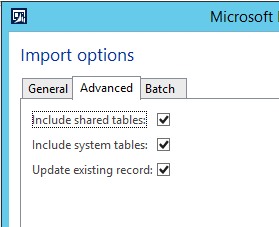
- Click on the Advanced
- Check all three check boxes
- Click OK. The import process will begin.
- When prompted with a dialog regarding selecting which tables to delete before import, check the box next to Security user role, and click OK.
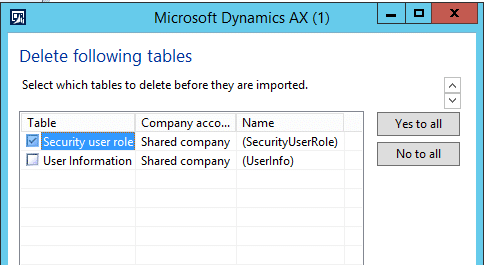
- Click Yes to continue.
- Click Yes when prompted to update existing data.
- Dynamics AX will now assign the security roles based on the file we created earlier and an Infolog will be presented when the import is complete. You can verify by opening the user options for the account to what the intended role is.


Under the terms of this license, you are authorized to share and redistribute the content across various mediums, subject to adherence to the specified conditions: you must provide proper attribution to Stoneridge as the original creator in a manner that does not imply their endorsement of your use, the material is to be utilized solely for non-commercial purposes, and alterations, modifications, or derivative works based on the original material are strictly prohibited.
Responsibility rests with the licensee to ensure that their use of the material does not violate any other rights.