


Guide to Advanced Budgeting in D365 Finance: Processing a Budget
This is part 2 of the two-part series on Advanced Budgeting in D365 Finance. In part 1, we went through all the setups and configurations in Dynamics 365 Finance which need to happen prior to gathering and processing a budget – Advanced Budgeting – Part 1.
Part 2 of Advanced Budgeting in D365 Finance will concentrate on the processing of the budget from creation through approval. As in Part 1, this will included workflows and additional options.
This discussion will include the following:
- Changes to the workflow.
- Create the budget and sublevels.
- Adding LY numbers, current budget, and export to excel.
- Adding new budget numbers and importing them back into D365.
- Optionally add budgets to the master budget.
- Approval of the budget and adding to register entries.
- If space, how it can be pulled/viewed on financial reports.
Changes to the Workflow
In D365 F&O, there are some out-of-the-box workflows that can be visible if the sample companies (Contoso) are utilized. The workflows I used are the ‘Opex budget top level’ and ‘Opex budget departments’ workflows. I went into each and added my user as an approver/processor where applicable. I then saved and activated the new versions. I also made myself manager of the operating units when I added those.
Budget and Sublevels
- Now we can get to the ‘fun’ part of the document. To start, we need to create the master budget.
- First, we go to Budgeting > Budget plans. Click New. The form below will open. Select the Budget planning process you created and fill in a Budget plan name. I would recommend starting the name with the year and an addendum such as the budget. Other fields should auto-fill in such as Responsibility center, Budget plan preparer, and Currency. Those would fill in all the required fields. There is no parent in this scenario because we are creating the parent. User groups and plan priority are optional fields.
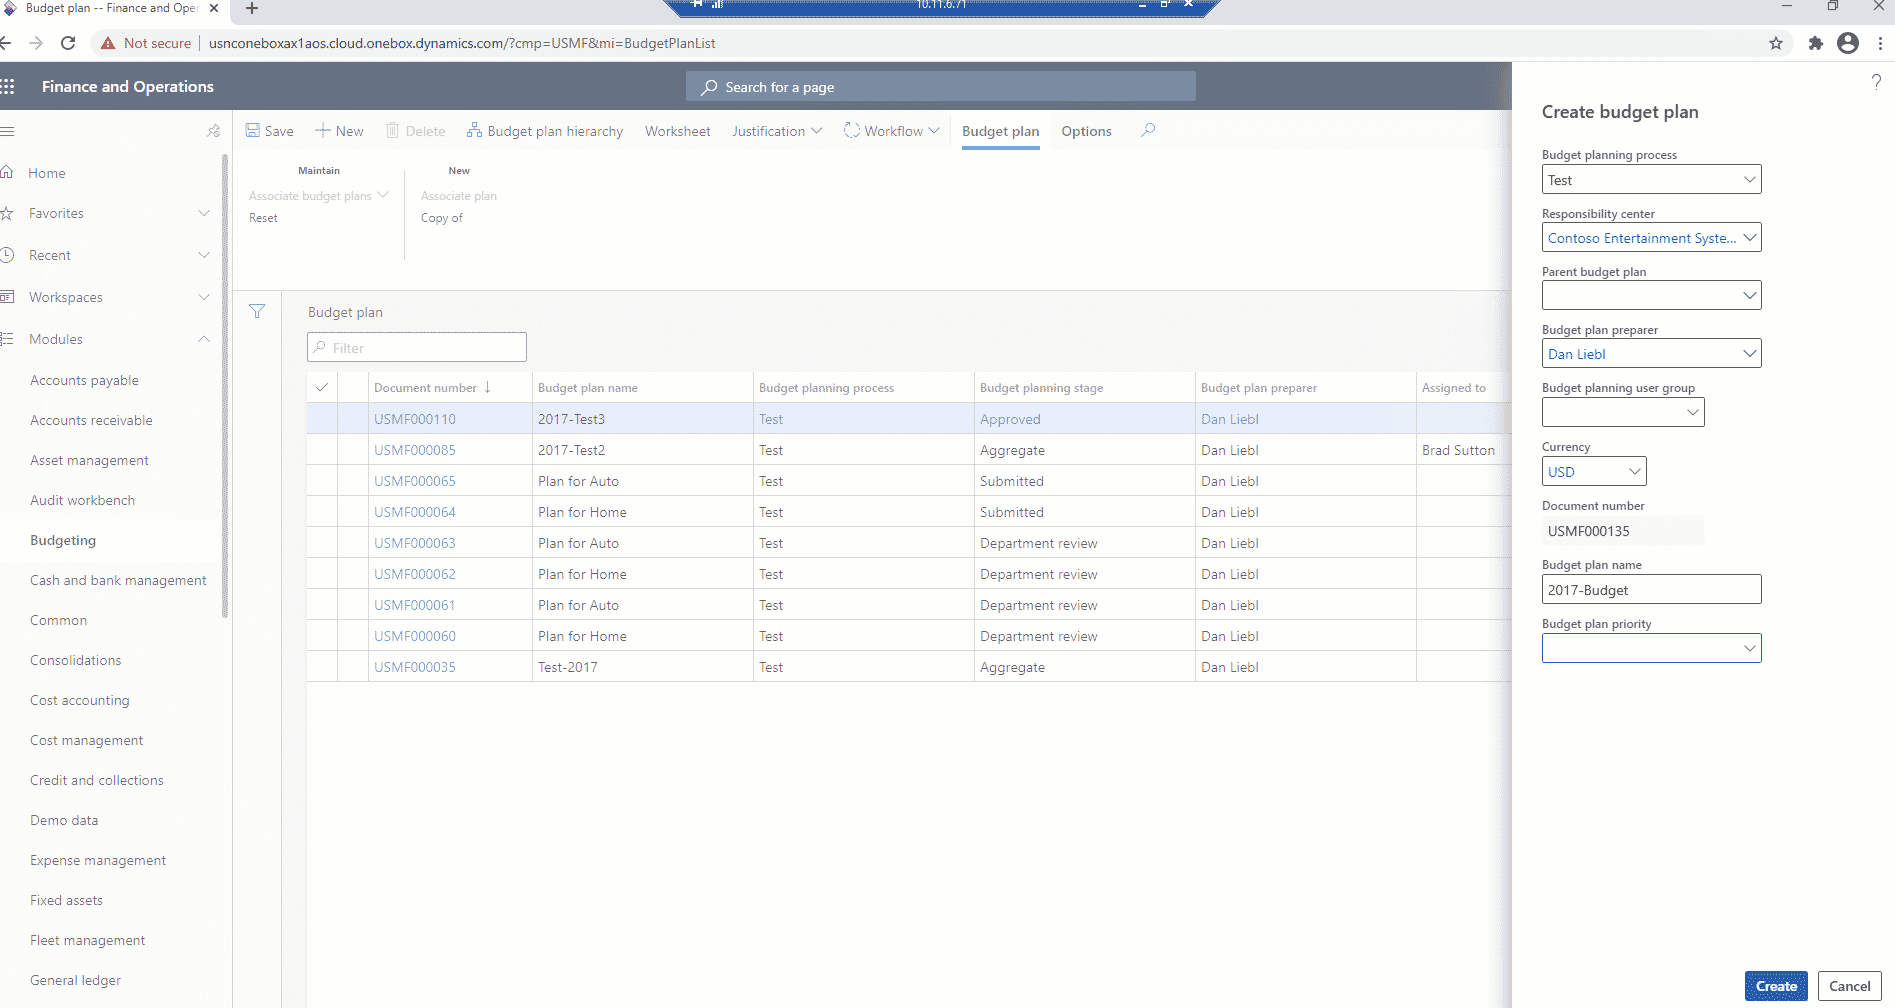
At this point, click the create button. It will open the budget plan form. Close the form.
- You are now back on the Budget plan list page. Try to click refresh to view the new plan, but you may need to close the Budget plan list page and reopen it as it sometimes does not refresh well. The budget should be at the first planning stage you created in setups. With the new budget highlighted, navigate to the Workflow button, and submit the workflow.
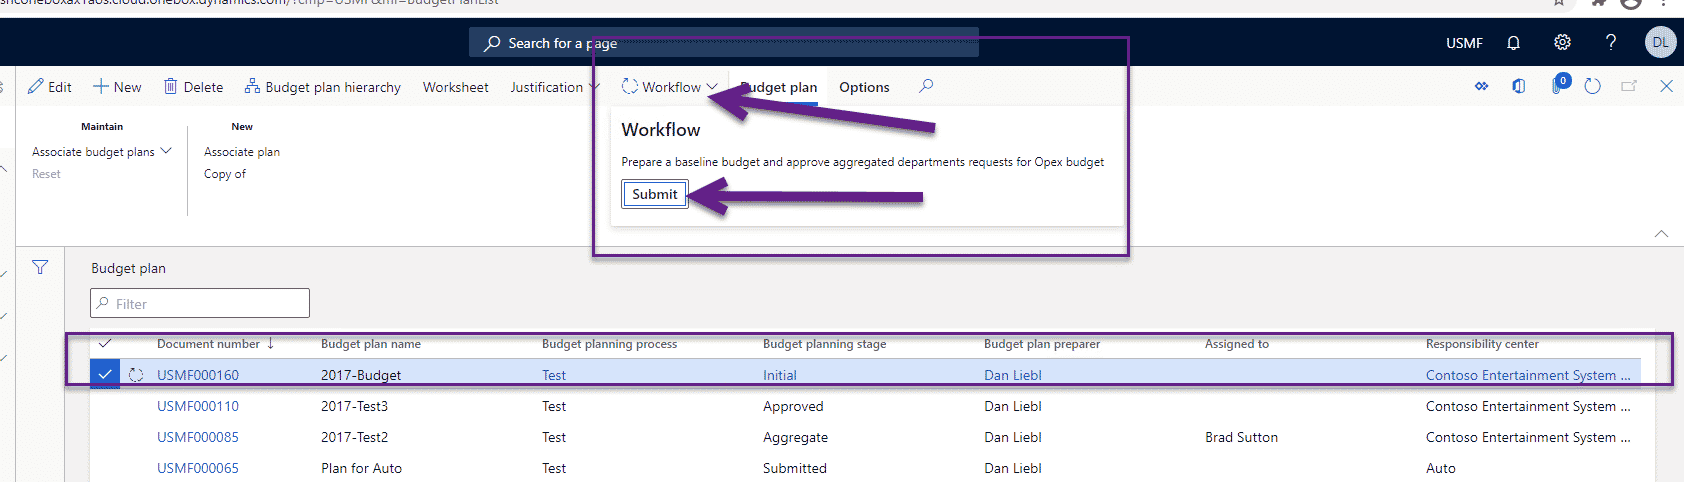
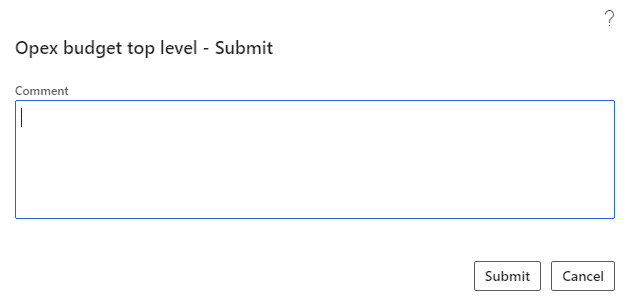
There is an option to enter in a comment, but it is optional. Click the Submit button.
At this point, the system will create all the sub plans which were defined in the organization hierarchy.
LY Numbers
Now that we have our plan and subplans, we need to add some numbers for the end-users to use as a guide to creating the new budget. Below, I will walk through the steps to do for each subplan. In our example, we are going to populate them with LY actuals and the current budget for each month of the budget year. There will be a blank 12 months for filling in the new budget. *With the utilization of workflows, there is a way to bring the numbers into the plan and have the workflows distribute the numbers to the subplans. This requires thorough testing around the workflows, the workflow stages, allocation stages and stage allocations.
- The steps mentioned here need to be completed with each subplan. Start with the first subplan by opening the subplan. I will be doing my Home business unit (001). From the blank plan page, navigate to the Budget plan lines fast tab and click Add from:
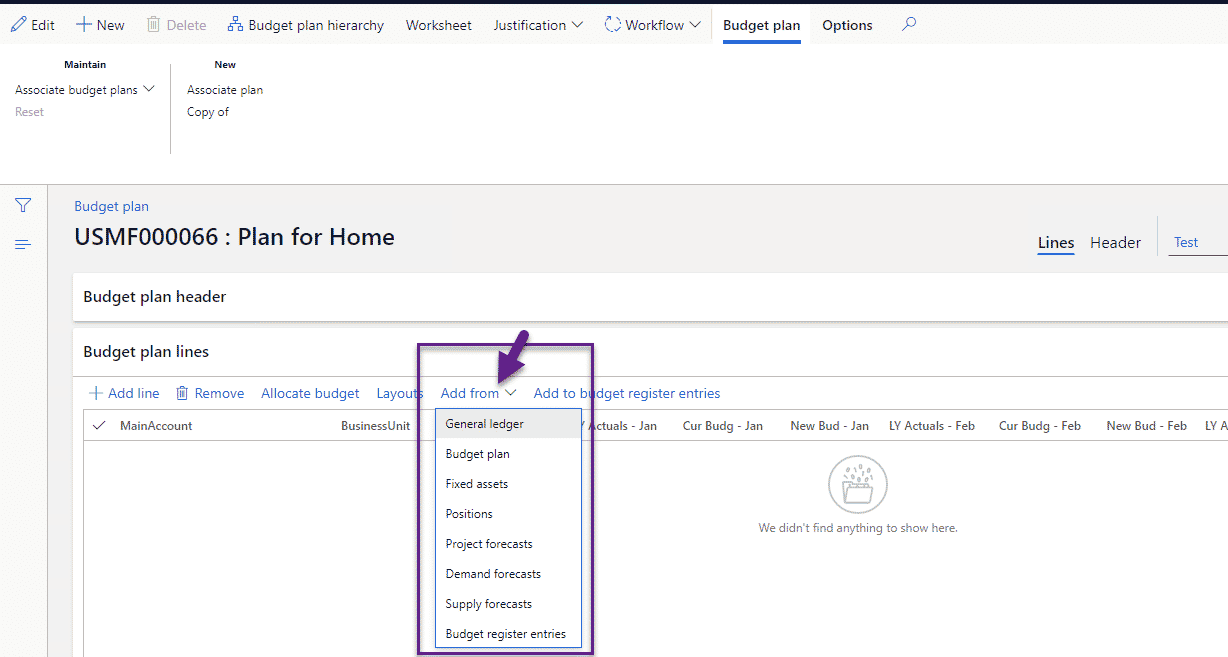
2. Determine which numbers you will do first. I will start with LY numbers. The selection to achieve this would-be General ledger. This opens the form below. Below the form, I have numbered the comments on the specific fields.
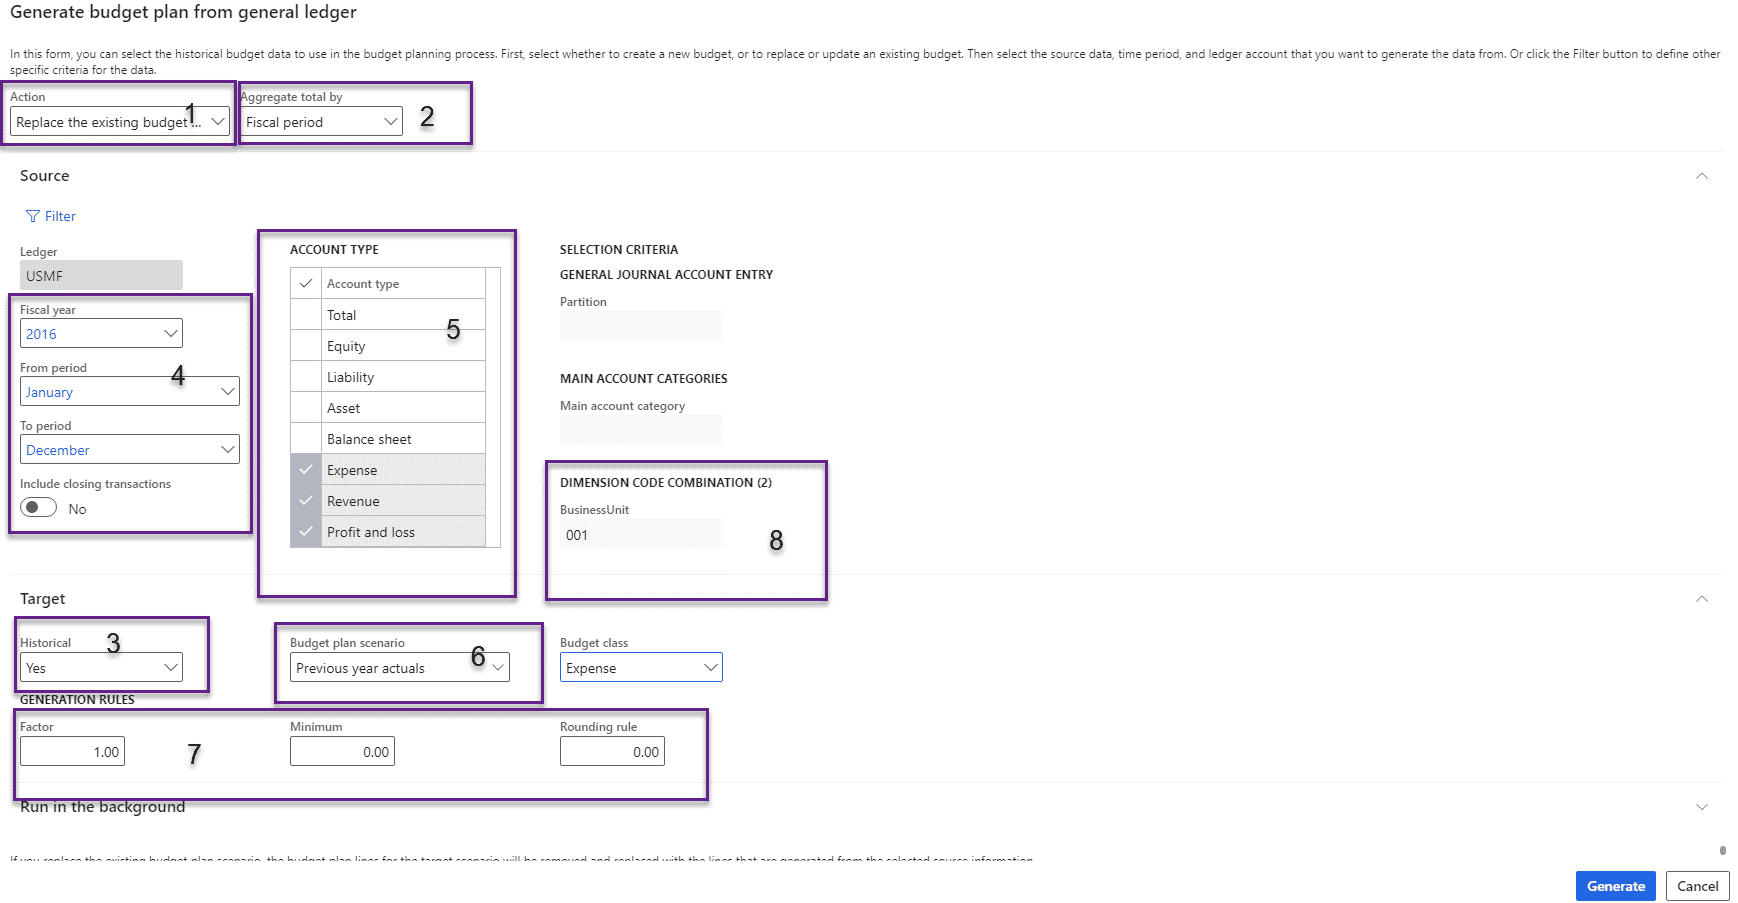
- The Action selection will default to ‘Replace the existing…’. When adding a new set of numbers, this is the preferred setting. It is good to get into the habit of checking this field each time as there are going to be other times when this will need to state ‘Update the existing budget…’.
- The Aggregate total should always state “Fiscal period”. If doing monthly periods, this will always be the Fiscal period. If doing annual numbers, it would be the Fiscal year.
- Target > The Historical setting coincides with the setting of Aggregate total by, justifying putting as the third item. When it is ‘Fiscal period’, it should always be ‘Yes’. For a fiscal year it would be No.
- Source > The Fiscal Year will represent the last full historical year. For a 2022 budget, it would be 2020 as budget planning is likely sometime in 2021. The From period and To period represent the range of periods. It looks at your fiscal year set up so if unchanged, it will state Period 1 to Period 12. If they were renamed to months, it will state January to December, assuming a calendar year.
- Source > The Account type needs is marked to show which accounts will be pulled in. If like in our example, you are only budgeting Profit/Loss accounts, it would be the Expense, Revenue, and Profit and loss selections.
- Target > The Budget plan scenario is the destination bucket you are targeting for the numbers. The drop-down gives a list of the plan scenarios from part 1 setups. In our example, it is called “Previous year actuals”.
- Target > The Generation rules allow some rules to alter the incoming numbers. A factor can be added, however, with actuals, this should always be 1.00. The others could be used as they are for rounding (nearest 1, 10, 100, etc..) or minimum numbers (disregard all numbers lower than X).
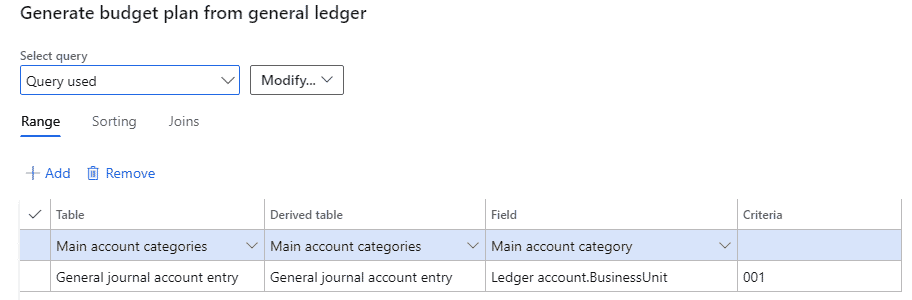
- Dimension code allows to filter by a financial dimension(s). Click on the Filter hyperlink in the Source fast tab to access. Add a row to the filter screen to add the field. They will be in an account entry derived table such as below. The format is always ledger account.FinancialDimensionName. Sometimes it will begin with the Main account…. Fill in your filtered dimension (in my case 001 for Home) and click Ok.

Once you have verified all the settings from above, click the Generate button. These are stored in usage data so will default in as you last did them to speed things along for other subplans. Just always double-check the Action setting (#1). Depending on the number of accounts and data, this could take a few minutes to process. You will get a message when it is done, but you may need to close the form and reopen it to view. I generally proceed to the next import.
Current Budget
With LY numbers now in, the next step is to bring in the current budget. That is done in much the same way. You can pull in the current budget one of two ways. One is by linking a previous budget plan and two is by finding the register entry. In this example, we will use the budget plan method. Going back to #1, use the Add from the drop-down and select a Budget plan. It will open the following form.
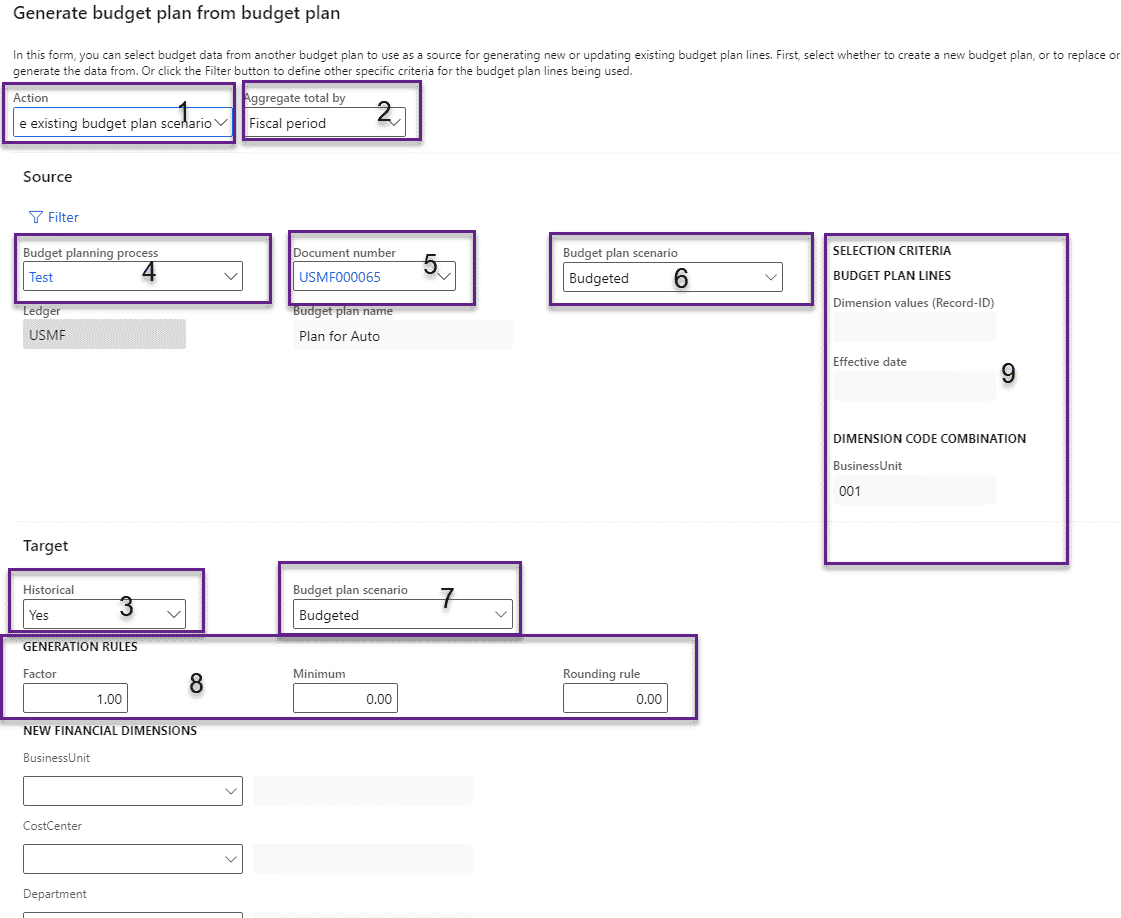
- The Action selection will default to ‘Replace the existing…’. When adding a new set of numbers, this is the preferred setting. It is good to get into the habit of checking this field each time as there are going to be other times when this will need to state ‘Update the existing budget…’.
- The Aggregate total should always state “Fiscal period”. If doing monthly periods, this will always be the Fiscal period. If doing annual numbers, it would be the Fiscal year.
- Target > The Historical setting coincides with the setting of Aggregate total by, justifying putting as the third item. When it is ‘Fiscal period’, it should always be ‘Yes’.
- Source > The Budget planning process field should be filled in with the one used to create the budget from which you are pulling numbers. Use the drop-down to select it. This would typically be the current year budget so likely some form of 2016-BPP (in the example we are creating a 2017 budget). In my example, it is Test.
- Source > The Document number field needs to be populated with the subplan budget plan number. You will need to look this up prior to starting the import. There is a dropdown with the list of all plans. You can also use this list to select from.
- Source > The Budget plan scenario is the source bucket you are using to pull numbers. In the example, we are using Budgeted. The drop-down gives a list of the plan scenarios from part 1 setups.
- Target > The Budget plan scenario is the destination bucket you are targeting for the numbers. In the example, we are using Budgeted. The drop-down gives a list of the plan scenarios from part 1 setups.
- Target > The Generation rules allow some rules to alter the incoming numbers. A factor can be added, however, with the current budget, this should always be 1.00. The others could be used as they are for rounding (nearest 1, 10, 100, etc..) or minimum numbers (disregard all numbers lower than X).
- Dimension code allows you to filter by a financial dimension(s). Click on the Filter hyperlink in the Source fast tab to access. Add a row to the filter screen to add the field. They will be in an account entry derived table such as below. The format is always ledger account.FinancialDimensionName. Sometimes it will begin with the Main account…. Fill in your filtered dimension (in my case 001 for Home) and click Ok.
Once you have verified all the settings from above, click the Generate button. These are stored in usage data per source so will default in as you last did them to speed things along for other subplans. Just always double-check the Action setting (#1). Depending on the number of accounts and data, this could take a few minutes to process. You will get a message when it is done, but you may need to close the form and reopen it to view. I generally proceed to the next import.
Exporting to Excel
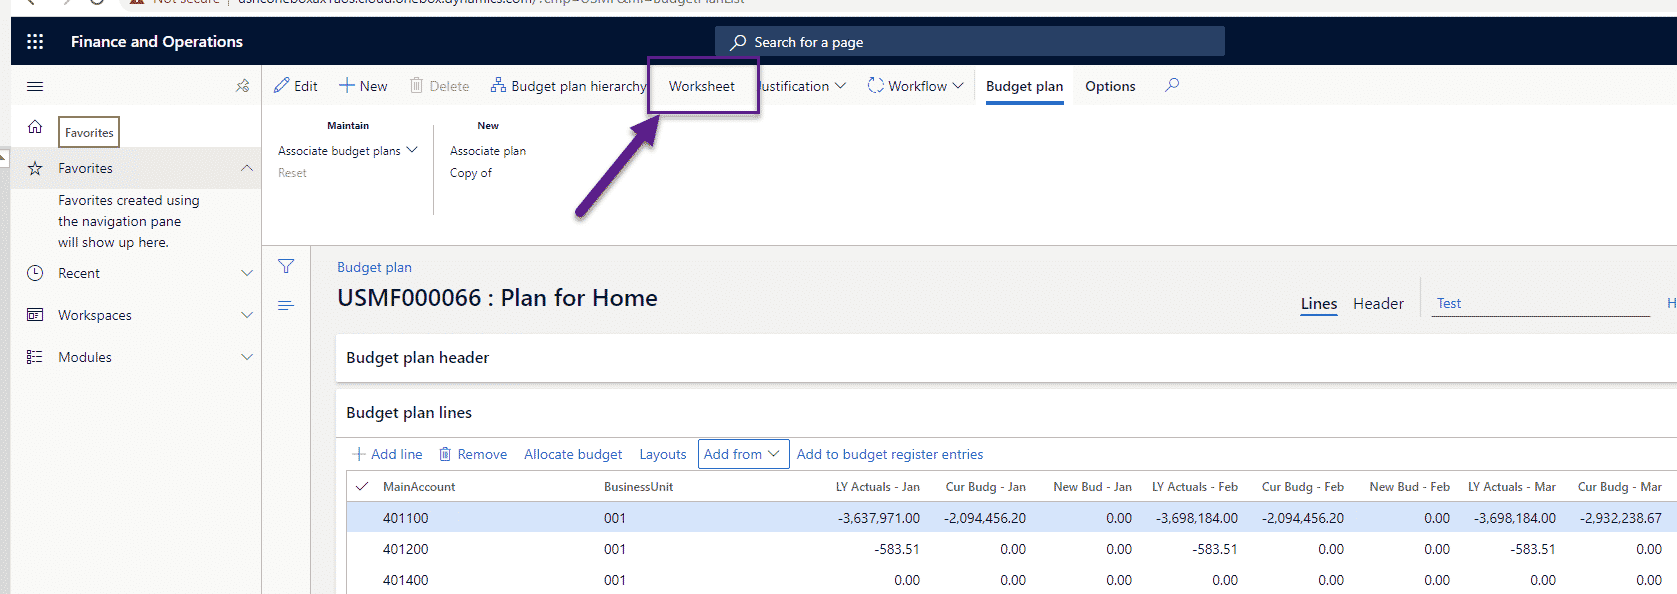
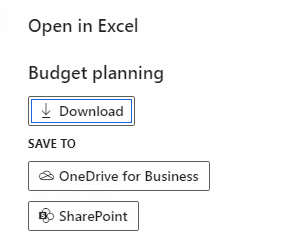
At this point, the subplan should have LY and current budget numbers and ready to be exported to excel. This can be done via a budget manager or by the budget clerk (if access is given via org hierarchy). To export, click Worksheet at the top of the budget plan page.
It will then bring up options for how you want it in Excel. Select Download otherwise you can select OneDrive or SharePoint if configured.
It will proceed to compile the numbers and give a prompt at the bottom left of the window with an excel file. 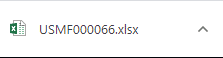 It is formatted as company and plan number.xlsx. You may have to enable editing prior to viewing the budget. Using standard Microsoft Office Data Connector features, you can create a template to include totals and comments and upload to the layout discussed in Setups. That template can then default on these exports.
- Proceed with all other subplans by importing all the numbers into the plan and export the numbers to excel. Follow the same steps above for the other subplans.
- Adding new budget numbers, importing back into D365, and complete the subplan. This step is completed by the owners of the subplans.
- Taking the spreadsheet from Part C, the user will need to populate all 12 periods with new budget numbers. This can be done by manually filling in each cell in the New budget column, copying from the budget or the LY numbers to the New budget, or copying in either of those numbers and making changes as they see fit in the New budget column.
- Depending on how the excel subplan was dispersed, there are 2 paths to get the numbers back into the plan.
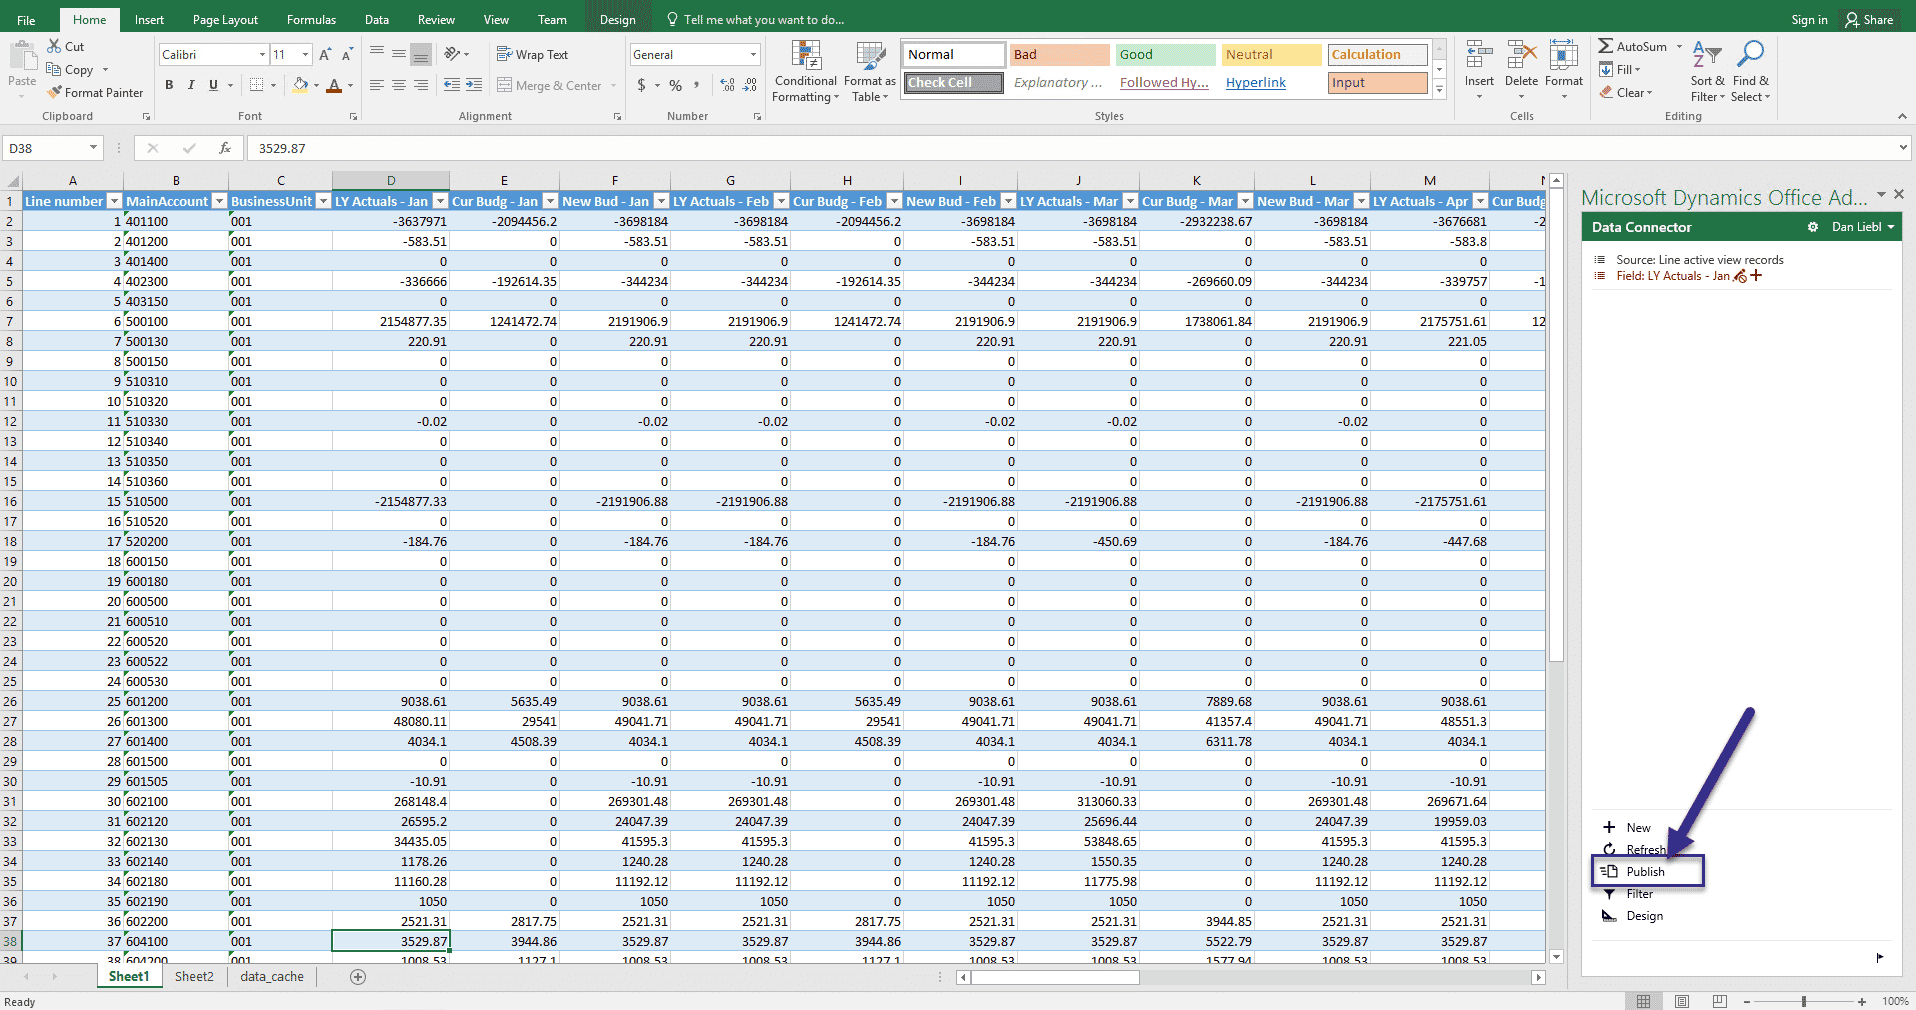
- If the owner has access to D365 and exports the workbook themselves, then they would just make changes and publish back in when complete. That can be done by clicking the Publish button in the Data Connector menu on the right.
- It will look like this. Excel will give status and a row count if large enough. It will give a status of ‘Data refreshed’ briefly when complete. If new lines are needed, it is best to insert them at the bottom because ‘behind the scenes’ is a line number and it is easier to insert a new row at the bottom, than to change all the line numbers. You can resort to excel if you need to view it differently.

- It is a good idea to store the finished excel documents on OneDrive or a server as a budget backup. Like in other windows, refreshing may require closing the plan and reopening.
- If the owner does not have D365 access and was emailed the document, I would recommend the budget manager or the budget clerk who sent it save a copy of the excel file. The document maintains the Microsoft Data Connector link to the database.
- Once the file comes back from the subplan owner, the budget manager or clerk needs to pull up the copy they saved and then copy in the numbers. The Current budget and LY numbers should be the same so they could copy in the entire worksheet (Jan – Dec). If there is an issue with the saved file, a new export using the Worksheet button will also suffice.
- The user completing this step will then need to use the Publish button as shown above in a’ to import back into D365.
- It is a good idea to validate the upload was successful so the subplan owner or budget manager should validate the new budget numbers are filled in. A review can be done and the changes can be made in D365 or in the excel file and re-published. Keep in mind, if the changes are made in D365, they will not be reflected in the excel file so the best practice would be to change them in the excel file and re-publish, especially if the excel file is serving as a backup.
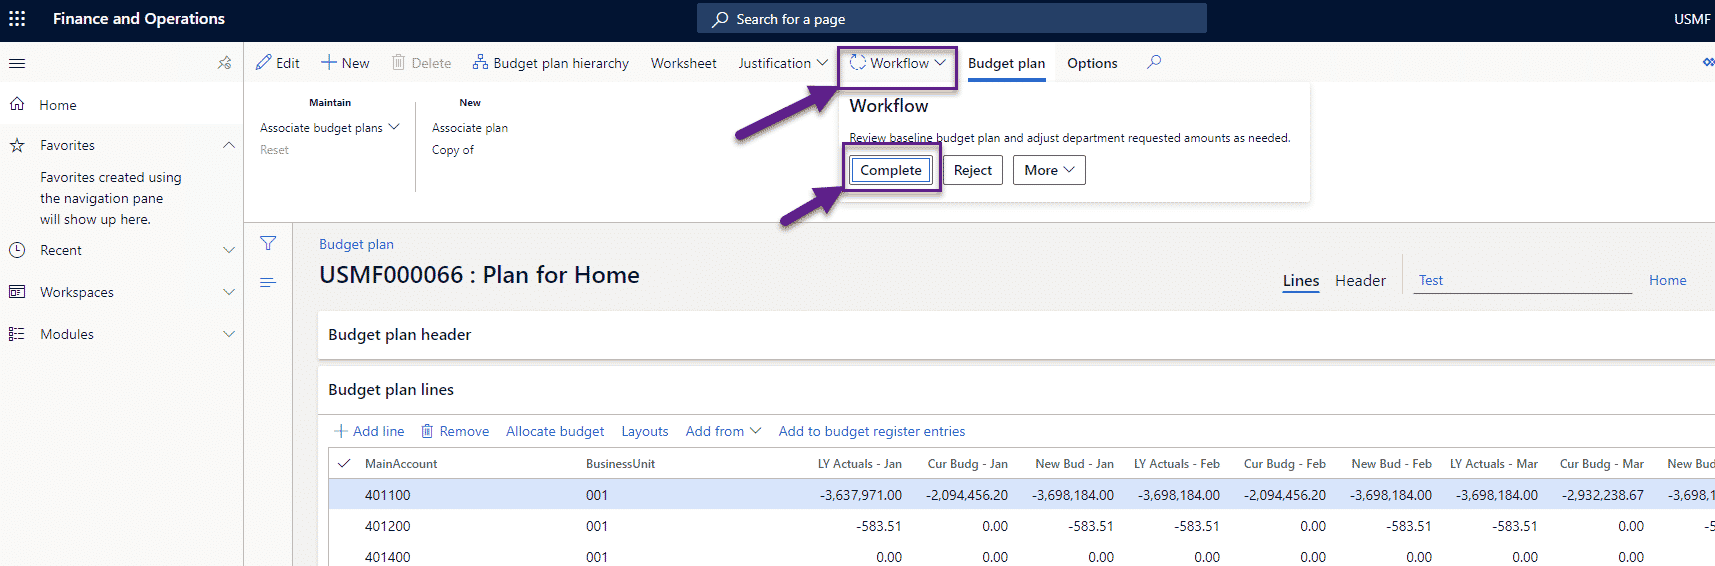
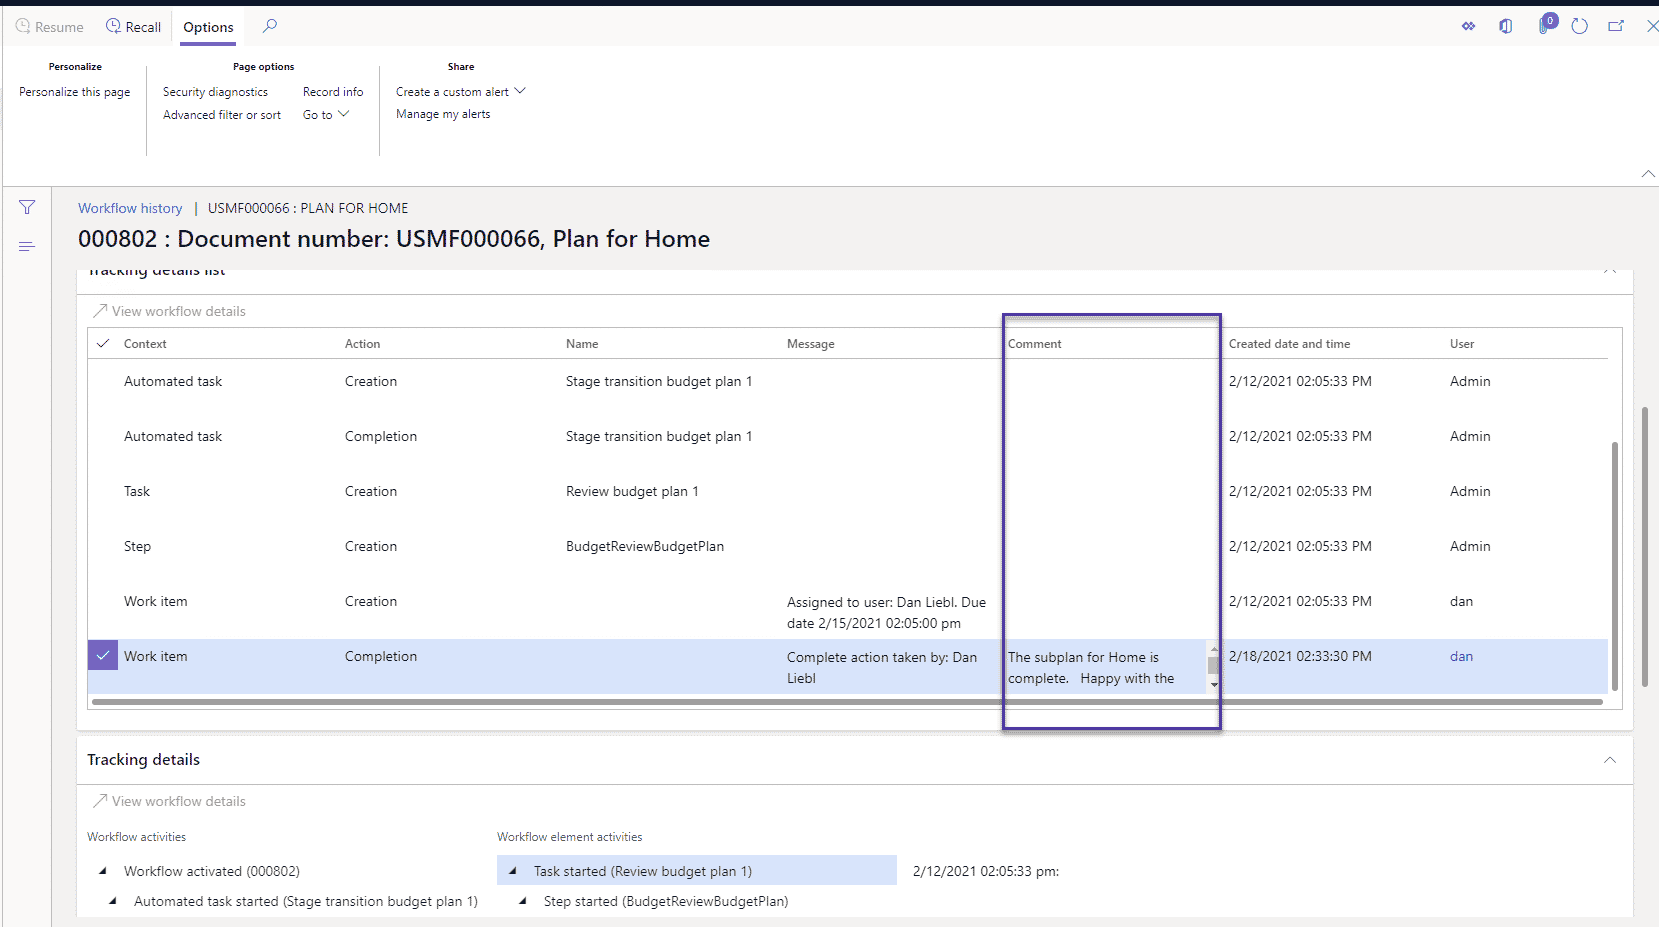
- The last step for each subplan is to complete the workflow step. This could be the subplan owner, or in some companies, a budget manager or clerk with supervisory responsibilities over the unit in the org hierarchy. This is done by selecting the subplan in the plan list page or opening the subplan and clicking Workflow > Complete. In this case, it is recommended to enter some comments. To view, these comments on the subplan or any budget plan, navigate to Workflow > Workflow history. Look for the specific step and view the comment. The status of the subplan is now Submitted or what was defined for the budget Stages in the Budget planning configuration. See below:
For viewing comments, they look like this.
How to Add Budgets to Master Budget
- This step is optional but let me discuss it a bit. The reason is the end goal is to create budget register entries with the new budget. They can be created as 1 entry or multiple entries. Because each budget register entry is pointing at a specific budget model, it does not matter if there is 1 budget register entry or 100 (if that many units in the org hierarchy). Best practice, in my opinion, would be dependent on the number of children or subplans. If the range is 2-20, then I would combine them to the master budget. If more than 20, then I would submit separately. The thought process is to find the happy medium between extra work and managing the budgets. There is no damage to doing the opposite as it boils down to personal preference as well.
That said, to process them to a master budget, use the budget plan import Add from import method listed above under C. Just be sure to pull and point them to the New Budget scenarios. Also, you will want to use the ‘Update the existing budget…’ action and select the correct budget plan. You may also want to apply a different layout to the master plan budget (only the new budget scenario) unless there is value in seeing LY and current budget numbers as well. Then all 3 imports would need to take place.
Approval of the budget and adding to register entries. If you went down the path of not importing to a master budget, you could argue the budget process is complete. I think it is best to close things out to still go through the steps here to close out and finish the budget plan. If sorting the budget list page by status or Budget planning stage, will cause noise and be included in lists it should not or need to be included in. If you did import to a master budget, you certainly want to complete the steps.
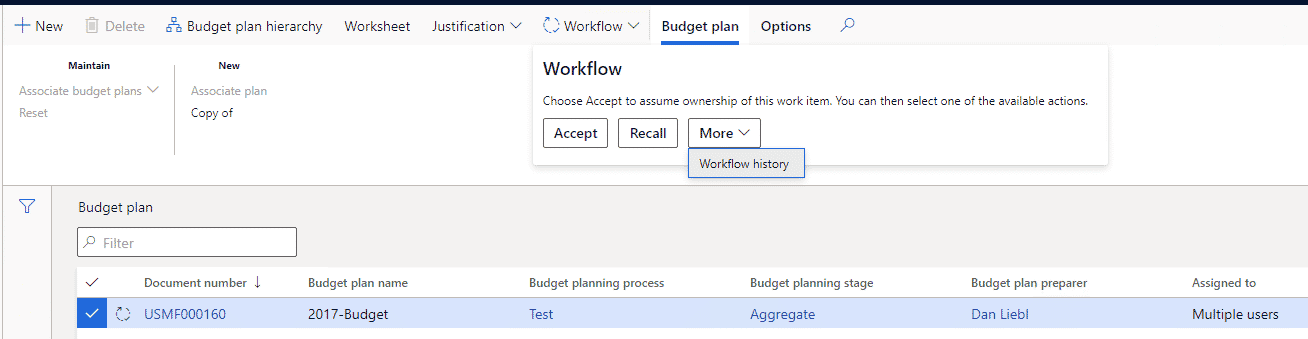
- The first step is to look at the workflow. In my example, there were multiple users with the ability to process a workflow. This is a good idea in case there are changes or situations where someone is not available at a deadline and then the process is stuck. The view looks like this (notice the multiple users):

- If there is a situation where there are multiple users who could complete the step when you click the Workflow button, you can choose to Accept, Recall, or More (which is only Workflow history). One user needs to take ownership of the workflow. As mentioned earlier, comments are optional but recommended as a tool to document and communicate.
It will look like this:
- If the master budget is used as a composite for all subplans and the numbers are complete, the numbers need to be pushed to the budget register entries. In my example, I did not combine so for this step I will have a subplan as the example, but it is the same process as would be done with the master budget.
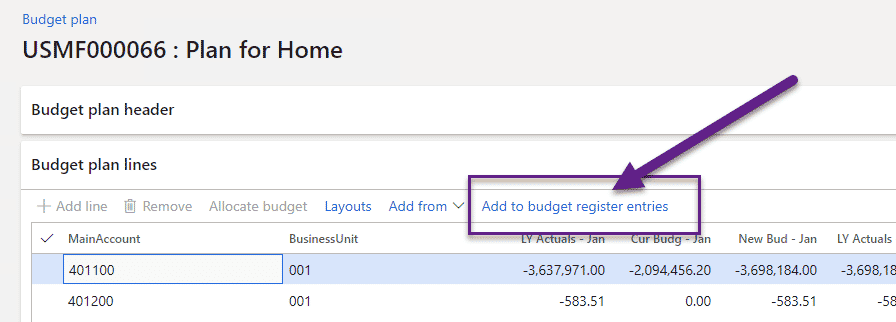
- Open the budget to send to the registry entries.
- Click Add to budget register entries button.

- This is like the Add from options we discussed in C. We have a source and a target. Below is the screenshot with numbers as I have done before.

- The budget plan scenario should represent the New budget scenario. In my example, that is Baseline.
- The default date is the current date. I would suggest leaving this as it is a guide to show you when you completed the process. The dates ‘post’ to the correct budget model year and dates.
- The budget code is whether it is the Original budget or revised numbers. The first post should always be Original or what you used as a code.
- The budget model should represent the budget plan you are posting to the budget register entries. In my example, I am doing the Home business unit or subplan. If you are processing a master budget, it would represent the master plan level.
- Aggregate lines default to No, but if you have multiple lines for the same account and financial dimensions, this setting allows you to combine them.
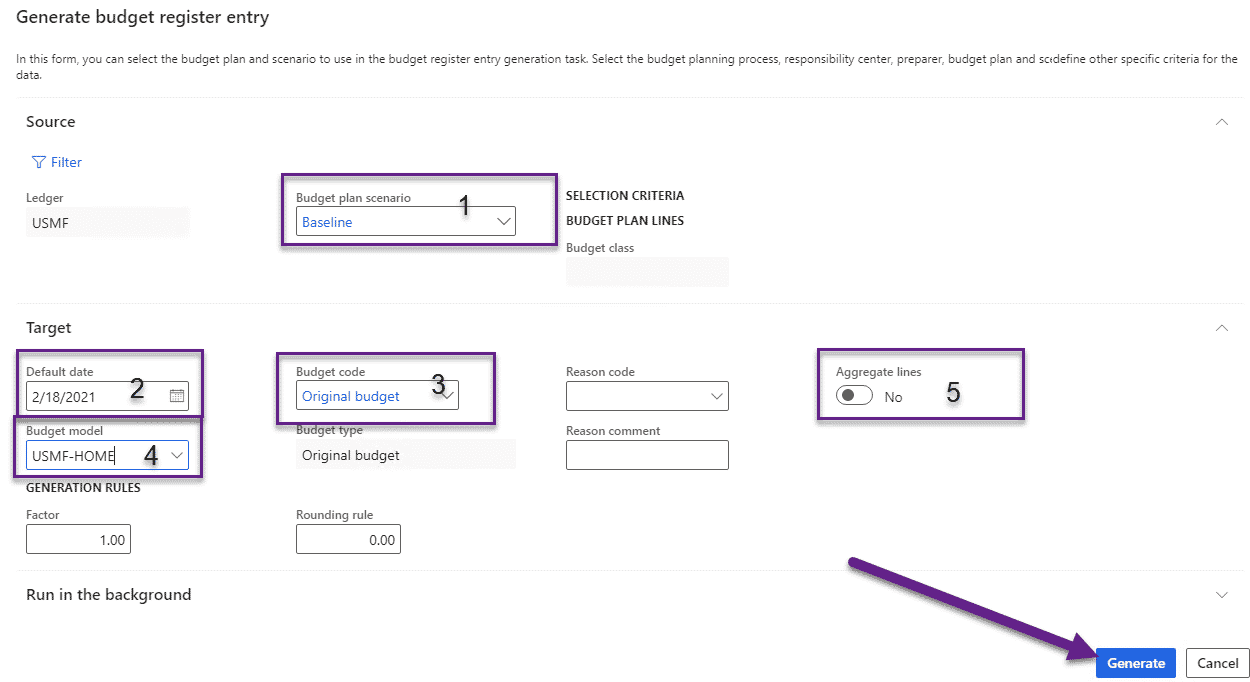
Click Generate to post them.
Approval and Adding Register Entries
- When all steps are complete and budget numbers are approved and finalized, the approval of the workflow at the budget matter level denotes it is complete. Click Workflow > Approve.
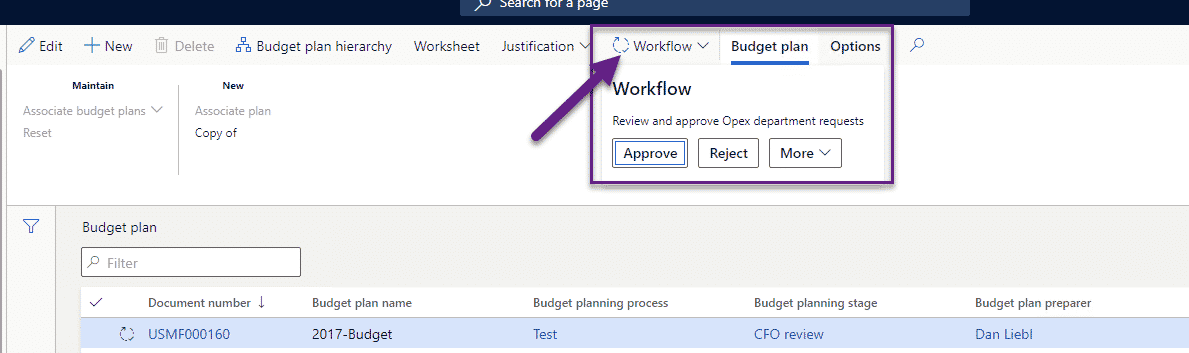
As with the other workflow windows, there is an option to add comments. Not required but recommended. Fill in a comment and click Approve at the bottom.
- 2. Processing of the budget to register entries can happen before workflow approval or after. The beauty of this step is if there are any errors or some sort of issue such as a wrong setting, you can delete the budget register entry and re-post.
- Once you have processed, you can view the entry in Budgeting > Budget register entries. You can click on the Entry number hyperlink to open and review prior to processing or posting. To process, click the Update budget balances button at the top of the form. Also, note the budget model states the subplan level. This makes it easy to monitor the processing as the list can be exported to excel.

Viewing in Financial Reports
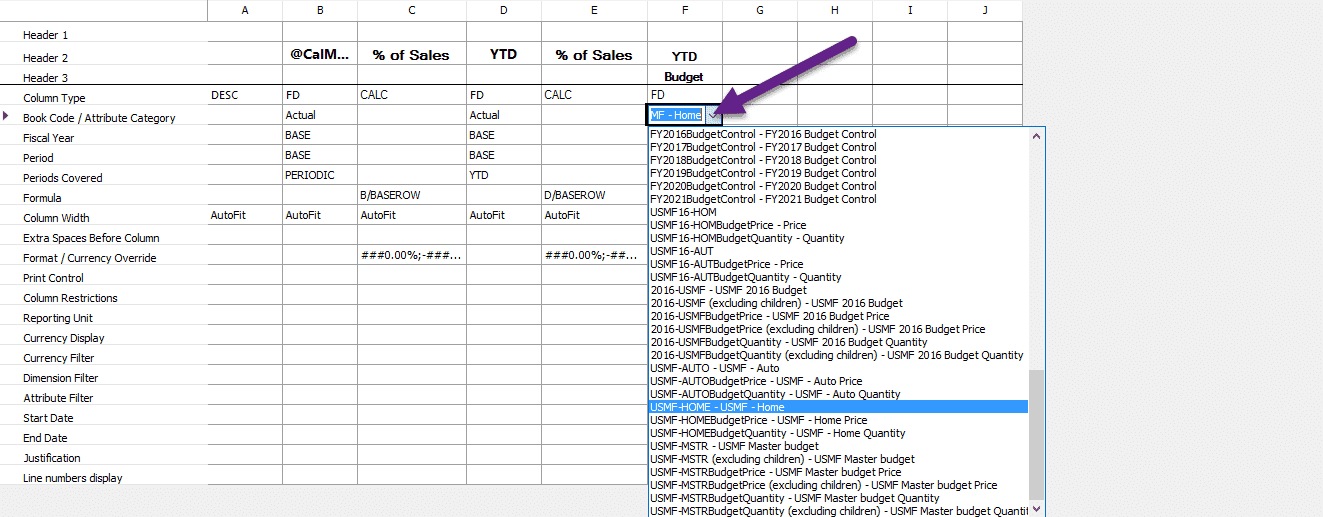
- If you are using Financial Reporter, I will quickly cover how to add the budget to your financial statements or other Financial Report. This is done by adding a column(s) pointing to the budget model which contains your numbers. These can be period or YTD numbers so you may reference multiple columns on a report. If you create the budget model so the parent is a ‘generic’ name, you do not need to update Financial Reporter each budget year. Adding or editing a budget is done on the column format:

Under the terms of this license, you are authorized to share and redistribute the content across various mediums, subject to adherence to the specified conditions: you must provide proper attribution to Stoneridge as the original creator in a manner that does not imply their endorsement of your use, the material is to be utilized solely for non-commercial purposes, and alterations, modifications, or derivative works based on the original material are strictly prohibited.
Responsibility rests with the licensee to ensure that their use of the material does not violate any other rights.