


How to Create a Personal View in Dynamics 365
Learning how to create a personal new in Dynamics 365 helps your team focus solely on the most relevant data records pertinent to their jobs.
You and your team can create and use custom views in various Microsoft tools, including:
- Dynamics 365 Customer Engagement systems like Sales, Customer Service, Field Service, and Customer Insights
- Custom model-driven applications
- Dynamics 365 ERP systems like Business Central and Finance and Supply Chain Management (Formely Dynamics 365 Finance and Operations)
While there are pre-determined views you can access out of the box, creating personal views ensures you see the information that matters most so you can do your job quickly and efficiently.
Let's analyze why personal views matter in Dynamics 365 and how you can create them to streamline workflows across your organization.
Why It’s Important to Know How to Create A Personal View in Dynamics 365
Creating a personal view in Dynamics 365 allows users to tailor their working experience so they can work comfortably. Here are some key reasons why a user might want to create one:
1. Focus on Relevant Data
- Standard system views may contain unnecessary information.
- Users can filter out irrelevant records and see only what matters to them.
2. Improve Efficiency & Productivity
- Saves time by eliminating manual data filtering every time.
- Provides quick access to frequently used data sets.
3. Customize Data Presentation
- Users can rearrange columns, add key fields, and sort records in a way that makes the most sense for their role.
4. Track Specific Metrics
- Sales teams might want a view for "High-Value Leads" based on deal size.
- Customer service teams could create a view for "Open Cases Assigned to Me."
5. Reduce Clutter
- Users can hide system views they don’t need.
- Helps streamline navigation by focusing on essential views.
6. Make Data-Driven Decisions Faster
- Personalized views provide instant insights without running reports.
- Users can quickly analyze trends or identify action items.
7. Set a Default View for Convenience
- Ensures the most relevant data appears immediately upon opening a table.
- Eliminates extra clicks to switch to a preferred view.
8. Enhance Collaboration
- Users can share personal views with teammates for consistency.
- Helps teams work from a unified dataset tailored to their needs.
Users can work smarter, stay organized, and improve their overall Dynamics 365 experience by creating personal views.
The Steps to Creating a Personal View in Dynamics 365
No matter what Dynamics 365 tool you are working with, personalizing your view can help boost efficiency and allow you to focus on the tools and tasks pertinent to your job. Here are the steps to help you create a personal view in Dynamics 365:
Step 1: Choose a Table and Start Customizing
- Navigate to the desired table. In this example, we'll use Accounts, but the same process applies to Contacts or other tables that use views.
- Select an existing system view. Click the dropdown in the top left to see available views.

- Decide what data you need by clicking "Edit columns" on the right-hand side. System views are shared across users, but you can create a custom version with additional columns or filters.


Step 2: Add or Remove Columns
- Once you are in the Edit columns screen, click on "+Add columns" to modify the visible data.
- Add key fields such as Account Health, Account Number, Street Address, or other relevant data.

- Drag and reorder columns to prioritize important information.
- Click "Apply" to save your layout.


Step 3: Apply Advanced Filtering
Once you've structured your columns, refine your dataset by applying filters:
- Click on Filters to access advanced filtering options.
- Add conditions based on any available field. For example, to filter for healthy accounts:
- Select Account Health as the field.
- Choose the operator Equals and set the value to Healthy.
- Add multiple filters if needed, even pulling data from related entities.
- Click Apply to update the view.


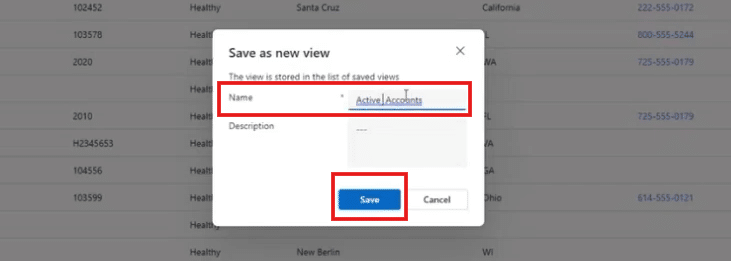
Step 4: Save and Set as Default
- Click Save As New View in the dropdown selector.
- Name your view, e.g., Active Healthy Accounts, and click Save.

- To make this your default view whenever you open the table:
- Select your new view from the dropdown.
- Click Set as Default View.


Step 5: Manage and Modify Personal Views
Editing a Personal View
- Open your saved view and adjust columns, filters, or sorting.
- Click Save Changes to Current View to update.


Deleting or Hiding Views
- Click Manage and Share Views from the dropdown.
- Select a view and choose to delete, hide, or modify visibility.
If system views clutter your workspace, you can hide unnecessary system views to keep your dropdown list clean.
Start Creating Your Personal Views to Boost Efficiency!
Personal views in Dynamics 365 allow you to customize, filter, and focus on the data that matters most. Whether you need a custom sales pipeline, service case list, or filtered marketing leads, these steps will help you tailor your software experience.
The Stoneridge Software experts can help you learn how to do this and assist you with other technical features in Dynamics 365 solutions. Talk to the team today to learn more.

Under the terms of this license, you are authorized to share and redistribute the content across various mediums, subject to adherence to the specified conditions: you must provide proper attribution to Stoneridge as the original creator in a manner that does not imply their endorsement of your use, the material is to be utilized solely for non-commercial purposes, and alterations, modifications, or derivative works based on the original material are strictly prohibited.
Responsibility rests with the licensee to ensure that their use of the material does not violate any other rights.