


How to Import Leads with Excel in Dynamics 365 Sales
Whether you’re collecting leads from trade shows, referrals, partners, or other sources, being able to easily manage and streamline the lead import process with Excel using Dynamics 365 Sales is a game-changer and will save you time.
In this blog, we will show you how to import leads with Excel in Dynamics 365 Sales, providing step-by-step instructions on uploading the valuable leads you’ve collected into your sales hub. From ensuring that you have properly configured your lead view to creating the template and executing the imports, we'll explore each step so you can feel confident with the process and can begin focusing on boosting your sales efforts sooner.
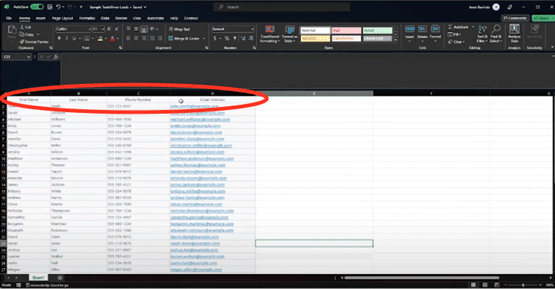
Step 1: Prepare your Excel File of Lead Information
- Ensure your Excel file contains the lead information you want to import into Dynamics 365 Sales. It should have columns that match the fields in your lead records (e.g. First Name, Last Name, Email, Phone, etc.). We will show you how to ensure your fields map into Dynamics 365 Sales in a step below.

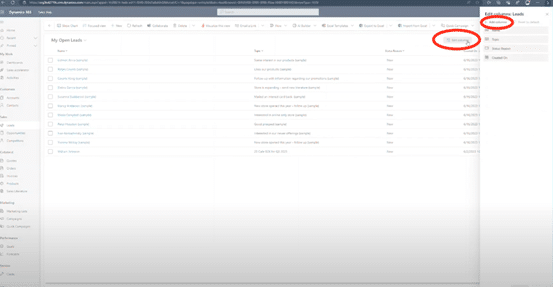
Step 2: Access the Leads View in Dynamics 365 Sales
- Log in to Dynamics 365 Sales and navigate to the "Leads" table in the Sales Hub.
Step 3: Modify the View in Dynamics 365 Sales if Necessary
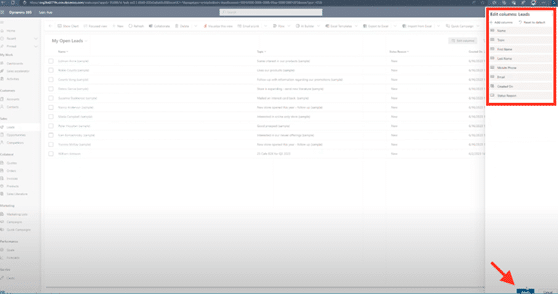
- If your Sales Hub view doesn't contain all the required fields to match up to your Excel file, you can edit the view to include them. Click on "Edit Columns" and add the necessary fields (e.g., First Name, Last Name, Mobile, and Email).

Step 4: Sort and Save the Modified View
- After adding the required fields, you can sort the fields. It is helpful to order them to match the fields you have in your Excel file. Drag and drop them into the desired order,, then click “apply” and save the view with a new name.


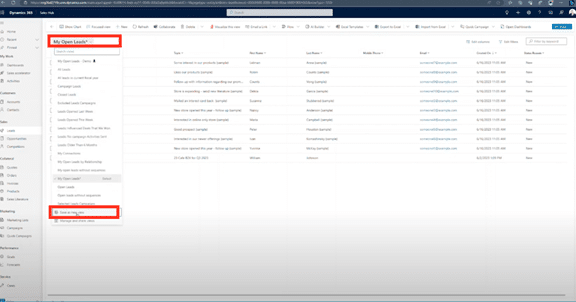
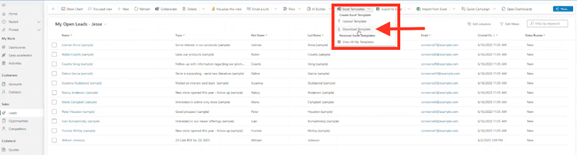
Step 5: Download the Excel Template
- From the modified view, click on "Excel templates" and then click "Download template" to download an Excel template that matches your view. Finally, click “Download”.

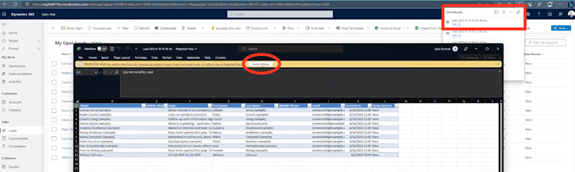
Step 6: Open and Modify the Excel Template
- Open the Excel template you downloaded, either from your downloads or via a link.
- Note: You may need to click “Enable Editing” at the top of the Excel document.
- Delete any existing data that auto-populates from the Dynamics 365 Sales Hub. When you do so, be to highlight and delete the entire rows, not just individual cells.

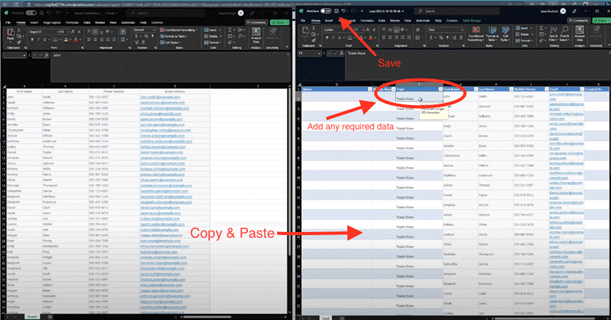
Step 7: Copy and Paste Lead Data
- Keep your downloaded Excel template open and also open your Excel lead document. It’s easiest if you open them side by side on your screen.
- Copy and paste your lead data from your trade show Excel file into the template. Ensure that the columns match the view you modified earlier.
Step 8: Add Any Data to Required Fields
- If topics are required for leads, add them in a new column in the Excel template. You can copy and paste the same topic for all the leads if they are from the same source (e.g., "Trade Show" or a more descriptive source name). Ensure that all required fields have data to successfully import the new records.
Step 9: Save the Modified Excel Template
- Make sure to save the modified Excel template with your newly pasted data. Once saved, you can close the window.
- You can also close your original Excel document with your lead information at this time.

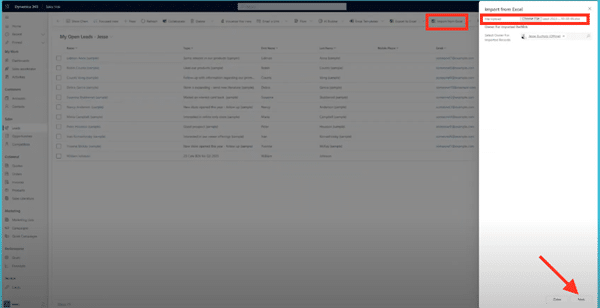
Step 10: Import the Leads from the Excel File into Dynamics 365 Sales
- Return to the Sales Hub with Dynamics 365 Sales and ensure you are in the lead view.
- Click on "Import from Excel".
- Select the Excel file you just modified and saved, then go to the bottom at click “next”.

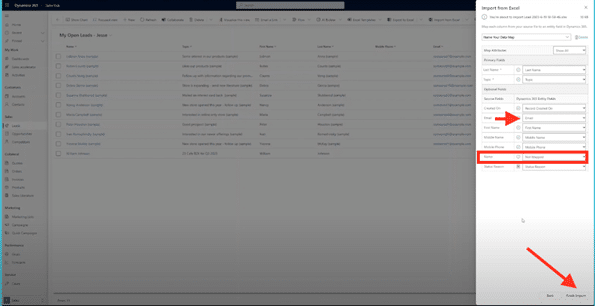
Step 11: Configure Import Settings
- Follow the Data Import Wizard to configure import settings.
- Unless you intentionally want to include duplicate data, choose “No” when asked about allowing duplicates.
- We now recommend reviewing the field mapping and confirming that the fields in your Excel file are correctly mapped to the corresponding fields in Dynamics 365 (e.g., Last Name to Last Name, Email to Email). To do so, click on “Review Mapping”.
- If the mapping looks correct, click "Finish Import" to initiate the import process. (Note: Don’t worry if the “Name” is showing as “not mapped”; it will automatically combine the first and last name when it imports the data.) Then click “confirm”.

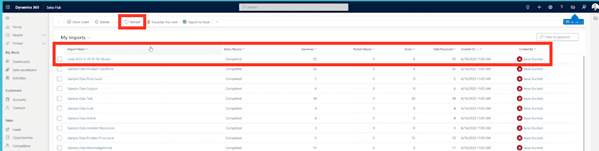
Step 12: Track Import Progress
- If you want to track the progress of your import, simply click "Track Progress" to monitor the import process. This page will display the status of the import, including successful imports, any errors and the total number processed.
- Click “Refresh” at any time to update the status of the import. (Note: The import process can take anywhere from 1 to 20 minutes, depending on the size of your import file.)

Step 13: Review Errors (if any)
- If there are any errors during the import, you can review them by drilling down into the import document to understand the causes of the errors.
Step 14: Verify Imported Leads
- After the import is complete, you can navigate back to the leads table in Dynamics 365 Sales to verify that the leads have been successfully imported with the correct information. It is always a good idea to review the imported data for accuracy and completeness.


Step 15: Cleanup
If you would like, you can delete the Excel file and any temporary files associated with the import process once you've confirmed that the leads are correctly imported.
That's it! You've successfully imported leads from an Excel file into Dynamics 365 Sales.
For a more detailed dive into the details of how to import lead with Excel into Dynamics 365 Sales, be sure to watch this video created by Stoneridge Software.
{
"@context": "http://schema.org",
"@type": "VideoObject",
"name": "Import Leads with Excel in Dynamics 365 Sales",
"description": "Learn how to easily import leads with Excel in Dynamics 365. Follow along as we guide you through the process, from customizing views to mapping fields.",
"thumbnailUrl": "https://i.ytimg.com/vi/q2CqqYbEy0g/default.jpg",
"uploadDate": "2023-10-13T16:32:58Z",
"duration": "PT8M24S",
"embedUrl": "https://www.youtube.com/embed/q2CqqYbEy0g",
"interactionCount": "71"
}
To learn more about partnering with Stoneridge, contact us today.

Under the terms of this license, you are authorized to share and redistribute the content across various mediums, subject to adherence to the specified conditions: you must provide proper attribution to Stoneridge as the original creator in a manner that does not imply their endorsement of your use, the material is to be utilized solely for non-commercial purposes, and alterations, modifications, or derivative works based on the original material are strictly prohibited.
Responsibility rests with the licensee to ensure that their use of the material does not violate any other rights.