Navigating Asset Leasing in Dynamics 365 Finance and Operations
Asset Leasing in Dynamics 365 Finance and Operations empowers your organization to streamline leasing processes.
Asset Leasing is a central hub for managing, tracking, and automating leasing transactions. It integrates with common modules you use every day and can connect with others. As a bonus, it helps you keep everything inside of your Dynamics 365 system and eliminates the need for outside data silos.
In this blog, we will highlight the key components of this module, weigh the pros and cons, and walk you through a tutorial on how to set it up. Note that the Asset Leasing module is written from the lessee’s perspective.
The Asset Leasing Lifecycle
There are four main components to the Asset Leasing module lifecycle:
Lease Classification
You have the option to allow Finance and Operations to help determine the classification of your lease. Some examples of classifications include:
- Operating lease
- Finance lease
- Short/long-term lease
- Low/high-value lease
You can do this manually by looking at the standard accounting code, but you can ask for Finance and Operations assistance as well.
Initial Recognition
Once a lease has been classified as high-value or long-term, your next step is to record the initial recognition. This transaction kicks off the lease and makes it active on your books. Additionally, if you integrate with the Fixed Assets module, this transaction will double as the right-of-use asset’s acquisition transaction. Dynamics 365 Finance and Operations helps you with this process by calculating values for you in the background.
Note, that initial recognition does not apply to short-term or low-value leases. These leases do not utilize a right-of-use asset, so they begin with monthly journal entries after being classified.
Monthly Journal Entries
Once you have created the lease, you can perform your standard monthly entries.
One benefit of the Asset Leasing module is it will automatically figure out monthly lease payments, and executory costs.
Expire, Extend, or Terminate
At the end of the lease term, you can let the lease expire, or you can choose to extend or terminate it.
The Benefits and Limitations of Asset Leasing in Dynamics 365 Finance and Operations
Let’s look at some of the features that come with Asset Leasing that will help you improve processes:
- Integrations with other modules: Asset Leasing always integrates with the General Ledger module and others, including:
- Accounts Payable: This comes into play if you link a vendor to your lease and want to have your invoices created on your vendor account to be paid out of your Accounts Payable payments module.
- Fixed Assets: This can be linked if the asset is going to transfer ownership at the end of the term. You can link the asset to a fixed asset ID in the fixed asset module.
- Streamlining work processes: The automation features of this module save your team time and reduce the chance of human error by running built-in calculations.
- Compliance: The Asset Leasing Module is compliant with ASC 842 and IFRS 16.
- Variety of options: It comes with short-term and low-value lease options in addition to others.
- Contains multiple informational fields: This keeps your information in your Dynamics 365 system instead of having it in multiple systems.
Conversely, there is one key limitation you should be aware of before using this system:
- Written perspective: As mentioned earlier, this module is only written from the lessee's perspective and not the lessor's.
How the Asset Leasing Module in Dynamics 365 Finance and Operations Works
Here is an example of how to set up a lease with the Asset Leasing module in Dynamics 365 Finance and Operations.
The example scenario will be a two-year lease for a shop in Dallas, TX. In the lease, you will be responsible for two executory costs: real estate taxes and utilities.
You can follow these steps to create a lease:
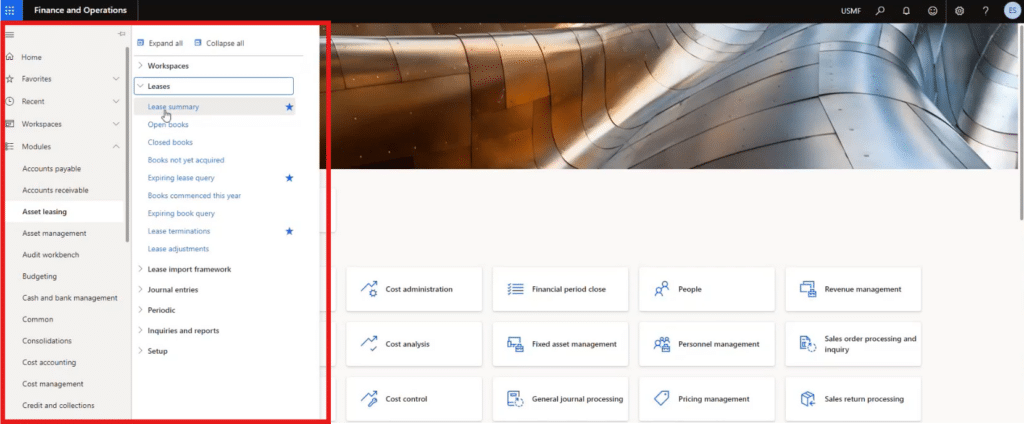
1. Navigate to Asset Leasing> Leases > Lease Summary
You can do this on the left-hand side of your screen.
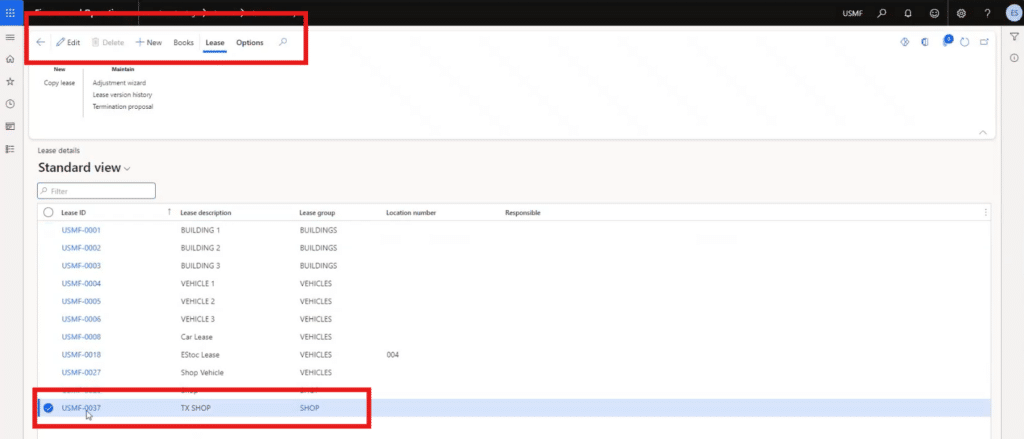
You will then see a master list of all the leases in your system. There are options to edit, delete, and create new leases along the top navigation pane. For this example, we are going to go into the TX Shop lease and edit it.
2. Set up the information you need to start the lease
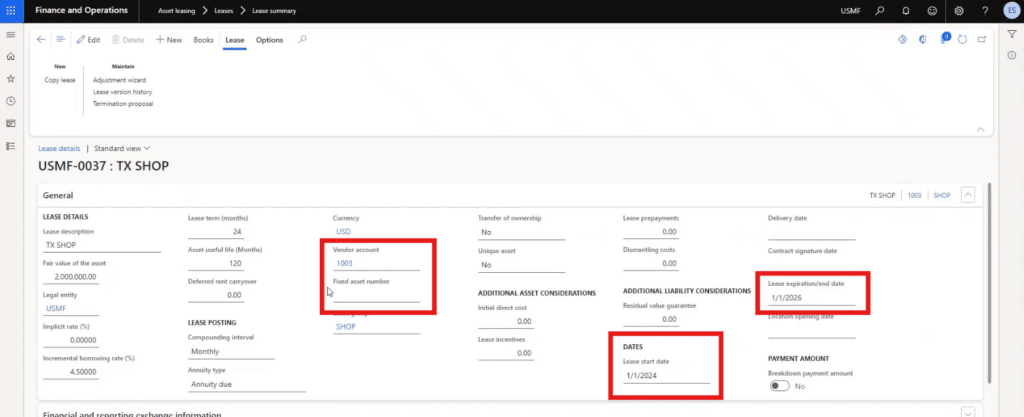
Once you are in your lease it’s time to set it up in the General tab. For our example, this includes:
- Setting the lease start and end dates: In this case, it is a two-year lease.
- Vendor account: Because we have the option to integrate with Accounts Payable by assigning a vendor account or lessor.
- Fixed asset number: Set this if it is a lease-to-own situation. You want to ensure the fixed asset shell ID is listed here. This ensures that at the end of your lease-to-own situation, the asset gets adopted into your own system.
As you can see in the photo below, there are multiple other details you’ll need to fill out to ensure the module runs properly.
3. Define your lease payments
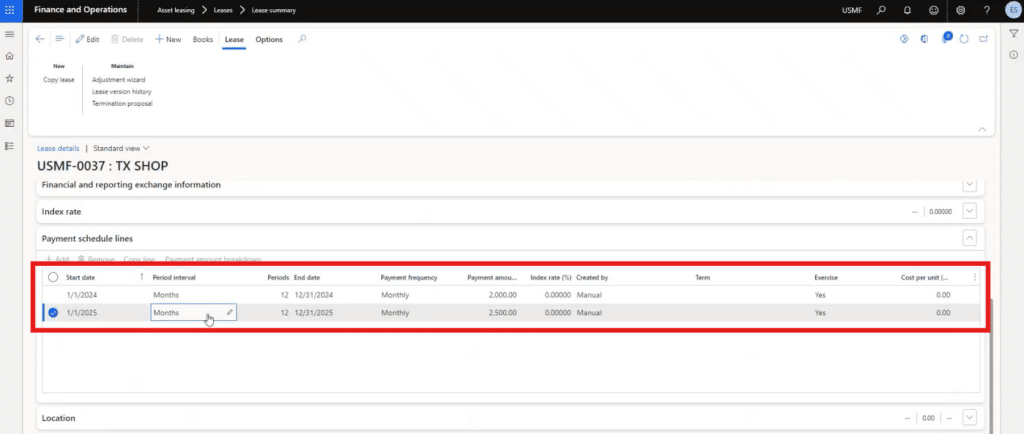
Scroll down from the General tab and open the “Payment schedule lines” tab. This is where you define the amount of each lease payment and how often you are paying them. In the example, you are making monthly payments of $2,000 in 2024 and then increasing that payment to $2,500 in 2025.
Dynamics 365 Finance and Operations will automatically generate a payment schedule based off the data you’ve provided.
4. Define Executory Costs
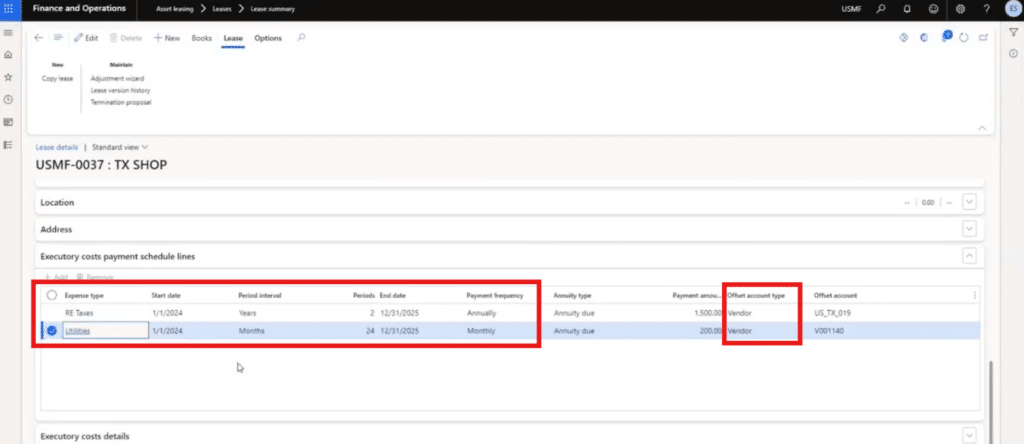
Scroll down from the Payment Schedules tab and open the “Executory costs payment schedule lines” tab. This looks very similar to the previous tab but this one is expense-specific. Here is where you input your Real Estate taxes and utilities. You can fill out the payment amount and how often the payment is made.
In the example, you’d be paying Real Estate taxes annually to the tune of $1,500. Conversely, utilities would be paid at $200 per month during the duration of the lease.
Additionally, you can also select an offset account type, which is either a vendor account or a ledger account.
Like the process in step three, Dynamics 365 will automatically generate an expense schedule based on your expense type.
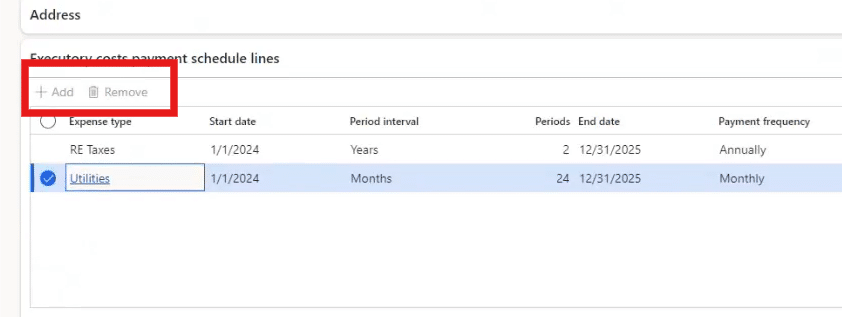
You can also create as many expense types as you need. For example, if you also needed to track and manage CAM, or common area maintenance, we would navigate to the expense type table and create it. After the expense type has been created, you would click on the “+Add” button and see CAM populate from the drop-down menu.
5 – Sort out Executory cost details
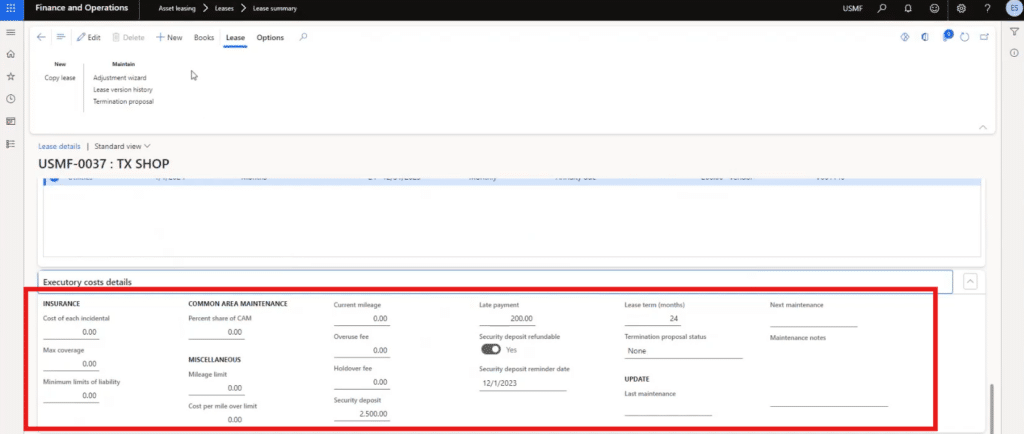
Open the Executory cost details tab and finalize your details in those informational fields. This includes insurance, security deposit information, late payment fees, and more.
6 – Optional: Attach a physical copy of the lease
If you click on the paper clip icon in the upper right corner, you can attach a physical copy of the lease for users to reference.
Payments and Transactions with Asset Leasing in Dynamics 365 Finance and Operation
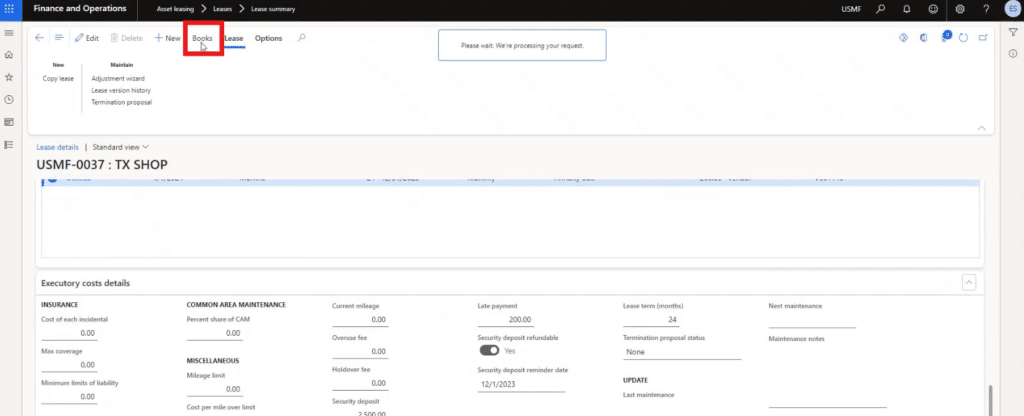
If you navigate back to the top of the screen, you can click on “Books” to view payments and schedules.
If you work with the Fixed Asset module, you will see a lot of similarities between books for a fixed asset versus books for a lease. The book of your lease is what drives lease classification and Accounts Payable integration.
Transactions
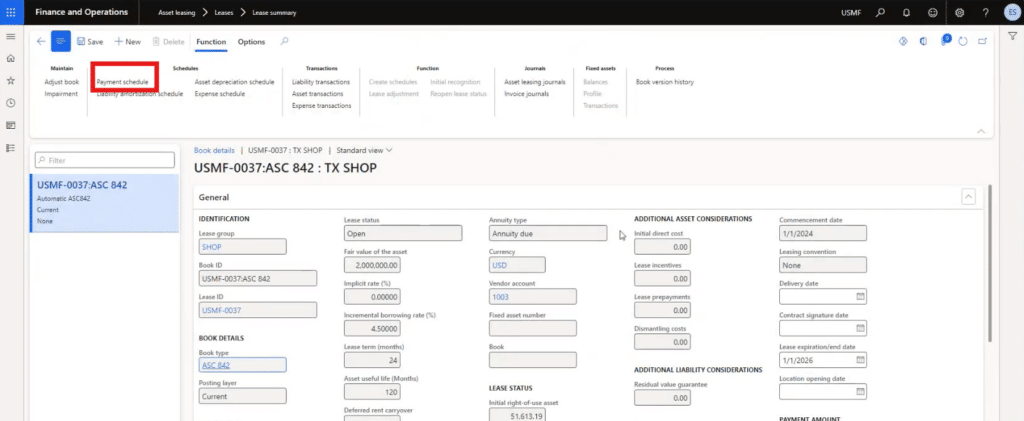
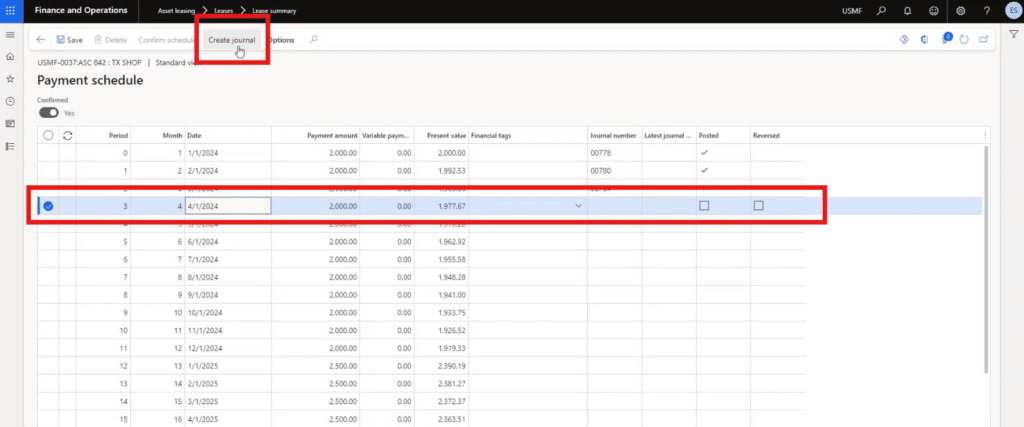
To monitor your transactions, click on Payment Schedule under the Schedules section.
You can track all of the invoices that have been posted for this lease. To begin posting an invoice, click “Create journal.”
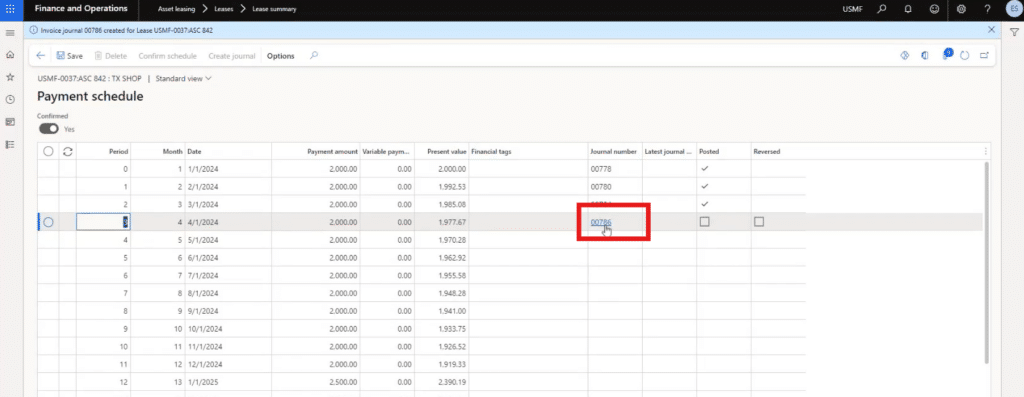
After you do this, the system will generate a new hyperlink that you can click on to go into the journal entry.
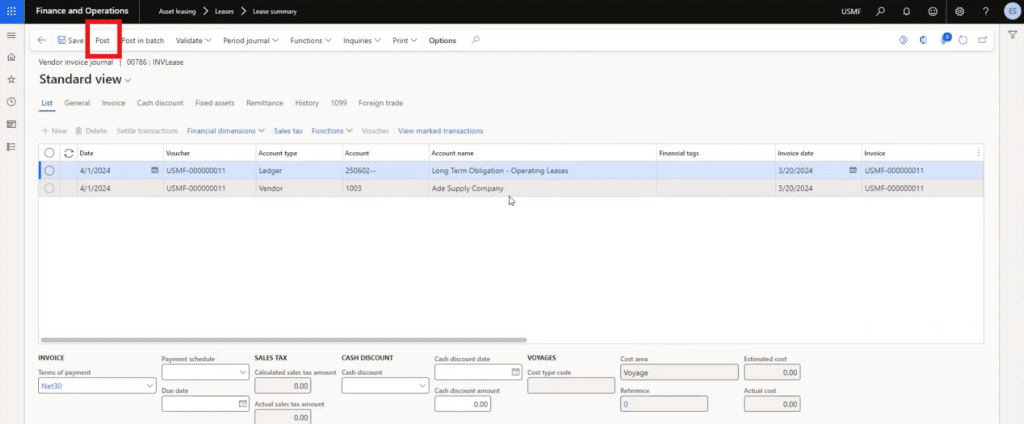
Once you’ve clicked on the hyperlink, you’ll be able to view the invoice. You will find that Dynamics 365 has already set the bulk of this transaction up for you based on everything you defined in the steps above. Once you have reviewed the invoice, click post. This will post the invoice to the vendor’s account as we choose to integrate with the Accounts Payable module.
If you go back to the lease and refresh the page, you will now see a checkmark in the Posted column for that payment. You can repeat this process for all the transactions that are included in your lease. For example, we will also post a journal for the utilities expenses
The Lease Ends: Now What?
Once your lease is over, you need a way to end it. Luckily, it’s quite simple!
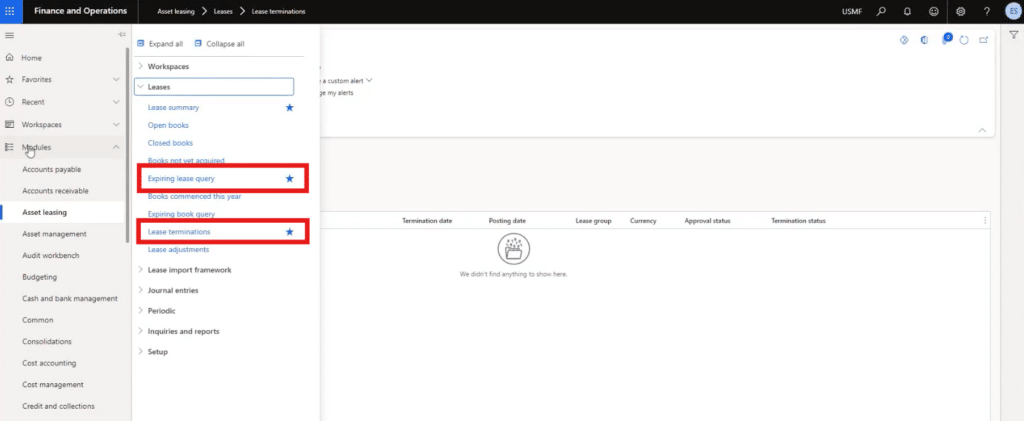
If you need to terminate your lease before expiration, go to the left-hand navigation tab and click on Asset Leasing > Leases > Lease Terminations. On this screen, you can propose terminations of leases if they aren’t working out.
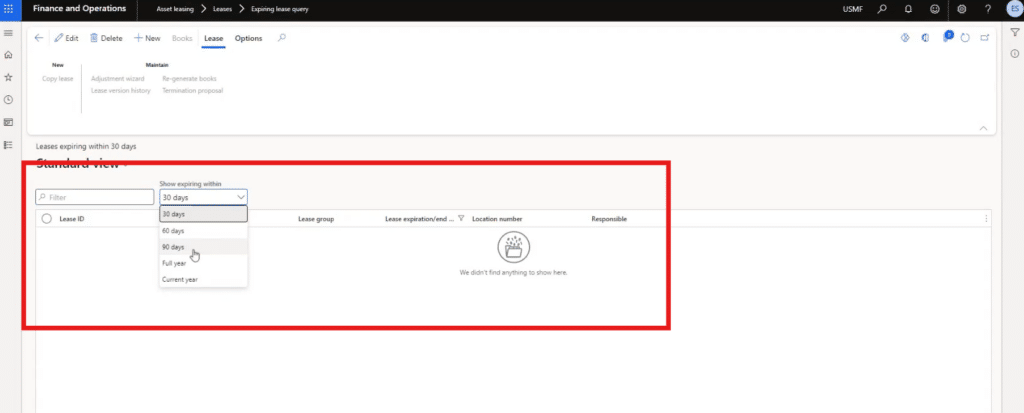
Another important feature in this module is the expiring lease query, which is also highlighted in the photo above. This is where you can see what leases are expiring and when they expire. This assists you in tracking any leases that need to be renewed, terminated, or allowed to expire.
Want to Learn More About Asset Leasing Dynamics 365 Finance and Operations?
Get in touch with Stoneridge Software! Our team of experts is ready to help you implement and utilize many tools and functionalities that will improve your team’s day-to-day and make work easier.
Co-Author: Jordan Soderstrom
Under the terms of this license, you are authorized to share and redistribute the content across various mediums, subject to adherence to the specified conditions: you must provide proper attribution to Stoneridge as the original creator in a manner that does not imply their endorsement of your use, the material is to be utilized solely for non-commercial purposes, and alterations, modifications, or derivative works based on the original material are strictly prohibited.
Responsibility rests with the licensee to ensure that their use of the material does not violate any other rights.


