


Navigating Prepayments in Dynamics 365 Business Central
Handling prepayments is an important step in both purchasing and sales. In this blog post, I will navigate you through processing prepayments in Dynamics 365 Business Central. I will use ambiguous language in my steps below since the steps are identical from both the purchasing and sales perspectives.
Setup
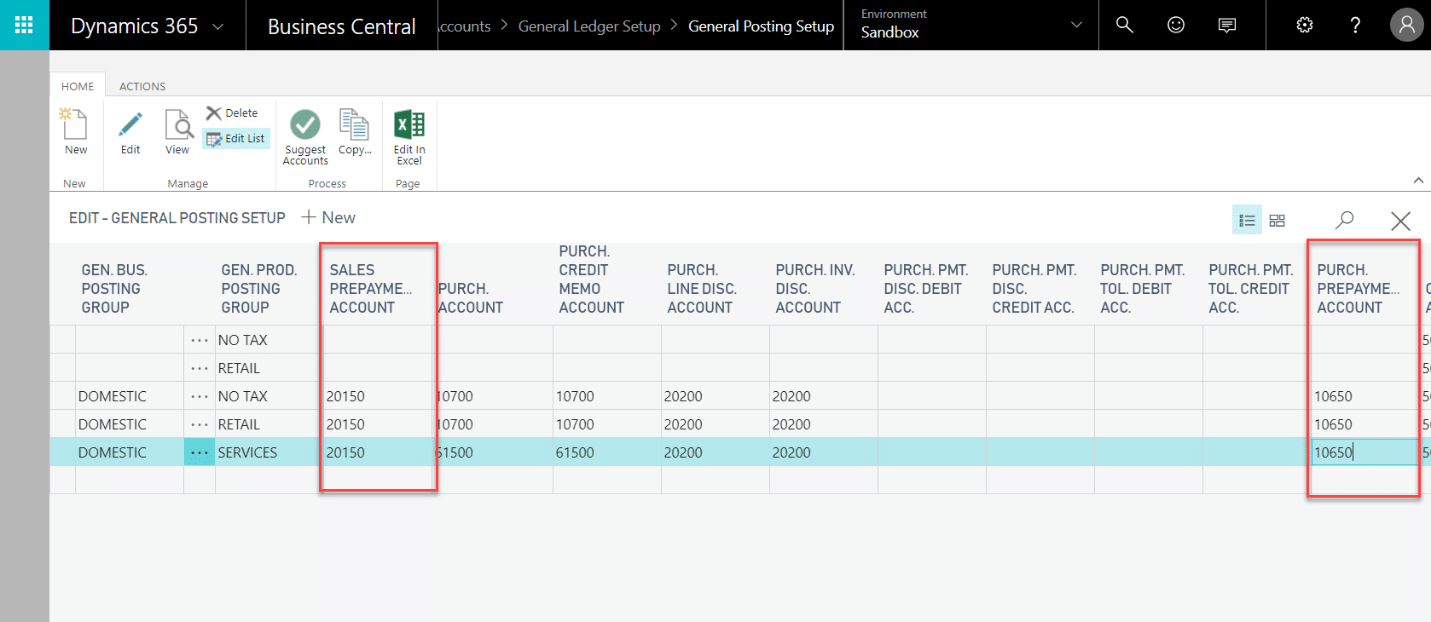
Before creating an order, you must map the general ledger posting accounts for prepayments in General Posting Setup. The relevant columns are “Purch. Prepayments Account” and “Sales Prepayments Account”.
Order
After setting up an order with the relevant vendor and item information, open the Prepayment fast tab. Here you can specify prepayment invoice document-specific information such as Payment Terms, Due Date, Discount %, etc. You are only able to post at most one prepayment invoice per line. In the “Prepayment %” field, put in the percentage amount of the total amount for the prepayment invoice. You will be asked to update the lines. Click Yes.
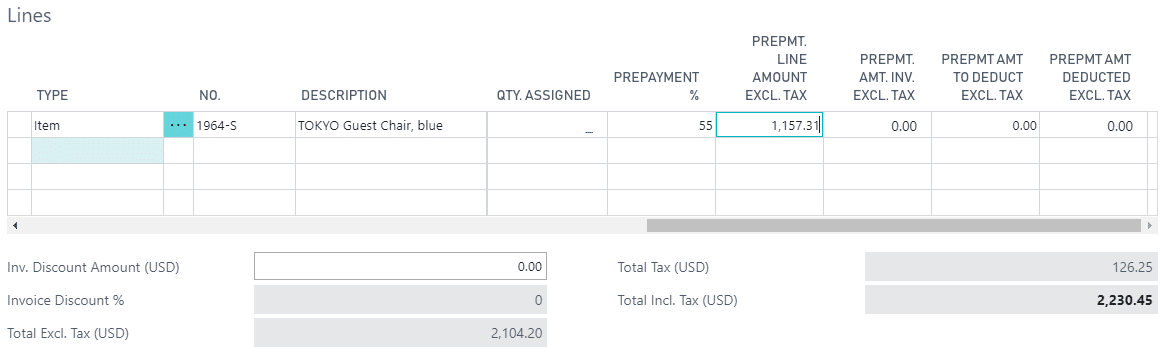
If you wish to edit or view the prepayment at the line level, make visible the following columns if they are not already using PERSONALIZE:
- Prepayment % - Specifies the prepayment percentage to use to calculate the prepayment amount for the line.
- Prepmt. Line Amount Excl. Tax – Specifies the prepayment amount of the line if a prepayment percentage is specified for the line.
- Prepmt. Amt. Inv. Excl. Tax – Specifies the prepayment amount that has already been invoiced for this line.
To gain visibility into prepayment invoices issued on an order at the line level, make visible the following columns if they are not already using PERSONALIZE:
- Prepmt Amt to Deduct Excl. Tax – Specifies the prepayment amount that has already been deducted from ordinary invoices posted for this order line.
- Prepmt Amt Deducted Excl. Tax – Specifies the prepayment amount that has already been deducted from ordinary invoices posted for this order line.
Once a Prepayment % or Prepmt. Line Amount Excl. Tax value has been specified, you are ready to post the prepayment invoice. Go to the ACTIONS tab, move to the Posting grouping, click the Prepayment icon, and click Post Prepayment Invoice.
After Posting the Prepayment Invoice
Before we view the posted invoice, you will see the status of the order change to Pending Prepayment. At this point, you are able to post the rest of your order as is. You can add quantity to the line, but must create another prepayment invoice such that the added prepayment columns are satisfied. You may also add another line at this point with its own prepayment terms if you wish.
Go to the NAVIGATE tab, move to the Documents grouping, and click the Prepayments button. Here you will see all prepayments associated with this order. Double click on the document to view. Here we see the invoice with a line item set to the G/L Account from the General Posting Setup. We are able to make a payment on this invoice as we would a regular invoice.
Full Invoice
If you have created a posted prepayment invoice, you may fully invoice your order when ready. Once posted, the invoice lines will show the amount from the posted prepayment invoice being taken out of the total, since it has already been accounted for. From a purchasing point of view, when it is time to pay for both the prepayment and actual invoice, both will appear. The prepayment invoice will show its specified amount, and the final invoice will contain the total minus the prepayment amount.

Under the terms of this license, you are authorized to share and redistribute the content across various mediums, subject to adherence to the specified conditions: you must provide proper attribution to Stoneridge as the original creator in a manner that does not imply their endorsement of your use, the material is to be utilized solely for non-commercial purposes, and alterations, modifications, or derivative works based on the original material are strictly prohibited.
Responsibility rests with the licensee to ensure that their use of the material does not violate any other rights.