


Reusing Addresses in Dynamics AX 2012: Part 1 – Address Standardization
In my role as an Architect, I am often involved in integrating applications with Dynamics AX. On most projects we end up dealing with addresses. As you probably know, in Dynamics AX, an address is actually a global entity in the Global Address Book. Technically, it is stored in the LogisticsPostalAddress table.
Inevitably our client wants to avoid creating duplicate addresses and reuse the LogisticsPostalAddress record if possible. I can tell you that it is probably not worth the effort to do this if you simply want to save database space. However, I have come across some business requirements that require reusing addresses and justify the effort necessary to do that.
Address Standardization
The first step of reusing an address is to standardize the format so you can search for the existence of an address in the LogisticsPostalAddress field. The reason for standardization is so you are using a standardized string to search for a standardized string.
For example, if I want to look for the address for the Stoneridge Software Barnesville office, I would likely look on our website and see that our address is "101 Front St South Barnesville MN 56514." I would then enter our address into the AX form and expect it to check for an existing address. However, if the address that was previously entered is "101 Front St S Barnesville MN 56514" then the system wouldn't find a match using a string search
We could solve that problem by making our search much more intelligent but that is a pretty complicated algorithm. Why not just make sure that each address that is entered or searched is using the exact same format? That is where Address Standardization comes in.
One Possible Solution for Address Standardization in Dynamics AX
There are several services that will provide Address Standardization and even Validation (make sure the address actually exists). One solution is to write the code necessary to call one of those services to standardize addresses as they are entered. That is the purpose of this series of articles. I will show you a couple of ways to add code to standardize addresses in Dynamics AX as they are entered.
- This first article will focus on creating a C# class and using it to make the call to the Address Standardization Service. We will simply use an AX Job to make the call and display some information in the Info Log window.
- The second article will integrate that code into the user interface for a more complete solution.
- The third article will attempt to implement the same solution using AX code without a C# assembly.
- The fourth and final article will provide the same solution in the new Dynamics AX (previously known as AX 7).
The Standardization Service
There are several services that provide address standardization and validation. I will use one simply because it provides a robust solution and has a free subscription. The free subscription is limited to 250 addresses a month but that should be sufficient for our purposes. The solution I will be using is called Smarty Street (https://smartystreets.com). To follow along with this, you will need to sign-up for an account here (it's free) and obtain an auth-id and auth-token.
I will take the following steps in this article:
- Create a C# Class Library project that will be used to make the calls to Smarty Streets. This step will include a test project to verify the code.
- I will deploy the solution to the Server and Client in AX.
- I will write an AX Job that will utilize the C# class library.
Create a C# Class Library project
There are many blog articles and walkthroughs on how to do this. I won't go into the details for this. You can find more information on MSDN here. Here is a good set of blog articles that you may find helpful. Suffice it to say that we will create a C# Class Library. Here are the initial steps that I took to get everything setup:
- Create a C# Class Library project named "SmartyStreetLib."
- Rename the default class that is created to SmartyStreetAPI.
- Create a Unit Test project to test the SmartyStreeAPI class. You can use this walkthrough as an example.
Now that you have an empty class in a Class Library project you will need to add the code to the class. I have decided to add the following code:
- The properties used as inputs to call the Smarty Streets Address API
- A property to get hold the Status response from the Smarty Streets Address API call
- A property to hold the response headers from Smarty Streets Address API call
- A method to build the URL for the Smarty Streets Address API call
- A method to get the addresses returned from the call
Create properties for the SmartyStreeAPI class
Our first step is to create the properties necessary to make the API Call. Let's look at what may be required. If we look at the documentation for the call (https://smartystreets.com/docs/us-street-api) we see two tables that are useful here. The first one shows the structure of the URL used to make the call and the second one shows the possible input parameters for the query portion of the call.
URL Composition
| URL Components | Values | Notes |
| Scheme | https | NOTE: non-secure http requests are not supported |
| Hostname | api.smartystreets.com | |
| Path | /street-address | |
| Query String | ?auth-id=123&auth-token=abc | Authentication information, inputs, etc. Additional query string parameters are introduced in the next section. |
Input Fields for Query String
| Name | Type | Max Characters | Default Value | Description |
| input_id | string | 36 | blank | A unique identifier for this address used in your application; this field will be copied into the output. |
| street | string | 64 | blank | The street line of the address, or an entire address (which we call a "freeform" input) |
| street2 | string | 64 | blank | Any extra address information
(e.g., Leave it on the front porch.) |
| secondary | string | 32 | blank | Apartment, suite, or office number
(e.g., "Apt 52" or simply "52" ; not "Apt52".) |
| city | string | 64 | blank | The city name |
| state | string | 32 | blank | The state name or abbreviation |
| zipcode | string | 16 | blank | The ZIP Code |
| lastline | string | 64 | blank | City, state, and ZIP Code combined |
| addressee | string | 64 | blank | The name of the recipient, firm, or company at this address |
| urbanization | string | 64 | blank | Only used with Puerto Rico |
| candidates | integer | Max Value: 10 | 1 | The maximum number of valid addresses returned when the input is ambiguous |
We will combine the Scheme, hostname, and path into a "base" URL. If I wanted to make my class more generic to support other APIs I would keep the different components for the base URL and construct it from those components. Since this will be specific to Smarty Streets, we will just combine the components into a single property.
Add the following code to the SmartyStreetAPI class:
public string UrlBase { get; set; }
We also notice that the query string will always include the auth-id and the auth-token. Let's create two properties to contain those values. I like to standardize my properties to use camelcase and I also like to document my properties (and all members of a class) using the format that allows you to include HTML and other meaningful tags that can be used to generate class documentation. So we will add the following code to the SmartyStreetAPI class:
        /// <summary>
        /// The authentication ID provided by SmartyStreets for your subscription
        /// </summary>
        public string AuthID { get; set; }
        /// <summary>
        /// The authentication token provide by SmartyStreets for our application
        /// </summary>
        public string AuthToken { get; set; }
Now we will add a property for each input available for the query string. So here is the code I added in the SmartyStreetAPI class for the input parameter properties:
        /// <summary>
        /// A unique identifier for this address used in your application; this field will be copied into the output.
        /// Max Size: 36
        /// Default Value: blank
        /// </summary>
        public string InputID { get; set; }
        /// <summary>
        /// The street line of the address, or an entire address (which we call a "freeform" input)
        /// Max Size: 64
        /// Default Value: blank
        /// </summary>
        public string Street { get; set; }
        /// <summary>
        /// Any extra address information (e.g., Leave it on the front porch.)
        /// Max Size: 64
        /// Default Value: blank
        /// </summary>
        public string Street2 { get; set; }
        /// <summary>
        /// Apartment, suite, or office number (e.g., "Apt 52" or simply "52" ; not "Apt52".)
        /// Max Size: 32
        /// Default Value: blank
        /// </summary>
        public string Secondary { get; set; }
        /// <summary>
        /// The city name
        /// Max Size: 64
        /// Default Value: blank
        /// </summary>
        public string City { get; set; }
        /// <summary>
        /// The state name or abbreviation
        /// Max Size: 32
        /// Default Value: blank
        /// </summary>
        public string State { get; set; }
        /// <summary>
        /// The ZIP Code
        /// Max Size: 16
        /// Default Value: blank
        /// </summary>
        public string ZipCode { get; set; }
        /// <summary>
        /// City, state, and ZIP Code combined
        /// Max Size: 64
        /// Default Value: blank
        /// </summary>
        public string LastLine { get; set; }
        /// <summary>
        /// The name of the recipient, firm, or company at this address
        /// Max Size: 64
        /// Default Value: blank
        /// </summary>
        public string Addressee { get; set; }
        /// <summary>
        /// The maximum number of valid addresses returned when the input is ambiguous
        /// Max Value: 10
        /// Default Value: 1
        /// </summary>
        public int Candidates { get; set; }
        /// <summary>
        /// The response headers in a string format
        /// </summary>
Our final set of properties will contain the status and response headers. The response headers are readily available from the WebClient class. We can see here that the WebClient class exposes the response headers using the WebHeaderCollection Class which extends the NameValueCollection Class. Enter the following code in the SmartyStreetAPI class to create a ResponseHeaders property for those headers:
        /// <summary>
        /// The response headers in a string format
        /// </summary>
        public NameValueCollection ResponseHeaders { get; set; }
Unfortunately, the WebClient class does not include the Status response as a response header. So we will need to create a special property to hold the status response. We will create a subclass in our SmartyStreetAPI class to represent a Status Response that will contain the response code and the description from the table below.
| Status Code | Response and Explanation |
| 401 | Unauthorized: The credentials were provided incorrectly or did not match any existing, active credentials. |
| 402 | Payment Required: There is no active subscription for the account associated with the credentials submitted with the request. |
| 413 | Request Entity Too Large: The maximum size for a request body to this API is 32K (32,768 bytes). |
| 400 | Bad Request (Malformed Payload): A GET request lacked a street field or the request body of a POST request contained malformed JSON. |
| 200 | OK (success!): A JSON array containing zero or more address matches for the input provided with the request. If none of the submitted addresses validate, the array will be empty ([]). The structure of the response is the same for both GET and POSTrequests. |
Enter the following code in the SmartyStreetAPI class to define the Response Class:
        public class StatusResponse
        {
            public int Status { get; set; }
            public string StatusDescription { get; set; }
        }
Enter the following code in the SmartyStreetAPI class to provide a property for the Status Response:
        /// <summary>
        /// Returns the status code and description
        /// </summary>
        public StatusResponse Status { get; set; }
Unfortunately the .NET WebClient class does not provide a means to get the status from your call. Of course we could simply assume the call was successful unless it throws an exception and we can get the status code from the WebException class but I wanted to expose the status in my SmartyStreetAPI class using the Status property. So I found this post on StackOverflow.com and it had a great solution for getting the status using reflection. Let's add a static method to get the status response:
        private static int GetStatusCode(WebClient client, out string statusDescription)
        {
FieldInfo responseField = client.GetType().GetField("m_WebResponse", BindingFlags.Instance | BindingFlags.NonPublic);

            if (responseField != null)
            {
                HttpWebResponse response = responseField.GetValue(client) as HttpWebResponse;

                if (response != null)
                {
                    statusDescription = response.StatusDescription;
                    return (int)response.StatusCode;
                }
            }

            statusDescription = null;
            return 0;
        }
Create Public Methods for the SmartyStreetAPI class
We only have two methods left to create. We could do all the work in a single method that builds the URL query, makes the call and returns the addresses, however, it is much easier to test if we break that into two separate calls. One will create the URL query and the other will use it to get the addresses.
Creating the URL Query
Several of the input parameters are optional so we need to create the code that examines the parameters that are provided. Some parameters are required as a minimum so let's also make sure those parameters are provided. Enter the following code into the SmartyStreetAPI class to build the URL Query:
/// <summary>
/// Returns a Url to be used for the query to SmartyStreets Address Standardization
/// </summary>
/// <returns>Smarty Streets Street Address compliant query URL</returns>
/// <remarks>Minimum Property Requirements:
/// UrlBase, AuthID, AuthToken, Street. If all of these propertys are not populated an ApplicationException will be thrown.
/// </remarks>
public string BuildUrlQuery()
{
if (string.IsNullOrEmpty(UrlBase)) throw new ApplicationException("Can not build a query without a value for the UrlBase Property.");
if (string.IsNullOrEmpty(AuthID)) throw new ApplicationException("Can not build a query without a value for the AuthID Property.");
if (string.IsNullOrEmpty(AuthToken)) throw new ApplicationException("Can not build a query without a value for the AuthToken Property.");
if (string.IsNullOrEmpty(Street)) throw new ApplicationException("Can not build a query without a value for the Street Property.");
StringBuilder url = new StringBuilder(string.Format("{0}?auth-id={1}&auth-token={2}&street={3}&candidates={4}", UrlBase, AuthID, AuthToken, HttpUtility.UrlEncode(Street), Candidates));
if (!string.IsNullOrEmpty(InputID)) url.Append(string.Format("&input_id={0}", HttpUtility.UrlEncode(InputID)));
if (!string.IsNullOrEmpty(Street2)) url.Append(string.Format("&street2={0}", HttpUtility.UrlEncode(Street2)));
if (!string.IsNullOrEmpty(Secondary)) url.Append(string.Format("&secondary={0}", HttpUtility.UrlEncode(Secondary)));
if (!string.IsNullOrEmpty(City)) url.Append(string.Format("&city={0}", HttpUtility.UrlEncode(City)));
if (!string.IsNullOrEmpty(State)) url.Append(string.Format("&state={0}", HttpUtility.UrlEncode(State)));
if (!string.IsNullOrEmpty(ZipCode)) url.Append(string.Format("&zipcode={0}", HttpUtility.UrlEncode(ZipCode)));
if (!string.IsNullOrEmpty(LastLine)) url.Append(string.Format("&lastline={0}", HttpUtility.UrlEncode(LastLine)));
if (!string.IsNullOrEmpty(Addressee)) url.Append(string.Format("&addressee={0}", HttpUtility.UrlEncode(Addressee)));

return url.ToString();
}
Calling The Smarty Streets API
The final method we need to create is the call to the API to get one or more addresses. We are going to send a single address but we may bet one or more addresses in response, depending on the parameters we provide. So our method must return an array of addresses.
If we were not going to use this code in Dynamics AX I would use a List<Address> instead of an array. However, since X++ does not support making templated (generic) calls we need to use a standard non-generic type.
In the code we are going to do the following:
- instantiate a WebClient object
- Set the Request Headers
- Make the call (HTTP Post)
- Get the Response Headers
- Get the Status Response
The main question here is what headers are we going to use? If you look at the header options in the tables below you will see that there are two categories, Input/output options and query options. The input/output options specify what content type to use for input and output. Examples of content type or JSON and XML. The query options specify how to use the input values provided on the call.
Input/Output Header Options
| Header | Description | Example |
| Content-Type | The purpose of the Content-Type field is to describe the data contained in the body fully enough that the receiving user agent can pick an appropriate agent or mechanism to present the data to the user, or otherwise deal with the data in an appropriate manner. | Content-Type: application/json |
| Accept | The purpose of the Accept field is to describe the data that will be accepted in the response data. | Content-Type: application/json |
Query Header Options
| Header | Description | Example |
| X-Standardize-Only | Includes more than just verified results by standardizing addresses where the primary numbers fit into the range on the street.
Note: This header is not compatible with freeform addresses and is ignored for those inputs. |
X-Standardize-Only: true |
| X-Include-Invalid | Activates the most aggressive matching mode, which may include results for addresses that are not even remotely valid. As a side-effect, ambiguous addresses return only one candidate result, not multiple.
Note: This header is not compatible with freeform addresses and is ignored for those inputs. |
X-Include-Invalid: true |
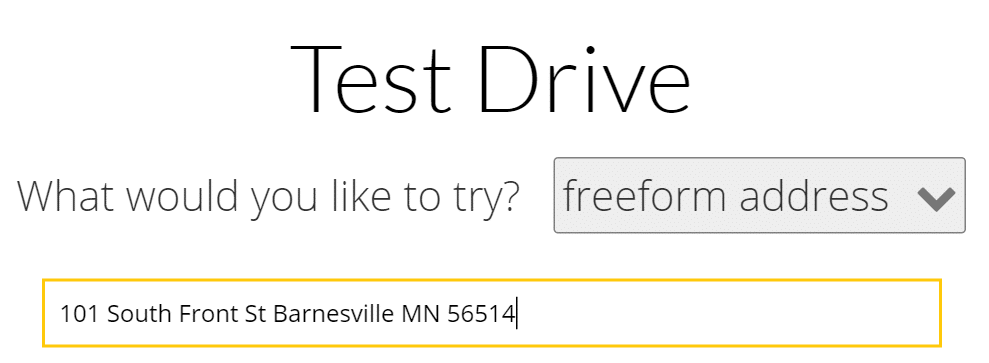
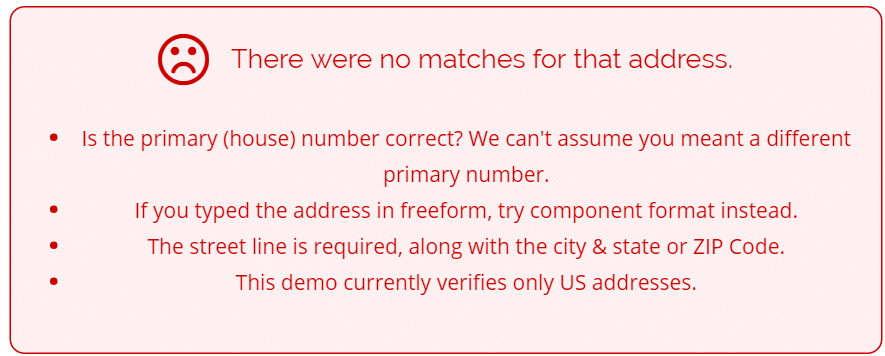
We want to be able to get addresses standardized even if the address cannot be validated. Interestingly, the address for the Stoneridge Software Barnesville office does not validate. So we will use the X-Standardize-Only header to specify that we only want to standardize and not validate. You can use the Smarty Street Interactive page to see how this works. Go to the page and enter "101 South Front St Barnesville MN 56514" as a freeform address.
You will get an error like this:
Now go and enter it as components:
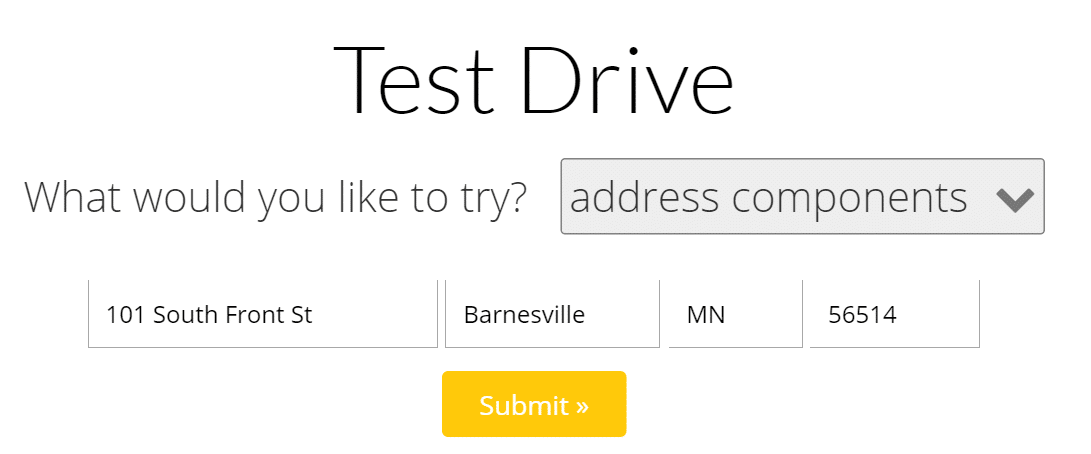
Now it tells you it is an invalid address but it still returns the address parsed. This is because the "X-Standardize-Only" header is set to "true." However, when this header is set we cannot use the freeform address option. That means we need to at least send the "lastline" option or the "city", "state" and "zipcode" separately.
Enter the following code into the SmartyStreetAPI class to make the API call:
this.ResponseHeaders = w.ResponseHeaders as NameValueCollection;
string statusDescription;
int status = GetStatusCode(w, out statusDescription);
this.Status = new StatusResponse() { Status = status, StatusDescription = statusDescription };
}
catch (Exception) { }
// if string with JSON data is not empty, deserialize it to class and return its instance
return !string.IsNullOrEmpty(json_data) ? JsonConvert.DeserializeObject < Address[] > (json_data) : new Address[1];
}
}
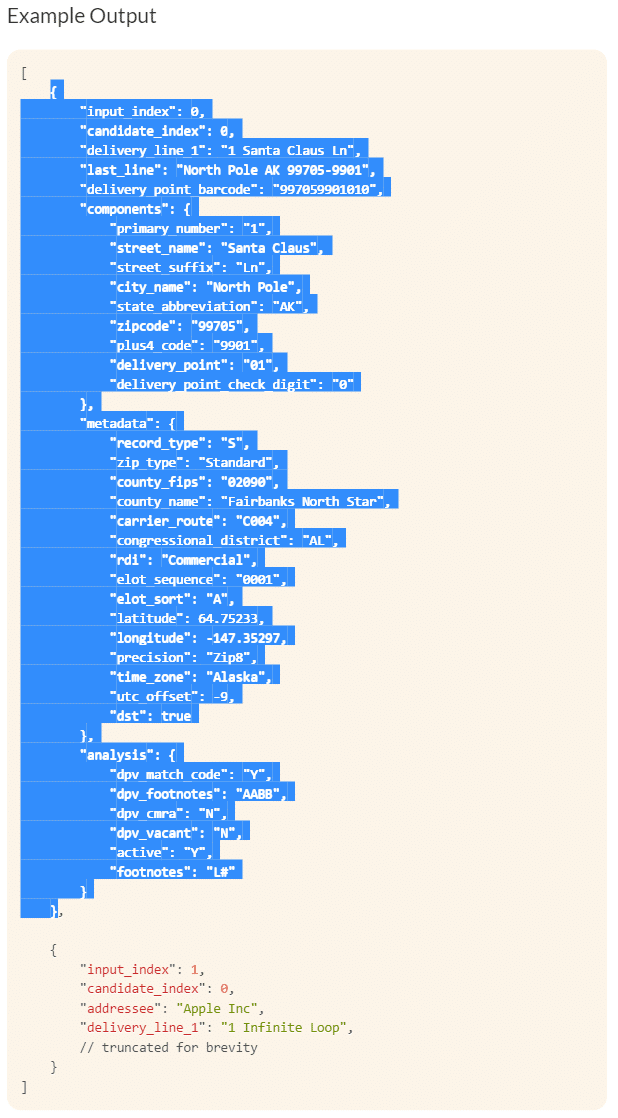
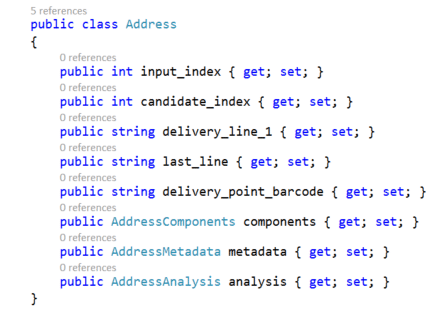
Once you have this code it would seem we are done, but this project will not build. The reason is because the "Address" class has not been defined. We need to create a class that can hold the JSON output. Fortunately, Visual Studio has a simple way to do this. Simply copy the example output from the Smarty Streets API documentation page and paste it in the bottom of the SmartyStreetAPI.cs file using the Edit/Paste Special/Paste JSON as Classes. Since the output is an array and we only want to create the class, It is important to copy only the first instance of the class definition with its sub classes. Do not copy the JSON array symbol or the comma or the subsequent partial object definition. (see the image below).
Once you have that pasted into your SmartySTreetAPI.cs file you will need to rename the "RootObject" class to "Address".
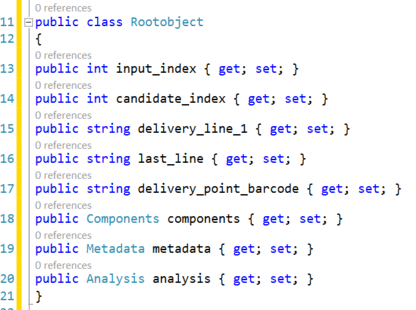
Then you can simply reformat the file to have a readable, full definition of the Address class.
Your project is missing one more thing to be able to build. The problem is this line in the DownloadSerializedJsonData method.
return !string.IsNullOrEmpty(json_data) ? JsonConvert.DeserializeObject < Address[] > (json_data) : new Address[1];
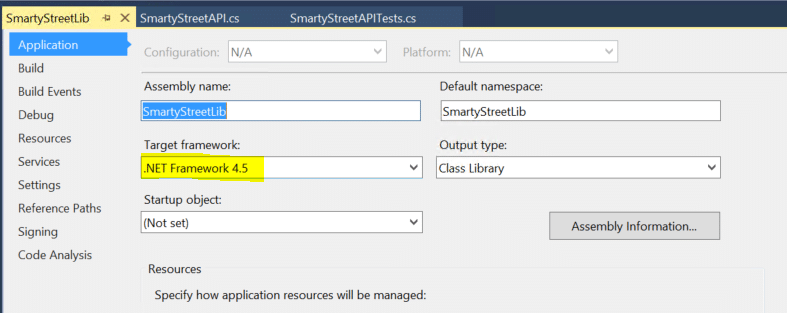
I chose to use the Json.Net library from Newtonsoft to deserialize the JSON return string into the Address class. This requires you to use the NuGet utility to get this library. Simply right click on the References node in your SmartyStreetLib project and click "Manage NuGet Packages …". Use the "Search Online field find JSON.NET and add it to your project.
You will need the following "Using" statements in your SmartyStreetAPI class file to get everything to work. You may need to also add a reference to the System.Web library using the reference manager.
using System;
using System.Collections.Specialized;
using System.Reflection;
using System.Text;
using System.Web;
using System.Net;
using Newtonsoft.Json;
Now your class should successfully compile.
Testing the SmartyStreetAPI Class
Now that we have a class we can use, we should test it. You should already have a test project. In the interest of time and space I won't provide a lot of details about creating a unit test. I will simply provide my unit test code below. You can run these two tests to verify your code.
[TestClass()]
    public class SmartyStreetAPITests
    {
        public SmartyStreetAPI Api { get; set; }
        [TestInitialize]
        public void Initialize()
        {
            Api = new SmartyStreetAPI();
            Api.AuthID = "<place your AuthID Here>";
            Api.AuthToken = "<Place Your AuthToken Here>";
        }

        [TestMethod()]
        public void BuildUrlQueryTest()
        {
            Assert.IsNotNull(Api, "Initialization did not complete correctly. Api should not be NULL");
            Api.Candidates = 10;
            Api.Street = "101 South Front St";
            Api.LastLine = "Barnesville MN 56514";

            string result = Api.BuildUrlQuery();
Assert.AreEqual("https://api.smartystreets.com/street-address?auth-id=d7e6b743-b4f9-63e0-4e45-97c02fb1cdfa&auth-token=s121PLRhWkXo3KM8RNIb&street=101+South+Front+St&candidates=10&lastline=Barnesville+MN+56514",
result);
        }

        [TestMethod()]
        public void DownloadSerializedJsonDataTest()
        {
            Assert.IsNotNull(Api, "Initialization did not complete correctly. Api should not be NULL");
            Api.Candidates = 10;
            Api.Street = "101 South Front St";
            Api.LastLine = "Barnesville MN 56514";
            string url = Api.BuildUrlQuery();
            Address[] Addresses = Api.DownloadSerializedJsonData(url);
            Assert.AreEqual(1, Addresses.Length);
            Assert.IsNotNull(Addresses[0]);
            Address address = Addresses[0];
            Assert.AreEqual("101 Front St S", address.delivery_line_1);
            Assert.AreEqual("Barnesville MN 56514-3838", address.last_line);
        }
    }
Once these two tests pass, we are ready to call the class from inside AX.
Calling SmartyStreetAPI Class From AX
If you correctly added the Visual Studio project to the AOT you will be able to see it in the AOT in AX and will be able to use the SmartyStreetAPI. Remember, you will have to use the full namespace to reference it (ie. SmartyStreetLib.SmartyStreetAPI )
You will need to add the Newtonsoft library to the Server and Client deployments. I won't go into details on the proper way to do that, but you can simply copy them for now. My Server directory is "C:\Program Files\Microsoft Dynamics AX\60\Server\DAXR3\bin\VSAssemblies". Basically, you want to find the VSAssemblies directory in your Server\Bin directory. Copy the Newtonsoft.Json.dll file from [VS Projects Directory]\SmartyStreetLib\packages\Newtonsoft.Json.8.0.3\lib\net45. If you used a different .net library for your project make sure to match the correct directory for the newtonsoft library. You can find your .NET library in your Projects Properties under the Application tab.
You will need to also copy that file to the client folder. That is found in the [Users]\[Current User]\C:\Users\AppData\Local\Microsoft\Dynamics Ax\VSAssemblies{SomeGuid}. Since I was logged in as Administrator in a Contoso Demo environment, mine client path was in C:\Users\Administrator\AppData\Local\Microsoft\Dynamics Ax\VSAssemblies{25ADFFAF-205F-4317-91C3-533E3758794B}. There is a good series of articles explaining how to deploy this DLL properly here.
Add a new Job to the AOT (I like to create a private project and add it to that for future reference and for exporting purposes). Name it TestSmartyStreetLib and add the following code:
static void TestSmartyStreetLib(Args _args)
{
str url;
SmartyStreetLib.SmartyStreetAPI api;
SmartyStreetLib.Address[] addresses;
SmartyStreetLib.Address address;
System.Exception netExcepn;
int addressCount;
str output;
api = new SmartyStreetLib.SmartyStreetAPI();
api.set_AuthID("<place your AuthID Here>");
api.set_AuthToken("<Place Your AuthToken Here>");
api.set_Candidates(1);
api.set_Street("101 South Front St");
api.set_LastLine("Barnesville MN 56514");
try
{
url = api.BuildUrlQuery();
addresses = api.DownloadSerializedJsonData(url);
address = addresses.GetValue(0);
}
catch (Exception::Error)
{
info("Caught 'Exception::Error'" );
}
catch (Exception::CLRError)
{
info("Caught 'Exception::CLRError'.");
netExcepn = CLRInterop::getLastException();
info(netExcepn.ToString());
}
catch
{
info("Caught an Exception");
}
addressCount = addresses.get_Length();
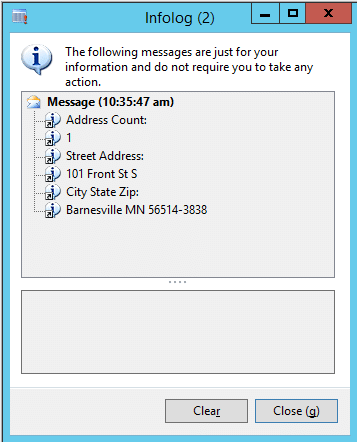
info("Address Count: ");
info(int2str(addressCount));
info("Street Address: ");
info(address.get_delivery_line_1());
info("City State Zip:");
info(address.get_last_line());
}
This should provide you with the following output:
Stay tuned for my next post where we integrate this class into the UI for AX.

Under the terms of this license, you are authorized to share and redistribute the content across various mediums, subject to adherence to the specified conditions: you must provide proper attribution to Stoneridge as the original creator in a manner that does not imply their endorsement of your use, the material is to be utilized solely for non-commercial purposes, and alterations, modifications, or derivative works based on the original material are strictly prohibited.
Responsibility rests with the licensee to ensure that their use of the material does not violate any other rights.