


Streamline Maintenance Requests with Production Floor Execution in D365 Supply Chain Management
In any manufacturing environment, the flow of healthy and consistent production can be upended by costly interruptions.
Whether a machine vibrates the wrong way, a batch runs hotter than expected, or a machine breaks down, your entire production schedule could be at risk in the blink of an eye. This is where Dynamics 365 Supply Chain Management delivers tremendous value by combining Production Floor Execution (PFE) and Enterprise Asset Management (EAM).
With these capabilities, you can turn shop-floor breakdowns into structured maintenance events, automate preventative maintenance, and maintain clear feedback loops between operations and maintenance.
In this blog, we’ll walk through:
- Why the PFE–EAM integration matters
- How to configure the environment
- How operators request maintenance and register downtime directly from the shop floor
- How maintenance teams receive and act on those requests
- How counters automatically generate preventative work
Then, we’ll move into a full demonstration on how to use these features effectively, ensuring your manufacturing operations run smoothly and consistently.
Watch the video presentation below or read on (or both!).
Why Streamlining Maintenance Matters
When maintenance is disconnected from production, you end up with:
- Missing or unclear information (“It made a weird noise earlier… I think?”)
- Delayed response times
- Unplanned downtime
- Inefficient repairs
- Poor visibility into machine health trends
All of these issues cost you valuable time and money and can have ripple effects throughout your business. If production is delayed, customers may not receive their products on time. This ends up putting additional stress on your customer service and sales teams and can potentially lead to a loss of clients as well.
With EAM and PFE, you can tie maintenance directly to production, allowing for clear lines of communication and smarter, more effective planning. Some of the key benefits include:
- Operators reporting issues the moment they appear
- Maintenance receives detailed, actionable requests automatically
- Work orders are linked to counter values, jobs, and assets
- Preventive tasks are triggered automatically
- Downtime is scheduled consistently and transparently
- Asset history becomes richer and more reliable
This is the foundation for a proactive, data-driven maintenance strategy — and Dynamics 365 provides the tools to make it happen.
What You Need to Know Before Getting Started
Now that you understand what these features can do for you, let’s start by giving you a brief rundown of the aspects of these tools you should familiarize yourself with prior to using them:
1. Products and Routes
Your finished goods (or variants) should have:
- Proper formulas and route
- Links to the correct operations
- Variants for size, hardness, or other characteristics
2. Production Floor Execution (PFE)
Within PFE, configure the UI so operators can:
- Request maintenance
- Register downtime
- View machine metrics and counters
- See open and scheduled maintenance actions
3. Assets and Asset Types (EAM)
Each real-world machine should be represented as an asset with:
- Asset type
- Counters (temperature, run hours, output quantity, etc.)
- Associated maintenance job types
4. Counters
Counters determine how you track the health of your machine. Typical examples include:
- Temperature (manual update)
- Production hours (automatic)
- Production quantity (automatic, driven by production order progress)
5. Downtime Reason Codes
Operators use these to categorize downtime directly from the PFE terminal.
6. Preventative Maintenance Plans
These allow maintenance jobs to trigger automatically when counters reach defined thresholds.
How It Works: PFE and EAM for D365 Finance and Supply Chain Management in Action
Below is a complete walkthrough of every configuration step, every PFE action, and the entire lifecycle from production to maintenance to preventative scheduling. You can also see this demonstration in the YouTube video posted above.
Part 1 — Setting the Stage
For this scenario, we are working at a small wire manufacturer in Fort Wayne, Indian. We’ll be producing 304V soft wire using a two-operation route:
- Wire drawing
- Annealing
Our goal is simple: Show how Production Floor Execution drives maintenance visibility and automates preventative work.
Part 2 — Product Setup
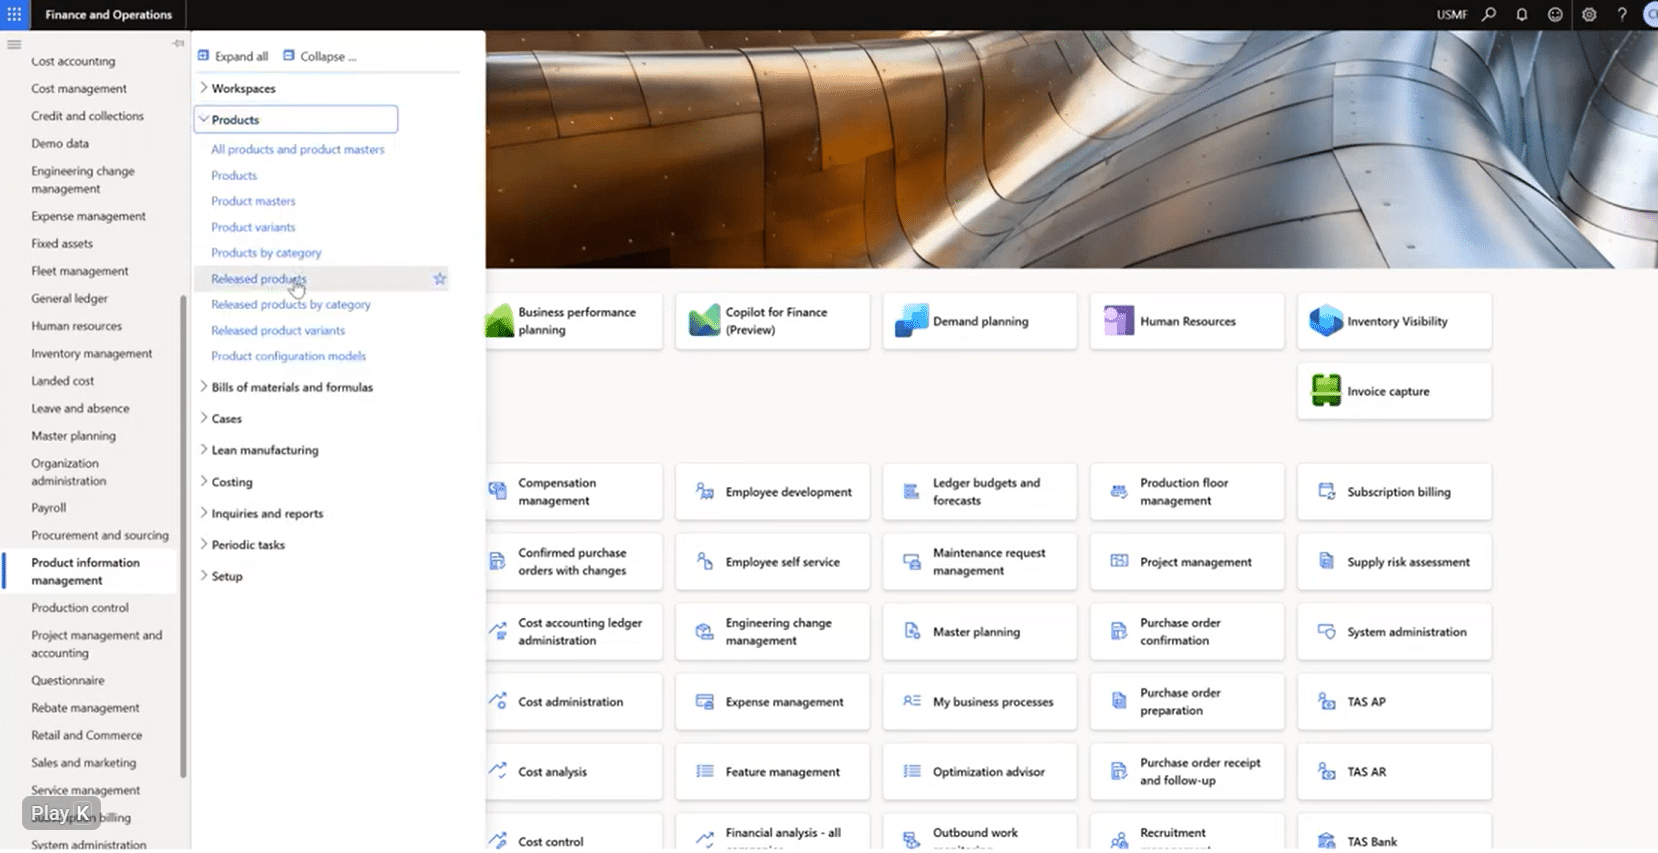
We begin in Product information management > Released products and have two items prepared:
- 304B Raw Wire — what we purchase.
- 304V Wire (Product Master) — what we manufacture.
The product master includes variants for:
- Hardness (hard or soft)
- Size (several OD options)
Part 3 — PFE Configuration
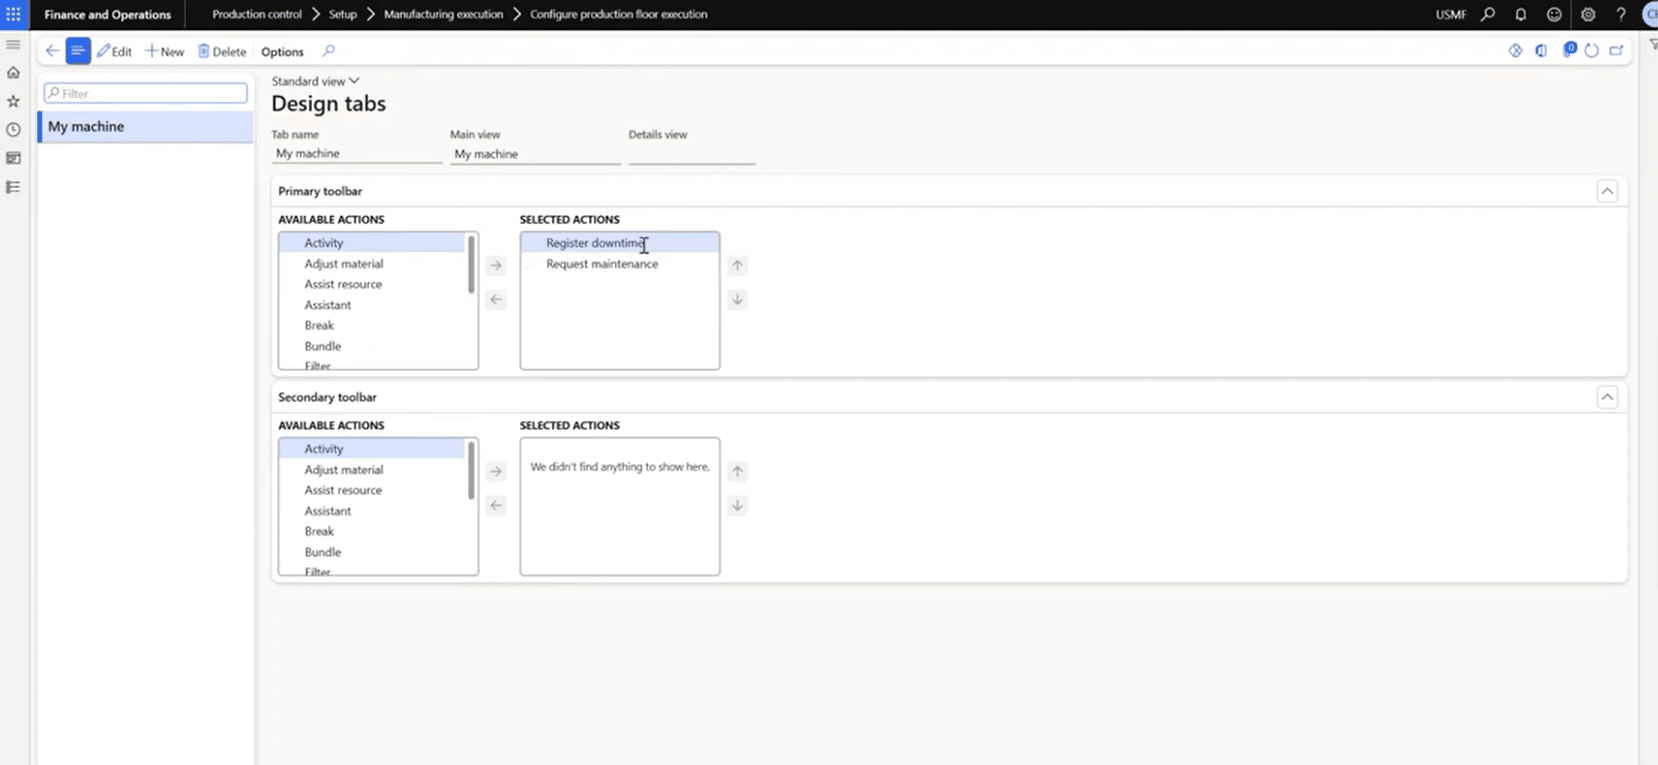
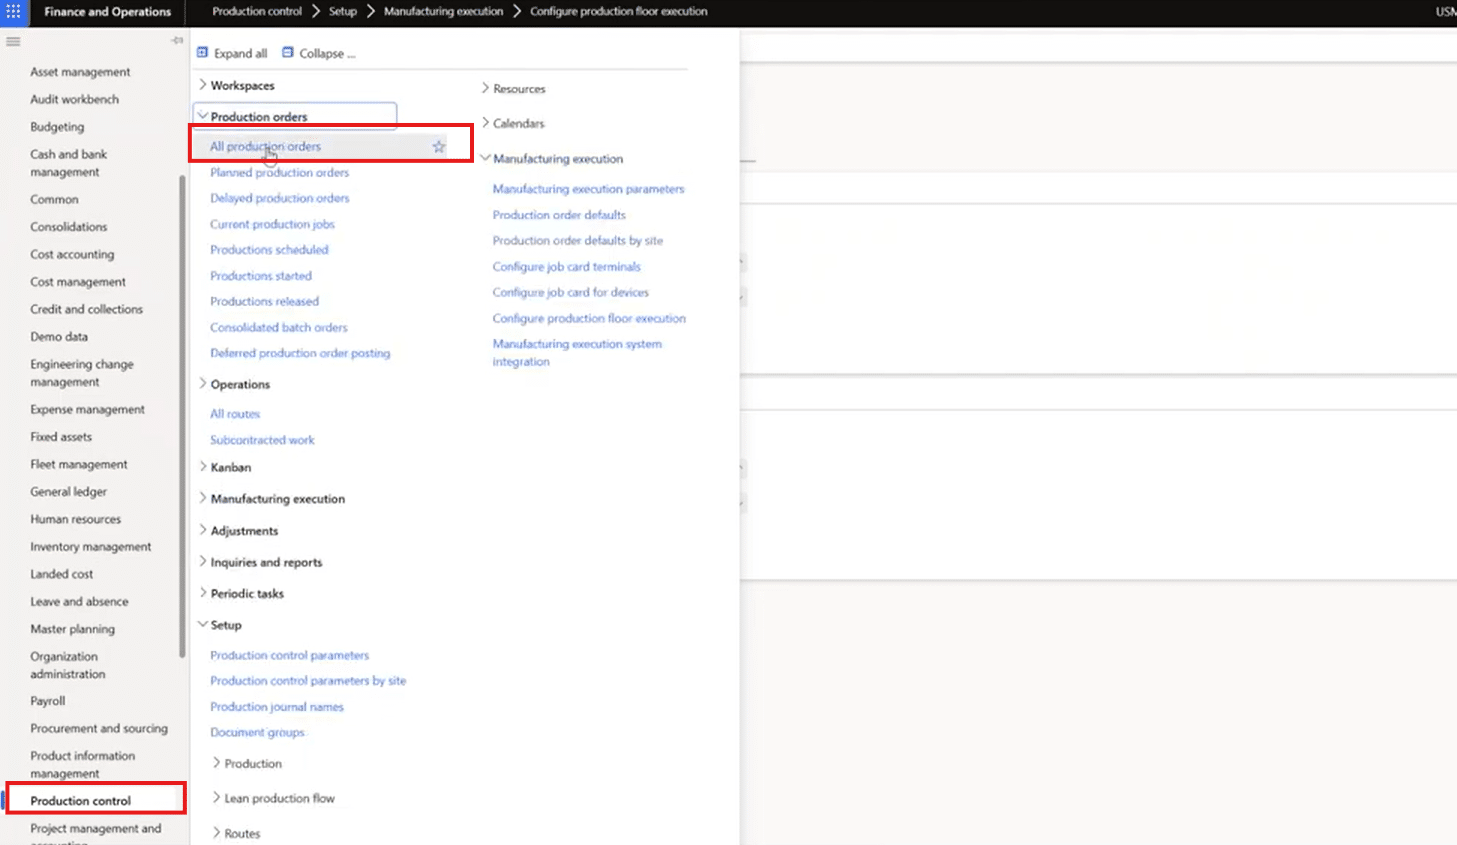
Next, we open Production control > Setup > Manufacturing execution > Configure production floor execution
Under the My machine configuration, we’ve enabled Register downtime and Register maintenance. These are the tools production operators will use during execution.
Part 4 — Asset Management Setup
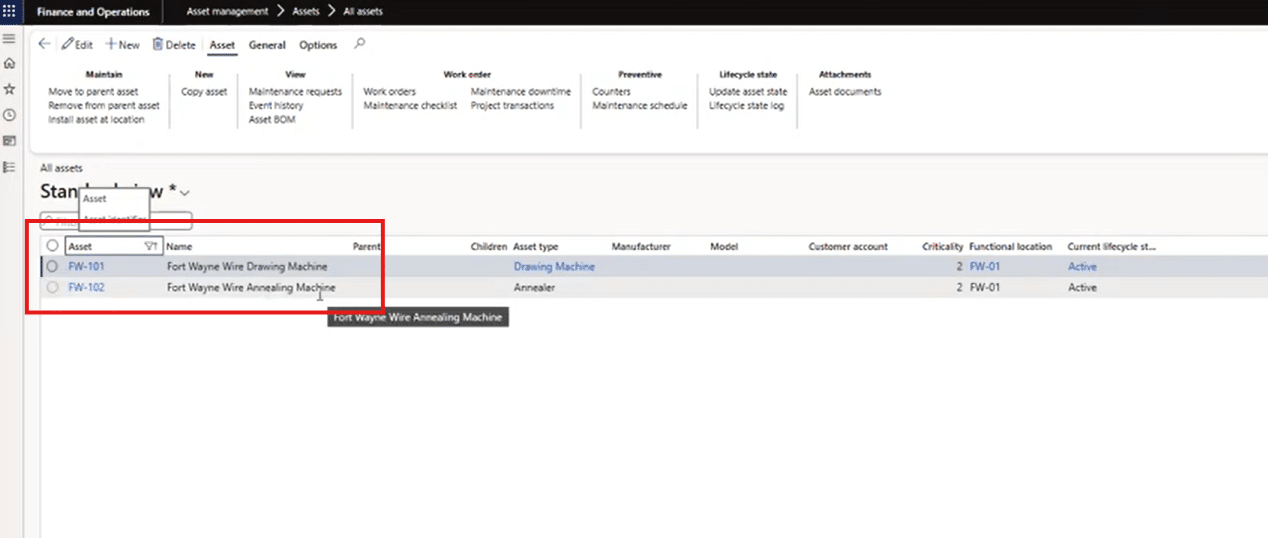
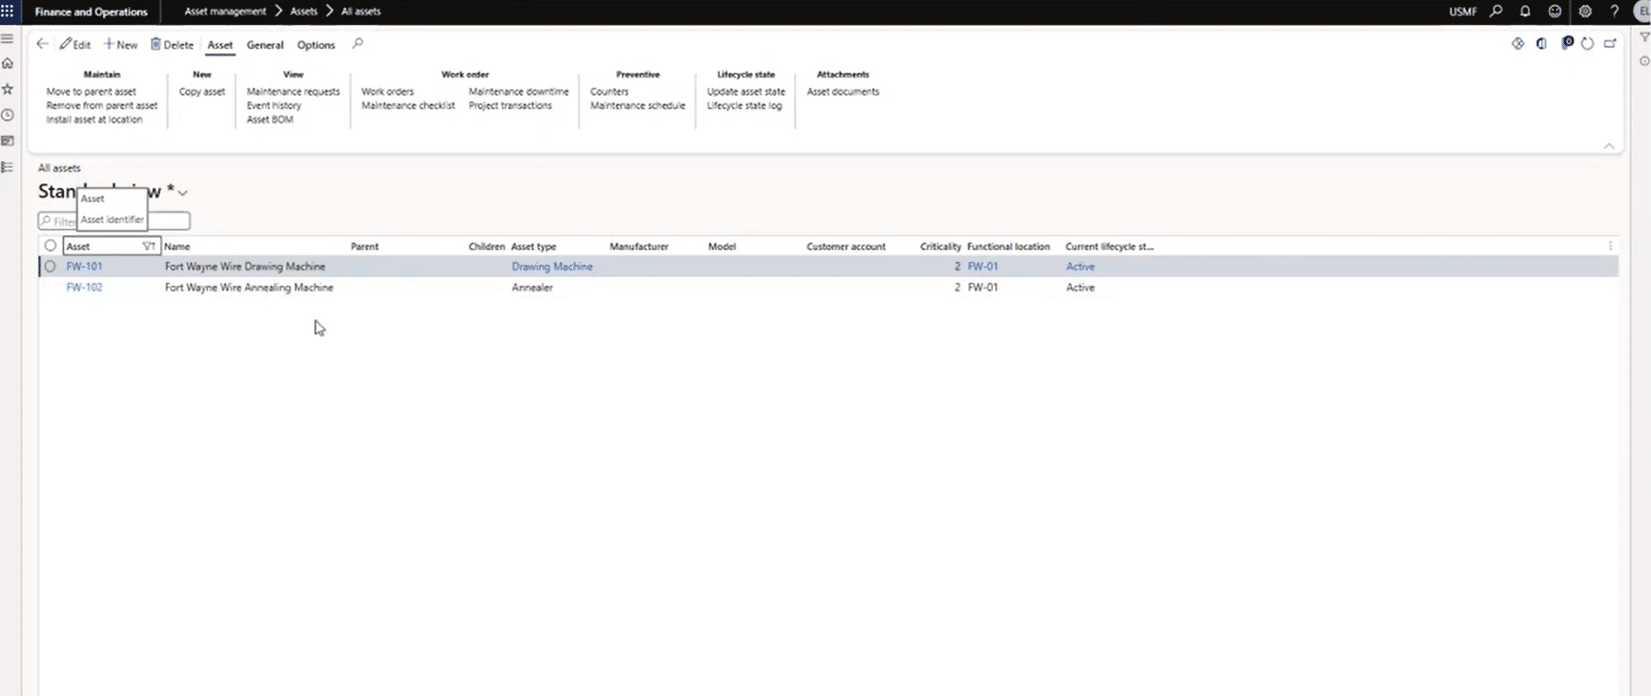
For Assets, we’ll navigate to Asset Management > Assets > All Assets, then filter your assets. For this example, the assets are:
- FW101 — Drawing machine
- FW102 — Annealing machine
Each asset shows work orders, downtime history, counters, and maintenance job types. With this information readily available in the system, it should give your maintenance team a head start when dealing with similar issues.
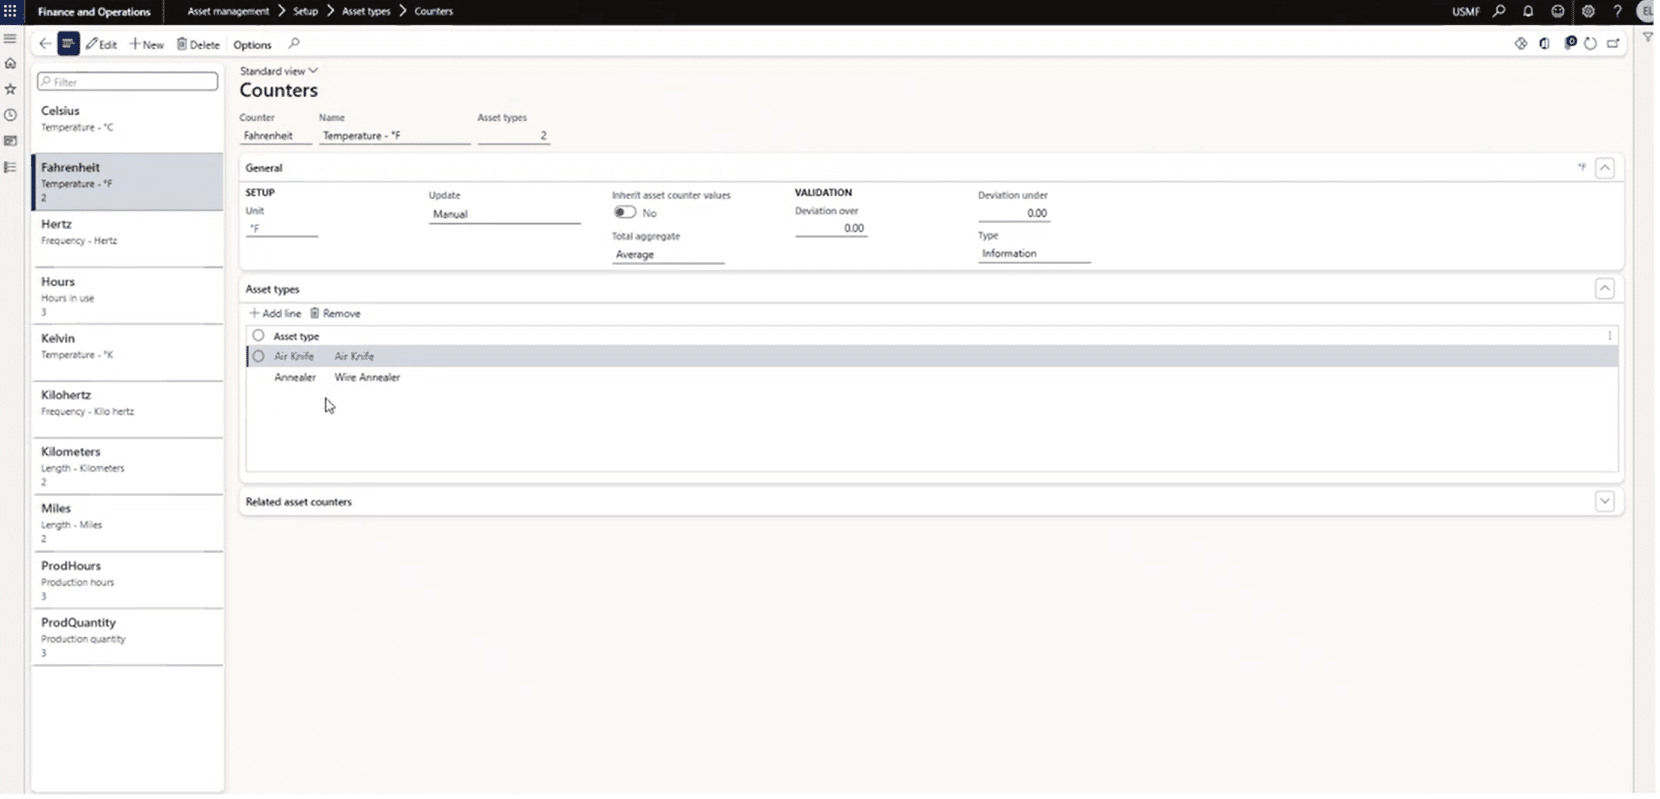
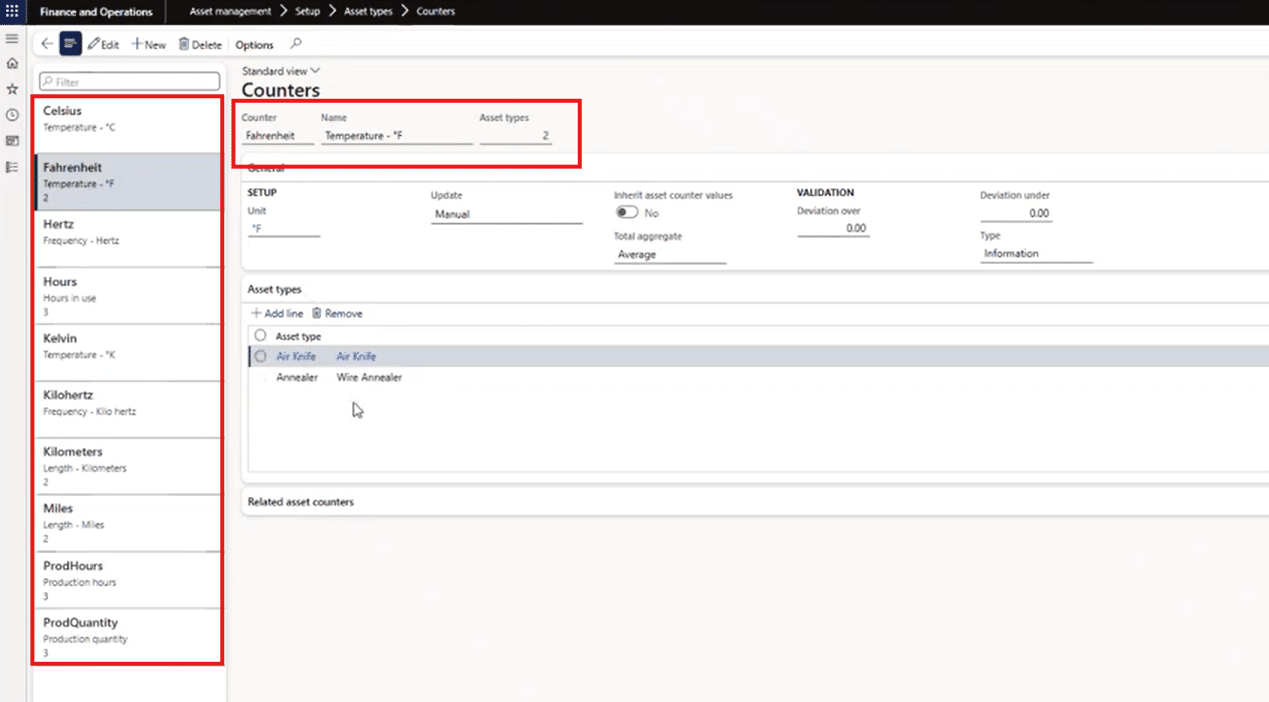
Counters
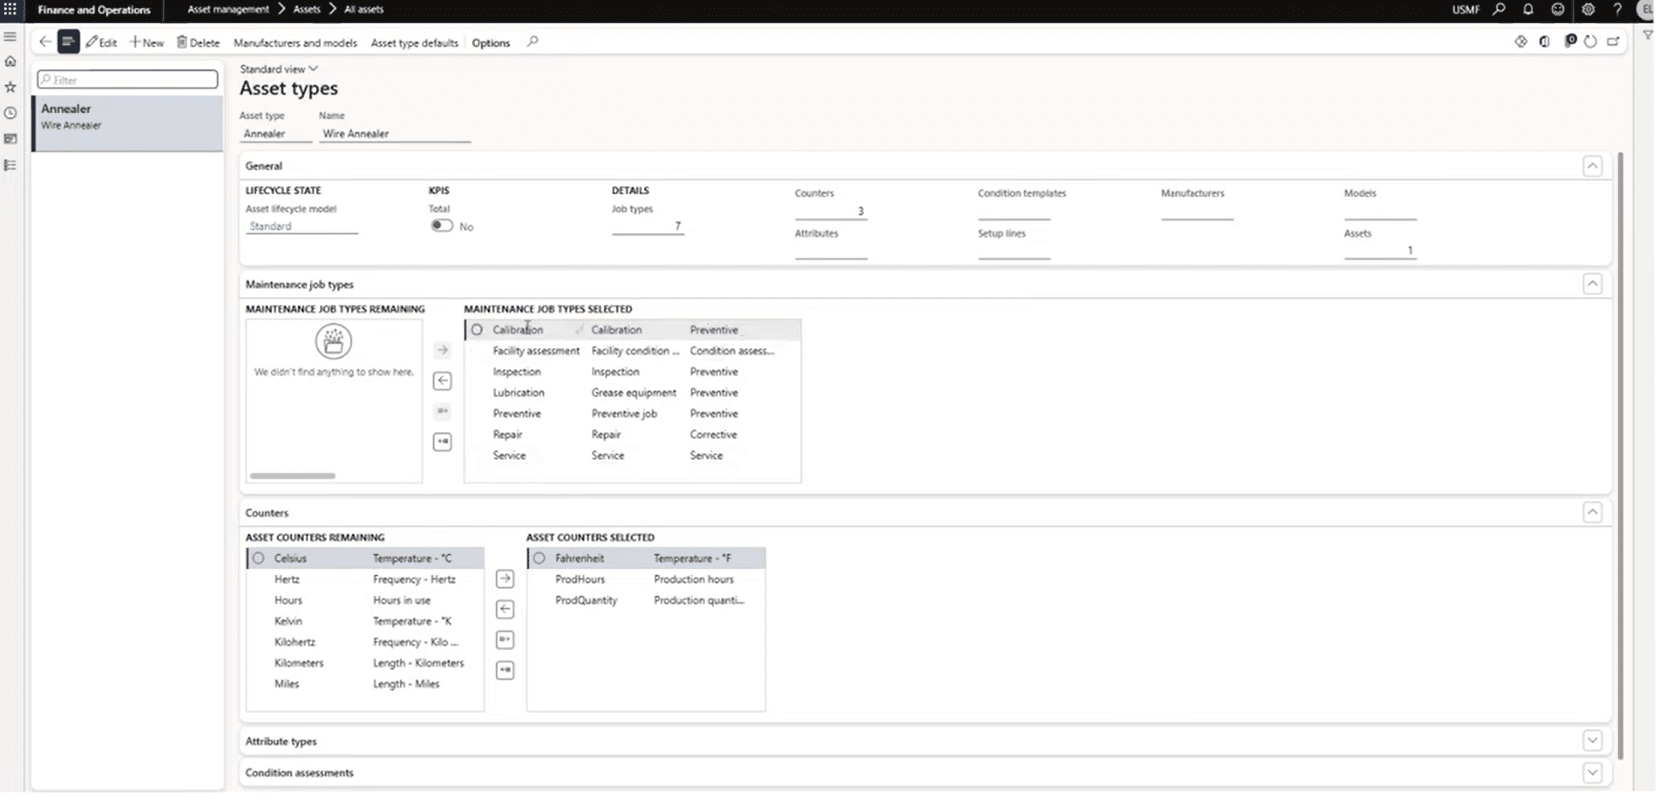
Next, we’ll open asset type counters and see:
- Fahrenheit — manually entered
- Prod hours — auto-updated during production
- Prod quantity — auto-updated from production jobs
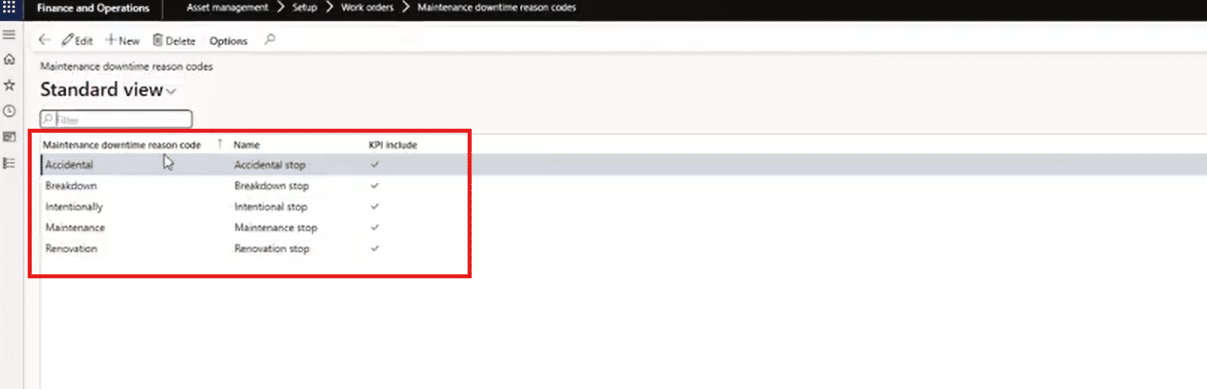
Downtime Reason Codes
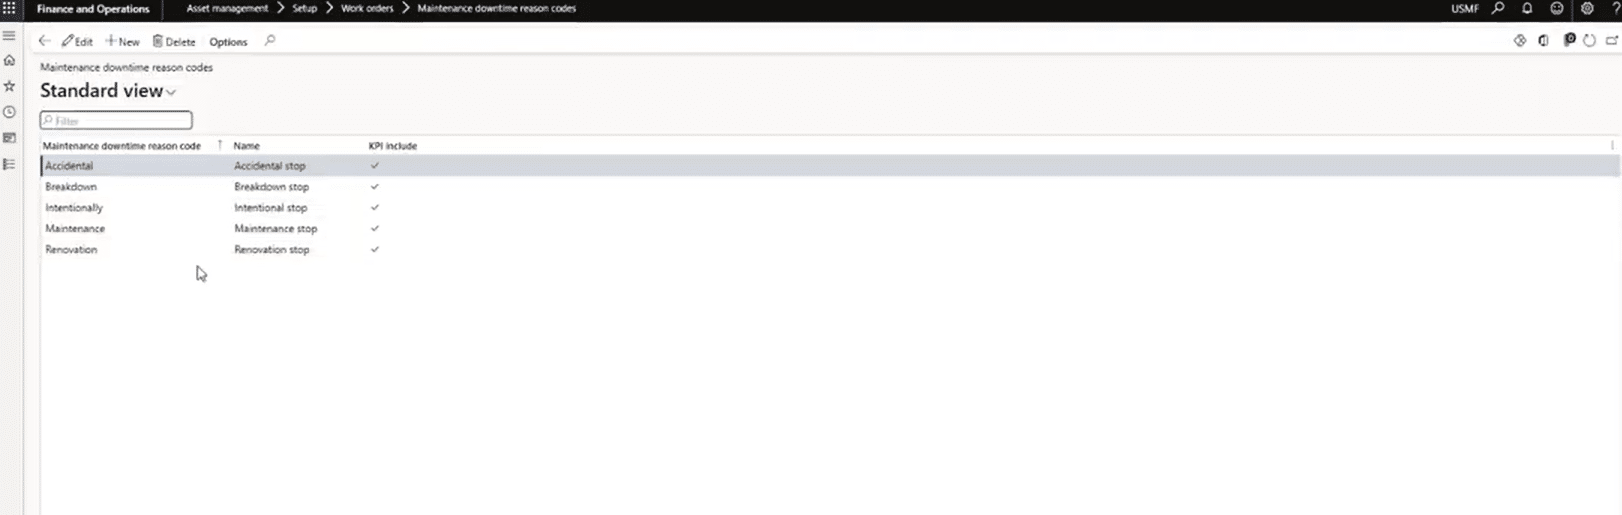
Lastly, we will create downtime reason codes by going to Asset management > Setup > Work orders > Maintenance downtime reason codes. From there, you can select the applicable code.
Part 5 — Creating and Releasing the Batch Order (My Steps)
The next part of the process is creating and releasing a batch order. For our example, we can do this easily by following these steps in the Production control module:
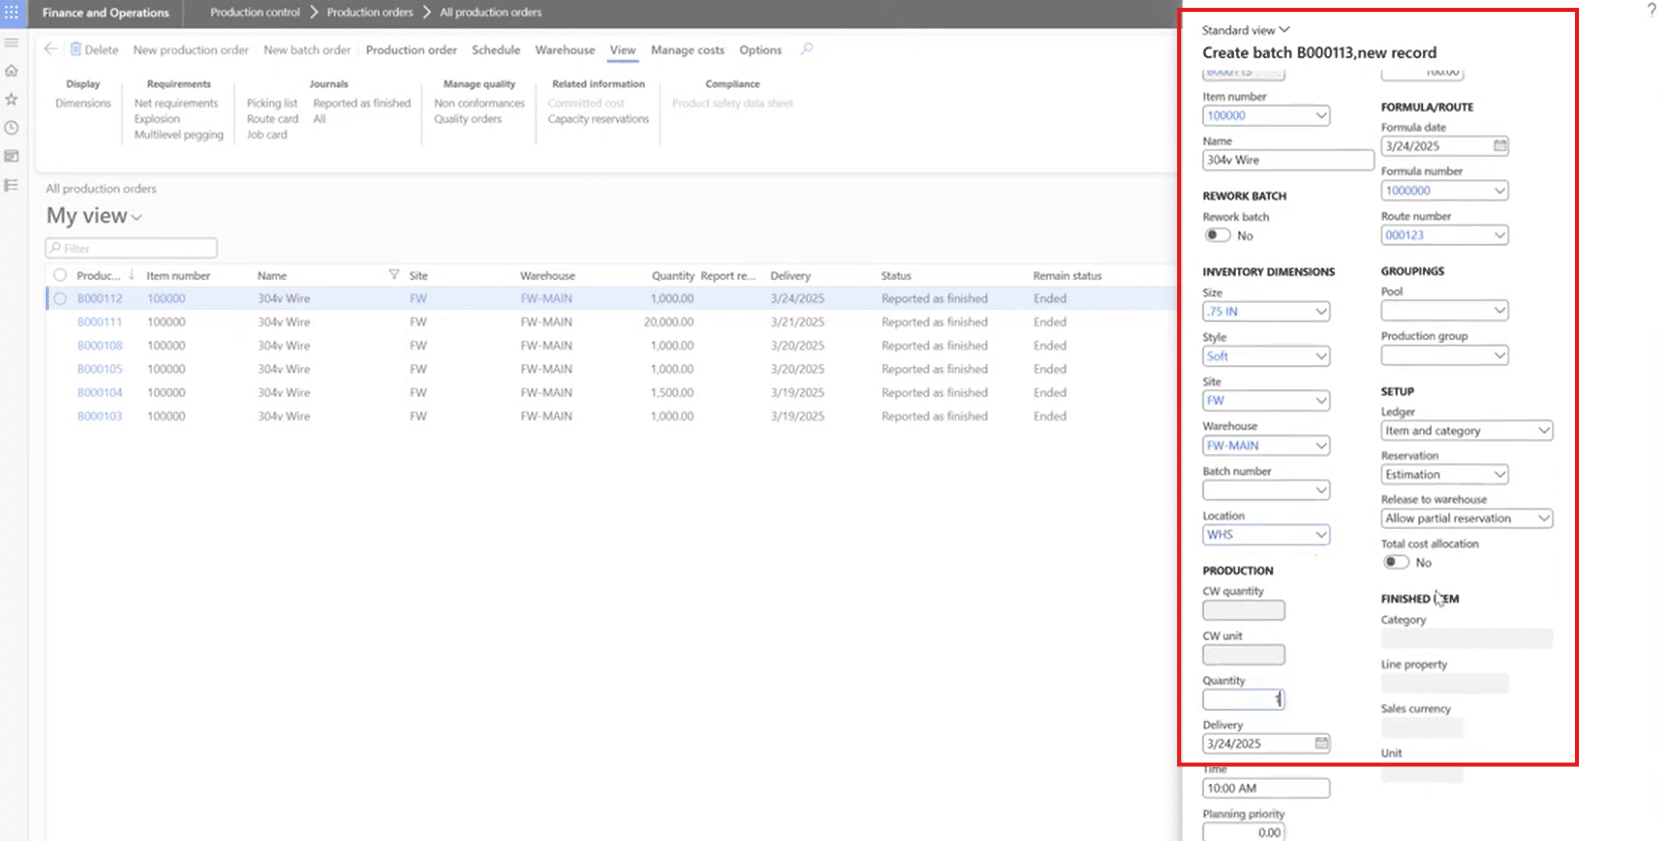
- Go to All production orders

- At the top, click New batch order
- Enter product: 304V
- The system prompts for variant
- I choose "Soft, .75"
- Confirm inserting the active formula and route by clicking “Yes” on the popup
- Enter Quantity: 1,000 ft
- Enter the location
- Click Create
After that is done, you will estimate how long an order will take, schedule the job, and then release the order so it appears on the production floor.
Part 6 — Running the Job in Production Floor Execution
From there, we can run the job by navigating to Manufacturing execution > Production floor execution. They will see two jobs waiting: wire drawing and annealing.

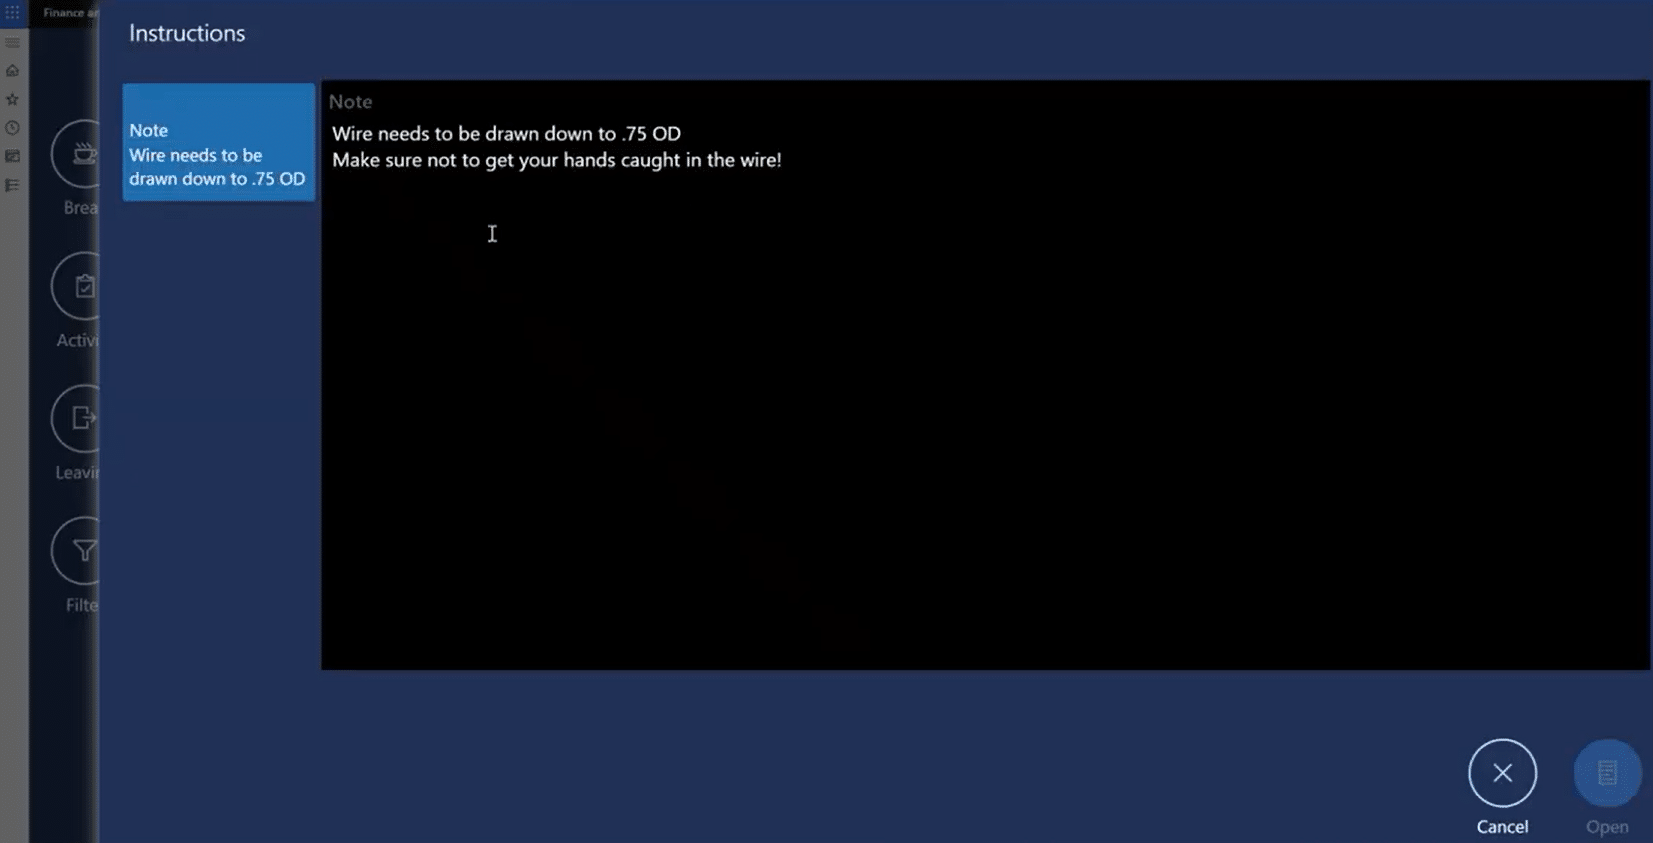
We can then open the drawing job to view the work instructions. These often serve as good reminder tools as they can include notes on what to do and what not to do.
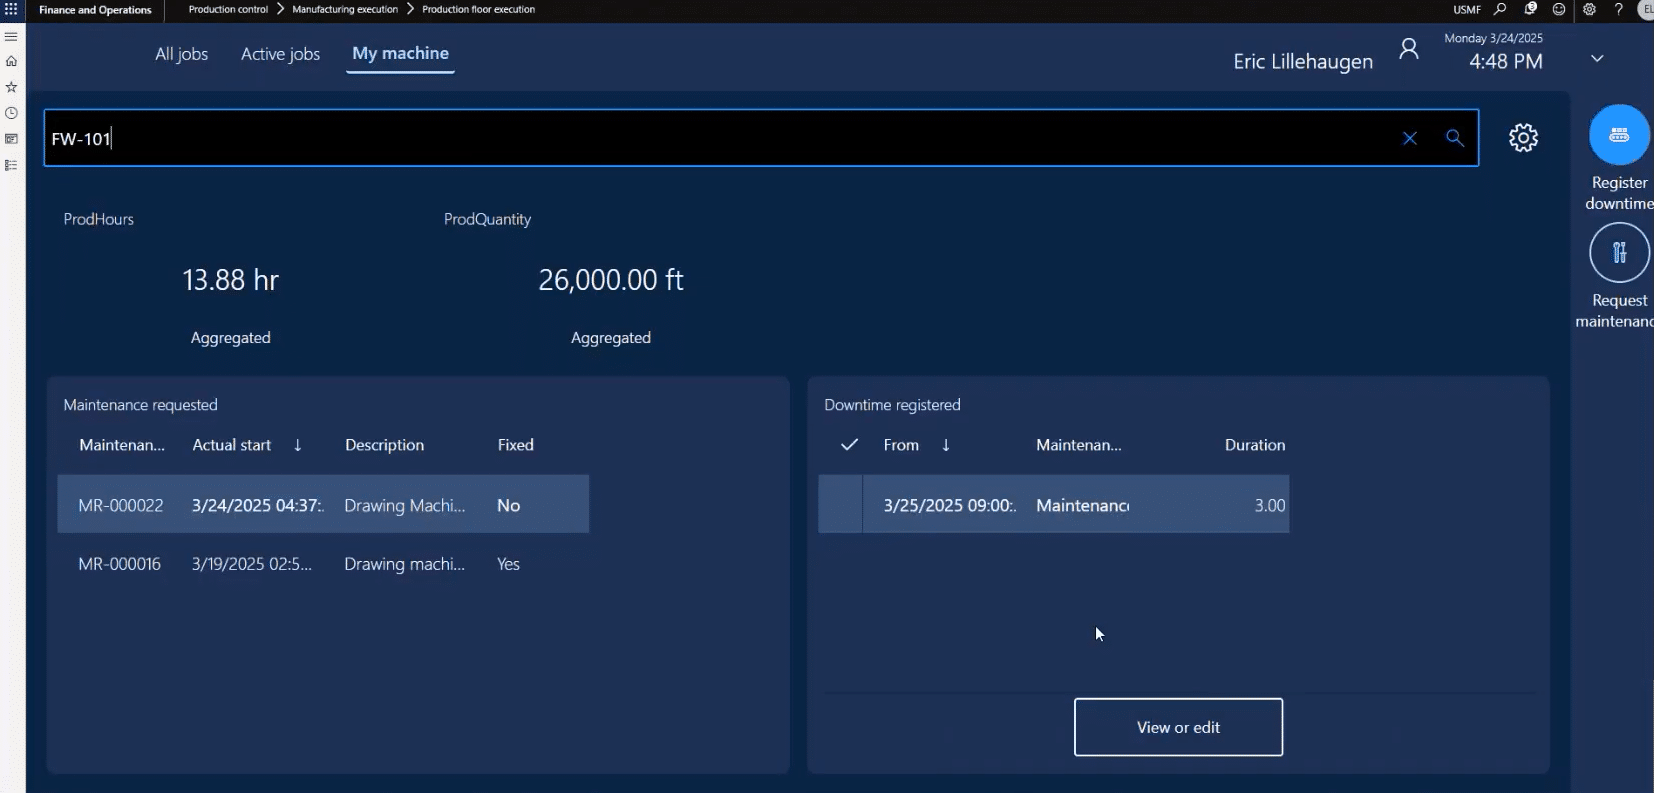
Members of your production team can also check machine health by clicking on My machine and opening F101. This will show us several things, including:
- Counters
- Last maintenance
- Any upcoming downtime
- Configurable counter display
- Aggregated vs. actual readings
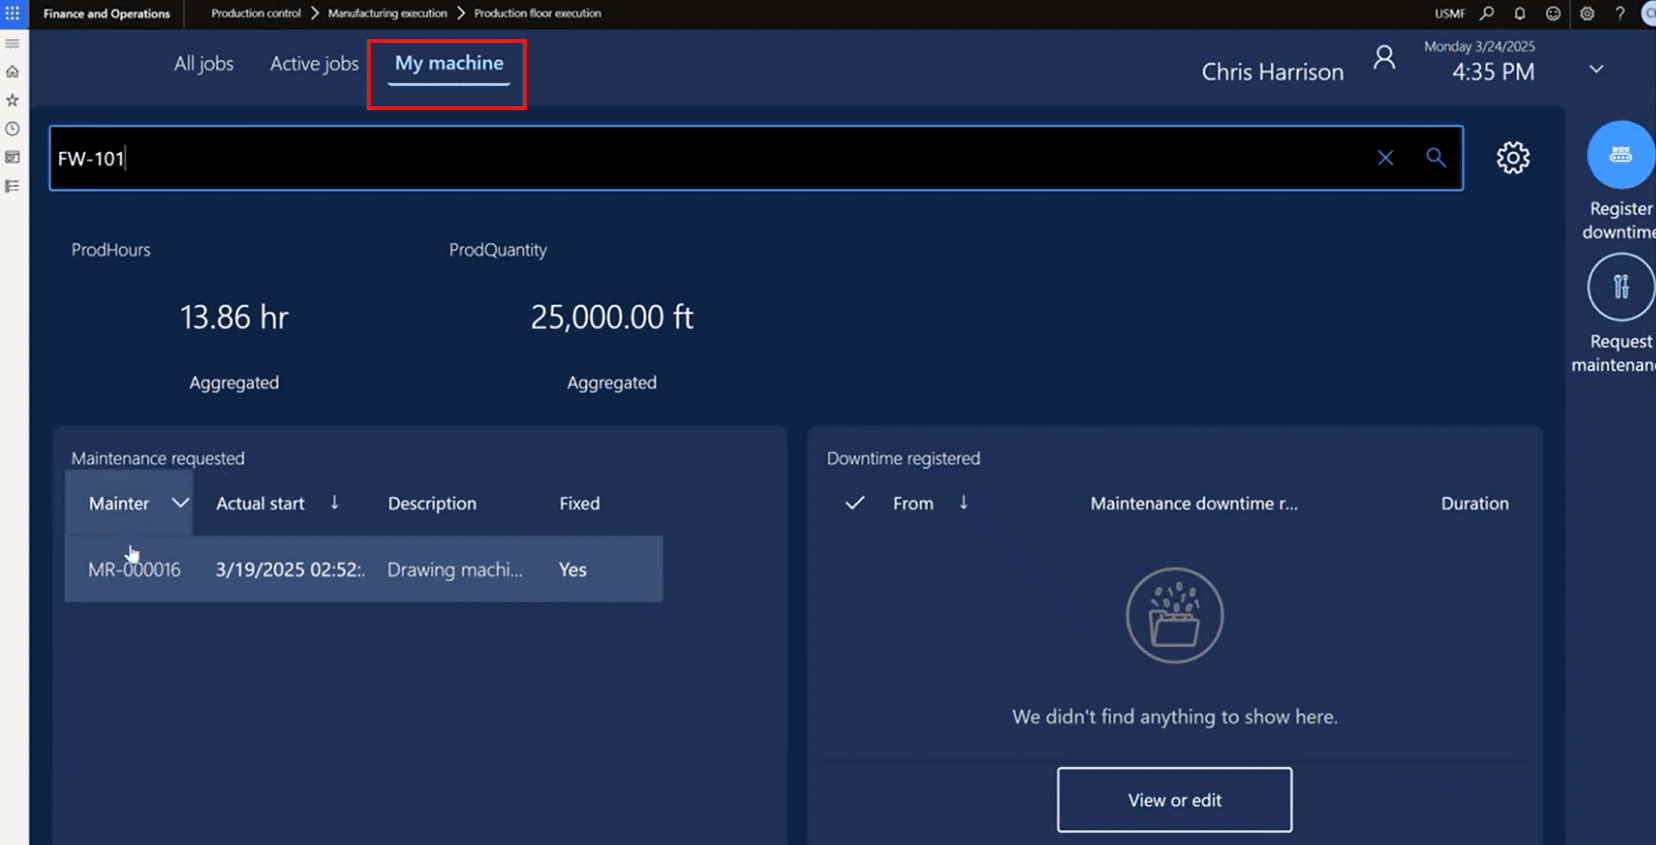
In our example, everything looks fine, and we can proceed to the next steps.
Part 7 — Starting the Job & Submitting a Maintenance Request
Next, we return to the job list and hit Start on the drawing operation.
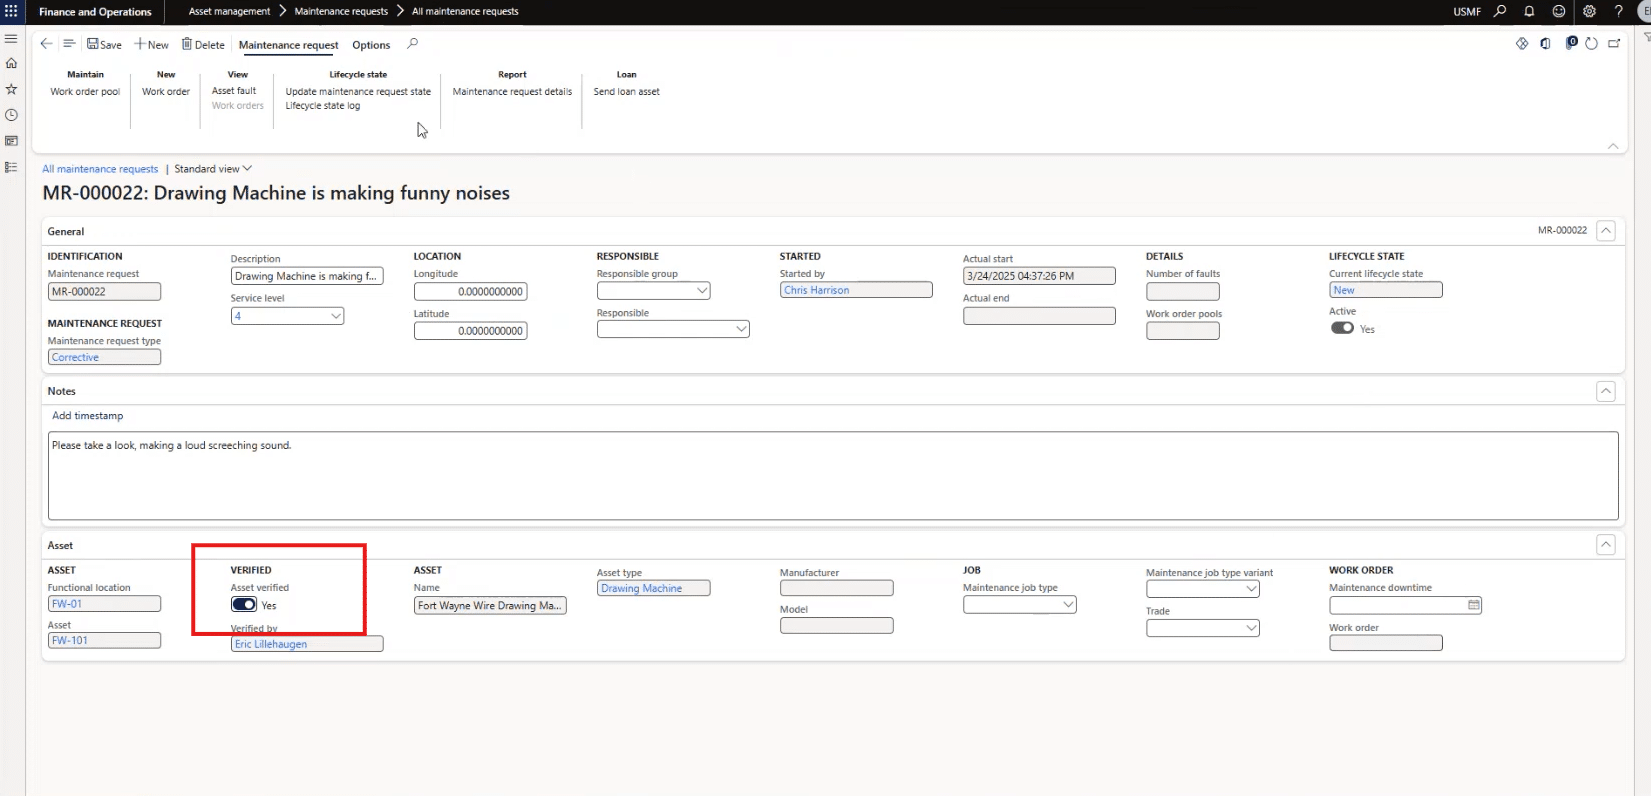
In our example, we are the person operating the machine and notice a noise that doesn’t sound right. In the system, we can go back to My machine, select Request maintenance, and then enter a description and notes like:
“Drawing machine is making funny noises. Please take a look. Making a loud screeching sound.”
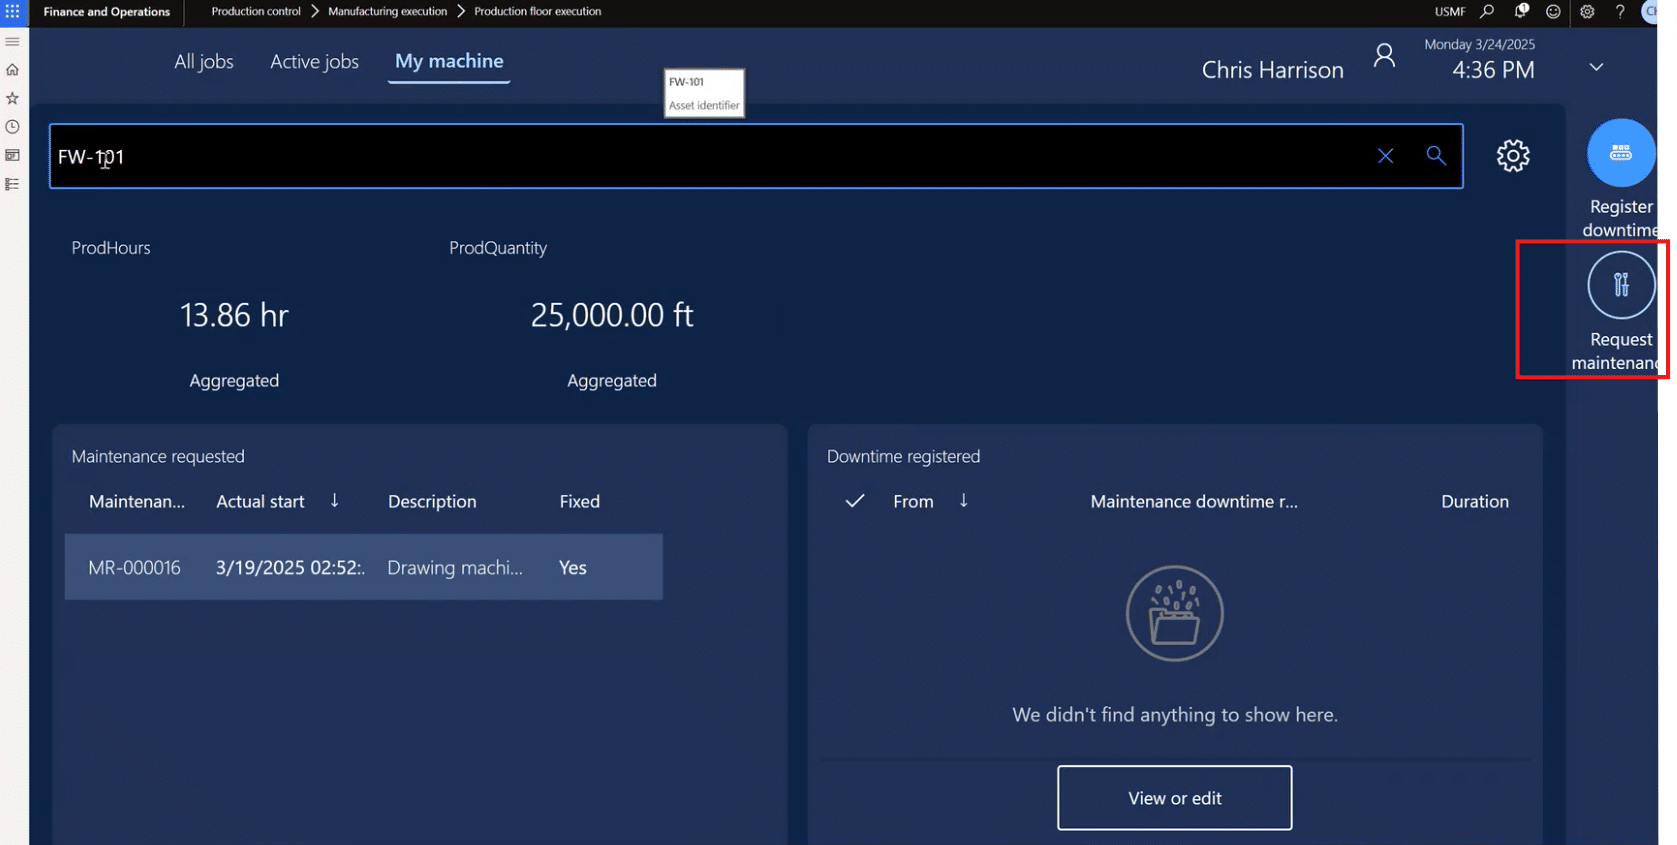

The request appears instantly in the machine’s maintenance history, and then we (members of the production team) can send notes to the maintenance team almost instantly. This equips your maintenance team with vital information that will reduce downtime and give them an idea of what they are in for.
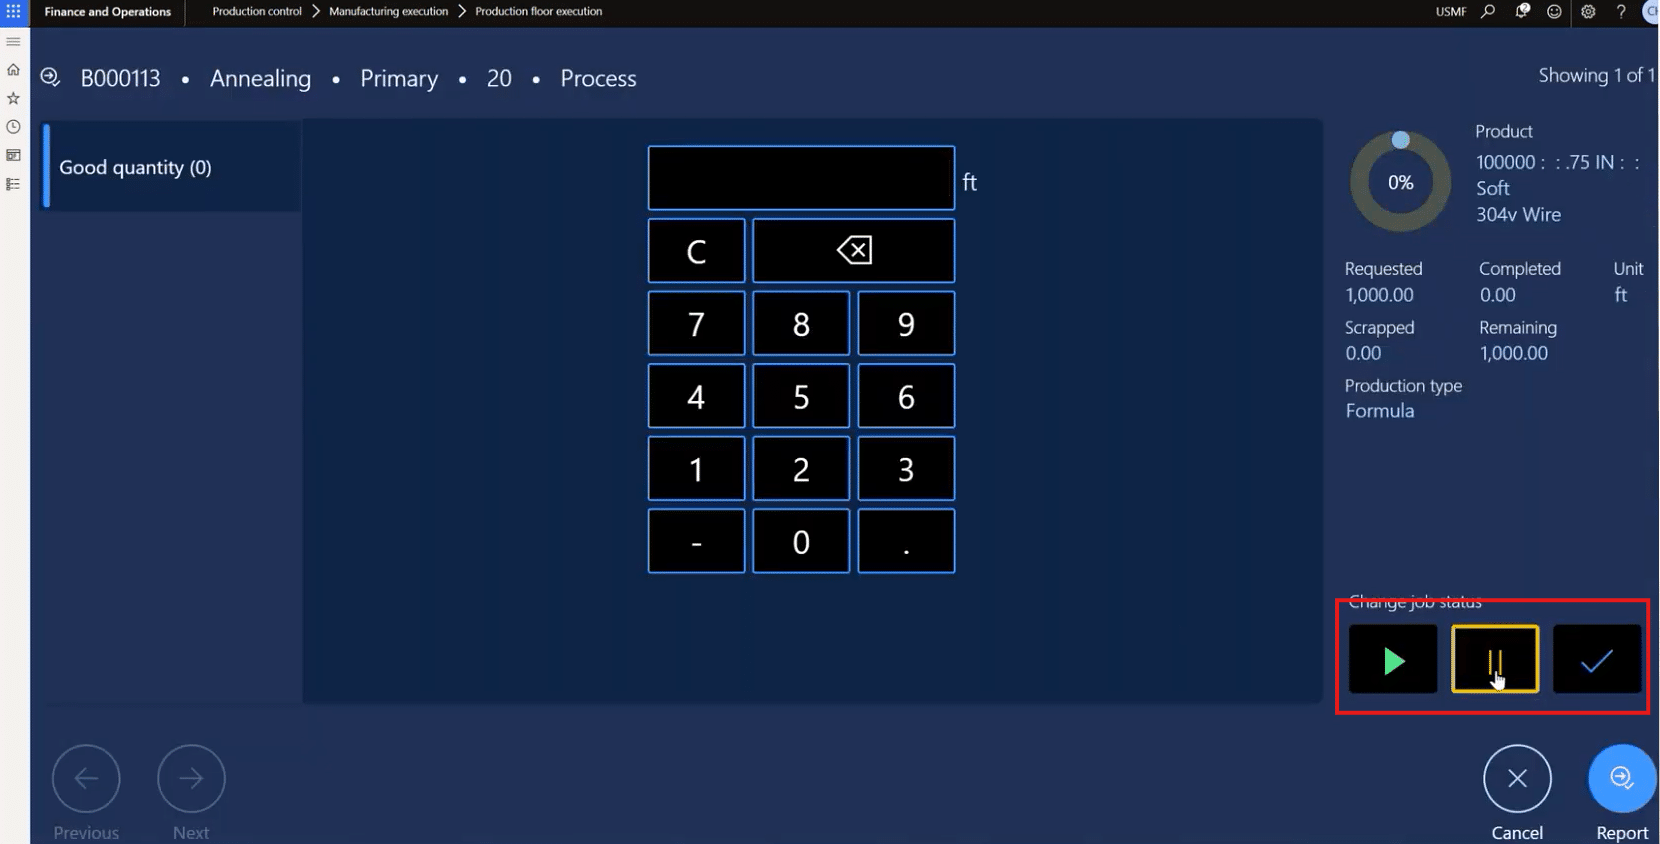
Part 8 — Pausing the Job and Registering Downtime
Now we will choose Report progress and then select Pause job.
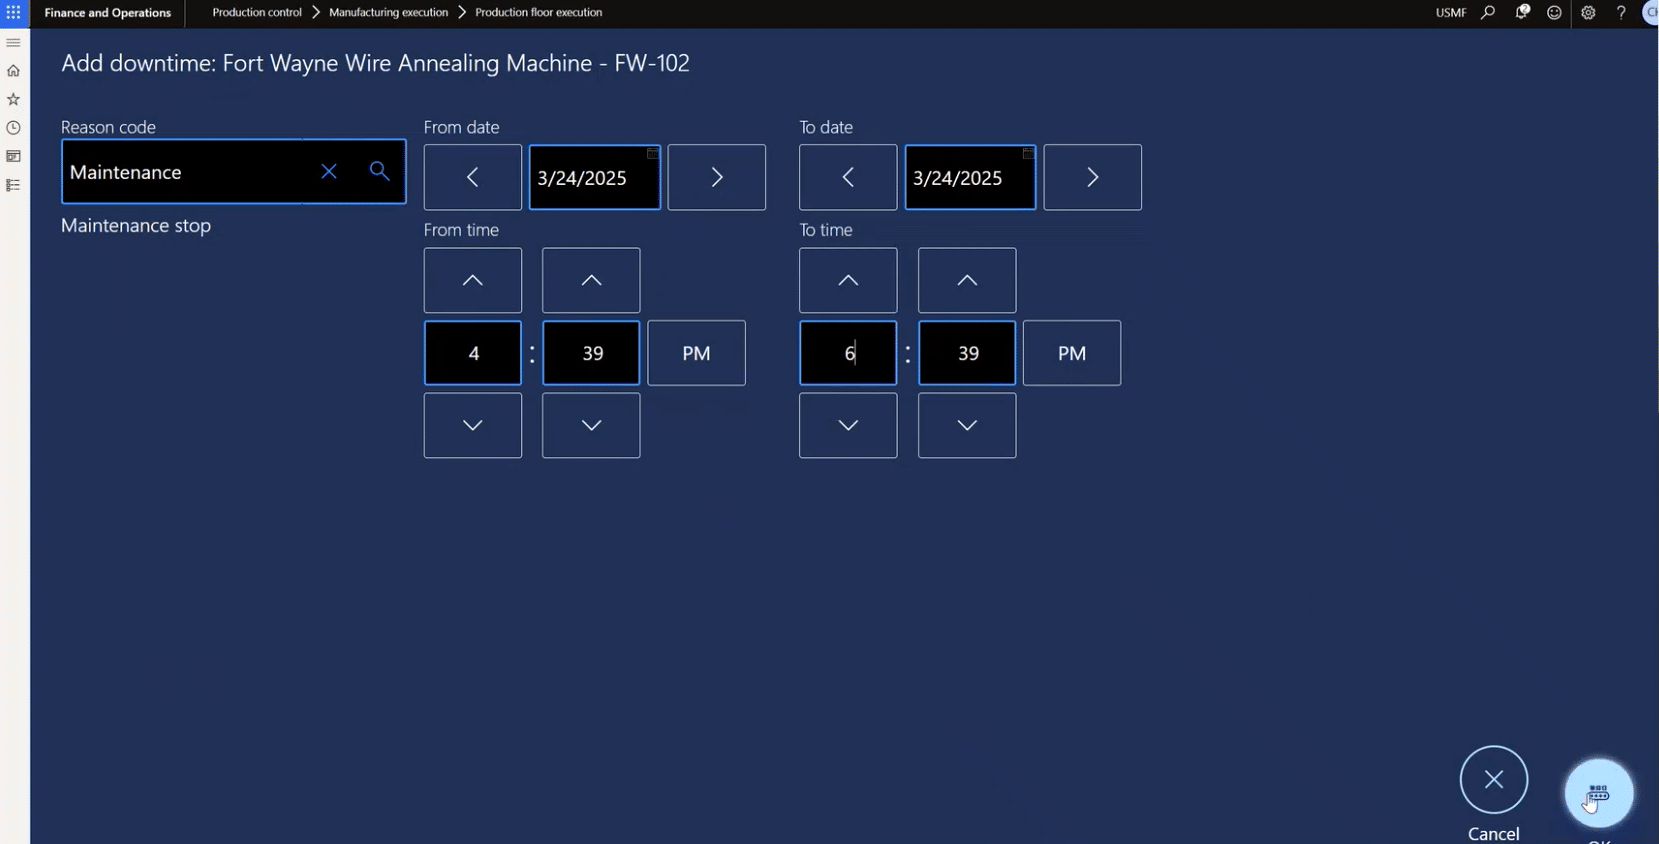
Then, go back to My machine and select Register downtime. Here we will input:
- The Reason code: Maintenance for a machine that isn’t working properly.
- Start: 4:39 PM
- End: 6:39 PM
Part 9 — Reviewing the Request in EAM
Now, we’re going to switch to the perspective of the maintenance team responding to the request that the production team just submitted.
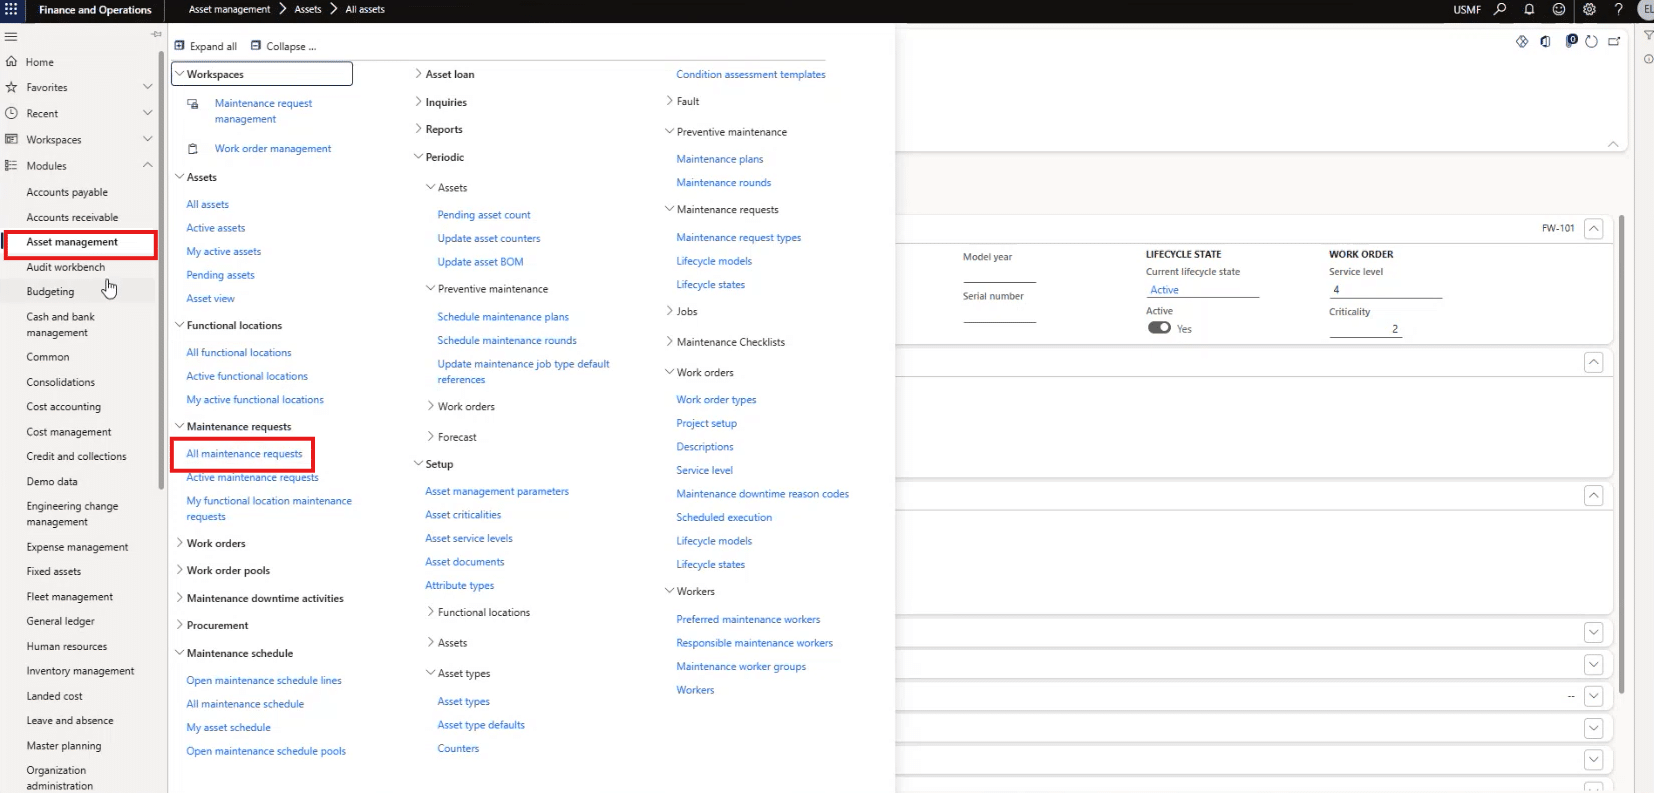
We’ll start by navigating to Maintenance requests > All maintenance requests. From there, we can open the request and change the status of the request to “Verified.”
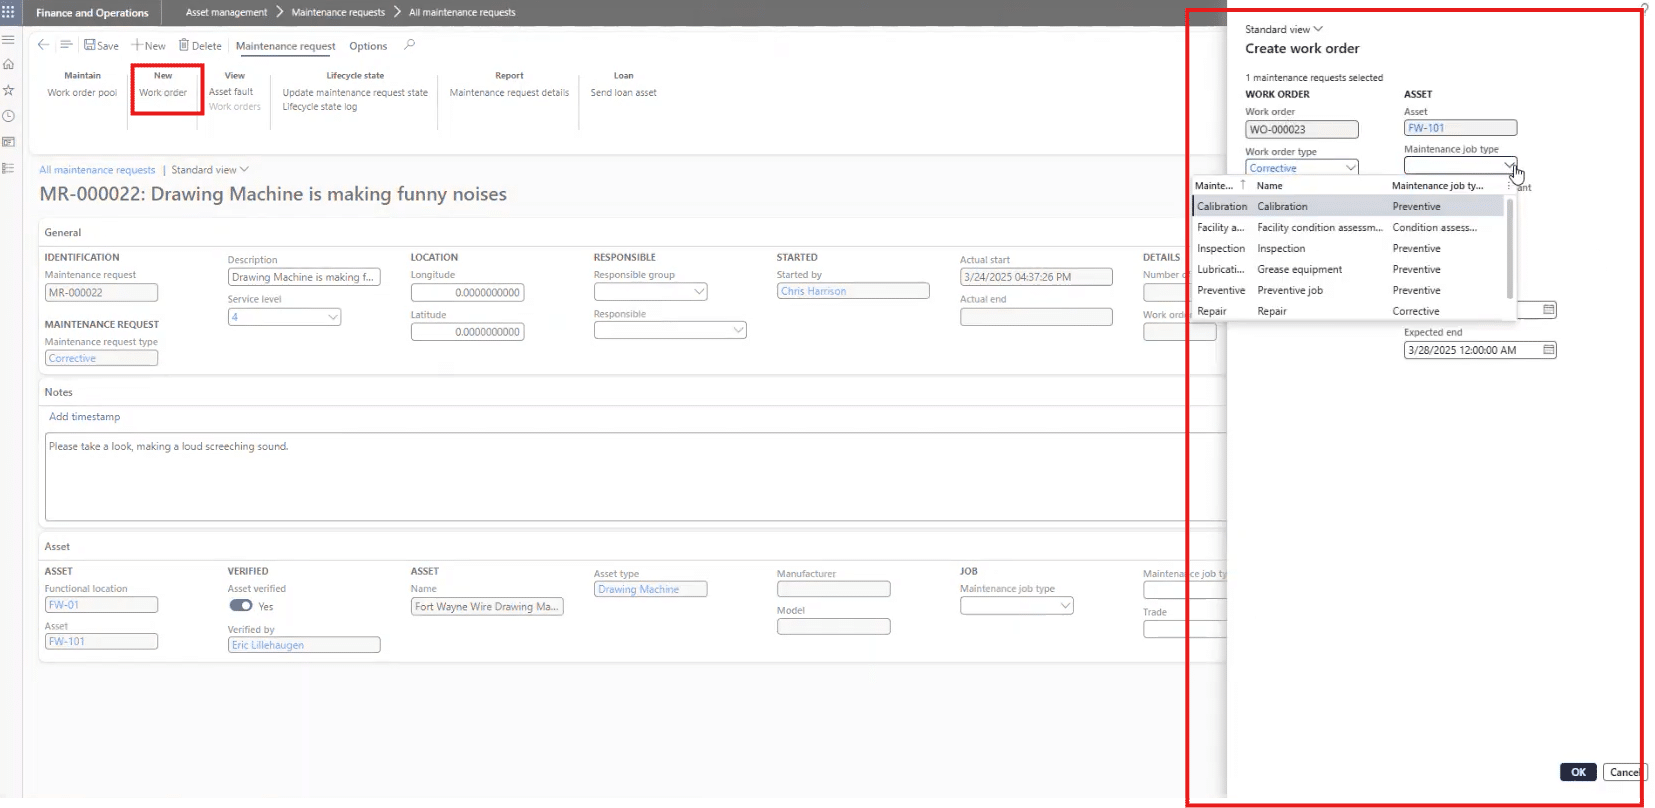
Then, we select New > Work order and fill in the proper details before creating it by clicking OK.
The status of the request will now update to “In progress.” In this portion, we might also adjust the downtime depending on what the issue is and how long it will take to resolve. For our example, we could modify
- Start time: Tomorrow at 9:00 AM
- End time: Same day at 12:00 PM
- Reason code: Maintenance.
Now the maintenance schedule is finalized.
Part 10 — Preventative Maintenance Triggering Automatically
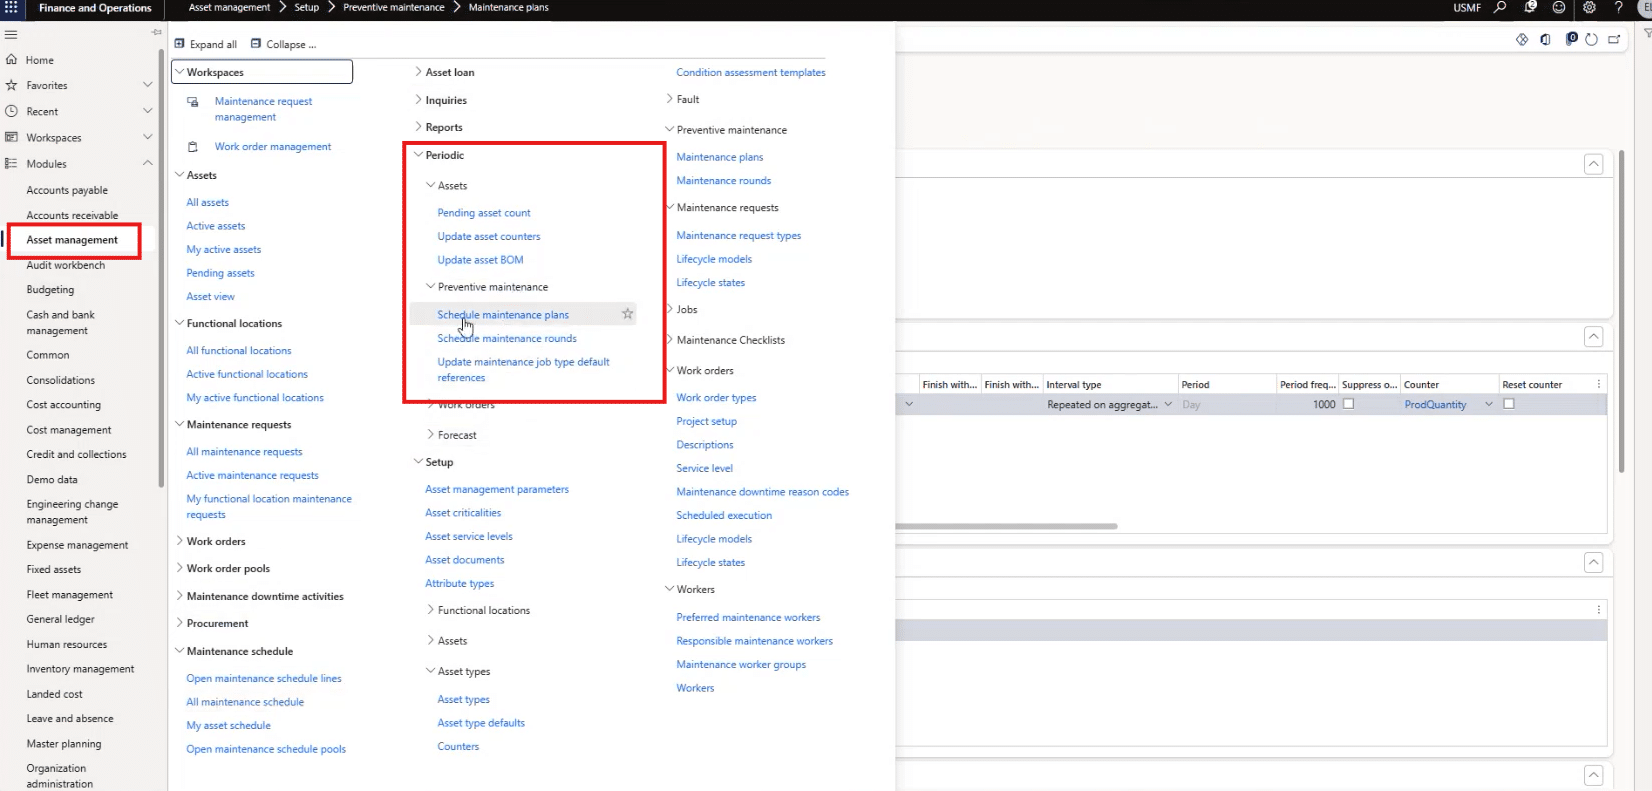
Once the issue is resolved, you can set up automated preventative maintenance plans that will allow you to respond faster to similar issues in the future. To do that for our example, we will:
- Navigate to Asset management > Periodic > Preventative maintenance > Schedule maintenance plans.

Part 11 — Seeing It All Back in PFE
Once the maintenance team completes their work, those on the production side can go back into PFE and the My machine tab, open FW101, and will now see:
- The preventative maintenance job
- The downtime registered
- The counters were updated with real production data
This closes the loop on the whole process and allows your production team to get back to work.
Why This Approach Works
Combining PFE and EAM provides manufacturers with several key benefits, including:
- Real-time communication between operators and maintenance
- Consistent, structured request handling, which ensures that all future maintenance requests and responses are in lock step
- Automatic preventative maintenance to stop shutdowns before they happen
- Accurate downtime tracking, giving you greater insights into what you need to do to make up for lost production
- Better asset performance visibility, which helps you determine when machines need to be fixed or replaced
- Higher machine uptime and lower repair costs, saving your organization time and money while keeping production on a healthy and consistent track
Ready to Harness PFE and EAM in Dynamics 365?
Talk to the experts at Stoneridge Software! Dynamics 365 Finance and Supply Chain Management is a powerful, unified platform that keeps machines healthy and production predictable.
If you want help configuring these features or setting them up so they work for your unique business, the Stoneridge team can help.
*This blog was co-authored by Chris Harrison, D365 Finance and Supply Chain Senior Consultant, Stoneridge Software

Under the terms of this license, you are authorized to share and redistribute the content across various mediums, subject to adherence to the specified conditions: you must provide proper attribution to Stoneridge as the original creator in a manner that does not imply their endorsement of your use, the material is to be utilized solely for non-commercial purposes, and alterations, modifications, or derivative works based on the original material are strictly prohibited.
Responsibility rests with the licensee to ensure that their use of the material does not violate any other rights.