


Table Controls in Dynamics AX 2012
I recently had a request to create a custom form that would be used to enter data into a matrix. The rows and columns needed to be dynamic as they would be coming from other custom tables. Standard Dynamics AX grid controls don’t really lend themselves do doing this well. The dynamic row and column portion of this also would make building this with a series of text boxes or in a list a challenge.
The dynamic nature of this feature really pointed to the use of a Dynamics AX native control called a table control. Here is a description of the table control from MSDN:

The control allows you to control via code the number of rows and columns, so it meets the criteria of being dynamic in sizing. It also allows you to control the type of data that goes into a specific row/column combination (called a cell), so I would have control over what can be edited or not (dynamic header area and data area). The downside is that you have to control all operations (creating the data in the table, saving the data in the table, has the data been edited in any way prior to closing or a save). However, I could not see a better fit for using this control in the feature to get what is desired.
I am going to document how to use the control by specifically calling out code and design pieces of the form. This will allow anyone to examine and trace how this was implemented as a learning process as well.
Step 1. Add the control
This is standard Dynamics AX functionality. Right click in the area you want to place the control, and choose New control >> Table. Once the control is added open the properties of the control and do the following:
• Give it a meaningful name (for my feature, I chose dataTable as it will be displaying the data to the end user in a Table control). This is accomplished by changing the Name property.
• Set the AutoDeclaration property to Yes. This is done as the code will be referenced by name multiple times in X++ code
• Set the Width property to be Column width. This allows the width to resize if the form size changes.
• Set the Height property to be Column height. This allows the height of the control to resize if the form size changes.
NOTE: if the table control is a child of a different control (a Group control for example), the parent control Width and Height properties must also be set as above to allow the resize to work as desired.
Step 2. Table control additional components need to be added
This is going to sound a bit strange, but different types of controls need to be added to the table. The table control will be used to display header information (not editable) and matrix data (editable with a custom lookup).
With a table control, the developer adds the specific type of control to the table one time, sets the desired properties, and then via code returns the type of control needed in a specific cell. For this feature, I created 2 different controls (both of type StringEdit). This is done by right clicking on the table, choosing New control >> StringEdit.
The first control is named catLine, and will be used to display the header information for rows and columns. This data will come from tables that were populated via the two prerequisite task for this feature.
The catLine control has the following properties set to control the display and functionality:
• Name: catLine
• AutoDeclaration: Yes
• AllowEdit: No
• BackgroundColor: Tooltip background
The second StringEdit control that is added is called editLine, and has the following properties set:
• Name: editLine
• AutoDeclaration: Yes
• BackgroundColor: Highlight text
The rest of the properties for both controls are left as the defaults.
Step 3. Control what type of control displays in a cell in the table
The table control method editControl() needs to be overridden/created to control what type of control is displayed in a specific cell of the table. The requirement I used what the first two rows of the table control would be used for the customer group information, and the first two columns of the table control would contain the product group information. This would be displayed using the catLine control. The rest of the table would be editable, thus requiring the use of the editLine control.
The method will return an object of type FormControl, and takes in two parameters. The first parameter is the column of the table, and the second is the row of the column.
Here is the X++ code that implements the above requirements:
public FormControl editControl(int _Column, int _Row)
{
    FormControl ret;

    ret = super(_Column, _Row);

    if (_Column < 3 || _Row < 3)
    {
        return catLine;
    }
    else
    {
        return editline;
    }
}
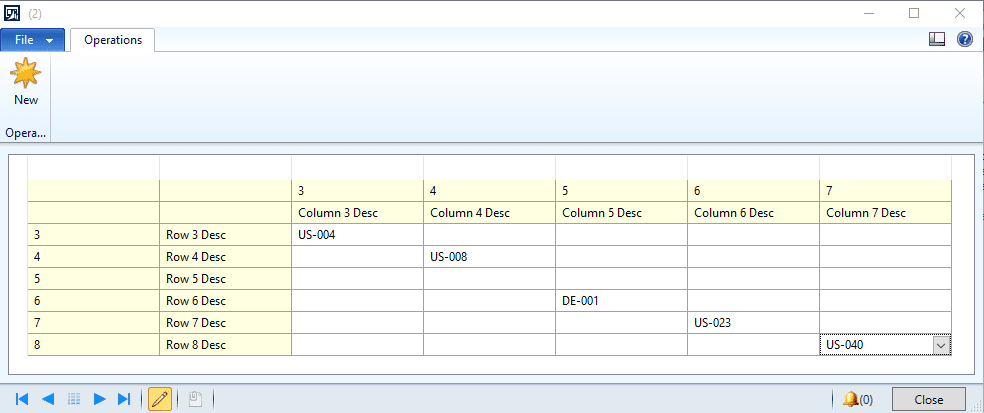
At this point, if you were to implement the above, and open the form, you would see a table control that looks like the following:

The yellowish cells are not editable (column labels and row labels) while the white cells are where the matrix data would be entered.
Step 4. Populate an empty table
The next step is to use the information to populate an empty table control so the matrix data can be created. This was done in a custom method named buildNewMatrix(). This method retrieves data from the two different tables (customer and product group), and builds an empty matrix in the table control. Data is populated on a cell by cell basis in the table control.
This is the method code:
public void buildNewMatrix()
{
    int                         rows,cols;
    Counter                     cellLoc;
    MatrixTableOne              localMatrixTable;
    MatrixTableTwo              custMatrixTable;
    MatrixTableThree            prodMatrixTable;

    // get dimensions for the new table

    dataTable.clear();

    // determine table dimensions
    select count(RecId) from custMatrixTable;
    cols = int642int(custMatrixTable.RecId) + 2;
    select count(RecId) from prodMatrixTable;
    rows = int642int(prodMatrixTable.RecId) + 2;

    dataTable.rows(rows);
    dataTable.columns(cols);
    element.redraw();

    dataTable.cell(1,2).data("Customers");
    dataTable.cell(2,1).data("Products");

    // fill in the row and column headings
    cellLoc = 3;
    prodMatrixTable.recordLevelSecurity(true);
    while select prodMatrixTable
    {
        // BP Deviation documented - retrieving data via select statement with RLS enabled
        dataTable.cell(1,cellLoc).data(prodMatrixTable. ProductGroup);
        // BP Deviation documented - retrieving data via select statement with RLS enabled
        dataTable.cell(2,cellLoc).data(prodMatrixTable.Description);
        cellLoc++;
    }

    cellLoc = 3;
    custMatrixTable.recordLevelSecurity(true);
    while select custMatrixTable
    {
        // BP Deviation documented - retrieving data via select statement with RLS enabled
        dataTable.cell(cellLoc,1).data(custMatrixTable.CustomerGroup);
        // BP Deviation documented - retrieving data via select statement with RLS enabled
        dataTable.cell(cellLoc,2).data(custMatrixTable.Description);
        cellLoc++;
    }
}
NOTE: notice the comments for BP Deviation documented. When working with the data in this manner, the form doesn’t really enforce security as the data is retrieved by code. This is why the comments are in the code (otherwise best practice violations are thrown). The line:
prodMatrixTable.recordLevelSecurity(true);
is used to make sure security is enforced at the table level when the data is retrieved.
Also notice how the cell locations are controlled when building out the table. Hard coded values can be used to populate specific cells, and variables are used to control how the columns are populated.
Step 5. Reading or writing data with the table control
After the data entry has been completed, OR if you want to load additional information into the table control, the same technique can be used. Data is accessed via the cell, retrieved, set to a field in a table buffer, and written to the table. This all has to be done via code (as stated previously) since the form does not have a datasource.
The method saveNewMatrix demonstrates how to save the data to a table.
public void saveNewMatrix()
{
// REMEMBER that the cell location is referenced as COLUMN,ROW in the cell method
Row startRow = 3;
Row endRow = dataTable.rows();
Row cellRow;
Column startColumn = 3;
Column endColumn = dataTable.columns();
Column cellCol;
try
    {
        // write row data cell by cell
        for (cellRow = startRow; cellRow <= endRow; cellRow++)
        {
            // write the cell data for each column in the row
            for (cellCol = startColumn; cellCol <= endColumn;cellCol++)
            {
                matrixTable.clear();
                matrixTable.Field1 = dataTable.cell(cellCol,1).data();
                matrixTable.Field2 = dataTable.cell(cellCol,2).data();
                matrixTable.Field3 = dataTable.cell(1,cellRow).data();
                matrixTable.Field4 = dataTable.cell(2,cellRow).data();
                matrixTable.Field5 = dataTable.cell(cellCol,cellRow).data();

                matrixTable.insert();
            }
        }
    }
    catch (Exception::Error)
    {
        Error("Error saving data");
    }

}
Step 6. Dealing with ‘dirty’ data and other control features
The term ‘dirty’ data means the data has been modified, and not yet saved. On normal forms, this is taken care of for the user automatically. In this instance, the Developer is going to have to be aware of the state of the data. This really is not that difficult to accomplish though. Remember that the table control only has 2 different controls on it, and one of them is read only. This means that by modifying the modified() method of the CONTROL, we can determine if ANY of the data in the table control has been changed.
Here is the modified method of the editLine control (the changedMatrix variable is a boolean that is declared in the classDeclaration of the form):
public boolean modified()
{
    boolean ret;

    ret = super();

    changedMatrix = true;

    return ret;
}
One requirement was to have a lookup for the data in the matrix as well. Again, as this is only a single control for data entry, the lookup() method of this control can be modified to provide the desired functionality throughout the data entry portion of the table control.
The above information should provide enough understanding of a seldom used control that exists within Dynamics AX. A Developer can really use this control for a number of purposes, and by adding many different types of controls to the table, have diverse functionality on a form.
I have attached an xpo file that contains a simple form that quickly demonstrates some of these concepts as well.

Under the terms of this license, you are authorized to share and redistribute the content across various mediums, subject to adherence to the specified conditions: you must provide proper attribution to Stoneridge as the original creator in a manner that does not imply their endorsement of your use, the material is to be utilized solely for non-commercial purposes, and alterations, modifications, or derivative works based on the original material are strictly prohibited.
Responsibility rests with the licensee to ensure that their use of the material does not violate any other rights.