


The Crucial Role of Expense Categories in Dynamics 365 Finance and Supply Chain Management
Dynamics 365 Finance and Supply Chain Management is a great solution that enhances your expense reporting.
With functionalities like simple report creation, configurable approval workflows, and reporting on the go, you can curate Dynamics 365 Finance and Supply Chain Management to suit your organization’s reporting needs.
One key feature of this reporting capability is expense categories. In this blog, we will outline expense categories, how they function, and how you can configure them to work for your business.
What Are Expense Categories, and Why Are They Important?
At first glance, it’s easy to think this functionality is a simple way to put your expenses into various categories. However, expense categories are a bit more complex than that and play a massive role in posting your expenses.
Each category requires a General Ledger (GL) account to be assigned upon configuration. As a result, it’s imperative to consider your reporting requirements when identifying your expense categories.
For example, a company that sends a team member to another city might need to rent a car for them. This company can categorize the car rental expenses and mileage and gas under "Automotive Expenses." However, the organization must still differentiate car rental expenses and mileage and gas when completing its reporting. In this scenario, they could create two separate expense categories tied to unique GL accounts.
It's important to note that there isn't a limit on how many expense categories your organization can have, however, you want to find a good balance and ensure the number of categories is manageable for your team. The goal is to find a balance between reporting requirements and a friendly user-experience when your team members go to create their expense reports.
How to Configure Expense Categories in Dynamics 365 Finance and Supply Chain Management
Here are the steps you can follow to properly set up and effectively use expense categories to strengthen your financial reporting:
1. To configure an expense category, you first need to create a shared category.
To do this, navigate to Expense management > Setup > General > Shared categories.
2. Click +New and input a category ID and category name.
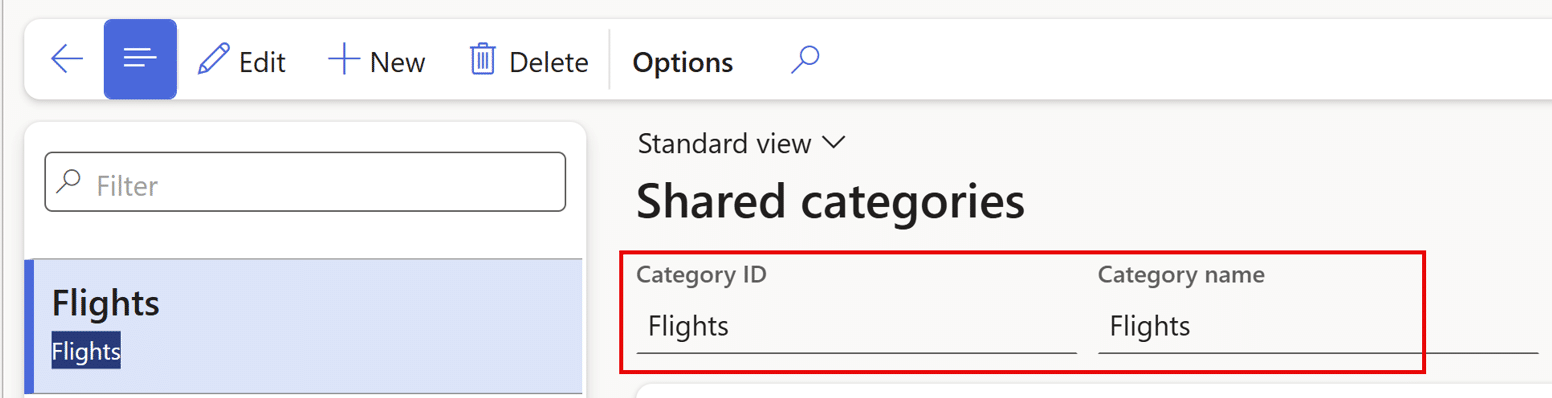
Let’s walk through creating a category for flight expenses. We’ll name this shared category “Flights.”
3. Next, we need to identify where this category should populate: projects, production, and/or expense.
For this example, we want this category to be available for both project and non-project expenses.
4. In the Expense type field, expand the drop-down menu and select the appropriate option.
For this example, we will choose “Airline.”
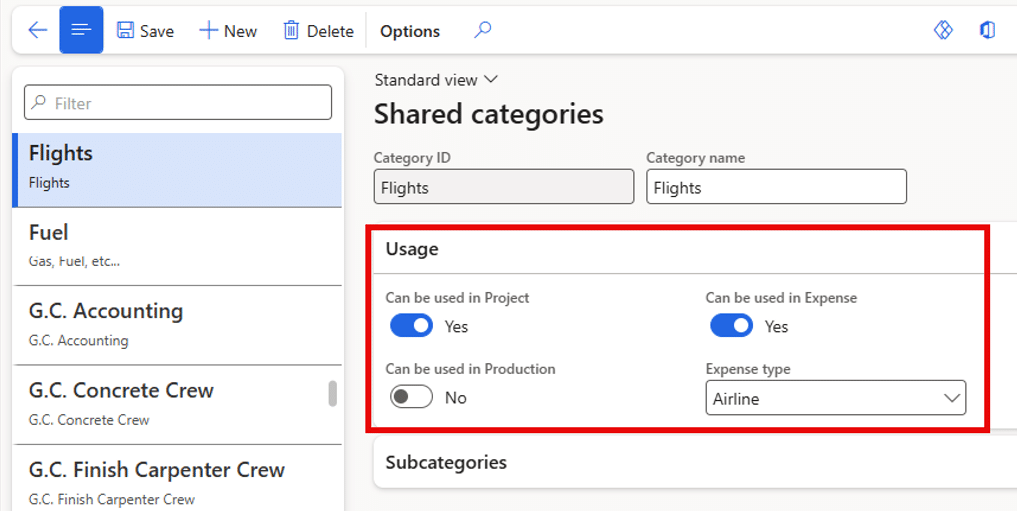
5. Once you assign an expense type, you may notice that some values have populated in the Subcategories fast tab.
These are utilized if you need to itemize this type of expense. For example, if you need to itemize hotel expenses, subcategories are a great way to separate the expense into even smaller buckets.
You may see that you are not able to remove these subcategories; that’s okay! You will have the option to inactivate them later if needed.

6. Click “Save”
7. Now that a shared category has been created, you need to create an expense category.
To do this, navigate to Expense management > Setup > General > Expense categories.
8. Click “+New.”
9. In the Category ID field, expand the drop-down menu.
You should see the shared category you created previously. Select it.
10. In the Category name field, input a category name.
11. If users should be able to allocate expenses to projects when creating an expense report, turn the Use in Project toggle to “Yes”.
For our example, we’ll keep this set to “No”.

12. In the Default payment method field, select the payment method to be set as the default for every expense associated with this category.
Note: Users will be able to change this if needed. See step 19 below for more information. For our example, we’ll choose “CompanyCC.” This means that every time a user creates a flight-related expense, the payment method will be defaulted as “CompanyCC.”
13. Turn the “Itemization mandatory” toggle to “Yes”, if expenses should be itemized.
14. If this expense category should no longer be visible to users, turn the “Inactive” toggle to “Yes.”
15. If this category should only be used for imported expense transactions, turn the “Import only” toggle to “Yes.”
16. In the “Main account” field, input the main account to be associated with the category.
For our example, we’ll select account 601504, “Flight Expenses.”
17. If applicable, select a value in the “Item sales tax group” field.
18. If applicable, select a value in the “Statistics group” field.
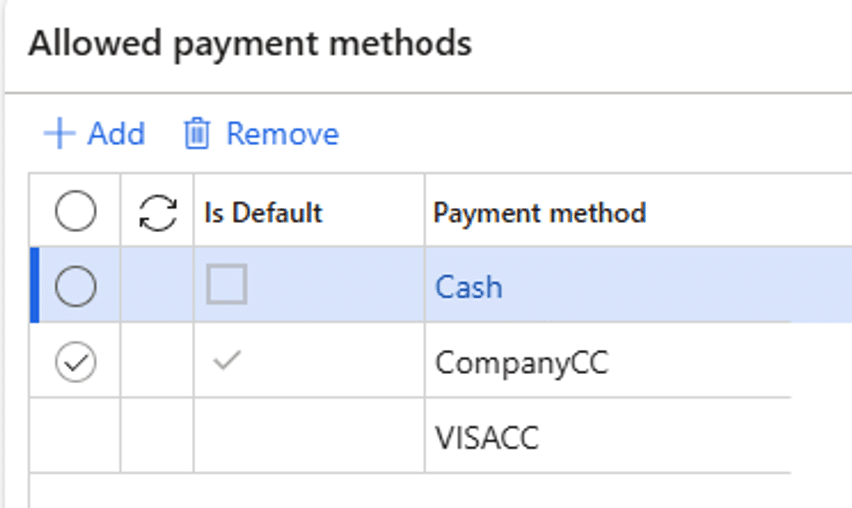
19. Navigate to the “Allowed payment methods” fast tab.
As a reminder, in step 12, you defined the default method. However, this step is where you will define all available options. Use the “+Add” and “Remove” buttons to add options to this table. For our example, we will allow three methods: Cash, Company CC, and VISACC. Note that CompanyCC has a check mark in the “Is default” field. This is because we defined it as the default in step 12.
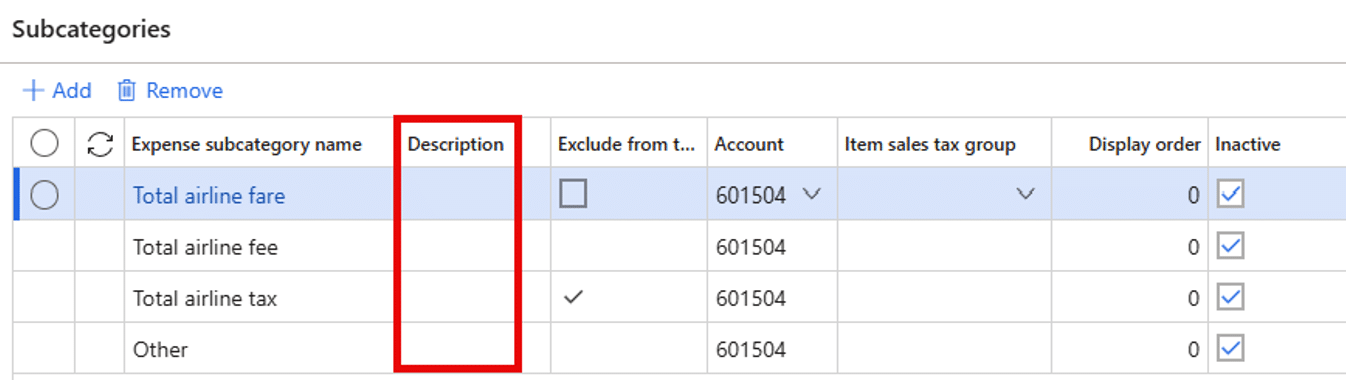
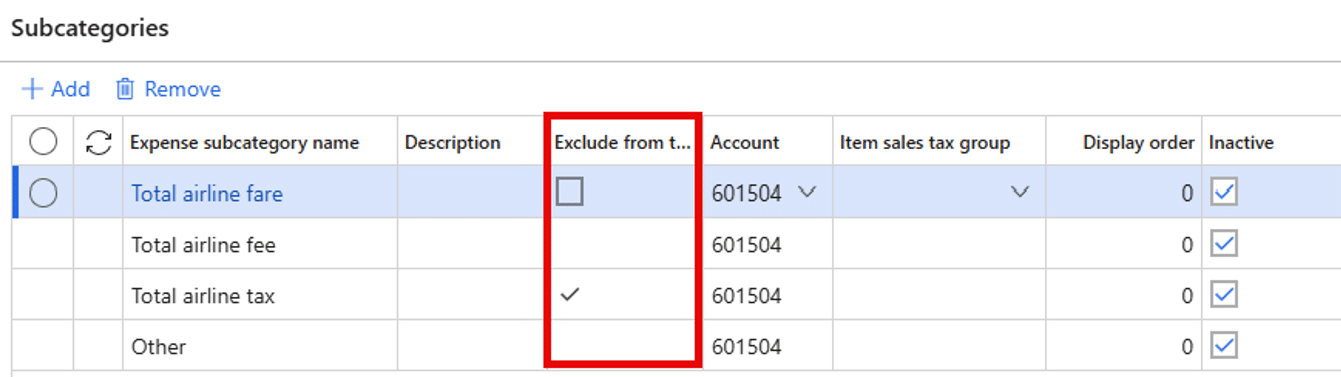
20. Navigate to the “Subcategories” fast tab.
This is where you can define if the subcategories are active, their descriptions, their main accounts, etc.
21. On the far-right column of the grid, location column “Inactive”.
If a particular subcategory is one that certain users shouldn't see, check this box. For our example, we don’t want any subcategories, so each box is checked.

22. If the subcategory should be displayed, input a value in its “Description” field.
23. If the subcategory should be displayed, select if it should be “Excluded from tax recovery” or not.
24. If the subcategory should be displayed, input a value in the “Account” field.

25. If the subcategory should be displayed, select a value in the “Item sales tax group” field.
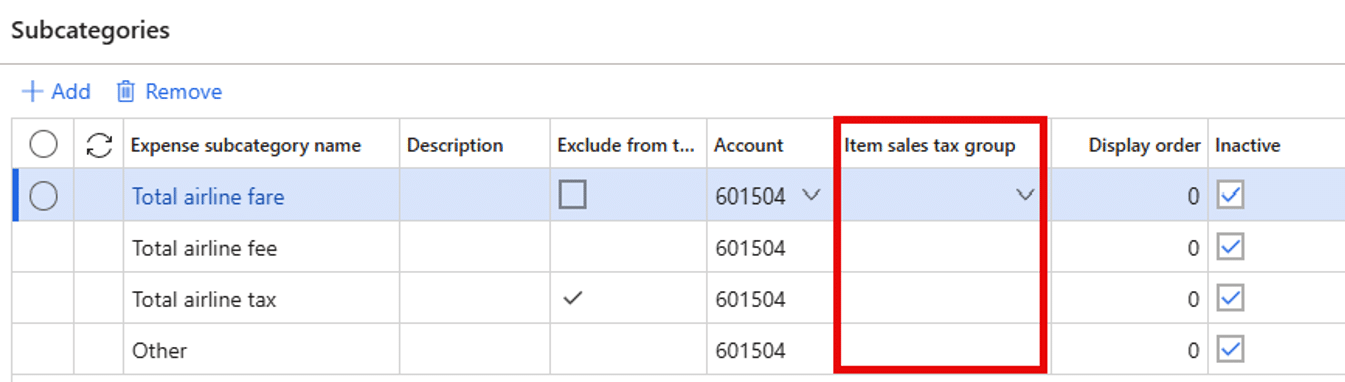
26. Utilize the “Display order” column to organize the sequence in which the subcategories should be displayed to users.

27. Click “Save”.
That's it! If you need further guidance, reach out to a trusted partner like Stoneridge.
The Impact of Expense Categories in Dynamics 365 Finance and Supply Chain Management
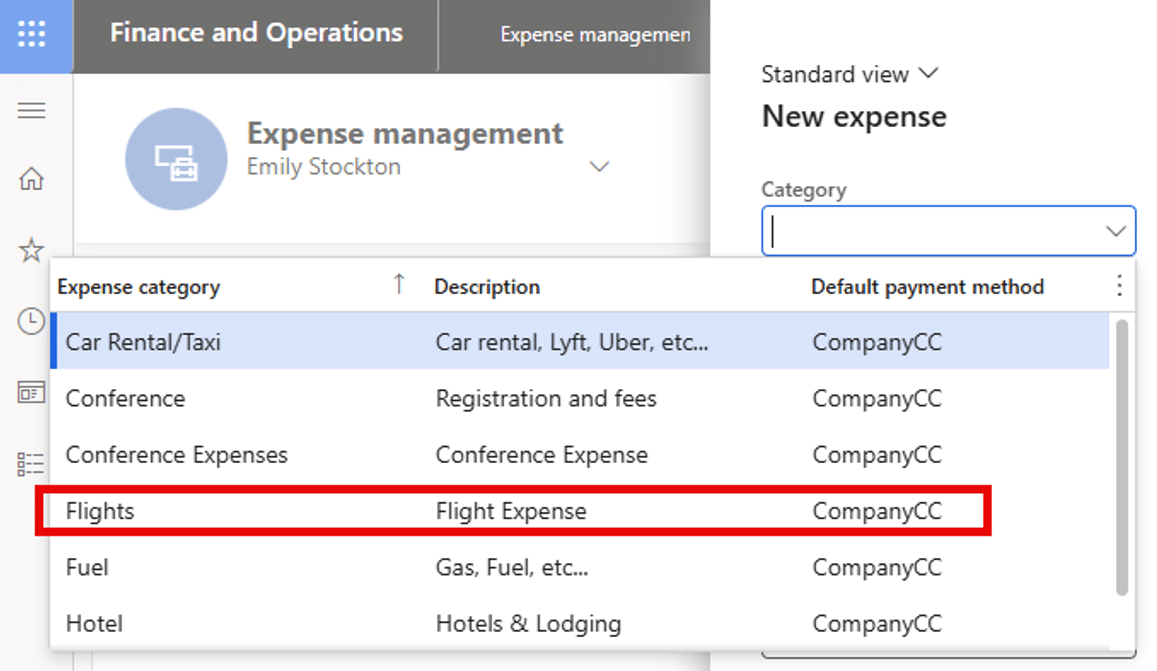
Now that you’ve created a new expense category, it will be visible to users when they create their expenses.
To test it, navigate to Expense management > Workspaces > Expense management, select the “Expenses” tab, and click “+ New expense.”

The first field you will be prompted to fill out is “Category.” When you expand the drop-down menu, you should see the category you created.
Once the expense report has been created, approved, and posted, you can review the transaction’s voucher. It will refer to the accounts assigned to the expense category and the payment method associated with the expense. For our example, a flight expense posting might look like this:
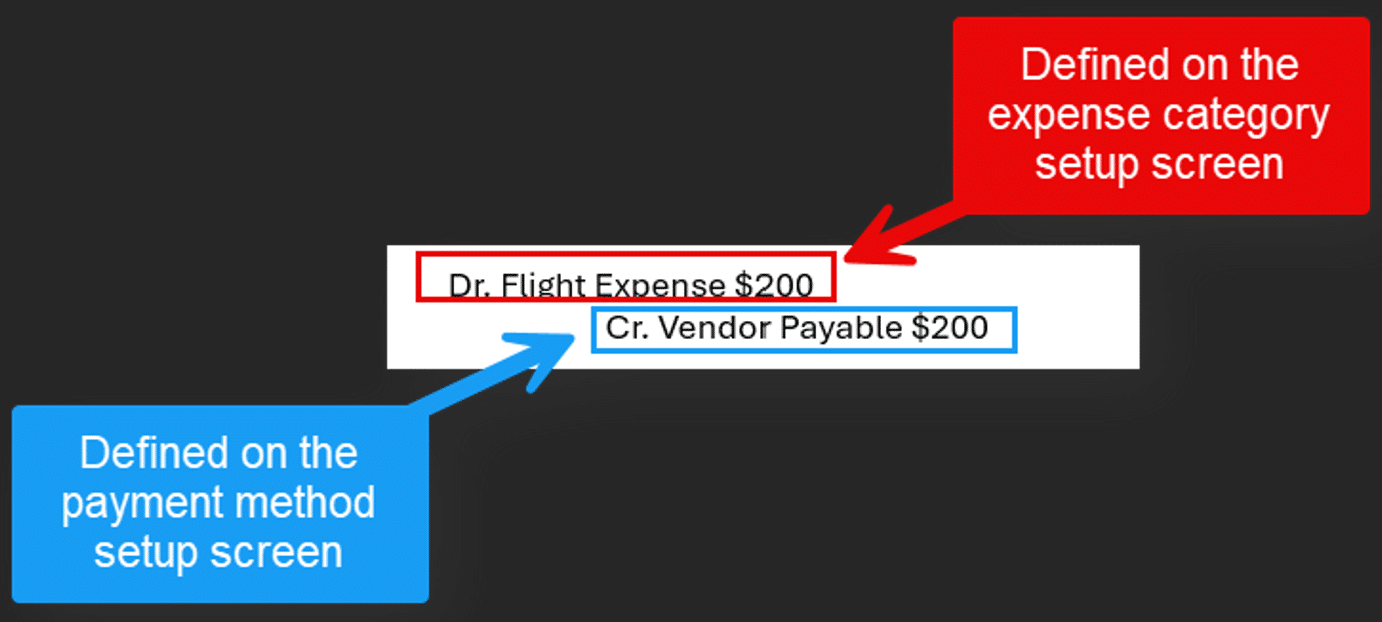
Expense categories within F&SCM are the driving force of how expenses are posted to your ledger. With functionality that allows you to assign a main account to individual expense categories or subcategories, you can report on a very granular level.
Want to Learn More About How to Optimize and Streamline Dynamics 365 Finance and Supply Chain Management?
This is just a small portion of the expense management functionality within D365 F&SCM. If you’re interested in learning more, get in touch with Stoneridge Software! Our team of experts is ready to help you implement and utilize many tools and functionalities that will improve your team’s day-to-day and make work easier.

Under the terms of this license, you are authorized to share and redistribute the content across various mediums, subject to adherence to the specified conditions: you must provide proper attribution to Stoneridge as the original creator in a manner that does not imply their endorsement of your use, the material is to be utilized solely for non-commercial purposes, and alterations, modifications, or derivative works based on the original material are strictly prohibited.
Responsibility rests with the licensee to ensure that their use of the material does not violate any other rights.