What You Need to Know About the Microsoft Dynamics AX Navigation Pane
The Navigation Pane within Microsoft Dynamics AX should feel very familiar - the feature is meant to mimic the Navigation Pane within Outlook. Did you know you have some options for personalization of the Navigation Pane - options you can set yourself, without the help of a developer or administrator?
TURN THE NAVIGATION PANE OFF
The first thing to note is that the Navigation Pane can be turned off and on. If you don't like it taking up real estate, you can turn it off by clicking on the View icon on the address bar to open up the View menu and then unchecking the Navigation Pane item in the menu.
[caption id="attachment_2830" align="alignleft" width="600"]
AUTO-HIDE THE NAVIGATION PANE
You do have the option of leaving the Navigation Pane turned on, but hiding it when not in use. To do so, click on the View icon on the address bar to open up the View menu, and check the Auto-Hide Navigation item as seen in the screen shot above. When selected, the Navigation Pane will appear collapsed on the left of your workspace, as in the picture below. To open it up, simply hover your mouse over the Navigation Pane. To collapse it back down, click anywhere else in the workspace. You can also turn the Auto-Hide option on and off by pressing Alt-Shift-F1 to bypass the View menu.
[caption id="attachment_2831" align="alignleft" width="600"]
ADD WINDOW OR REPORT TO FAVORITES ON NAVIGATION PANE
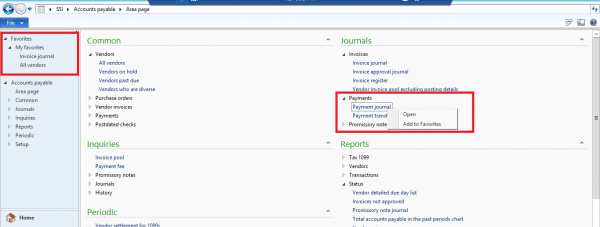
Do you find that 75% of the time you are accessing the same 3 windows within AX? Would you like to be able to access them easily, without having to navigate from module to module? Add them to your Favorites section of the Navigation Pane. Right-click the menu item for your favorite window or report, and select Add to Favorites.
[caption id="attachment_2844" align="alignleft" width="600"]
ORGANIZE NAVIGATION PANE FAVORITES
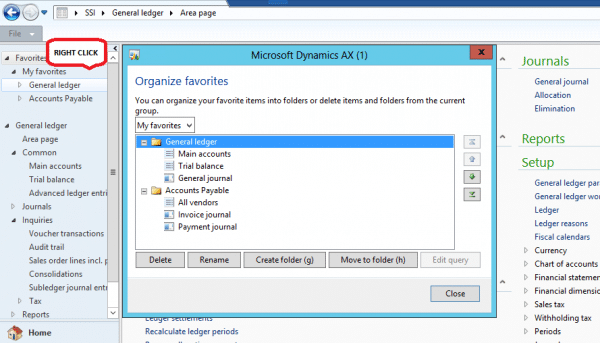
If you have numerous Favorites saved, and would like to organize them into a folder structure, you can do so by right-clicking Favorites on the Navigation Pane and choosing Organize Favorites. Use the Delete, Rename, Create folder and Move to folder buttons to organize your folder structure.
[caption id="attachment_2846" align="alignleft" width="600"]
REMOVE FAVORITES MENU FROM NAVIGATION PANE
If you don’t save your Favorite menu options, and would prefer to gain that bit of real estate back, and you remove the Favorites section from the Navigation Pane by clicking on the View icon on the address bar to open up the View menu, and un-selecting the Show Favorites in Navigation Pane checkbox to toggle the Favorites section off.
[caption id="attachment_2847" align="alignleft" width="600"]
RESIZE AREA DEVOTED TO MODULE BUTTONS
At the bottom of the Navigation Pane is an area devoted to buttons which function as shortcuts to modules within AX. You can resize the area devoted to module buttons, which changes the number of buttons presented, by clicking on the handle and dragging it up or down.
[caption id="attachment_2841" align="alignleft" width="180"]
ADD, REMOVE AND RE-SORT NAVIGATION PANE BUTTONS
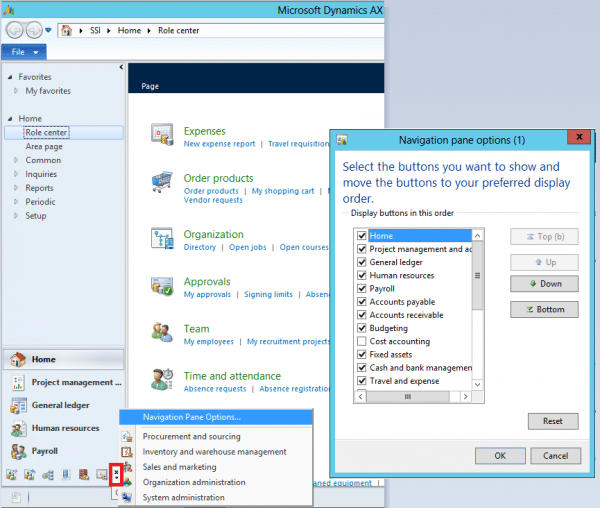
Do you see the Cost Accounting button on the Navigation Pane, even though you do nothing in that module? You can specify which module buttons you want presented on the Navigation Pane by selecting from modules available to you. You can make this selection by navigation clicking on the View icon on the address bar to open up the View menu and selecting Navigation Pane Options. From within the Navigation Pane window, select which buttons to display, and re-sort the order in which they’re presented by using the Top, Up, Down and Bottom buttons. You can also bypass the View icon and open this window by clicking on the configure button on the bottom of the Navigation Pane.
[caption id="attachment_2843" align="alignleft" width="600"]
Additional simple tips and tricks end users can use to improve their AX experience can be found by searching the Stoneridge Software blog for ‘User Tips and Tricks’.
For more advanced ways to improve your users’ AX experiences, please contact Stoneridge Software today.
Under the terms of this license, you are authorized to share and redistribute the content across various mediums, subject to adherence to the specified conditions: you must provide proper attribution to Stoneridge as the original creator in a manner that does not imply their endorsement of your use, the material is to be utilized solely for non-commercial purposes, and alterations, modifications, or derivative works based on the original material are strictly prohibited.
Responsibility rests with the licensee to ensure that their use of the material does not violate any other rights.
