


Advanced Bank Reconciliation Configuration Guide for Dynamics 365 Finance
This guide will walk you through the two fundamental components of setting up and testing the advanced bank reconciliation functionality in Dynamics 365 Finance & Operations (F&O) including:
- Technical setup
- Functional configuration
- Testing Procedures
We will also touch on the BAI2 bank statement format guide near the end of the post.
Understanding Bank Reconciliation Configuration and Testing in Dynamics 365 Finance
A key difference between simple and advanced bank reconciliation is that the advanced method requires the import of bank statement data. Before starting, you need to decide what method to use for importing that data. Microsoft allows four options out of the box, three of which are facilitated through the Electronic Reporting (ER) framework, and one through the Data Management Framework (DMF).
ER formats:
- BAI2 – primarily used in Canada and the US
- MT940 – primarily used in Latin America and Asia
- CAMT.053 – primarily used in Europe
The DMF method allows you to import an Excel or CSV formatted file.
Consider two things when making your decision on which format to use:
- Does your bank provide a BAI2, MT940, or CAMT.053? Some smaller banks may not, in which case you would have to go the Excel/CSV format route.
- Can your bank statement data be imported without modification? Certain business scenarios may require bank statement data to be modified before it’s imported for reconciliation (though it should be avoided if possible). For example, if you have two legal entities in F&O that share a single bank account, the statement data would need to be separated by legal entity before importing. It may be easier to do that in a CSV file than a BAI2/M940/CAMT file because CSV is more user friendly.
This guide contains detail for utilizing a BAI2 format as well as an Excel/CSV format.
Technical Setup for Advanced Bank Reconciliation - D365 Finance & Operations
If you want to use ER formats to import your bank statement data, you must use a Tier 2 environment or higher. ER configuration requires connection to the Dataverse which isn’t possible in a Tier 1 environment. If however, you plan to use the DMF method to import your bank statement data, any environment tier will work. Steps 3-8 need to be taken only if you intend to use an ER format.
Step 1 - Enable the Advanced Bank Reconciliation Feature
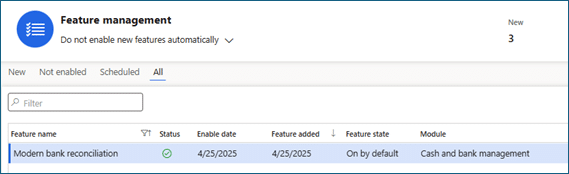
The Modern Bank Reconciliation feature is available in version 10.0.39 and GA in versions 10.0.41 and later. To enable the feature, go to Workspaces > Feature management. Select the All menu and search for Feature name: Modern bank reconciliation. If It is not already enabled, click Enable.
Step 2 - Run Advanced Bank Reconciliation Data Upgrade (if needed)
If you already use Advanced bank reconciliation, but are enabling the Modern bank reconciliation feature for the first time, you need to run the Advanced bank reconciliation data upgrade process. Go to Cash and bank management > Setup > Advanced bank reconciliation setup > Advanced bank reconciliation data upgrade. The wizard will guide you through the upgrade process and is necessary to ensure the new features work as intended with the data and configurations already in place.
- Note: if you are only using the simple/manual bank rec process in F&O, you do not need to do this step.
Step 3 - Ensure You're Using the Right Environment
To utilize ER formats, you need to use a Tier 2 F&O environment so it can connect to the Dataverse. Microsoft requires the Dataverse connection during environment setup. After connection to the Dataverse, the ER Repository will be available to import the necessary bank statement formats.
Step 4 - Assign Roles
In the Power Platform admin center, assign the ER-Repository role to any required users. This role will be needed to import the desired ER formats from the repository into D365 Finance.
Step 5 - Configure Repositories
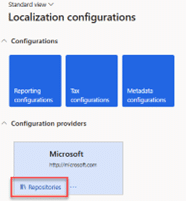
In D365 Finance, go to Workspaces > Electronic Reporting. In the Configuration providers area, click on the Repositories link.
Step 6 - Open the Repository
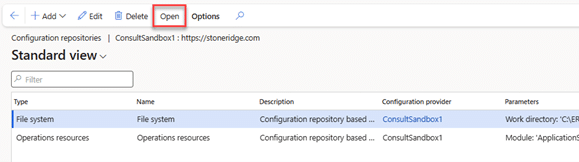
Click the Open button on the appropriate repository.
- Note: if you get an error that says “Request to Dataverse failed. Check that solution is installed and application user has access to Dataverse tables” it’s likely that you do not have the ER-repository role mentioned in step 4 above.
Step 7 - Choose Your Format
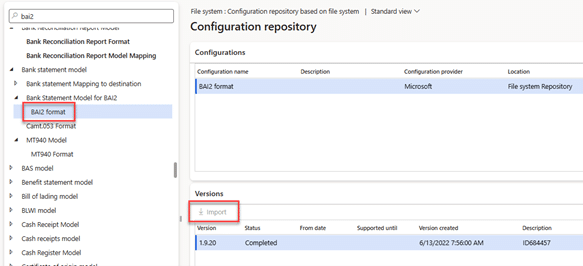
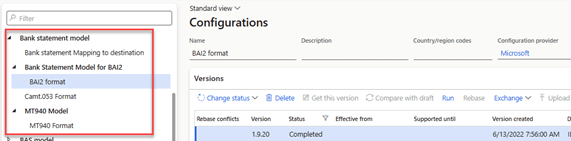
Search for the Bank statement model in the left-hand menu. Select the desired format (BAI2, MT940, or CAMT.053) and click Import. This will make the selected format available in your D365 Finance environment.
Step 8 - Verify Your Results
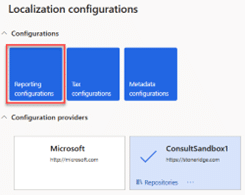
After the import is complete (which may take several minutes), go back to the Electronic Reporting workspace and click the Reporting configurations tile. Verify that the imported bank statement format within the Bank statement model is visible.
Functional Configuration for Advanced Bank Reconciliation - D365 Finance & Operations
Once the technical setup is finished, you can start testing as soon as you complete the configuration below:
1. Set Up Rule Logic
Advanced bank rec requires the usage of Bank transaction types to utilize some of the matching rule logic. If you don’t already have them setup, go to Cash and bank management > Setup > Bank transaction types. Enter a Bank transaction type and Name for every unique transaction type. The most common examples are:
- Electronic deposit
- Check deposit
- Transfer in
- Interest income
- Electronic payment
- Check payment
- Interest expense
- Transfer Out
- Bank Fee
- NSF charge
2. Default Transaction Types
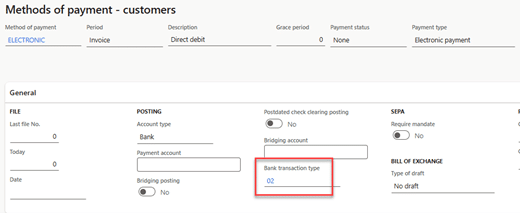
Once the bank transaction types are set up, it’s important to default the types on the applicable methods of payment. Note: Not every bank transaction type will be defaulted on a MOP, but every MOP should have a default transaction type.
- For example, the electronic deposit and check deposit transaction types should be defaulted on their respective Customer methods of payment. To set the default, go to Accounts receivable > Payments setup > Methods of payment. In the general tab of each method of payment, select the appropriate bank transaction type. This ensures that a bank transaction type is coded to every posted customer payment.
- Repeat the above steps on the Vendor methods of payment by going to Accounts payable > Payments setup > Methods of payment.
3. Map Transaction Types
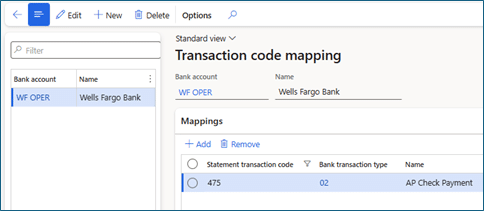
After setting up the bank transaction types, you need to map the configured types to the codes used on the imported bank statement. Your bank can provide you with a list of transaction codes for the format you’re using. Go to Cash and bank management > Setup > Advanced bank reconciliation setup > Transaction code mapping.
- Click +New and select the first bank account you want to create a mapping for.
- Within each bank account, click +Add in the Mappings form to create the appropriate mappings for that account.
- A common example if using a BAI2 format would be to map Statement transaction code 475 to the bank transaction type you set up for Check payments. BAI2 code 475 is typically used for physical check payments.
- Transaction code mapping needs to be setup only for the transaction types used within the matching rule setup (more on that below). You can add additional mappings as you test and see additional need for matching rules.
- Repeat steps a and b for each bank account that uses Advanced bank reconciliation.
4. Select the Right Format
If you are using an ER format, go to Cash and bank management > Setup > Advanced bank reconciliation setup > Bank statement format.
- Click +New on the top ribbon.
- Enter a Statement format identifier (this is an internal identifier only and has a 10 character max)
- Enter a Name (this is also an internal identifier).
- If using an ER format, leave the file type blank. If not, enter the file format type (ex: .txt or .csv)
- In the Import format configuration, select the appropriate ER format.
- Repeat steps a-e for any additional formats required.
5. Configure Cash and Bank Parameters
Go to Cash and bank management > Setup > Cash and bank management parameters. Select the Bank reconciliation menu.
- Show statement line amount in debit/credit: set this option to Yes if you want to see the statement transactions in two separate columns instead of a single column.
- Validate date difference: set this option to Yes if you want to allow automatic matches on transactions that have different dates. If you select yes, enter the allowed date difference in the next field.
- Validate transaction type mapping: set this option to Yes if you want to allow automatic matching only when the imported statement transaction code is mapped to the bank transaction code.
- Allow bank statement edit: set this option to Yes if you want to allow the imported statement number and date to be editable.
- Require manual matching when advanced reconciliation matching rules find multiple documents that match on amount: set this option to Yes to require users to manually match statement transactions that find more than one matching bank transaction amounts instead of auto-matching the first found bank transaction.
- Best practice is to set this to Yes to prevent incorrect auto-matching.
- Set the booking date as default accounting date for new transactions: set this option to Yes to use the date within the imported bank statement file as the ledger posting date for new transactions. Setting this option to no will default the date of import as the ledger posting date.
- Allow empty bank statement when marked as reconciled: Set this option to Yes to allow for worksheets to be marked as reconciled even if no transactions are matched within the worksheet.
6. Select the Account
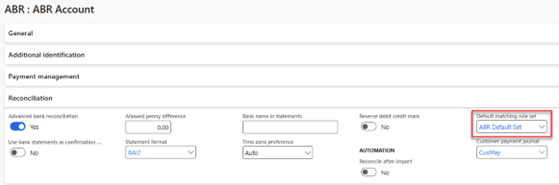
Go to Cash and bank management > Bank accounts > Bank accounts. Select the account for which you want to use advanced bank reconciliation. In the Reconciliation fast tab:
- Select Advanced bank reconciliation = Yes. NOTE: once you import transactions and mark them as reconciled for the first time, advanced bank reconciliation cannot be turned off.
- If you would like to use imported bank statement data as confirmation of electronic payments, set this toggle to yes.
- To allow for penny differences during reconciliation, enter the allowed amount.
- In the Statement format dropdown, select the desired format for the account.
- In the Bank name in Statements field, enter the company name as it appears in the imported statement file.
- Select the appropriate time zone.
- If your imported bank statement file uses debit/credit indicators, you may need to turn on the Reverse debit credit mark. Most banks will indicate a credit amount for transactions that are deposits for your organization, and will thus be debits in your ledger. Note: credit/debit indicators are not used on a BAI2 format.
- Set the Clear bridged transactions during reconciliation to Yes if you are using bridging and would like to automatically clear those transactions.
- Set the Reconcile after import toggle to yes if you would like F&O to automatically reconcile transactions (when possible). The best practice is to keep this option turned off during initial testing, and as you get comfortable with the process, consider turning it on.
- Once matching rule sets are setup, you can select a default matching rule set on the bank account.
- If you want to post Customer payment journals from the reconciliation worksheet, select a Customer payment journal
- If you want to post Vendor payment journals from the reconciliation worksheet, select a Vendor payment journal
7. Create Rules
Go to Cash and bank management > Setup > Advanced bank reconciliation setup > Reconciliation matching rules. Create as many rules as necessary to automate the matching of statement to bank transactions. Reminder: statement transactions = imported transactions from the bank statement; bank transactions = posted transactions to the bank subledger in F&O. To create a new rule click the +New button on the top ribbon.
Note: The testing procedures in the next section give examples of common matching rules and best practices.
- Enter a Matching rule and Name. Ensure that the name is descriptive enough to distinguish the rules from each other.
- In the Action field, select the action type you want to use for the current rule.
- Options are as follows:
- Match with bank document – used to define how statement transactions should be matched against existing posted bank transactions
- Clear reversal statement lines – used to remove reversal statement lines from the worksheet when a bank error causes two statement lines to be listed in the imported bank statement
- Mark new transactions – not available with the Modern bank rec feature. It is replaced by the Generate voucher action.
- Clear reversal bank transactions – used to remove reversal bank transactions from the worksheet when transactions were posted in F&O that never made it to the bank and were subsequently reversed
- Generate voucher (formerly called Mark new transactions) – used to create and post new ledger transactions in F&O
- Generate customer payment – used to create and post new customer payment transactions (on account) in F&O
- Generate vendor payment – used to create and post new vendor payment transactions (on account) in F&O
- Settle customer invoice – used to find customer invoices then create and post a new customer payment journal in F&O that’s settled against those invoices
- Options are as follows:
- If you selected the Match with bank document action, you’ll need to also select a Matching Type (One to one, One to Many, Many to One, or Many to Many).
- After setting up a matching rule or editing an existing rule, be sure to Activate it on the top ribbon so that it can be used.
- The below table lays out the required steps for each combination of action and matching type (if applicable).

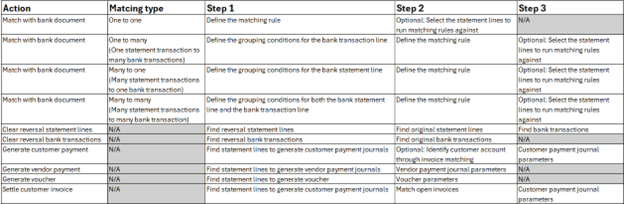
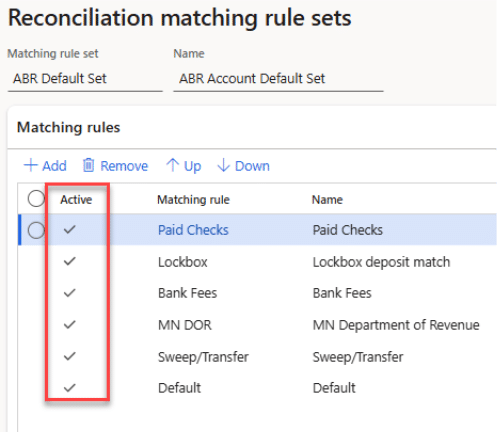
8. Create Rule Sets
Go to Cash and bank management > Setup > Advanced bank reconciliation setup > Reconciliation matching rule sets.
- Create as many rules sets as necessary. Sets allow groups of rules to be executed all at once, resulting in less clicks for the end user. A rule set can be run automatically when a statement is imported by defaulting the set on the bank account record.
- Be mindful of the order of the rules within the set. If you have a default rule, best practice is to run that rule last within a set, so that all other rule logic is checked first before using the default logic.
Testing Procedures
Testing the advanced bank rec process involves setting up matching rules and sets, preparing a bank statement file to test with, importing the statement, performing the matching and reconciliation, and running the reconciliation report. Below are the details for each of those components including some best practices to help you get started if you’re new to advanced bank rec.
Setup matching rules
Best practice is to start with three types of matching rules:
1. A default “match with bank document” rule to match 1:1 statement transactions to bank transactions already posted in F&O. The idea is that your default rule would be placed at the very end of your rule set, and only get used if no other matching rule is found for an imported statement transaction. A typical default rule could be setup like this:
- Matching rule: Default
- Name: Default matching rule (no tolerance)
- Action: Match with bank document
- Matching type: One to one
- Step 1 (matching criteria):
- Match amount = Yes
- Match date = Yes
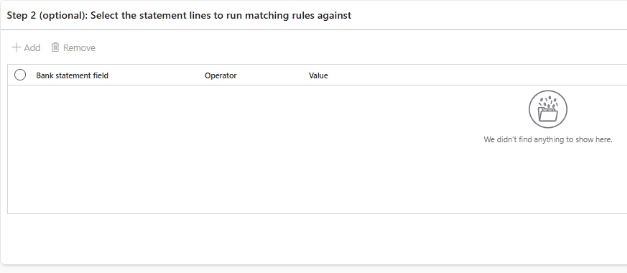
- Step 2 (statement lines to run matching rules against): Leave this blank so that the default rule applies to all imported statement transactions.
- Step 1 (matching criteria):
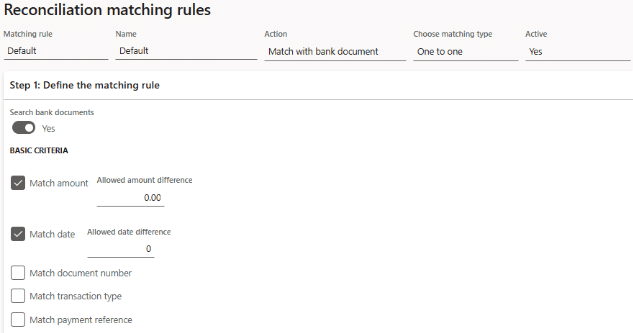

The result of this rule is that the matching logic will match a statement transaction to a bank transaction if the date and amount exactly match.
You can create additional default rules that mirror the above setup, except that they allow for date and/or amount differences. It’s beneficial to set those up separately so that when you’re reviewing your matched transactions, you can easily see the ones that match on the rule allowing date/amount differences, in case you want to give those matches a double check.
2. “Match with bank document” rules to match non-1:1 statement transactions to bank transactions already posted in FO. Some common examples are:
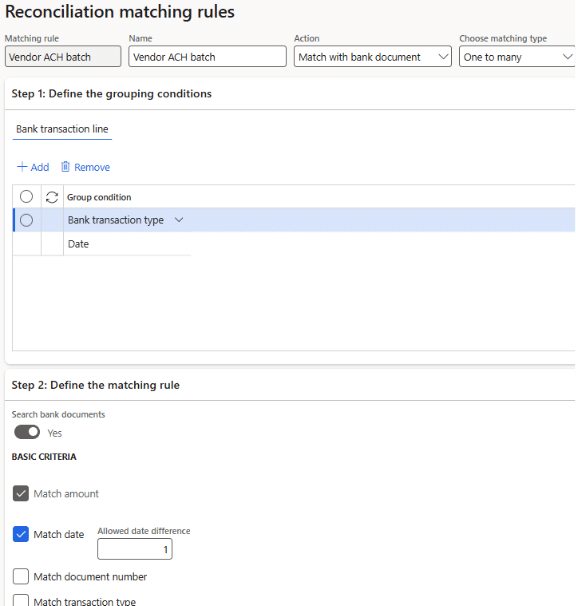
- Vendor ACH payments will usually hit the bank account as a summarized withdrawal, but will be posted in F&O as individual vendor payments. A rule for this scenario could look like this:


The logic here tells the system to group the F&O posted transactions by bank transaction type and date, then look for matches on amount and date (with a one-day tolerance), and only look for matches on statement lines with a 469 code. This assumes that a code of 469 is used on your statement for vendor ACH batches.
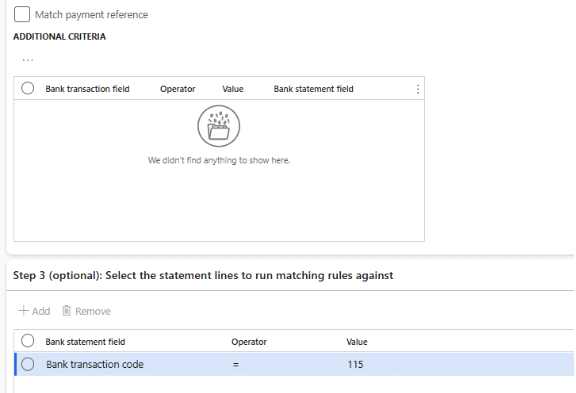
- Customer check deposits will usually hit the bank account as a summarized deposit, but will be posted in F&O as individual customer payments. A rule for this scenario could look like this:
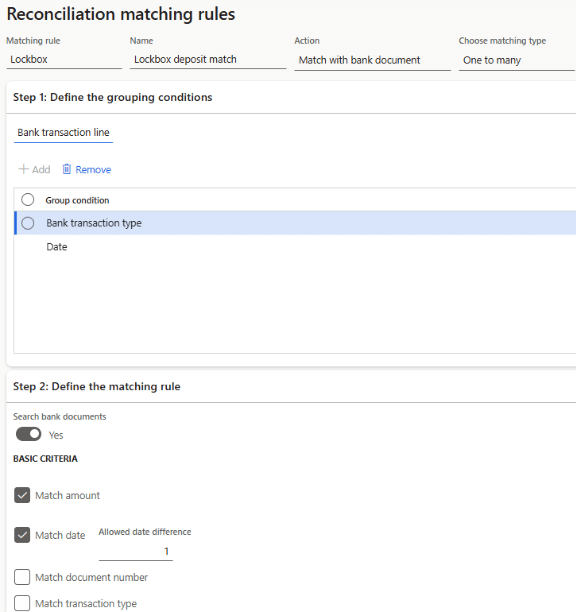
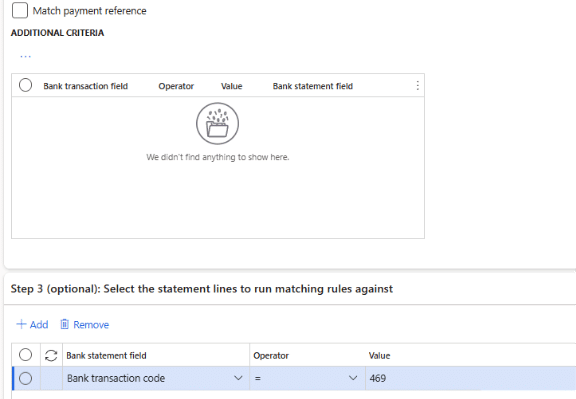
The logic here tells the system to group the F&O posted transactions by bank transaction type and date, then look for matches on amount and date (with a one-day tolerance), and only look for matches on statement lines with a 115 code. This assumes that a code of 115 is used on your statement for customer check/lockbox deposits.
- “Generate voucher” and/or “Generate customer/payment journal” rules for transactions that don’t originate in F&O. Some common examples are:
- Bank fees that post to your account automatically every month. A rule for this scenario could look like this:

Financial details:

The logic here tells the system to look for imported statement transactions with a type of 698. If found, create a voucher in the USMF entity with an offset to the 618190 ledger account. This assumes that the transactions with a code of 698 can always be posted to 618190. To limit the scope, you could add an additional line in Step 1 to look for a specific description within the statement line.
- Payments to tax authorities that are initiated outside of F&O on the DOR website. A rule for this scenario could look like this:

Financial details:

The logic here tells the system to look for imported statement transactions with a type of 469 and a description that contains “MN DOR 553161234.” If found, create a vendor payment journal in the USMF entity for Vendor V000028. This assumes that the vendor is uniquely identified in the Description field within the bank statement data.
Set up matching rules
Best practice is to start with three types of matching rules:
1. A default “match with bank document” rule to match 1:1 statement transactions to bank transactions already posted in F&O. The idea is that your default rule would be placed at the very end of your rule set, and only get used if no other matching rule is found for an imported statement transaction. A typical default rule could be setup like this:
- Matching rule: Default
- Name: Default matching rule (no tolerance)
- Action: Match with bank document
- Matching type: One to one
- Step 1 (matching criteria):
- Match amount = Yes
- Match date = Yes
- Step 2 (statement lines to run matching rules against): Leave this blank so that the default rule applies to all imported statement transactions.

The result of this rule is that the matching logic will match a statement transaction to a bank transaction if the date and amount exactly match.
You can create additional default rules that mirror the above setup, except that they allow for date and/or amount differences. It’s beneficial to set those up separately so that when you’re reviewing your matched transactions, you can easily see the ones that match on the rule allowing date/amount differences, in case you want to give those matches a double check.
2. “Match with bank document” rules to match non-1:1 statement transactions to bank transactions already posted in FO. Some common examples are:
- Vendor ACH payments will usually hit the bank account as a summarized withdrawal, but will be posted in F&O as individual vendor payments. A rule for this scenario could look like this:

The logic here tells the system to group the F&O posted transactions by bank transaction type and date, then look for matches on amount and date (with a one-day tolerance), and only look for matches on statement lines with a 469 code. This assumes that a code of 469 is used on your statement for vendor ACH batches.
- Customer check deposits will usually hit the bank account as a summarized deposit, but will be posted in F&O as individual customer payments. A rule for this scenario could look like this:

The logic here tells the system to group the F&O posted transactions by bank transaction type and date, then look for matches on amount and date (with a one-day tolerance), and only look for matches on statement lines with a 115 code. This assumes that a code of 115 is used on your statement for customer check/lockbox deposits.
3. “Generate voucher” and/or “Generate customer/payment journal” rules for transactions that don’t originate in F&O. Some common examples are:
- Bank fees that post to your account automatically every month. A rule for this scenario could look like this:
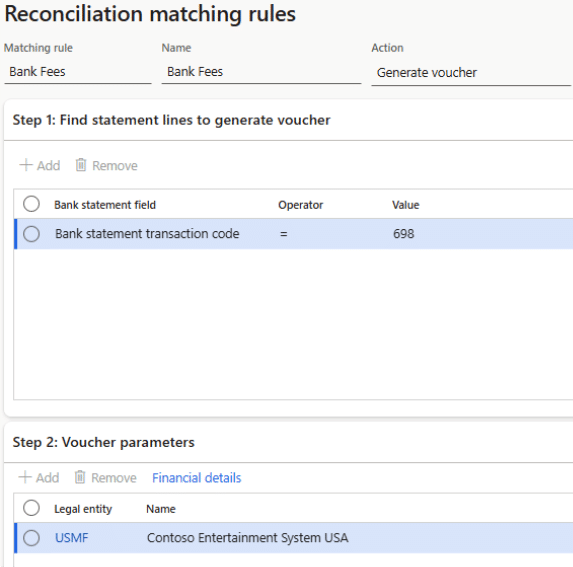
Financial details:
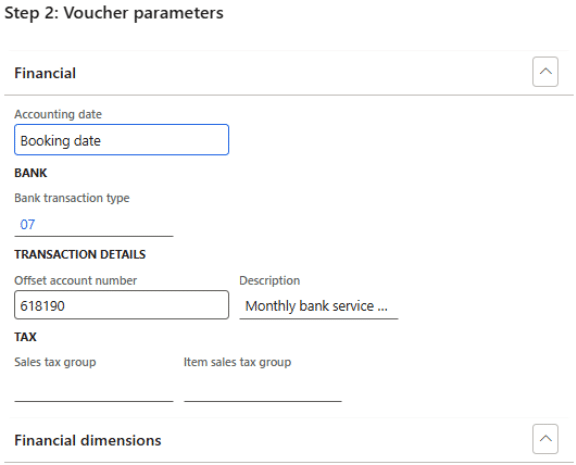
The logic here tells the system to look for imported statement transactions with a type of 698. If found, create a voucher in the USMF entity with an offset to the 618190 ledger account. This assumes that the transactions with a code of 698 can always be posted to 618190. To limit the scope, you could add an additional line in Step 1 to look for a specific description within the statement line.
- Payments to tax authorities that are initiated outside of F&O on the DOR website. A rule for this scenario could look like this:
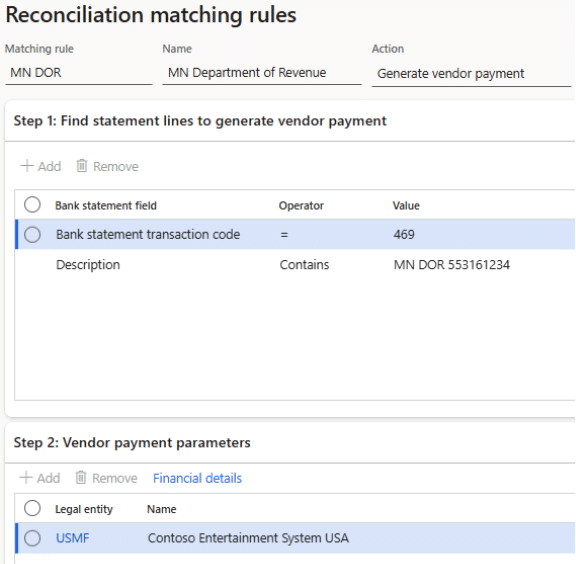
Financial details:
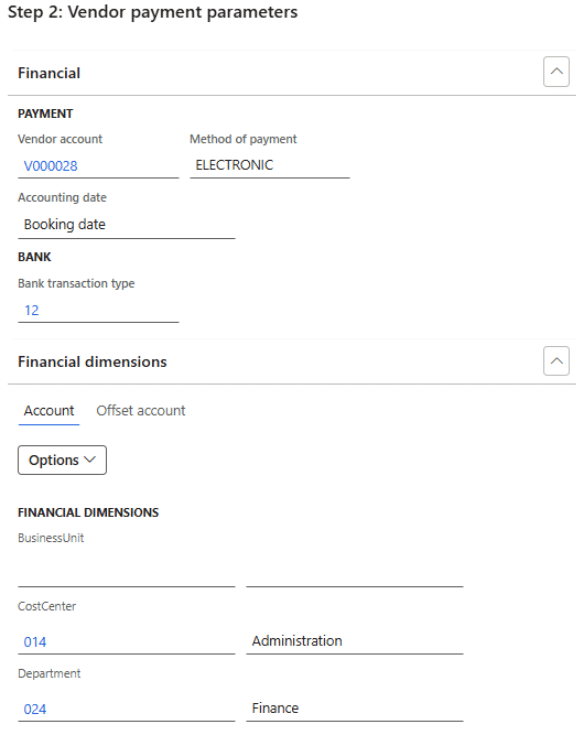
The logic here tells the system to look for imported statement transactions with a type of 469 and a description that contains “MN DOR 553161234.” If found, create a vendor payment journal in the USMF entity for Vendor V000028. This assumes that the vendor is uniquely identified in the Description field within the bank statement data.
Set up matching rule sets
1. Go to Cash and bank management > Setup > Advanced bank reconciliation setup > Reconciliation matching rule sets.
- Click +New on the top ribbon to create a new set, then click +Add in the Matching rules tab to add rules to the set.
- The order of the matching can be significant depending on the rules you have set up. The first rule in the set will be executed first when the matching process is run, then the second, and so on. The only rule of thumb here is that it’s usually best to run your default rule(s) last. That way all other logic is executed first before matching on date and amount.
- Ensure all the rules in your set are Active. To activate a rule, go to Cash and bank management > Setup > Advanced bank reconciliation setup > Reconciliation matching rules. Select the inactive rule and click Activate on the top ribbon.
-
- Create as many sets as you need. Typically, you only need one set per bank account. Sometimes bank accounts can even share a set if they have the same types of transactions. As a reminder, you can default the set on the bank account if you want to run it automatically during statement import.
Prepare the test bank statement file
This can be the most time-consuming part. If you have one available to you, the best and easiest thing to do is to utilize a real file from your bank. Oftentimes, you can go into your bank portal and download historical statement data in BAI2, MT940, or CAMT.053 formats. This is the best option because it represents how your data will truly be presented in the statement files and can therefore thoroughly test the matching rules you set up.
If you don’t have your desired statement format available to you, but are confident that you will move forward with advanced bank reconciliation on your account, you can reach out to your account representative at your bank and ask to start receiving your statement data in the desired format. This sometimes requires lead time and may also be an additional cost, depending on your institution and account services in place.
If you don’t have access to the desired format currently, and don’t want to move forward with adding that service until you’ve tested the functionality, the last resort is to create your own file. All three formats are standardized, so there are many resources available online should you need them. Appended below is a BAI2 guide as well as a sample BAI2 file that you can use to get started.
Import the test bank statement
Before importing the test bank statement, you may need to stage some data so that the file does not fail the validation during import. F&O will validate 4 things:
- Bank account number – ensure that the bank account(s) in the file match the bank account numbers set up in the cash and bank management module
- Statement date – you cannot import a statement date that already exists in F&O
- Beginning balance – if the beginning balance is present in the file, it must match the prior statement’s ending balance
- Ending balance – if the ending balance is present in the file, it must equal the beginning balance plus the total of the transactions in the imported file
If you are using a live file, you’ll either need to modify the beginning and ending balances in the file, or create a journal entry before importing to bring the subledger balance in line with the balances in the file.
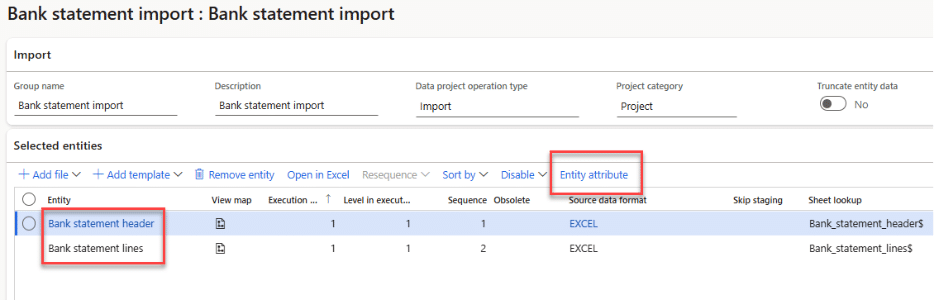
If you’re using the DMF to import your statement, you need to import to the Bank statement header and Bank statement lines entities. Use the Entity attribute form to ensure your data is properly formatted.
If you’re using ER statement formats, perform the following steps:
- Go to Cash and bank management > Bank statement reconciliation > Bank statements. Click +New on the top ribbon.
- Select the bank account (or set the Toggle to Yes to import for multiple accounts), select the statement format, and browse for the statement file. Click Upload. Then click ok.
- After import, the status of the statement will be Open. Click Confirm on the top ribbon. Once the status shows Confirmed, the statement can be used in a worksheet for reconciliation.
- After importing a file, a worksheet needs to be created that includes the date of your imported file. To create a worksheet, go to Cash and bank management > Bank statement reconciliation > Bank reconciliation. Click +New on the top ribbon. Select the bank account, enter a description, and select a cutoff date.
- The worksheet is the “folder” that houses your bank rec data for the specified period. The bank statement files are the papers within the folder. Each worksheet is reconciled individually. The worksheet setup is flexible; it can be for a single day or a range of dates. The best way I’ve found is to create one worksheet per month so that way you’re reconciling a month’s worth of bank statement data together. The benefit of doing one worksheet per month is that you can match transactions across days. For example, if you post a single journal in F&O for your bi-weekly payroll entry, it may hit your bank account across multiple days. You’ll be able to reconcile across days (as long as the dates are within the same month) if you have a worksheet for the whole month. If, however, you do a worksheet for each day, you would need to post an adjusting entry to move dollars to the proper dates before you can reconcile. I’ve found that auditors only care that the balances are correct within a month, and so doing a monthly worksheet/reconciliation is more flexible and requires less adjustments.
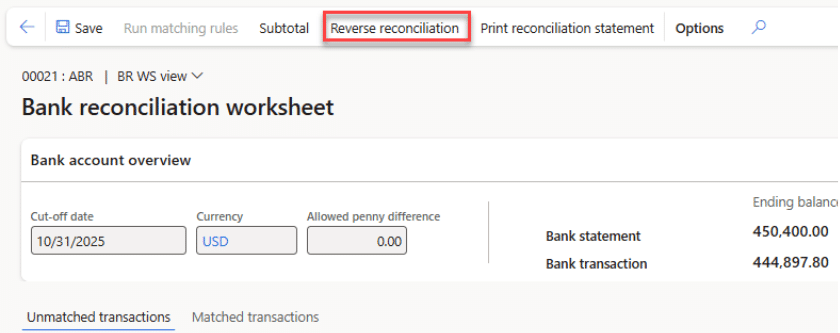
- Once you’ve created a worksheet with the desired cutoff date (the month end date if you choose to do monthly reconciliations), click Worksheet on the top ribbon.
- Note: there cannot be overlapping days in worksheets for a single bank account. Once you’ve created a worksheet for the period, you don’t need to create a new worksheet until your cutoff date has passed.
Match transactions
1. Within the worksheet, you can now start matching statement transactions to F&O bank transactions. If you didn’t run the matching rules during import, you can do it manually here. Click Run matching rules on the top ribbon. Select either a rule set or an individual rule. If there is a lot of data, you can run the matching in batch. Click OK.
- After the matching rules have run, you’ll get an Infolog at the top of your screen indicating how many transactions were matched. Click on the Matched transactions tab to review the matches.
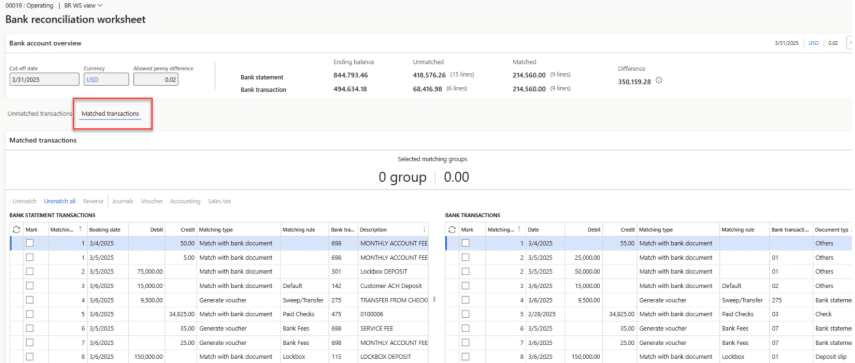
Statement transactions are on the left, and F&O bank transactions on the right. The Matching ID column indicates the transactions that were matched against each other. The Matching type and Matching rule columns indicate how the match was found.
- After reviewing the Matched transactions, go back to the Unmatched transactions tab to review what’s left. If there are transactions you expected to find a match, it’s likely that one or more of your rules needs to be adjusted. To modify a rule, go back to the Rule setup, deactivate it, make the desired change, then reactivate the rule. Then, go back to the bank rec worksheet and click Run matching rules again. This time, select the individual rule you modified and run it. Continue this process until your transaction matches as desired.
Reconcile the worksheet
Once all statement transactions have been imported for the worksheet period and matched against posted F&O bank transactions, you can mark the worksheet as reconciled. You should see $0.00 in the bank statement unmatched field, and no remaining transactions within the bank statement side of the Unmatched transactions form.
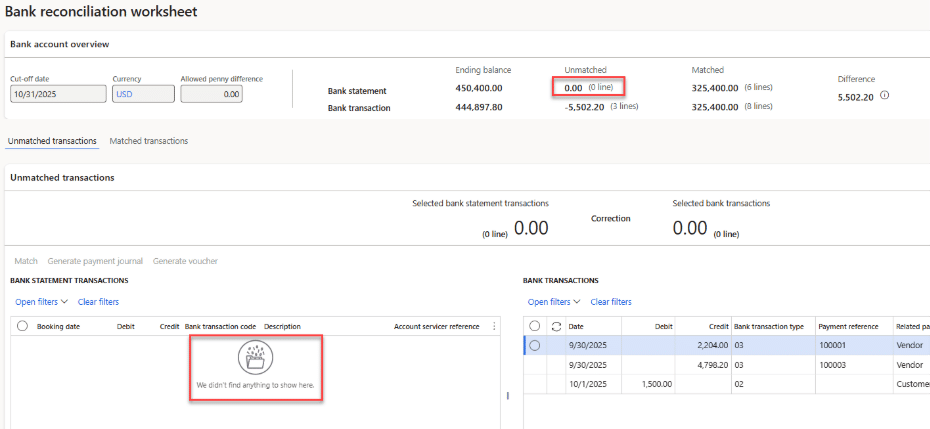
There will likely be unmatched F&O bank transactions; that is to be expected. Those transactions will include uncleared AP vendor checks, transactions with timing differences at the bank, and potentially some transactions that need to be adjusted. We will address those transactions in the next step.
After confirming that there are no unmatched bank statement transactions, click “Mark as reconciled” on the top ribbon. Note: As of the writing of this documentation, there is no validation on the “Mark as reconciled” button, meaning that you can click it at any point, regardless of whether there are unmatched transactions. The good news is that if it’s accidentally clicked, you can easily reverse the reconciliation.
Run the bank reconciliation statement
Once you’ve marked a worksheet as reconciled, you should run the reconciliation statement to analyze the remaining unmatched transactions. From the bank reconciliation form, highlight the reconciled worksheet and click Print reconciliation statement on the top ribbon.
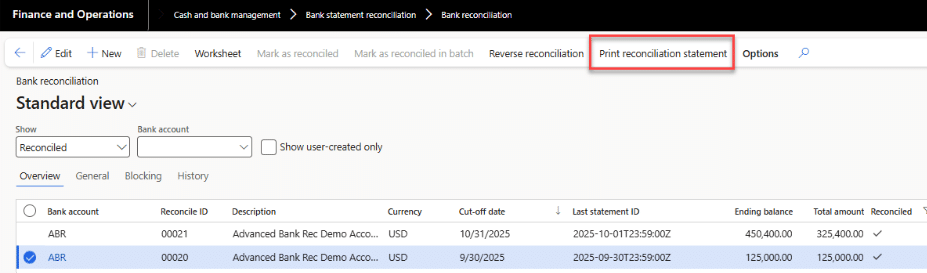
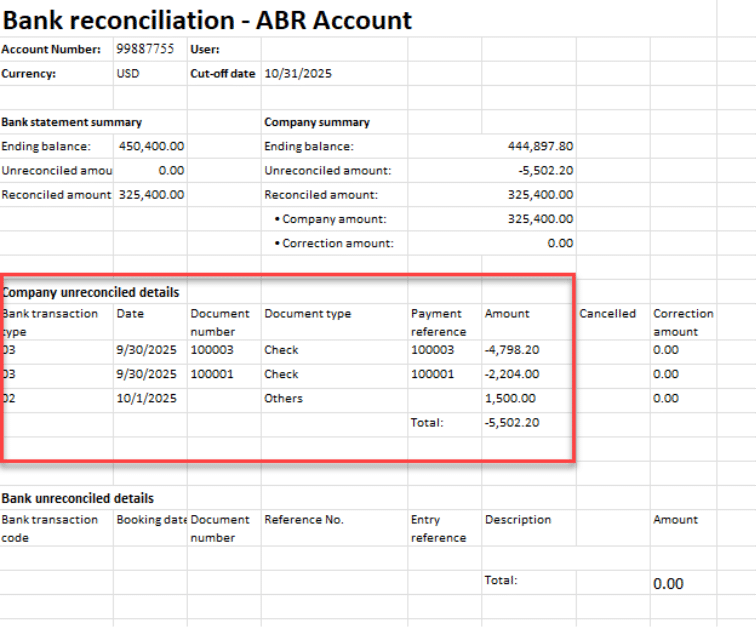
The resulting report contains “Company unreconciled details” which is the list of transactions that are posted in F&O to the bank account but have not yet been posted at the bank. These transactions should be reviewed to ensure that they truly belong on your books.
How to interpret a BAI2 file
In short, the BAI2 format is a cash management balance reporting specification developed by the BAI (Bank Administration Institute), presented as a plain text, comma delimited. Its structure is complex, composed by header, group headers, detail, group footers and grand total. Each record is identified by a code and the detail has a type code that defines the transaction.
Let’s take a brief look at the BAI2 file format.
BAI2 Record Description
You can consult the BAI’s Technical Reference manual here.
The BAI2 file can contain information for multiple bank accounts at the same time. The transactions are grouped by Transaction Date and sub-grouped by Bank Account Number.
A BAI2 bank statement is in .txt format and looks like this:

We are particularly interested in the columns colored, as following:
(Purple) Record Code: Identifies the type of record.
| Record Code | Record Name | Record Purpose |
| 01 | File Header | Begins file |
| 02 | Group Header | Begins group |
| 03 | Bank Account Identifier | Begins bank account detail |
| 16 | Transaction Detail | Indicates transaction within the bank account |
| 88 | Continuation | Used when the description in record code 16 exceeds the maximum allowed characters |
| 49 | Account Trailer | Ends account |
| 98 | Group Trailer | Ends group |
| 99 | File Trailer | Ends file |
(Red) Transaction Date: YYMMDD, the date the funds posted to the account(s).
(Light Blue) Bank Account Number: indicates the bank account to which the transactions were posted. The system will only import the data if this number matches a bank account number setup in the cash and bank management module.
(Green) Type Code: Identifies the type of balance (Summary/Transaction) being reported. Reminder, a Credit to the bank is a Debit to you. When you see credit below, consider it a deposit into your account. When you see debit, consider it a withdrawal.
| Type Codes | Description |
| 001-099 | Account status type codes |
| 100 | Total statement credits summary type code |
| 101-399 | Credit summary and detail type codes |
| 400 | Total statement debits summary type codes |
| 401-699 | Debit summary and detail type codes |
| 700-799 | Loan summary and detail type codes |
| 900-999 | Customized type |
(Yellow) Amount: Presented as Absolute value for the Detail records, with implied decimal places that are determined by the currency code. In our case, we are assuming that we are always talking about USD, which has 2 decimal places. For example, the amount 55599 is 555 integer and 99 decimal, or $555.99.
(Pink) Funds Type: Indicates the availability of the Amount. It may occupy one field or several separately delimited fields. The first field is a single-character code that indicates the distribution of availability, and therefore defines any fields that follow.
| Fund Type Code | Meaning |
| Z | Unknown |
| 0 | Immediate availability |
| 1 | One day availability |
| 2 | Two or more days of availability |
| V | Value dated |
| S or D | Distributed availability |
- Z, 0, 1, or 2 indicates the availability of the entire Amount.
- If funds type = S, the next three fields are immediate availability amount, one-day availability amount, and more than one-day availability amount.
- If fund type = V, the next two fields are date and time.
- If fund type = D, the next field indicates the number of availability distributions, and each following pair of fields indicates the number of days and the amount available, respectively. (Example: …,D,3,0,150,1,100,2,90,…)
(Dark Blue) Customer Reference: The Customer Reference Number will be the Check number for the Type Codes 474, 475 and 395.
(Gray) Text (Description): This field can contain a number of things, including unique identifiers for the trading party, like a name and ID number, and a description of the transaction.
Most banks can also include opening and closing balances in the 03 record for each account. The most common way that data is reported is through transaction type code 010 for the beginning balance and 015 for the ending balance. It will appear in the BAI2 file like this:

In the above example, the beginning balance is $125,000.00, and the ending balance is $450,400.00.
The open and ending balances (if present in the file) will be imported into F&O and validated to ensure that 1) the beginning balance matches the prior statement’s ending balance, and 2) the ending balance equals the beginning balance plus the total of the transactions listed in the file.
Sample BAI2 lines that can be copied into a .txt file to get started on a new test statement. Replace everything within and including the square brackets with actual data. Everything else can be imported as-is and can also be changed as needed for testing:
01,A-1,B-1,[file date],,,,,/
02,ABR,,,[transaction date],2359,USD,/
03,[bank account number],USD,010,+[opening statement balance],,,015,[closing statement balance],,/
16,115,35000000,,,/
88,LOCKBOX DEPOSIT
16,142,1500000,,,/
88,Customer ACH Deposit/
88,OTHER REFERENCE: HOME GOODS
16,275,950000,,,/
88,TRANSFER FROM CHECKING 2233445566
16,469,1425000,,,/
88,MN DOR 553161234
16,475,3482500,,,100002/
88,CHECK PAID
16,698,2500,,,/
88,MONTHLY ACCOUNT FEE
49,,/
98,,,/
99,,,/
Need Help with Your D365 Finance Advanced Bank Reconciliation Setup?
Whether you're navigating technical configurations or fine-tuning functional settings, our experts are here to support you. Contact the Stoneridge team to ensure your advanced bank reconciliation process is set up for success.

Under the terms of this license, you are authorized to share and redistribute the content across various mediums, subject to adherence to the specified conditions: you must provide proper attribution to Stoneridge as the original creator in a manner that does not imply their endorsement of your use, the material is to be utilized solely for non-commercial purposes, and alterations, modifications, or derivative works based on the original material are strictly prohibited.
Responsibility rests with the licensee to ensure that their use of the material does not violate any other rights.