


Bank Reconciliation in Dynamics GP
Every company needs to ensure that their books match the reality of their bank transactions. Microsoft Dynamics GP includes several features to assist in accomplishing this task with ease! You can adjust the cleared amount of individual transactions, post adjustments to match interest income and service charges on the statement, save your work so you can complete the reconciliation in increments, reprint reconciliation reports as required, and generate a report to assist in reconciling your chequebook to the General Ledger cash account. Please refer to the following guide for tips on using these convenient GP features.
Reconcile Bank Statements
A common oversight is posting cash receipts in Sales, but not depositing those receipts in GP after depositing them in the bank. Review your available cash receipts, and verify that the transactions in GP are accurate
- Open Transactions >> Financial >> Bank Deposits
- Leave the deposit type as Deposit with Receipts
- Select the Chequebook ID you are intending to reconcile
- Review the list of available receipts to ensure that all deposited receipts in the reconcile period have been deposited & are no longer available
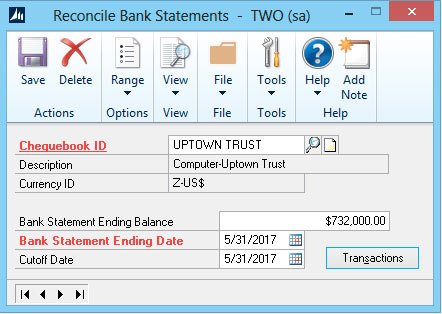
The Reconcile Bank statements window is accessible via Transactions >> Financial >> Reconcile Bank Statements
- Select the Chequebook ID
- Enter the Bank Statement Ending Balance
- Enter the Bank Statement Ending Date for the balance above. This also becomes the default Cleared Date when clearing transactions
- Enter the Cutoff Date. Typically, the cutoff date is the same as the bank statement ending date. Only unreconciled transactions on or before this date will appear in the reconciliation. Furthermore, the chequebook’s balance calculates as of the cutoff date.
- The Save button can be used to save any reconciliation work that has been done, without having to complete the reconciliation
Clearing Transactions
Compare the list of transactions in GP to the bank statement, and mark the cleared transactions with a checkmark in the C column of the list
- From the Reconcile Bank Statements window, click the Transactions button to open the Select Bank Transactions window
- The Select Range functionality can be used to select a beginning and ending transaction and mark or unmark all of the transactions in that range
- A running total of the number and value of the cleared payments and deposits is kept at the bottom left of the window
- The adjusted balances at the bottom right of the window update as you clear transactions. A summary of the calculation is available by clicking the blue arrow besides the Difference value
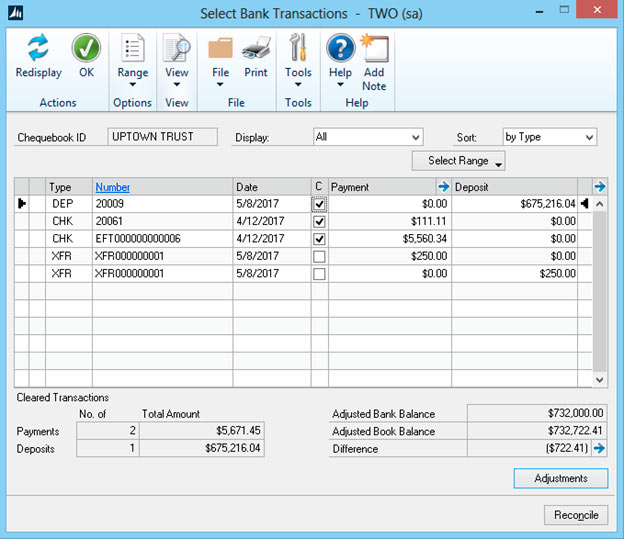
Cleared Amounts
If a transaction cleared the bank at a value that differs from the transaction’s value in GP, the cleared amount can be adjusted by selecting the transaction and clicking the blue arrow beside either the Payment or Deposit column header. Note that this feature should only be used for immaterial differences, such as rounding. Material differences due to errors should be corrected (e.g. void the erroneous transaction, and re-post a corrected version), and then reconciled.
- The Cleared Date can be adjusted from its default value matching the Bank Statement Ending Date
- The Cleared Amount can be adjusted to match the value that cleared the bank
- Click the OK checkmark button to save the updated values
- An informational icon will appear beside payment or deposit amounts that are cleared at a different value than the original transaction within GP
- Clearing a transaction at a different value compared to its value in GP’s chequebook register should require an adjustment in the register. These adjustments can be entered as other income or expenses with appropriate offset accounts in the Reconcile Bank Adjustments window

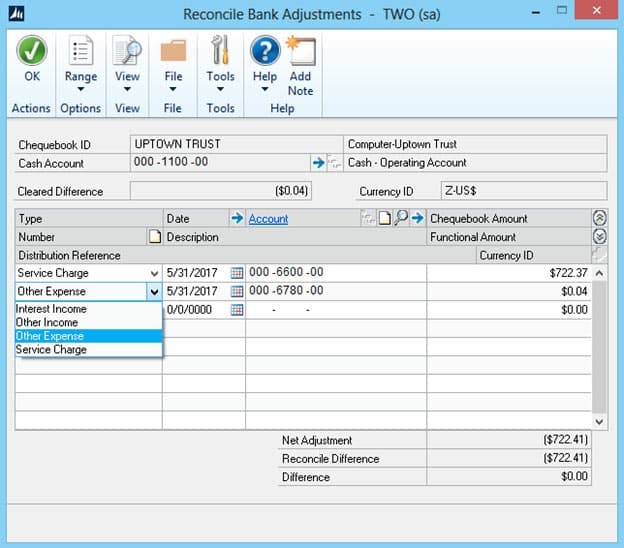
Adjustments
Adjustments to the checkbook register, such as interest income and service charges on the bank statement, can be entered as part of the reconciliation
- From the Select Bank Transactions Window, click the Adjustments button to open the Reconcile Bank Adjustments window
- Note that the cash account for the selected chequebook is displayed near the top of the window, as is the cleared difference
- Enter the type of adjustment, date, offset account, and chequebook amount for each adjustment
- Click the OK button to save the adjustments
Reconcile
Once the difference between the adjusted bank and book balances is $0.00, you can complete the reconciliation
- In the Select Bank Transactions window, click the Reconcile button
- The adjustments you have entered will update the chequebook balance, the Bank Reconciliation module, and the General Ledger
- Adjustments and cleared transactions will be marked as reconciled and moved to history
- The Reconciliation Edit List, Bank Adjustments Edit List, Marked Transactions Report, and Outstanding Transactions Report will ask to be printed
Reprinting Reports
Bank statement reconciliation reports can be reprinted, based on each reconciliation’s audit trail code
- Open Reports >> Financial >> Bank Posting Journals
- Select the desired report: Reconciliation Journal, Bank Adjustments Journal, Cleared Transactions Journal, or Outstanding Transactions Report
- Create a new report option, or modify an existing option
- While you may not know the exact audit trail code, clicking the magnifying glass lookup button will open the Bank Audit Trail Codes list, which includes the posted date, and user who posted each reconciliation to assist in selecting the correct code
- Select your print destination, and click Print
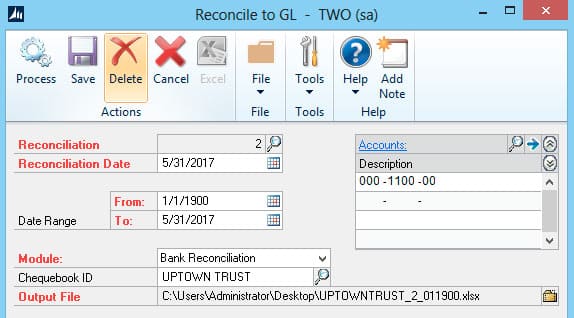
Reconcile to the General Ledger
Now that your Bank Reconciliation module is reconciled to your bank statement, you should reconcile to the general ledger cash account for your chequebook. Differences may arise due to a variety of issues, such as timing mismatches, batches that have been posted for subledgers but have not posted through to the GL, posting interruptions due to connection issues, and non-cash transactions with erroneous distributions to the cash account
- Chequebook balance can be found in Inquiry >> Financial >> Chequebook Balance, and the cash account balance in Inquiry >> Financial >> Summary
- If there is a difference to reconcile, you can use the Reconcile To GL routine at Microsoft Dynamics GP button >> Tools >> Routines >> Financial >> Reconcile to GL
- The routine will analyze Bank Reconciliation transactions for the chequebook, general ledger transactions for the cash account, and then produce a file identifying the transaction matching between the module and the GL. Use this file to assist in identifying transactions for further investigation in GP. Transactions in the Unmatched section of the file are the most likely cause of any imbalance
I hope this information helps simplify reconciling your bank, chequebook, and general ledger to each other! If you have any questions about bank reconciliation in Microsoft Dynamics GP, please contact GP Support

Under the terms of this license, you are authorized to share and redistribute the content across various mediums, subject to adherence to the specified conditions: you must provide proper attribution to Stoneridge as the original creator in a manner that does not imply their endorsement of your use, the material is to be utilized solely for non-commercial purposes, and alterations, modifications, or derivative works based on the original material are strictly prohibited.
Responsibility rests with the licensee to ensure that their use of the material does not violate any other rights.