


Expense Management Made Easy in Dynamics 365 Finance and Supply Chain Management
Every organization, regardless of size or industry, must deal with diverse and sometimes complicated expenses.
When you use Dynamics 365 Finance and Supply Chain Management for expense management, you gain access to capabilities that make expense reporting intuitive for employees, transparent for managers, and effective for finance teams.
In this blog, we will walk through what expense management is within D365 Finance and Supply Chain Management, why it matters, and how your team can use both the web application and the mobile app to make expense reporting easier than ever.
Understanding the Expense Report Lifecycle
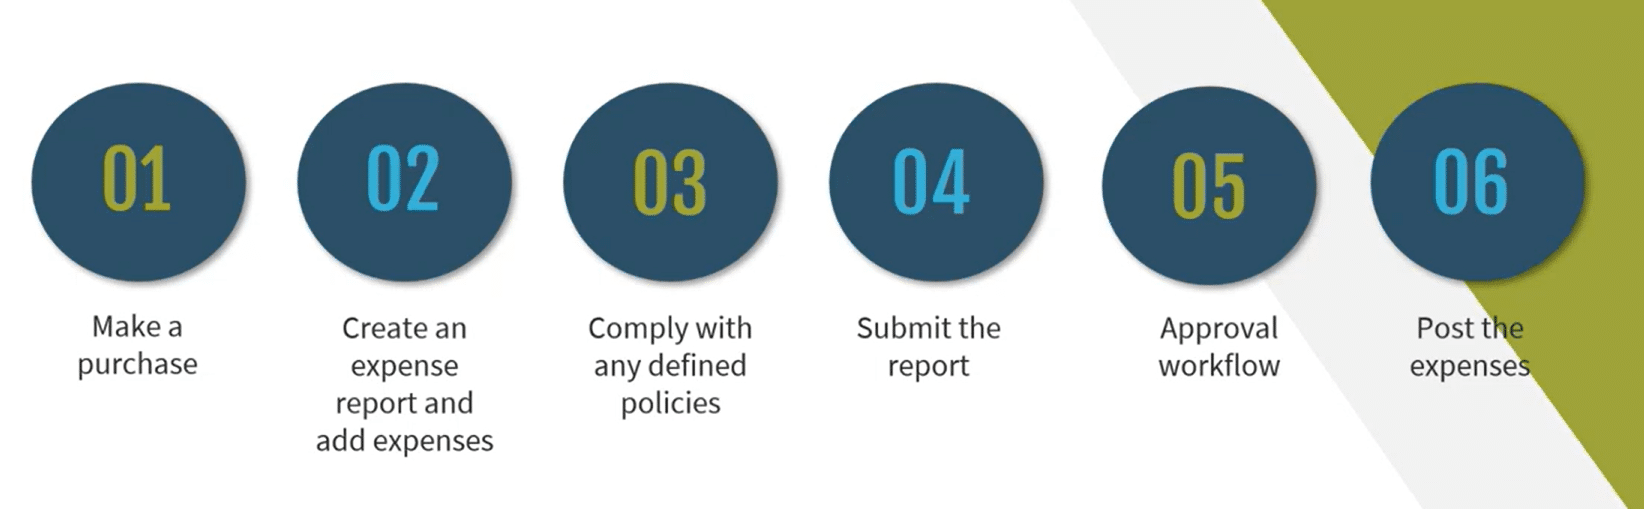
Having a firm grasp on the expense reporting lifecycle will give you some insight into how Dynamics 365 Finance and Supply Chain Management can assist you during every step. While every business has its own operational nuances, the expense lifecycle generally follows a familiar pattern:
- An Expense Is Incurred: It may be a hotel stay, a mileage reimbursement, a meal receipt, or another business cost.
- An Expense Report Is Created: The employee begins documenting what occurred and what needs reimbursement.
- Policy Compliance Must Be Met: Organizations set expense policies, like:
- All meal expenses require receipts
- Airfare above a certain class requires justification
- Certain categories must be tied to projects or cost centers
- The Report Is Submitted: The person who made the expense gets approval.
- Approval Workflow Occurs: This may be a simple manager approval or a more complex multi-level or project-based workflow.
- Expenses Are Posted to the Books: Once approved, the expenses are reflected in the company’s financial records (either the expense subledger or directly to the general ledger).
The lifecycle is consistent in principle, but the details often vary from business to business. Dynamics 365 is very effective as it lets you curate expense management to your own requirements, workflows, and policies—without sacrificing consistency or control.
Why Expense Management in D365 Finance Matters
Dynamics 365 gives organizations several key benefits when managing employee expenses:
- Simple Creation and Submission: Users can easily build expense reports, attach receipts, and categorize expenses—reducing friction and saving time.
- Flexible & Customizable Approval Workflows: Workflows can reflect the structure of your organization. Whether approvals are by manager, project, department, or multiple layers, the system supports it.
- Policy Compliance Built In: Expense policies are enforced before submission. If required information is missing—such as a receipt or justification—the user will be prompted to correct it prior to approval.
- Consistency Across Devices: Users can submit, approve, and review expenses from the web or the mobile app—ideal for remote workers, travelers, or busy teams.
- Better Visibility & Control: Companies can monitor spending trends and compliance from the expense workspace.
The result is a streamlined, transparent, and controlled expense process that benefits employees, managers, and the finance team alike.
Using Expense Management in the D365 Finance Web Application
The primary way users will access expense management capabilities will be through the web application. Let’s look at how you can use it effectively:
1. Open the Expense Management Workspace
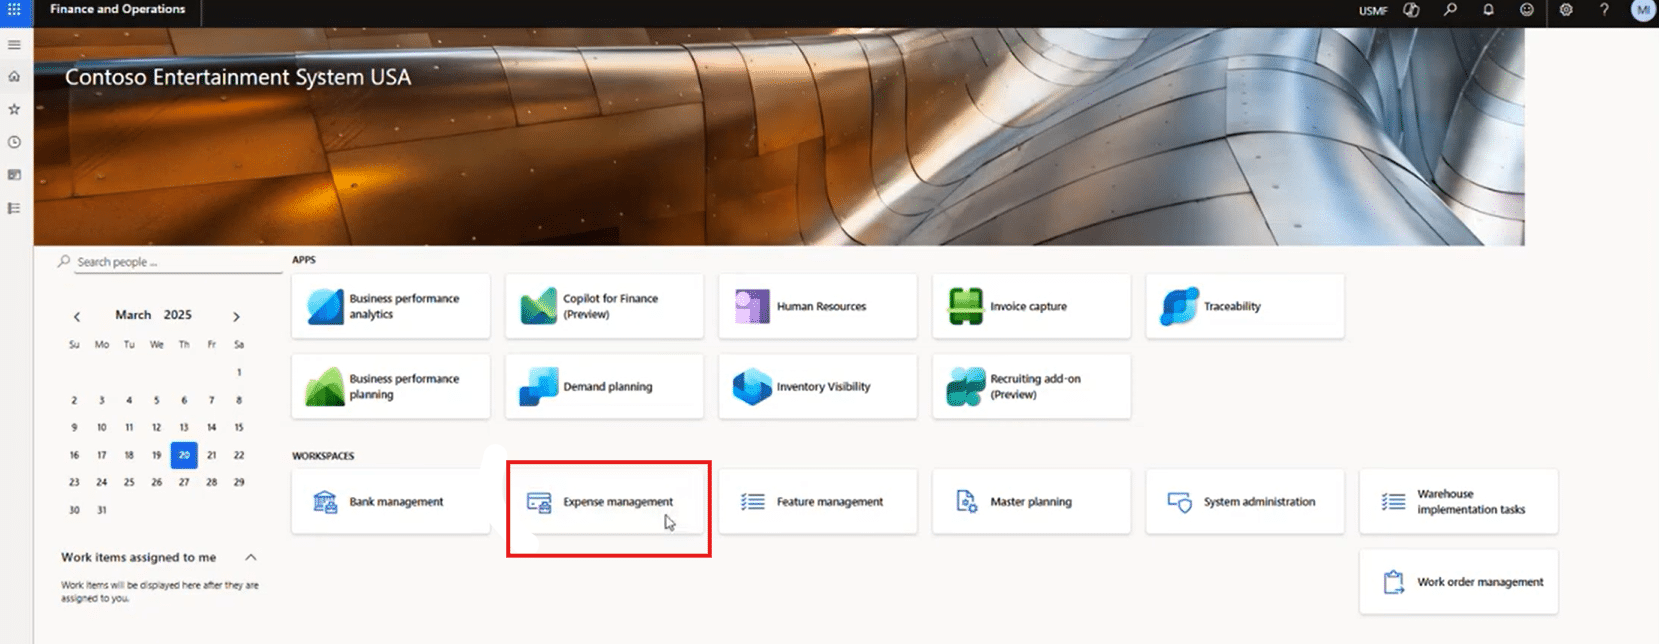
Users can access expense management through the module or directly via the Expense Management Workspace. For this example, we are working primarily out of the workspace.
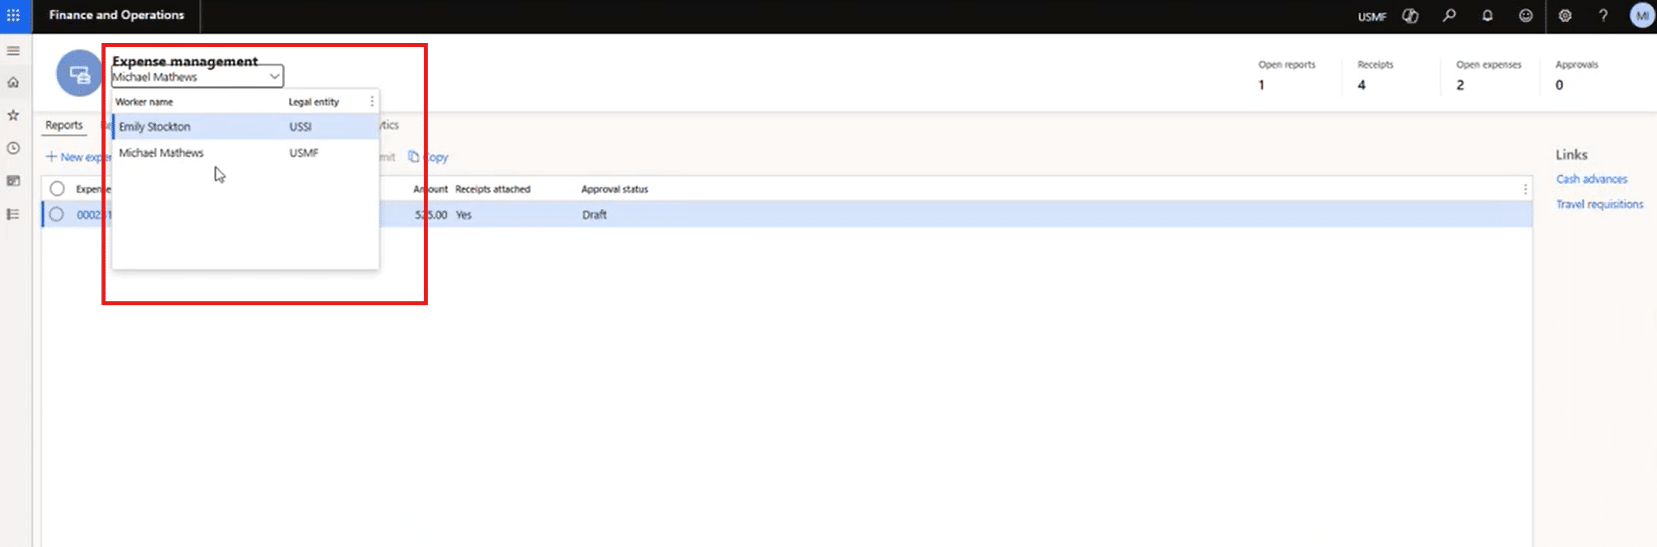
One key thing to know right away is that the solution allows you to delegate the creation of expense profiles and expense reports for other users across multiple entities. By selecting the drop-down menu under “Expense management”, managers or approvers can create expense reports under other records.
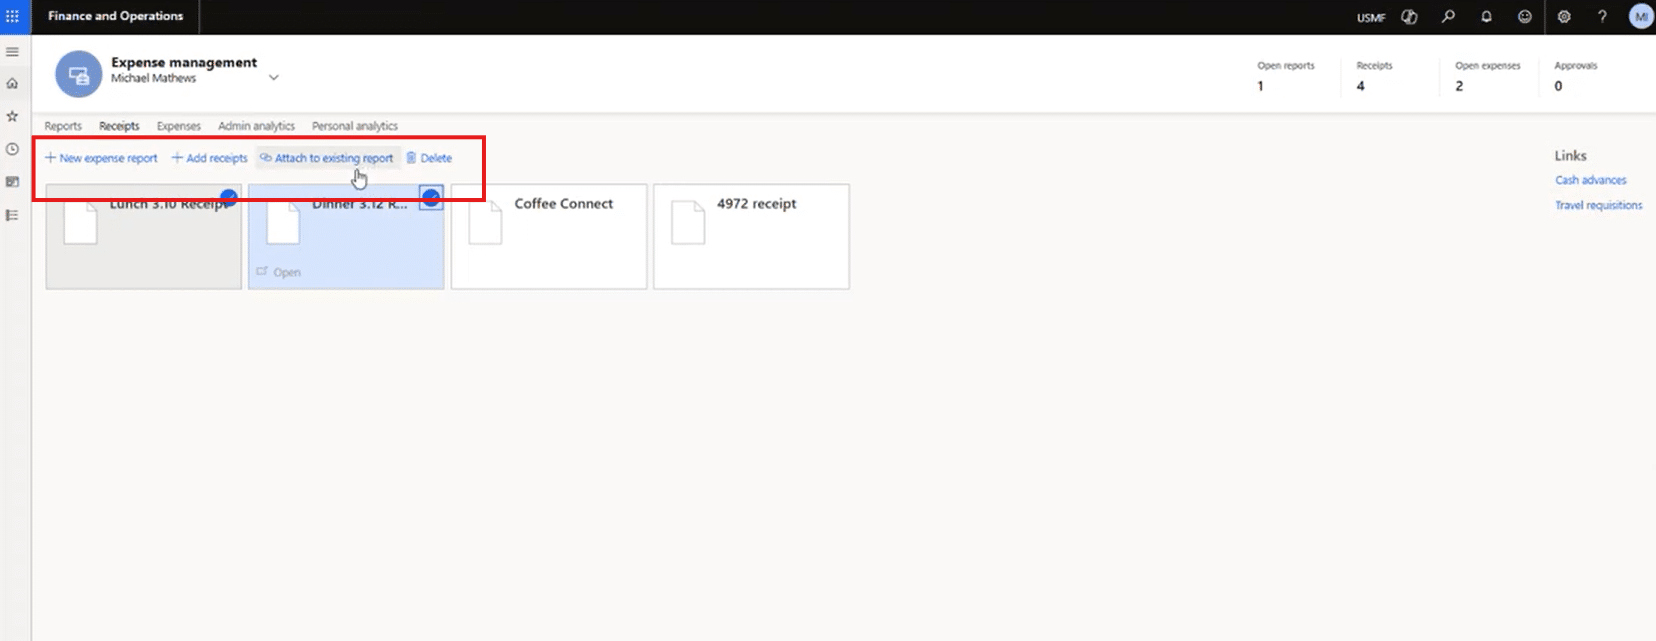
At the top ribbon, there are five main tabs you can utilize when managing expenses. They are:
- Reports: Where you can create new reports or see a list of the reports you have already made.
- Receipts: Where the person creating the report can upload receipts as a proof of purchase.
- Expenses: This tab lets you attach expenses to the reports you create or add expenses to existing reports.
- Admin and Personal Analytics: These tabs provide you and your team with valuable insights into spending, policy compliance, and efficiency.
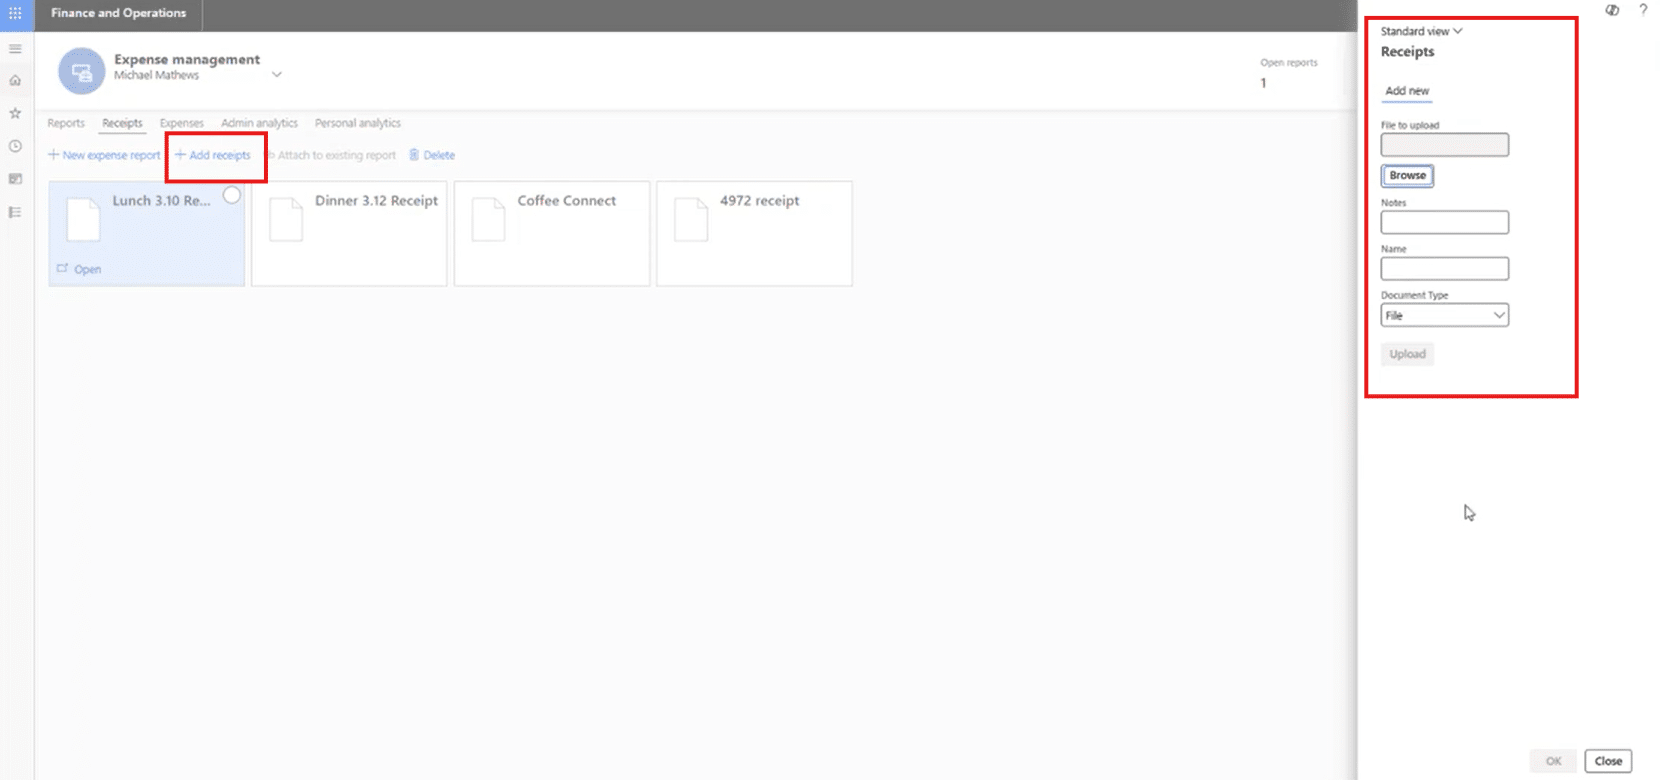
2. Create or Manage Receipts
The Receipts tab displays all uploaded receipts as individual tiles. From here, users can:
- Add new receipts
- Review existing receipts
- Select receipts to move to new or attach to existing expense reports
To upload a receipt:
- Select +Add receipts
- Click on Browse to an image or file then select the receipt you want to upload.

- Optionally, rename the receipt or add notes (e.g., Client meeting lunch)
- Click on Upload
- Once you get the message in blue at the top that says your upload is complete, you can click OK to go back to your list of receipts.
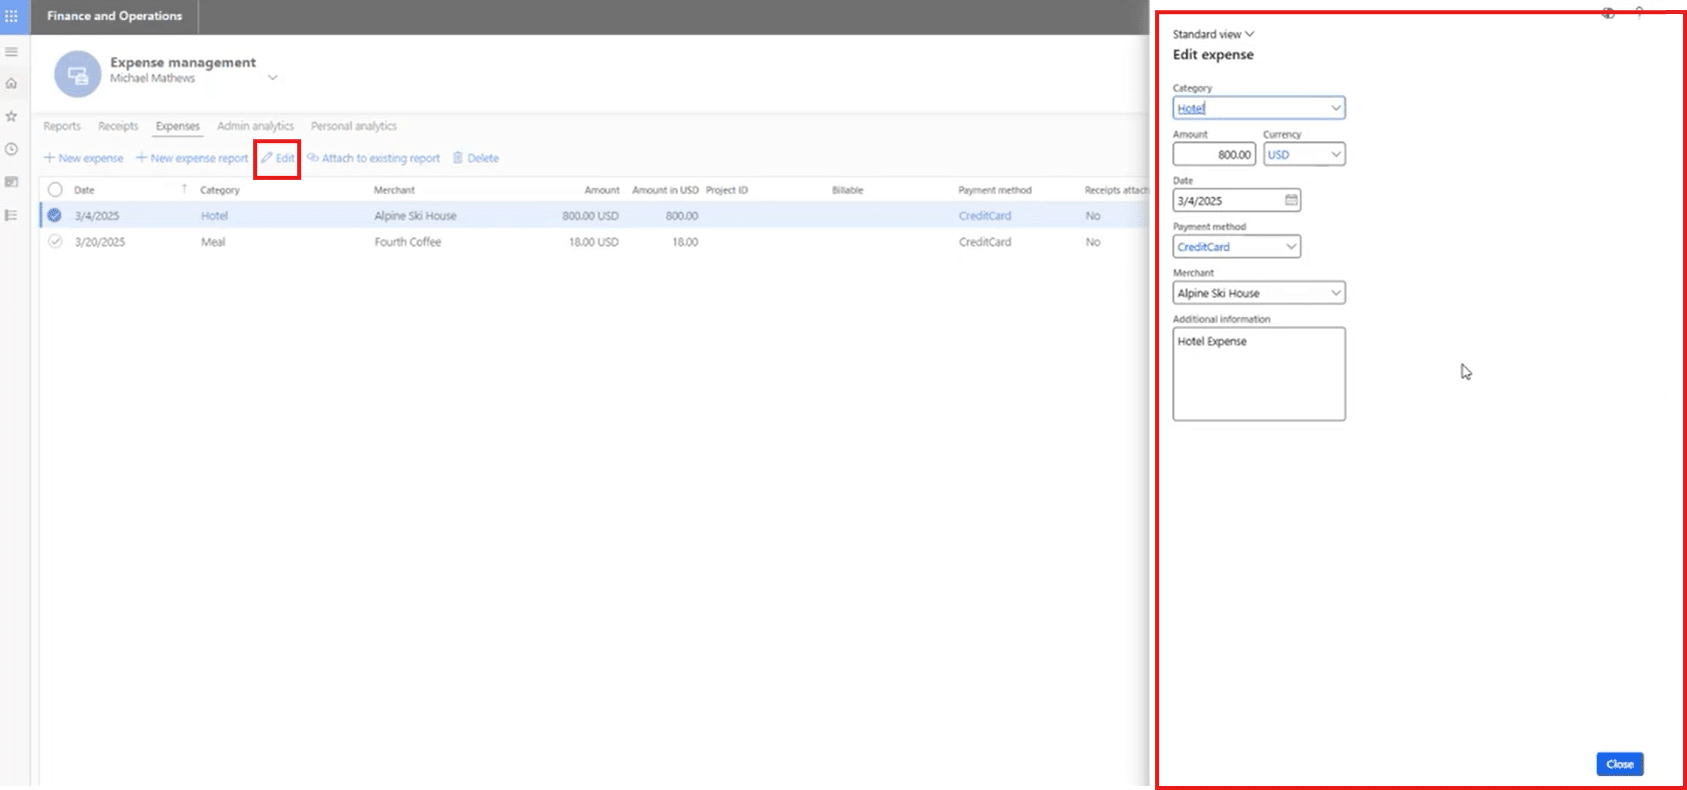
3. Create or Edit Expenses
Navigate to the Expenses tab. From here, you will see a list of your open expenses. You can click on individual expenses or multiple if they are going onto the same expense report.
Users can:
- Edit existing expenses, including changing the category amount, where the expense occurred, how much it was, and more. Once you are done editing, select Close.

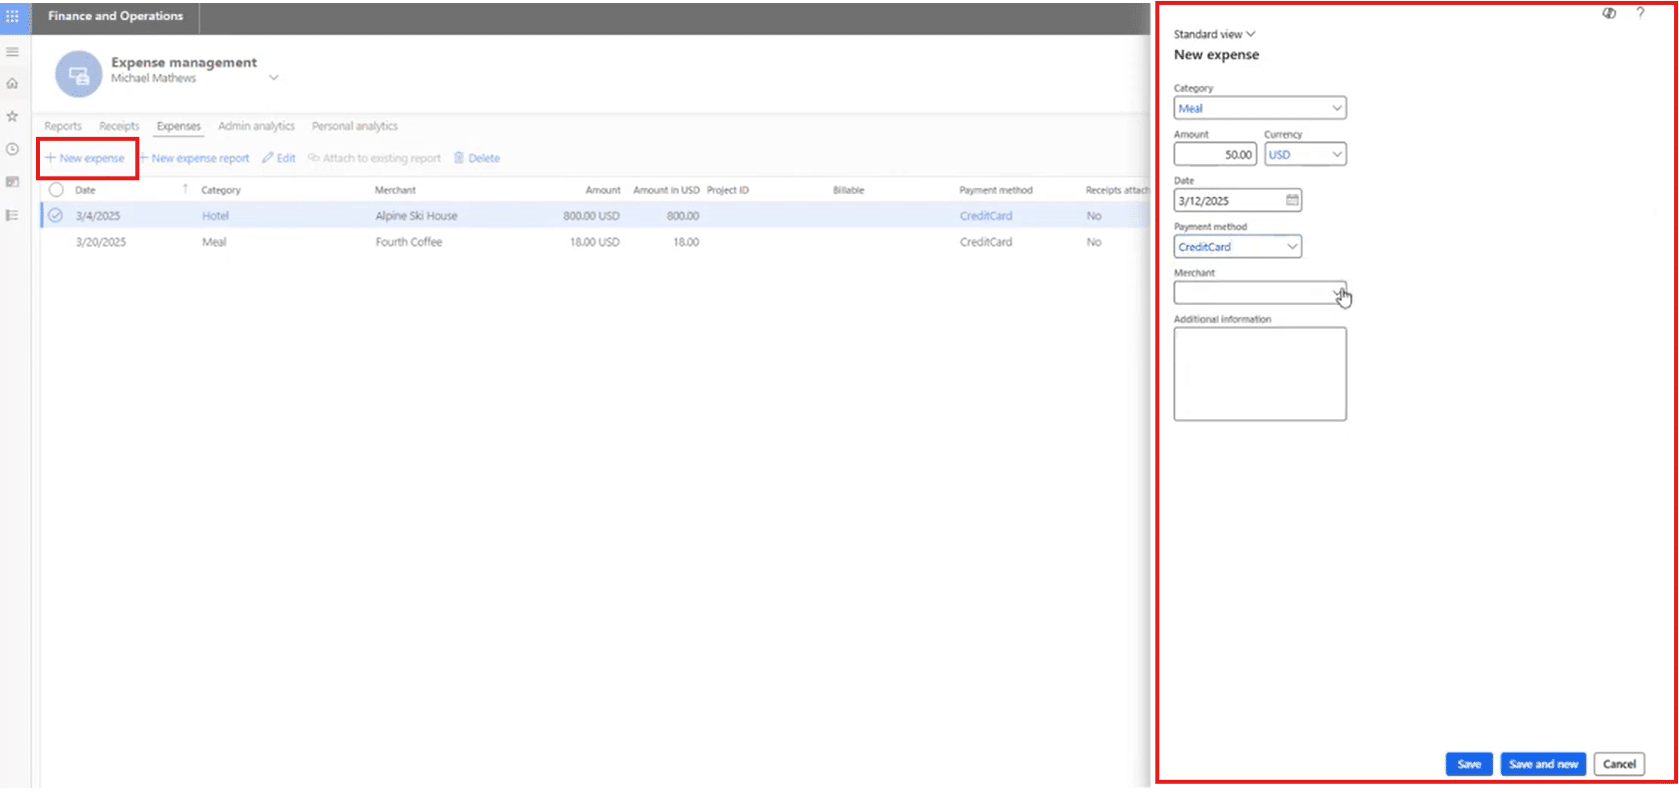
- Create new expenses by following these steps:
- Select New expense
- Choose an expense category (example: Meals)
- Enter:
- Amount
- Expense date
- Payment type (e.g., corporate card, personal reimbursement)
- Merchant (optional)
- Notes or additional details
- Select Save (or Save and new to quickly enter multiple expenses)

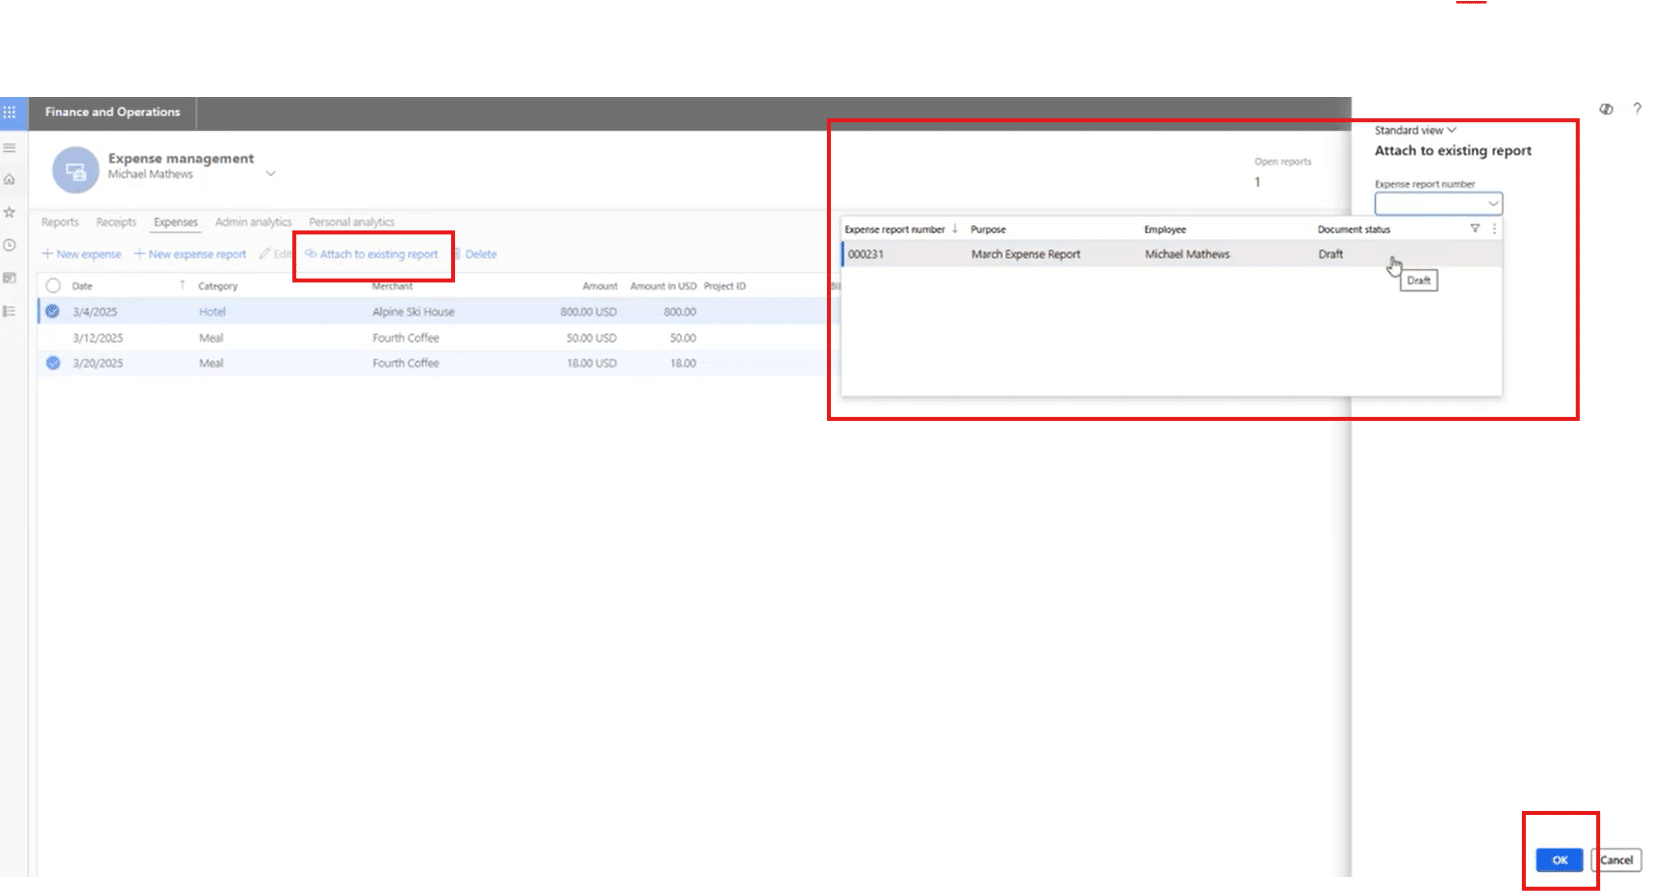
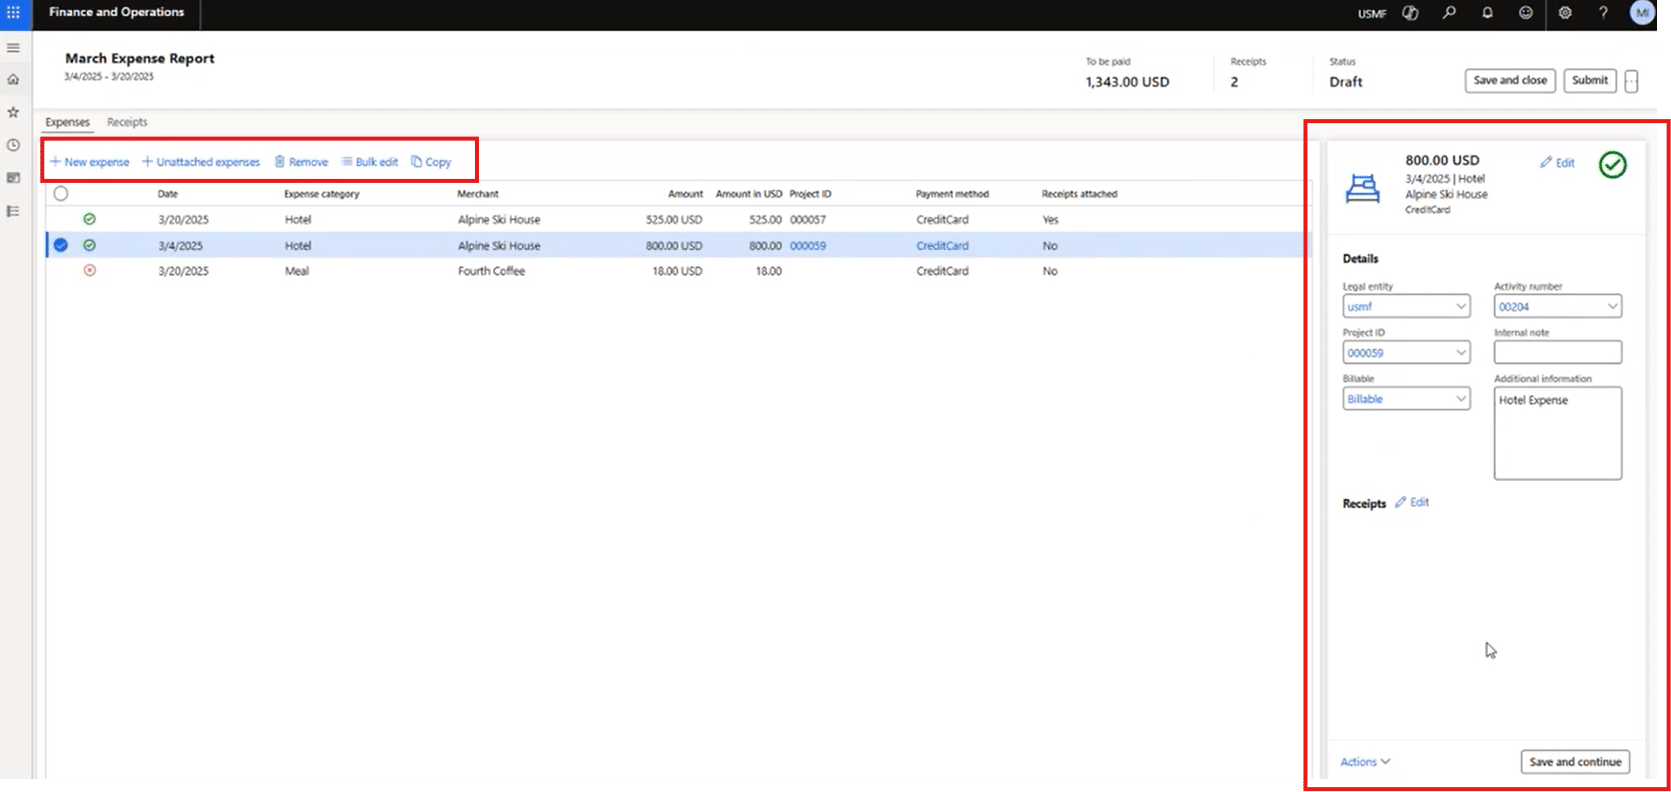
4. Build the Expense Report
Once expenses and receipts exist, they can be attached to a report.
- Select expenses to include
- Choose Attach to existing report or create a new report

- Open the report to review details such as:
- Total amount
- Project ID
- Activity Number
- Number of attached receipts
- Whether expenses are billable or tied to projects
- Make changes if necessary (unattached, add, or remove expenses, amend receipts, etc.)

5. Address Policy Compliance
If a policy rule is violated (for example, meals require receipts), the system flags the issue before submission and will notify you in a red banner at the top. When users configure the policy, they can actually define if they should receive a red banner warning (a hard stop error) or a yellow banner warning (which serves only as a warning and will not stop processing).
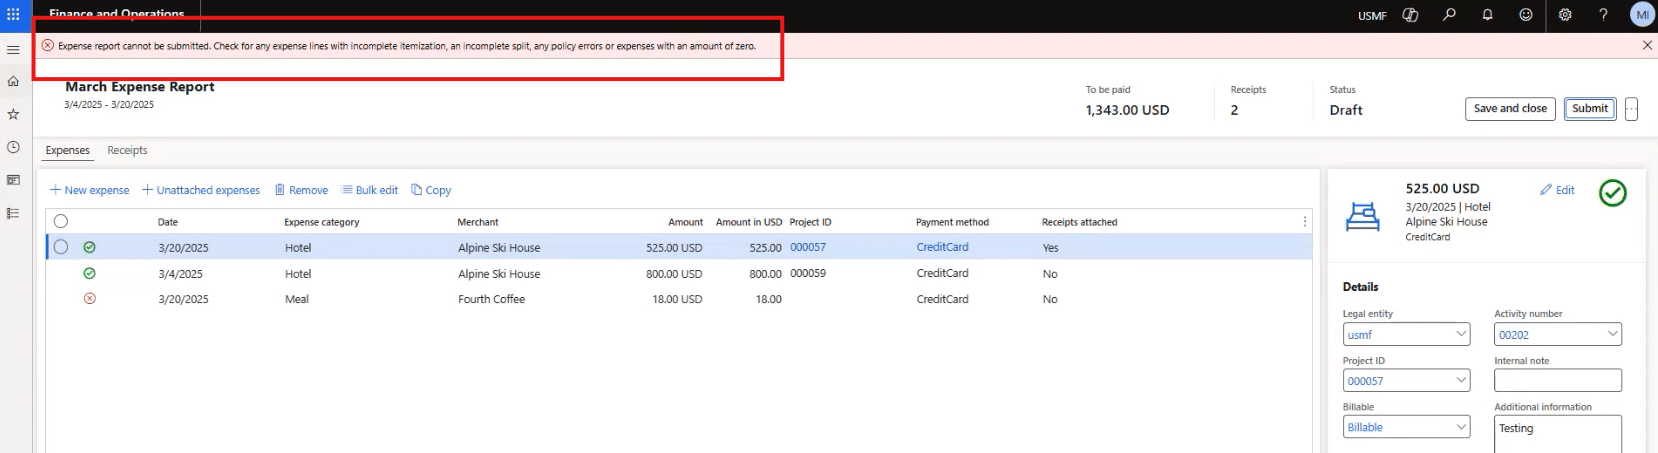
While each organization is going to have different rules, users who get that message can take steps to address the error, including but not limited to:
- Reviewing which expense has a compliance issue
- Attaching required receipts or justification
- Confirming that the policy indicator switches from red (invalid) to green (valid)
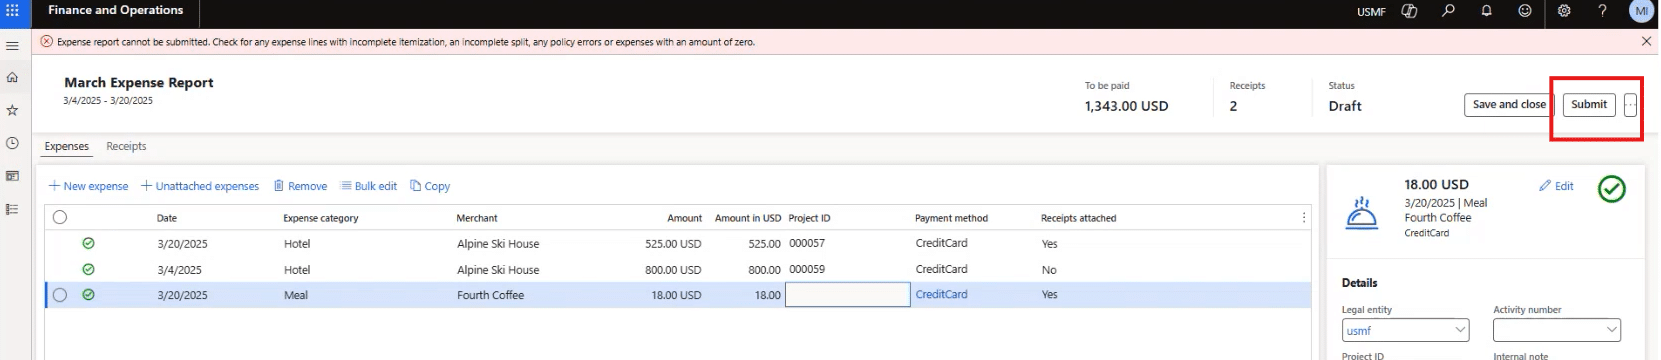
6. Submit for Approval
Once compliant you can:
- Select Submit in the top-right corner to open a sidebar.

- Add comments for the approver if desired
- Submit to workflow by clicking on Submit in the bottom right corner of the sidebar.

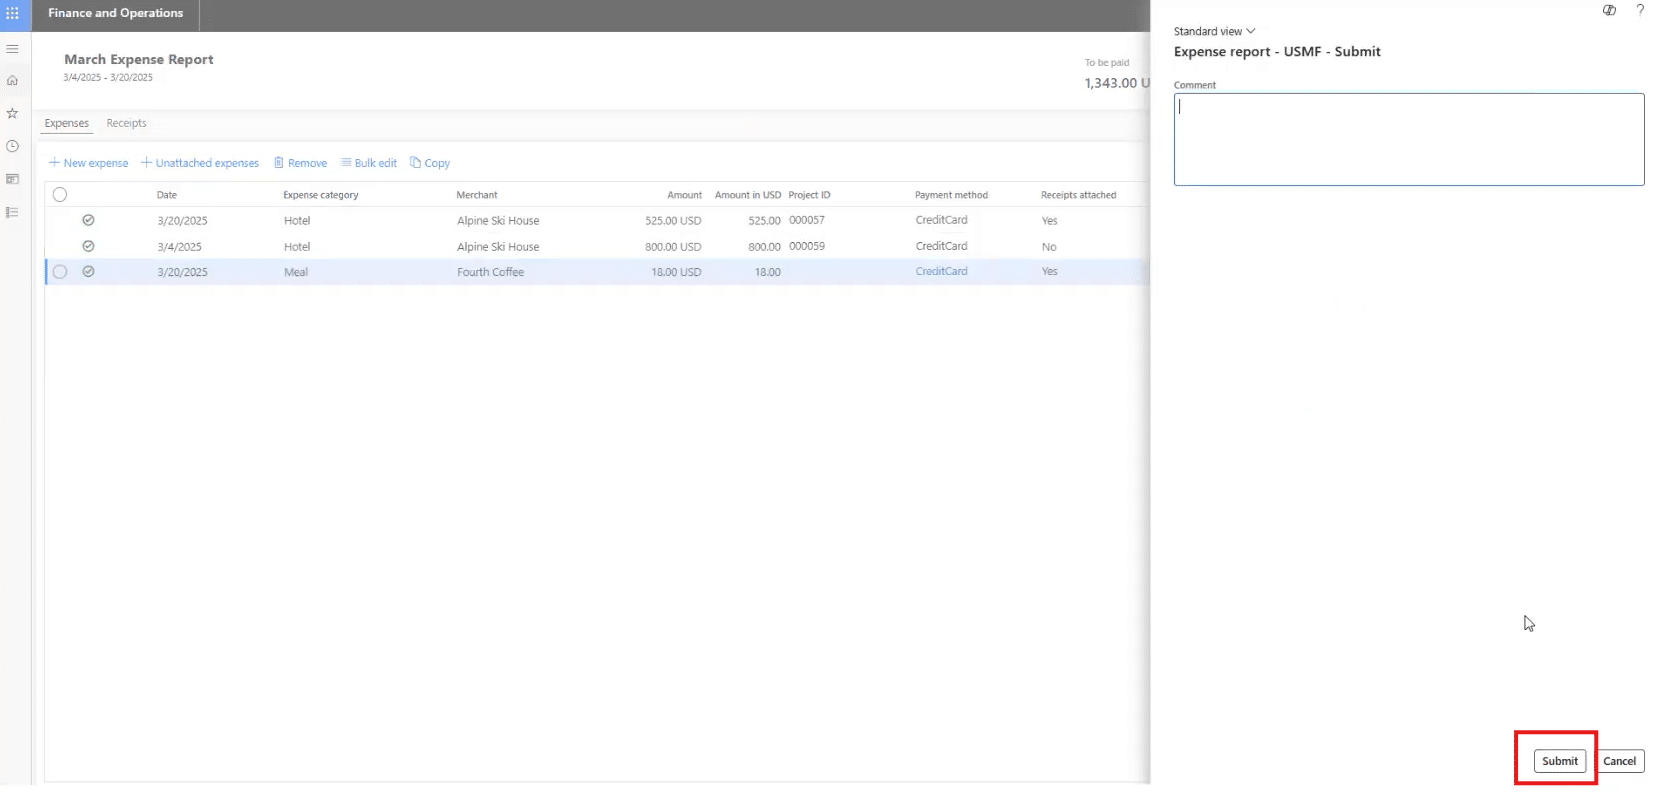
The report now appears in Review status and follows the established approval workflow. From there, the manager can look over the expense report and make sure everything is good to go before approving.
Using Expense Management in the Mobile App
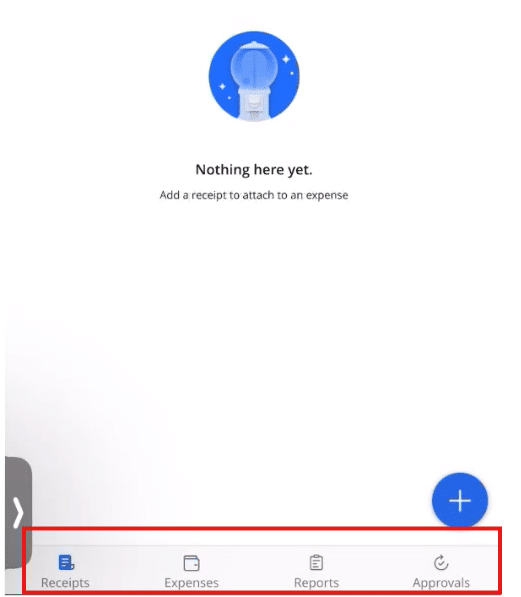
A reality of the business landscape today is that sometimes you have to work on the go. Luckily, the Expense Management mobile app mirrors the core features of the web client, with four main tabs at the bottom of the screen:
- Receipts
- Expenses
- Reports
- Approvals
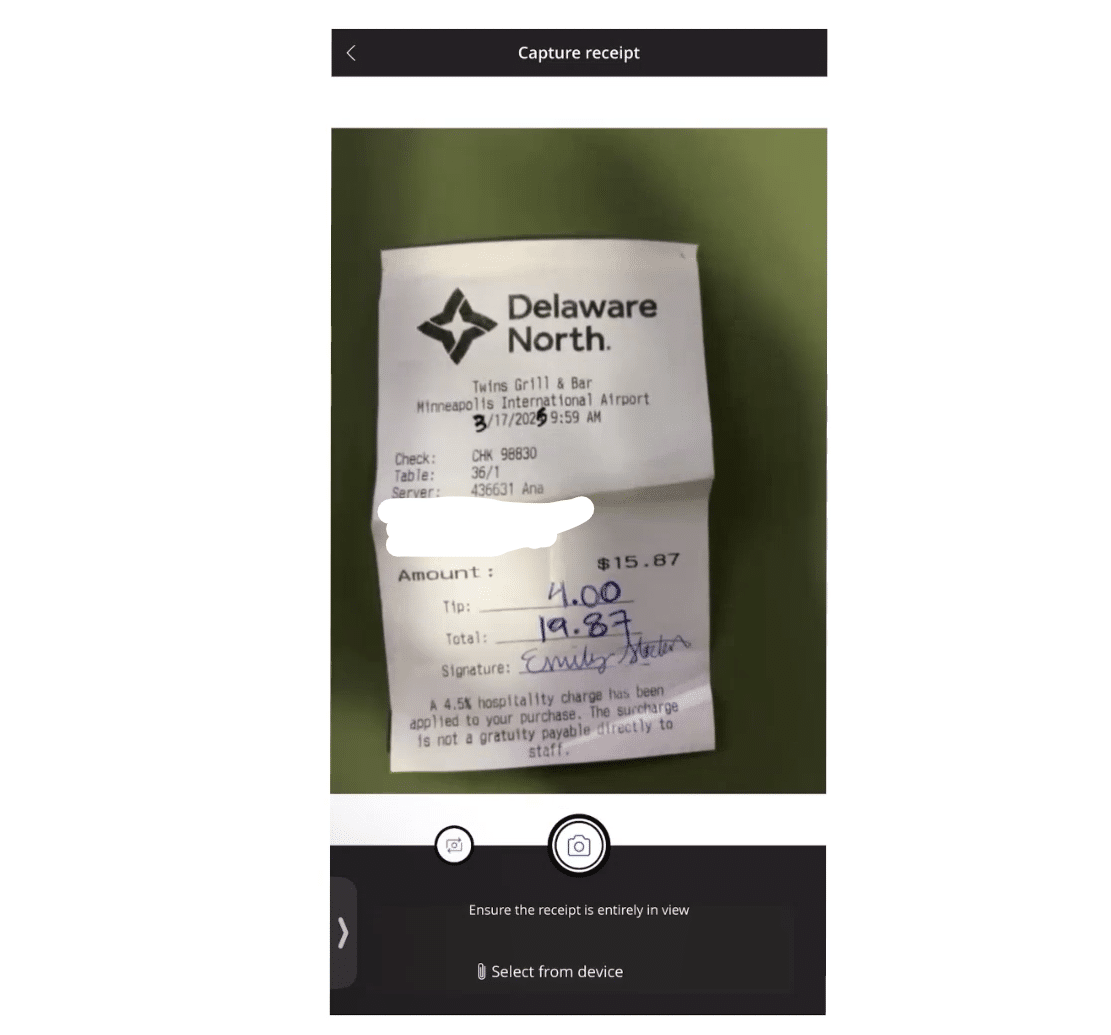
1. Capture a Receipt
- Open the Expenses tab
- Select the + icon
- Use your phone’s camera to take a photo
- Confirm the picture and associated details
- The system creates an unattached expense
2. Complete the Expense Details
- Select an Expense Category
- Enter the amount
- Confirm the date
- (Optional) Enter merchant details
- Select Done

3. Create an Expense Report
Once you complete the above process, the receipt photo and information will go in as an unattached expense. You can now create an expense report on the mobile app:
- Go to the Reports tab at the bottom.
- Select the + icon to create a new report
- Name the report (example: “March Expenses”)
- Add a description if desired
- Select Attach expenses
- Choose the expense(s) to include and click Done
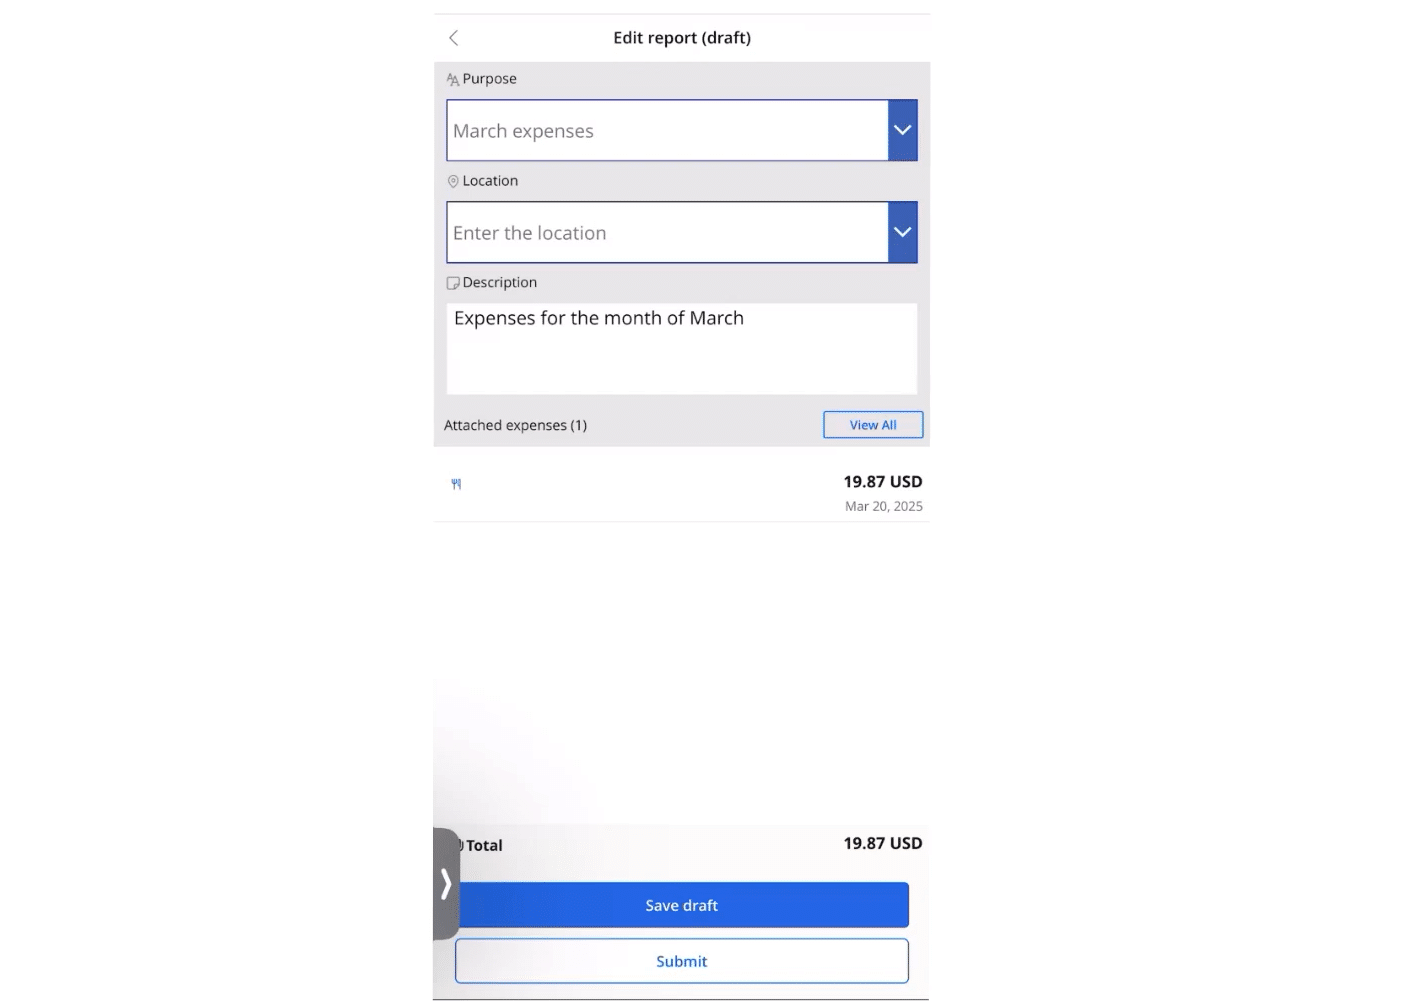
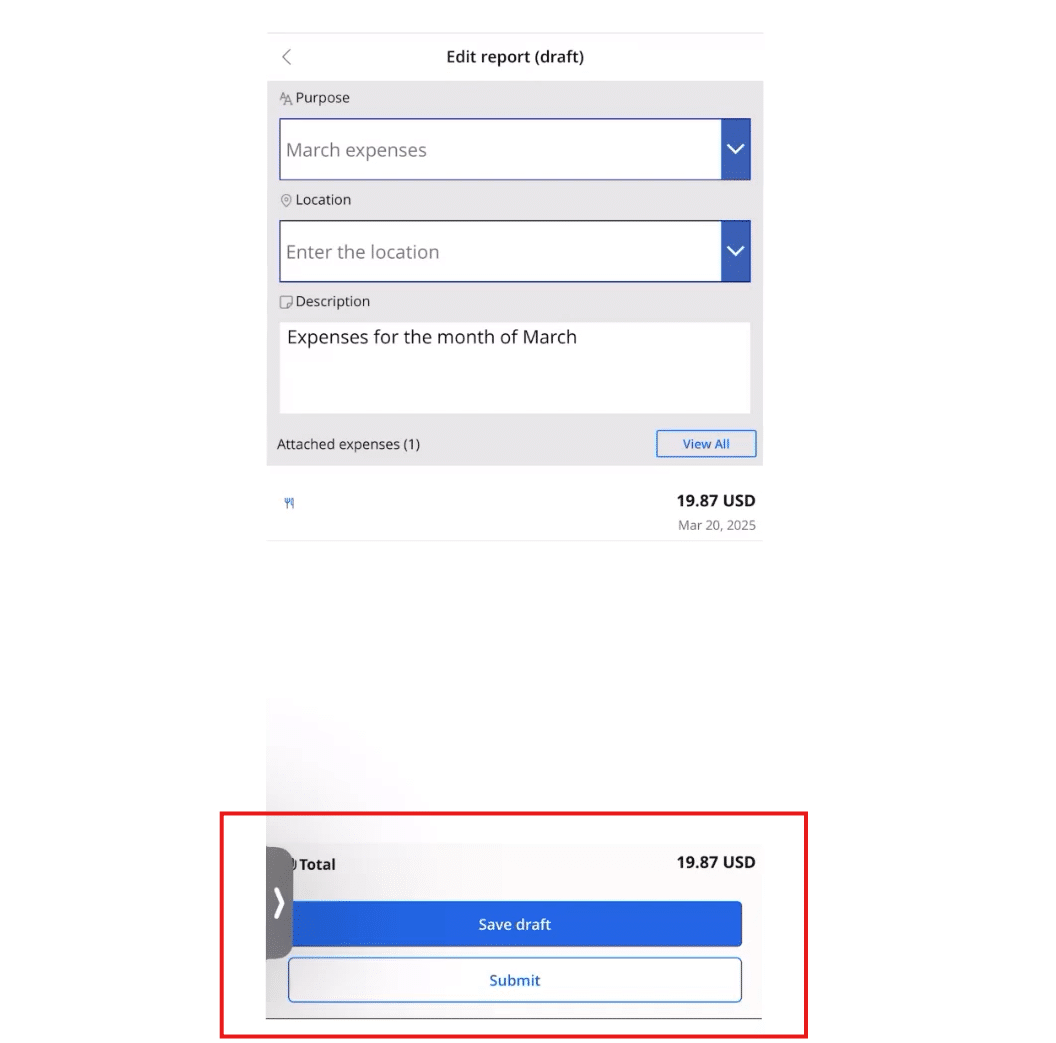
4. Save as Draft or Submit
- Select Save draft to continue later
- Or Submit to send to workflow immediately
5. Track Approval Status
Within the Reports tab, you will see three options at the top:
- Draft shows a list of expense reports not yet submitted
- In Review shows reports in workflow
- Approved displays reports already approved
![]()
This tab allows you to track the status of your expense reports to make sure they are going through for approval.
6. Approve as a Manager (If Applicable)
If the user is also an approver:
- Select the Approvals tab
- Review the details, attachments, and workflow timeline
- Select Approve or Reject
- Add optional comments if needed

Bringing It All Together
With D365 Expense Management, organizations gain a solution that:
- Makes reporting easy for employees
- Ensures compliance before expenses are submitted for approval
- Streamlines workflows for managers
- Keeps finance teams confident that postings are accurate and complete
- Supports real-time reporting and mobility
Most importantly, the system can be configured to reflect your unique business requirements—not the other way around. Whether employees are submitting from their laptops in the office or from their mobile phones between client meetings, Dynamics 365 Finance and Supply Chain Management takes the headaches away and makes expense management easy.
Ready to Explore Expense Management Further?
If you think your organization could benefit from a streamlined, flexible, and mobile-ready expense process, we’d be happy to help you explore what this could look like.
Talk to the Stoneridge experts today to learn more!
*Contributions to this blog also made by author Mike Mathews

Under the terms of this license, you are authorized to share and redistribute the content across various mediums, subject to adherence to the specified conditions: you must provide proper attribution to Stoneridge as the original creator in a manner that does not imply their endorsement of your use, the material is to be utilized solely for non-commercial purposes, and alterations, modifications, or derivative works based on the original material are strictly prohibited.
Responsibility rests with the licensee to ensure that their use of the material does not violate any other rights.