


How to Change Costing Method in Dynamics 365 Finance and Operations
Dynamics 365 Finance and Operations supports multiple costing models, each with its advantages and trade-offs.
In this blog, we will cover how to transition from First in, First out (FIFO) costing to standard costing and why that switch can benefit your business in the long run.
Why Transition from FIFO to Standard Costing in Dynamics 365 Finance and Operations?
For manufacturing companies that use Microsoft Dynamics 365 solutions, transitioning from FIFO to standard costing offers several key benefits:
- Improved cost control
- Simplified inventory evaluation
- Efficient record-keeping
- Consistency in Financial Reporting
However, this transition is not simple. In this post, I’ll walk through the necessary setups for converting from FIFO to standard costing, address common challenges, and demonstrate how to use Finance and Operations' built-in Standard Cost Conversion tool to facilitate the process.
Process Summary: Transitioning from FIFO to Standard Costing

The following picture outlines the high-level activities described throughout this document to switch the item costing method. Important note: once you execute the conversion, it is final and cannot be reversed.
The following steps are:
- Pre-Requisites
- Ensure that all sales orders in “Delivered” status are invoiced, and any Production order in “Started” or “Reported as Finished” statuses must be closed. All Purchase Orders in “Confirmed” status must stay in the Confirmed State and cannot be received, and all invoices need to be completed.
- Configure GL postings for Variance and Rounding
- Turn off batch processing
- Run through testing in a non-production environment
- Transition Steps
- Define your transition and conversion period in the costing record
- Add items to the costing record
- Calculate pending standard prices or Import Pending item prices
- Run a system check to clear any unresolved issues
- Validate Ready to Convert
- Perform the “Check” to identify any item errors
- Common Errors and how to fix them
- Inventory Close
- Run an inventory close before conversion with the closing date one day before the “Transition” date
- Conversion
- Update status to “Ready” once no errors are evident
- After Conversion
- Run an inventory close post-conversion
- All items are updated to Standard Cost
- Current physical transactions are converted to standard cost based on the conversion date
- On-hand inventory is converted to standard cost
- Any difference between value methods is posted as inventory revaluation
- Break out items by distinct item model groups post-conversion
Let's dig further into these steps in more detail.
Prerequisites
You need to follow these prerequisites to ensure a proper standard cost conversion.
- For proper cutover, it is recommended to perform the standard cost conversion over the weekend; all users will be unable to use the system during the transition and conversion.
- Ensure that all sales orders in “Delivered” status are invoiced, and any Production order in “Started” or “Reported as Finished” statuses must be closed. All Purchase Orders in “Confirmed” status must stay in the Confirmed State and cannot be in a received or registered state and Invoices need to be completed.
- If an item has no active cost, you must import a pending item price V2 report into data management. For items with product dimensions, each variant must have an active cost price. We recommend exporting a cost report for each item in case they are not active in the system you can use it in the import file.
- Service items are prohibited from using a standard cost model, ensure that no service items are selected for the conversion when adding to the costing record. (if using the “add item” function, only)
- Ensure that your GL postings have a Purchase Price Variance & Rounding accounts linked.
- Ensure the conversion process and subsequent testing of standard cost postings are done end-to-end in a non-production environment before making any changes in production
- Identifying and turning off the batch jobs creates inventory transactions during the cut-over window. For example, MRP jobs run and create a production/purchase/transfer order.
Transition Steps
Define Variance Accounts
Standard Costing requires that Purchase price variance accounts and rounding variance accounts be specified, due to the system needing to account for variances between the purchase price and the standard cost we calculate on a purchase order. The Purchase Price Variance would typically be an expense account (5####) and Rounding Variance would typically be miscellaneous income (9####), but you can choose whichever accounts you believe are more appropriate. You can find this page at Inventory Management -> Posting -> Posting.

Create a New Model Group
Create a new item model group to convert items from FIFO to Standard Cost. In Finance and Operations, item model groups control how items are managed on item receipts (purchase) and issues (sales), and how item consumption is calculated. The standard cost conversion will convert all model groups selected in the costing version to the “new” model group we selected.
Model groups also determine how items are handled in terms of inventory control. Make sure “Post Physical” and “Post Financial” are checked, see below for the general parameters needed for setup.

Create Costing Versions
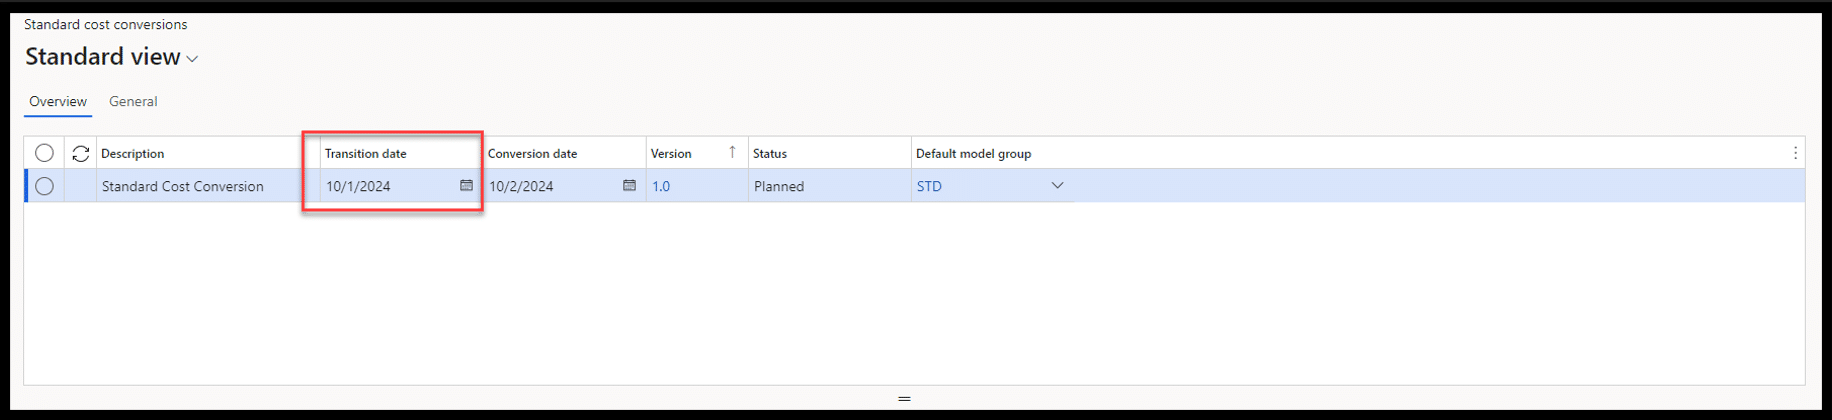
To begin the conversion process, we will need to create a new cost conversion record, the costing version will include all items you are adding for the conversion. Please note that you can create a new conversion record only when existing conversion records have been completed. You can find this page by navigating to Cost Management -> Inventory Accounting Policies Setup -> Standard Cost Conversions. Click “New” and add a description (We recommend describing which item(s) groups will be converted in this record).
Add a Transition Date, Conversion date (One day after the transition date), version (Recommend the format below, the version will include all items being converted once you add items), and the Default model group (see Create New Model Group section in this document).

Create Costing Conversion Record
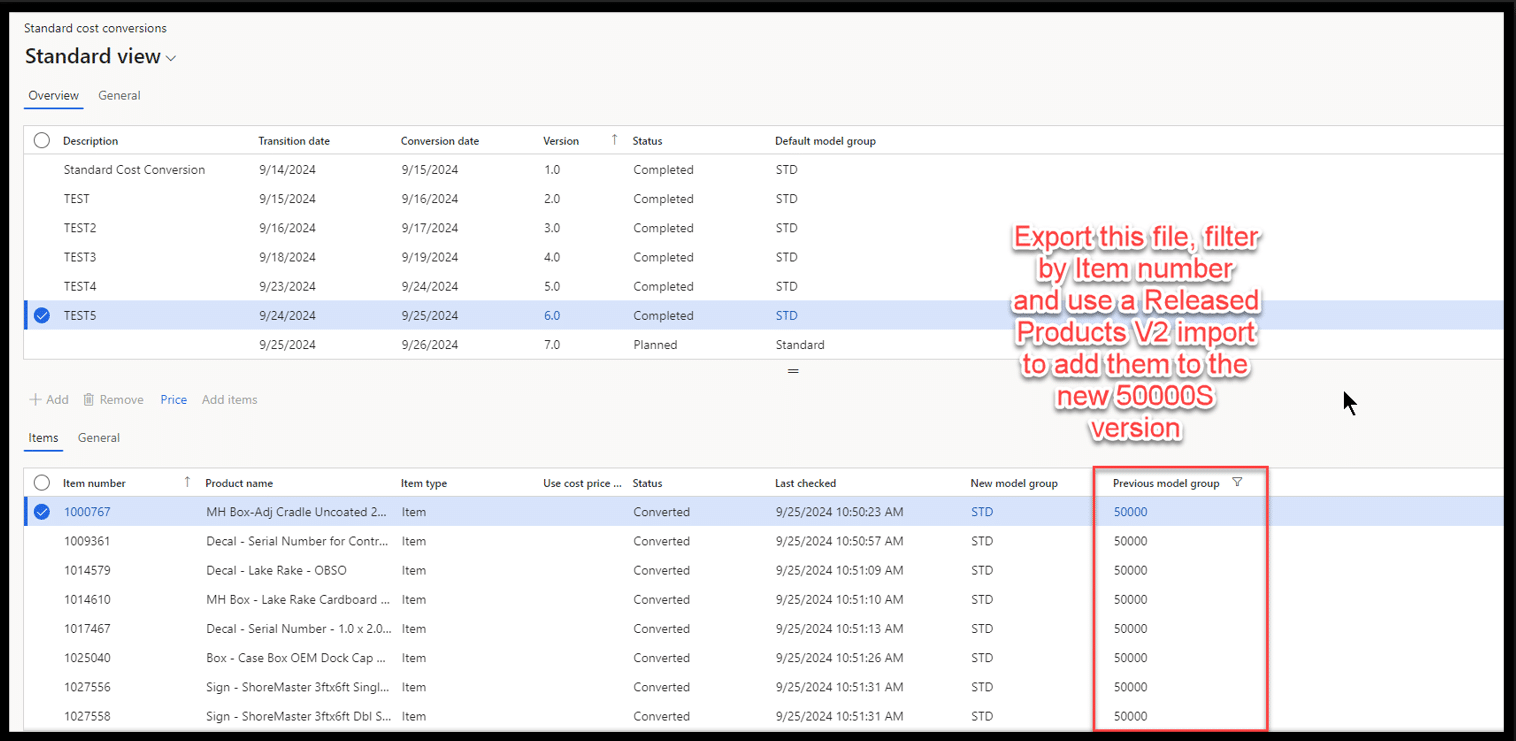
Add Items
To add items to your conversion record, click the “Add Items” command under the conversion record. When the dialog box pops up, Leave “!Service” as-is and run the query.


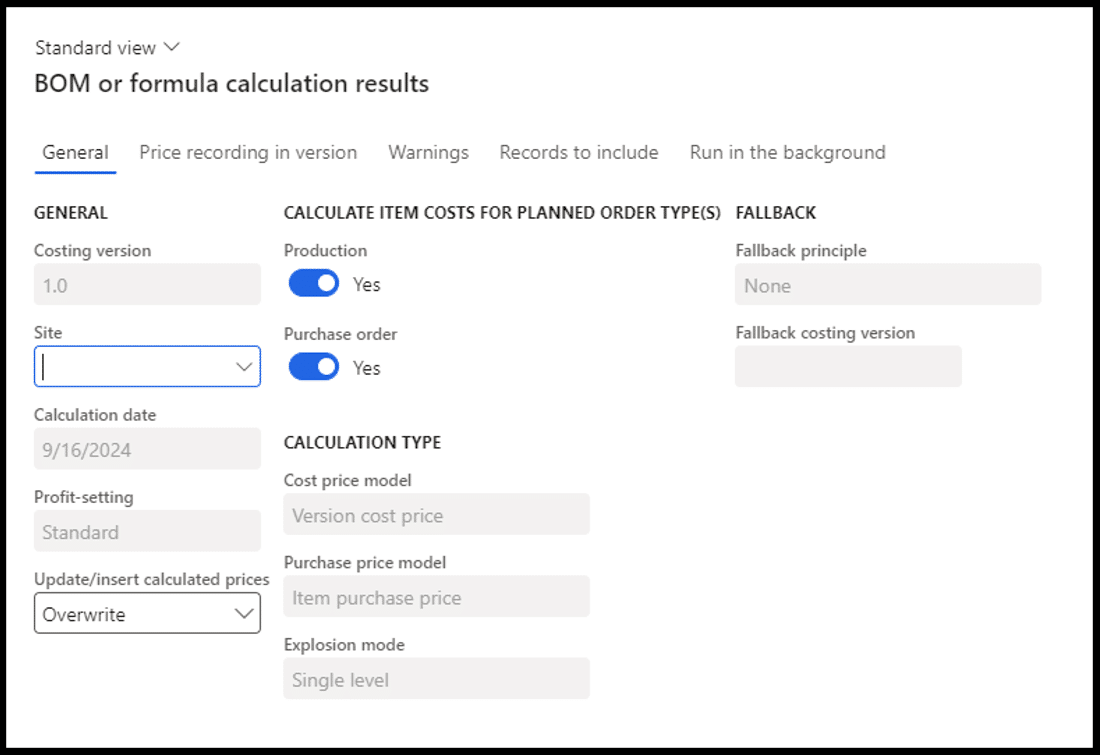
Calculate Costs
After all items have been added to the conversion record, we will calculate the item cost under the “Price” command on the same screen. Click on “Calculate item cost” to transition the cost calculation from FIFO to Standard. Under the “General” Tab, select the site you want to apply the items to.


Next, select a Site you are converting to. Note that you will run this calculation for every item in the conversion record before you can check and convert.
- “Price Recording in Version”, use the Record Cost Price and Charges
- Leave “Warnings” as blank

- “Run in the Background” set “Batch Processing” to Yes, and add a Task description on the site you are running.
- Run the steps before for the other sites
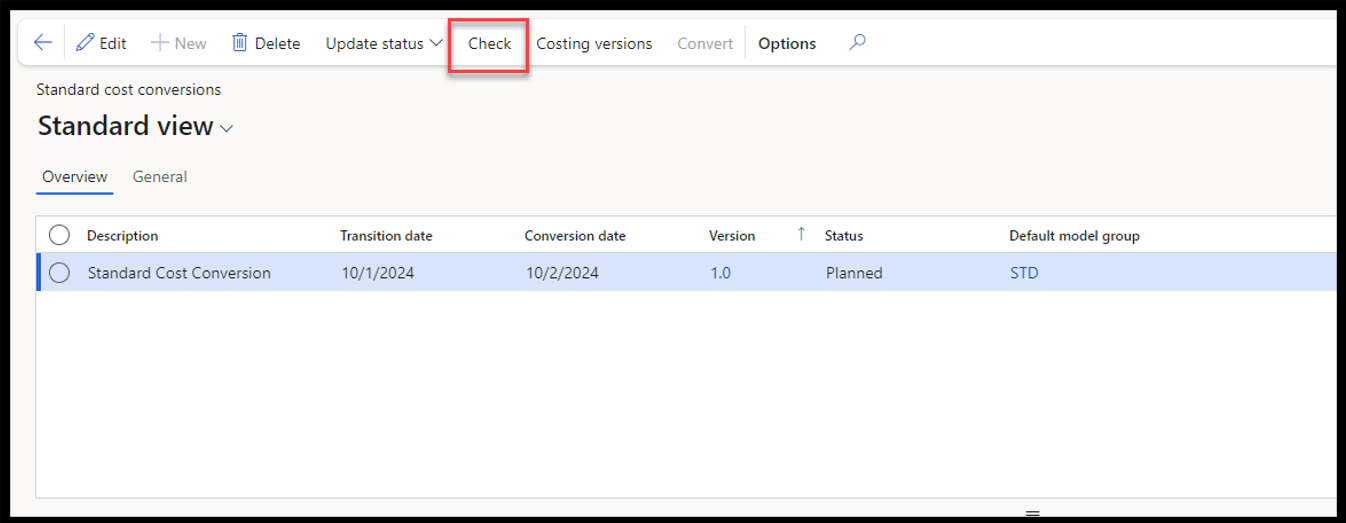
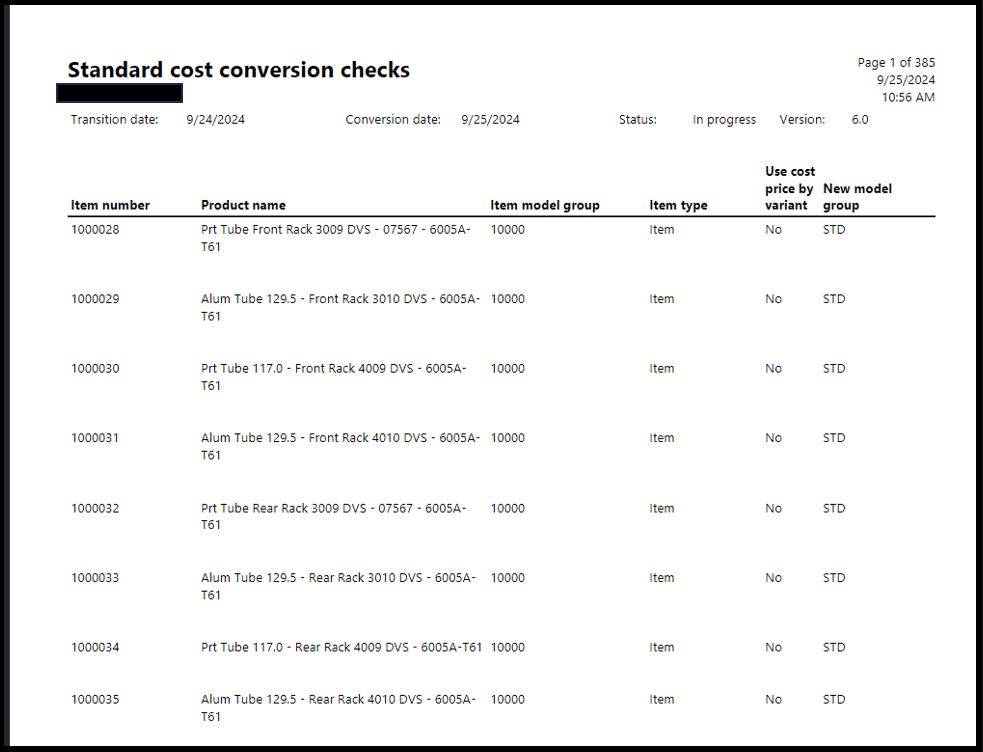
Validate Ready to Convert
Once all item costs have been calculated, perform the “Check” to ensure that all items are ready for the transition and conversion. Once the “Standard Cost Conversion Checks” sidebar pops up, fill in the following information as seen below. It is also recommended you run this report in batch.

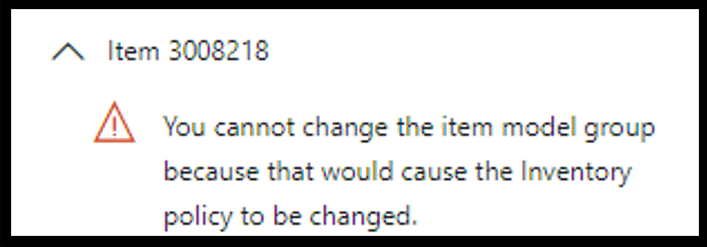
Common Errors
Cannot change item model group due to inventory policy
This error is due to the item model group configurations not having the “Post Physical and Financial” Inventory. Make sure both settings are checked.

Unposted journal entry lines
Ensure that the following transactions have the following statuses:
- Purchase Orders: Purchase Orders with a confirmed status must stay in the Confirmed State and cannot be in the received or registered state. Invoices need to be completed
- Sales Orders: Any Delivered item needs to be invoiced to be cleared
- Production orders: Production orders with “Reported as Finished” or “Started” statuses must be closed out to process.

“Item Price does not exist” error
This can be the result of the following:
- No On-Hand inventory is present, resulting in errors in the cost calculation
- There is no cost associated with the item in its entirety
- There is no cost associated with the item at that specific site
Note which items are running into this error, and fill out the “Pending Item Price V2” import sheet to correct the issue.

“Latest Cost Price” error
Ensure that “Latest Cost Price” is set to No. under the Managed Costs fast tab on each item, or you will encounter errors.

Inventory Close
Once all items have been added, the cost applied, and the check performed without errors, we can run an inventory close before the transition period. All open transactions will be settled using the old valuation method. During the transition, you can enter and post backdated transactions (e.g., invoices). NOTE: The inventory close date must be one day before the transition start date to ensure a clean break from the old valuation method.
Conversion
After the check is completed and there are no errors, set the “Update Status” to ready. Once you are ready to convert, click on the “Convert” command in the action pane and continue through the dialog boxes. After the conversion date, ensure that the conversion record status and item lines have a status of “Completed” and “Converted”.

After Conversion
We recommend you run another inventory close after the items have been converted.
Once the items have been converted to standard cost, you will import a Released Product V2 file to adjust the newly converted items to their new item model group. After the import is completed, sample a few recently converted items to see if they have been properly changed.
Talk to Our Experts Today to Learn More About Optimizing Dynamics 365 Finance and Operations
Our experts have years of experience helping manufacturing companies get the most out of their Dynamics 365 solutions. Get in touch today to find more ways to optimize your technology solutions!

Under the terms of this license, you are authorized to share and redistribute the content across various mediums, subject to adherence to the specified conditions: you must provide proper attribution to Stoneridge as the original creator in a manner that does not imply their endorsement of your use, the material is to be utilized solely for non-commercial purposes, and alterations, modifications, or derivative works based on the original material are strictly prohibited.
Responsibility rests with the licensee to ensure that their use of the material does not violate any other rights.