


How to Create Marketing Forms in Dynamics 365 Customer Insights – Journeys
Learning to create forms in Dynamics 365 Customer Insights – Journeys can help you enhance your marketing efforts through data collection and lead segmentation.
In this blog, you will learn why marketing forms are important and the steps you can take to create effective forms in Dynamics 365 that will empower your marketers to attract more leads.
Why Are Marketing Forms Important?
Using forms in Dynamics 365 Customer Insights – Journeys (formerly known as Dynamics 365 Marketing) helps you in several important ways:
- Lead Generation: You can capture essential user or client data, such as names, emails, preferences, and more, to grow your subscriber list. The more leads you generate, the more sales opportunities you get.
- Segmentation and Personalization: Forms allow you to send targeted and personalized content to different clients. This lets you speak to your clients and prospects, improving customer satisfaction.
- Compliance and Consent: Dynamics 365 cloud solutions have built-in tools to ensure you are automatically compliant with anti-spam legislation. This takes stress off your marketing team's shoulders.
- Improved Engagement: Creating effective forms can boost conversion rates and brand engagement. The more people who engage with your form, the more customer data and leads go into your system.
- Automation and Nurturing: You can configure forms to trigger automated workflows and track customer sentiment, which helps to move leads through the sales funnel and ensure customer satisfaction.
12 Steps to Creating an Effective Email Marketing Form in Dynamics 365 Customer Insights - Journeys
Start by going to your Customer Insights – Journeys environment and navigating to the channels pane on the lefthand side. Select “Forms” and then click “+ New” to create your form.
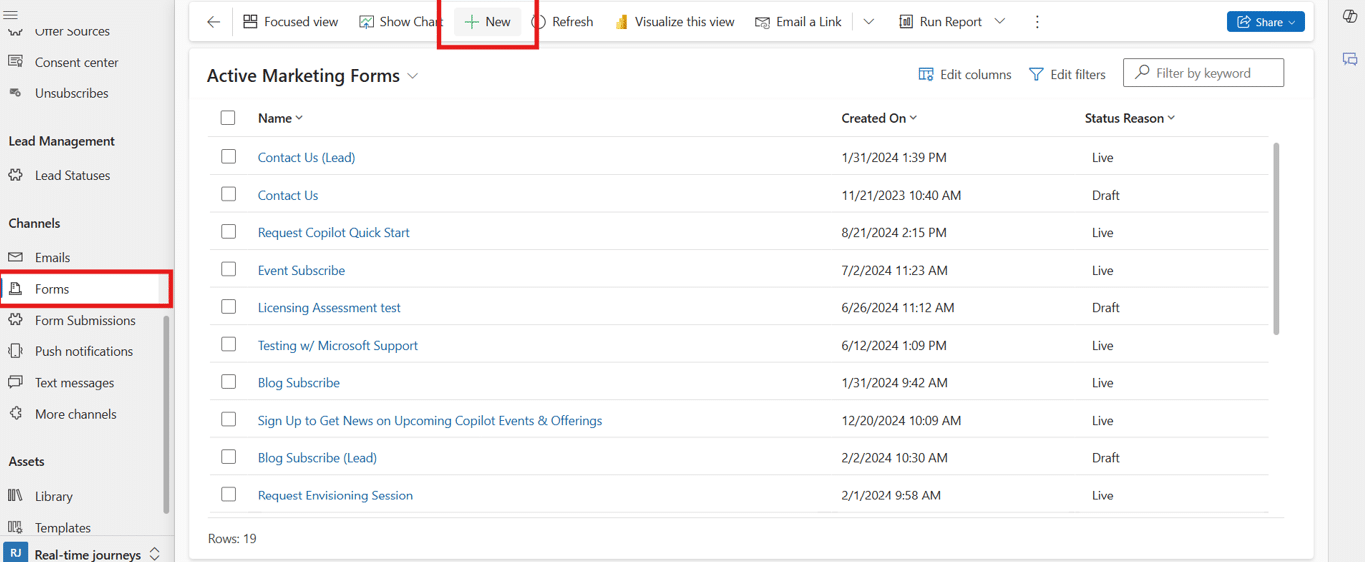
Note: To create an event form, you can go to the website and form tab of your event. You can also change the target audience using the Audience picker in the top right corner and adjust all other settings for each form.
Learn more about how to manage already created forms here.
From there, you can follow these steps to create your forms:
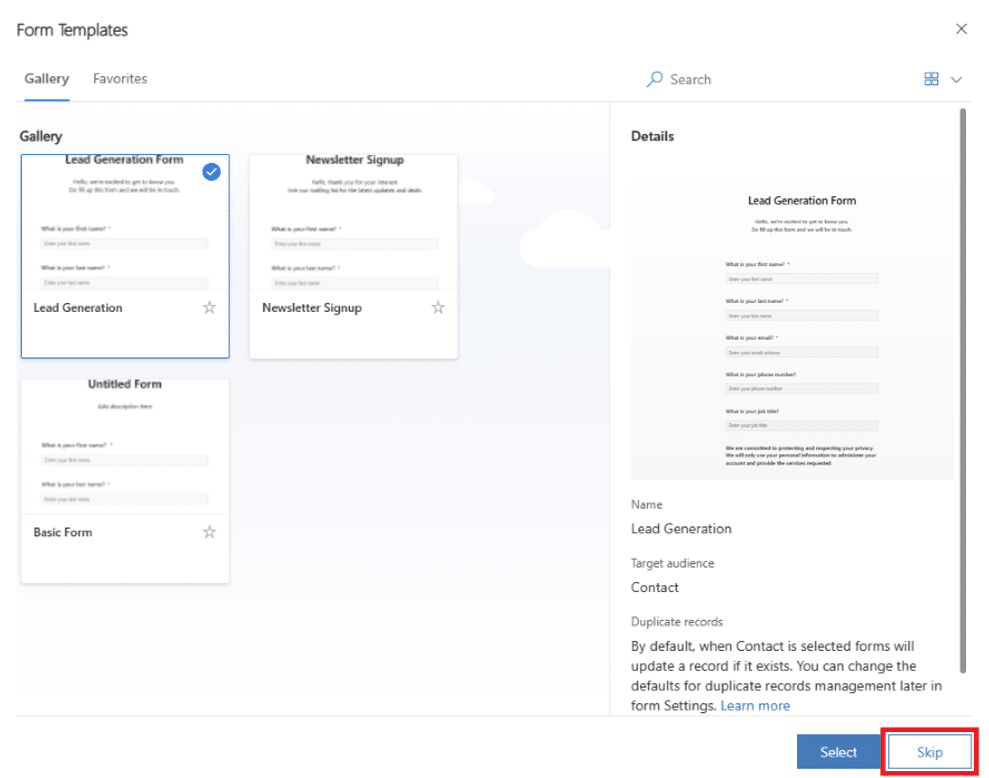
1. Choose a Template or Start with a Blank Form
You will see a list of templates filtered by target audience if you want to choose one of those. If you want to start with a blank form so you can customize it yourself, skip this section.
Once you select a template or create your own, go into the form editor and finish creating and customizing your form.
2. Check the Target Audience in the Top Right Corner and Name Your Form
Select the audiences you want to update. Audience types include:
- Lead: Each form submission creates a new record – even if the person filling out the form uses the same email address.
- Contact: If someone fills out the form and the system recognizes the email address, it will update the record and not create a duplicate contact.
- Lead and Contact: If a contact with the same email address is already in your system, it will update, whereas a new lead is always created.
You can change duplicate record handling by going to the form settings. Alternatively, you can change the defaults for all new forms.
In this example, enter a name for your new form and select Contact as the target audience.

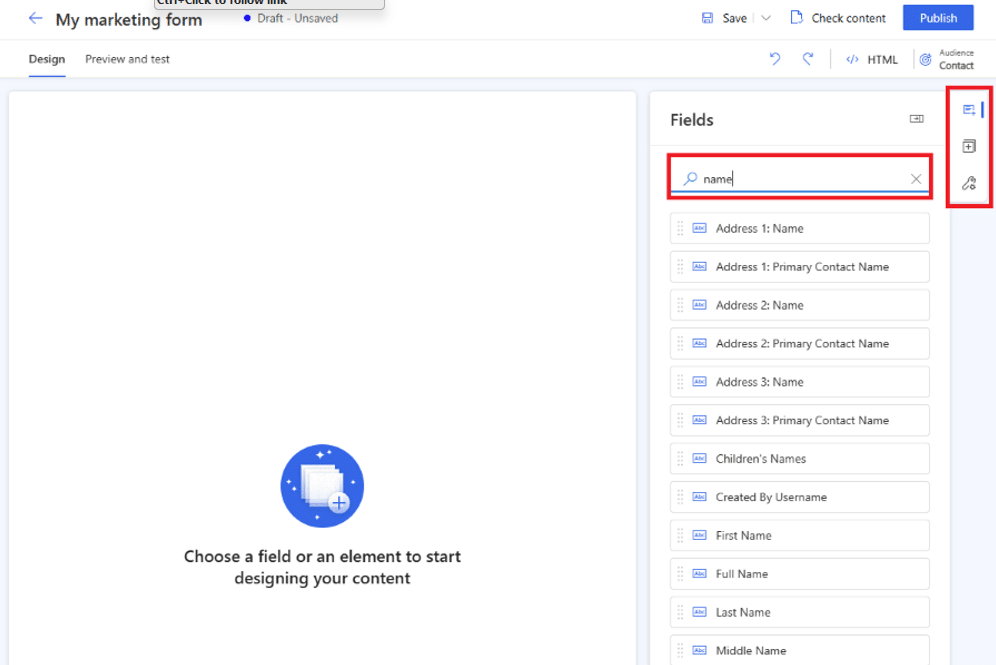
3. Navigate to the list of questions represented by form fields
There are many field types you can choose from. You can find the list in the right pane, which includes all attributes of the selected target audience. If you created a new custom attribute, it should be visible in the list, and then you can use it as a field in your form. Note that some system fields may be hidden if they can’t be used in the form. If you can’t find a field, you can use the search bar to filter the field you are looking for.
Enter "Name" into the search bar to find the "Last Name" field.
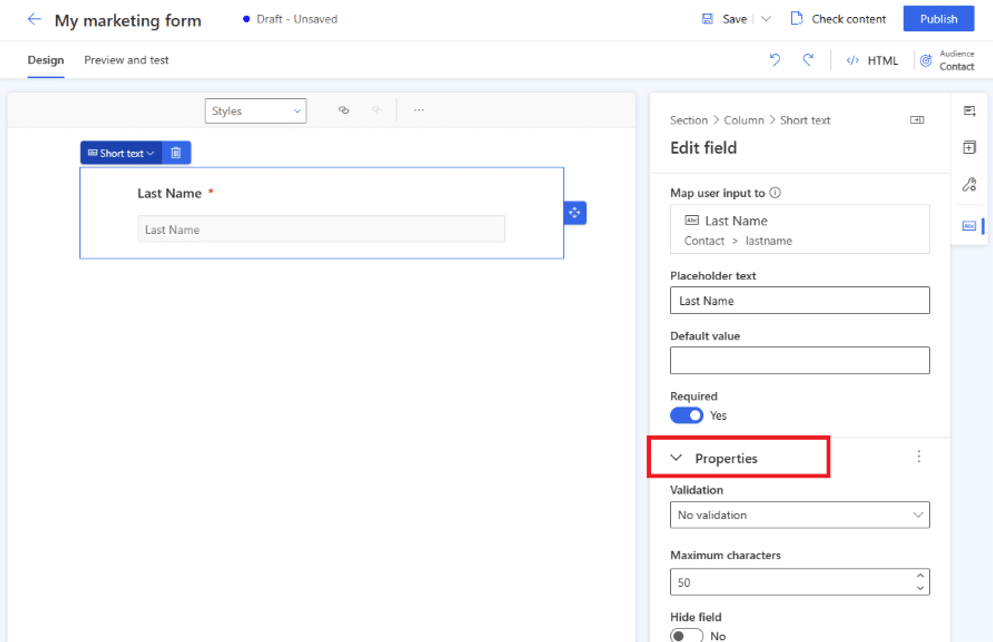
4. Bring the field from the list into the form canvas
Find the field you want to add and drag it into the form creator. Once you add all the fields you need for your form, you can customize their properties in the right pane. This could include setting required fields, establishing configure validation, and more.
Here are some tips on adding fields to your form:
- You can drag and drop a field on the form canvas to change its position.
- Fields can be removed from the form by selecting the trash icon.
- You can enable the "Hide field toggle" to hide a field so it isn't visible to your web page visitor.
- If you need to access the field properties after adding it to your form, simply click on the desired field.
5. If you need to, edit the field label by selecting it on the canvas
You can use the rich text editor to amend the style of the text on the canvas. You can also change the placeholder text and default value in the right pane by entering text into the field on the canvas. This allows you to customize your form based on your organizational brand.

6. Style your form field to fit your brand
Access the Theme section by selecting the brush icon on the right pane. This allows you to style your input field and apply it to all input fields on your form.

7. For more complex forms, change the layout to multi-column and create layout sections
Sometimes, a simple form will do the trick. If you need to create something more complex, you can do that by navigating to the Elements section on the right pane. From there, you can drag and drop column layouts into the canvas to create new sections. You can also add elements and fields to these newly created sections.
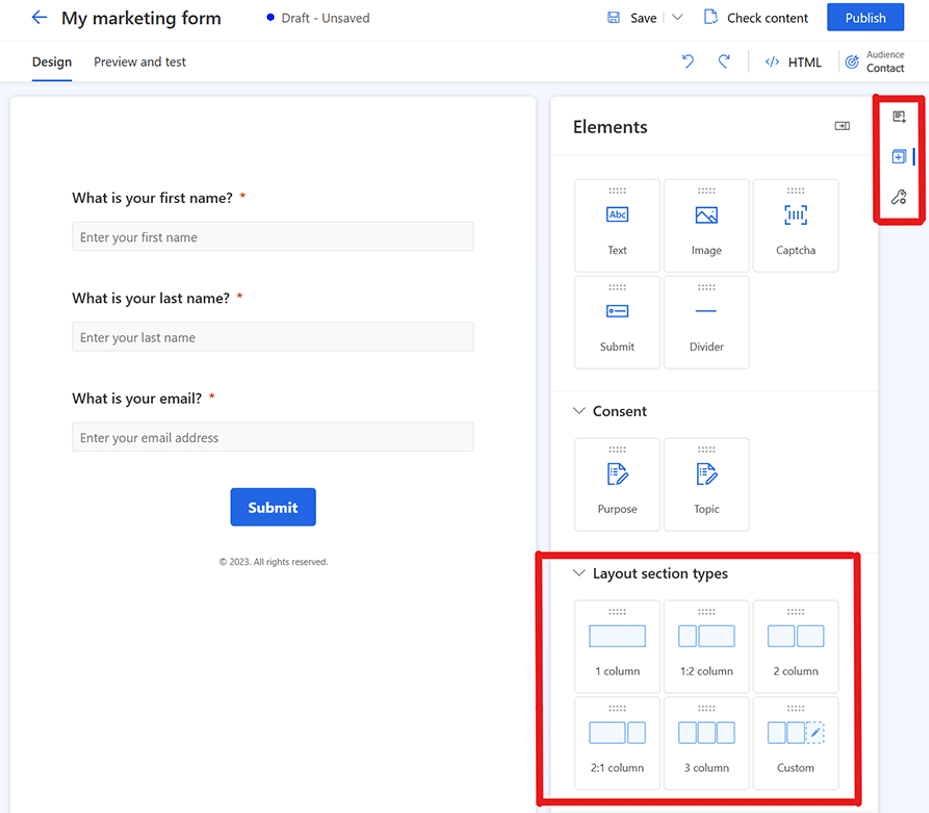
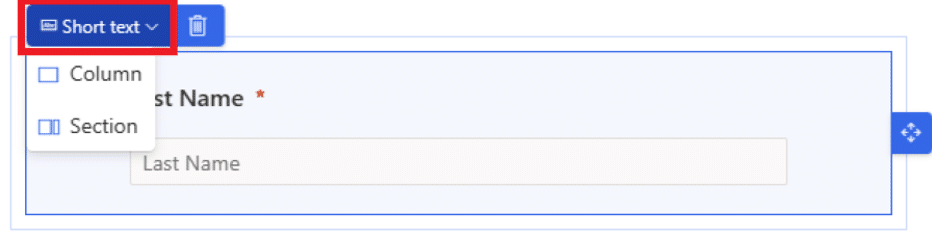
Note: You can access the existing section's styling by selecting the top left corner of the field or other element and selecting Section. The section properties will appear in the right pane.
8. Add elements to your form
You can add elements like static text, images, dividers, and more in the Elements section. Note: Submit buttons are mandatory, as the system will not let you publish the form without one. You can customize the colors and style of text in that button to suit your brand.

9. Add consent control to your form
Once you do this, you can select the correct consent purpose in the properties. Select the consent checkbox caption to change the text if you need to. Including consent controls in your forms and marketing communications is essential for legal compliance.
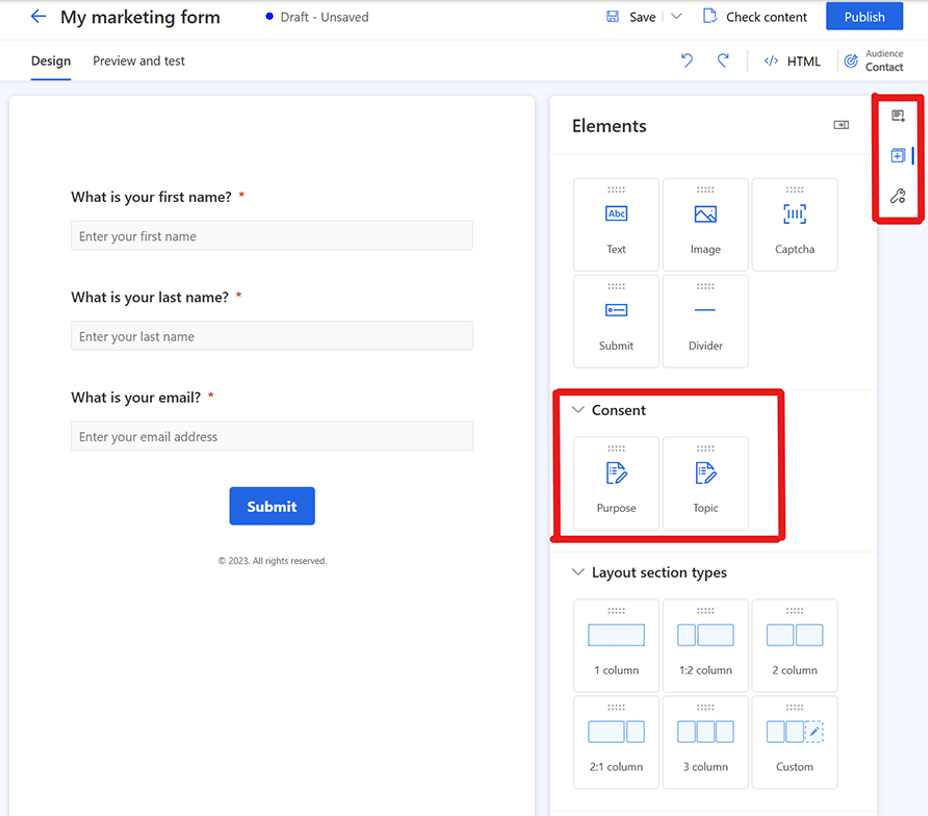
Adding purpose and topics consent elements creates contact point consent records for the chosen channels, email, and text.
10. Preview Your Form
Once you are done creating and customizing your form, you can preview it to check responsiveness. To do this, select the Preview and Test tabs. You can do previews for various platforms to ensure it renders properly for mobile devices, tablets, and desktop computers.

11. Publish Your Form
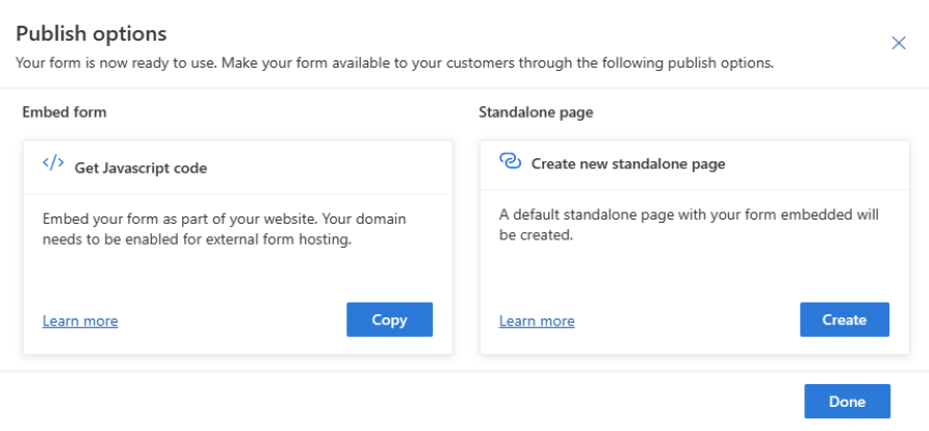
Once you make your form public, select the Publish button in the top right corner. The form will automatically save, and the system will start the validation process. Once the form is validated, you can select from two options on how to publish your form:
- Embed to an external page using Javascript: You can use the same code snippet for multiple web pages and set up script tracking to count the statistics of visitors for the page on which the form is embedded. This is the most common way to integrate the form into your site’s web pages.
- Create a standalone page: The system automatically creates a new page and embeds the form. You can then access a public URL and share it with people who will fill out the form.
Important Note: Make sure the domain where you embedded your form is authenticated for external form hosting. If the domain isn't allowed for external form hosting, the form won't be rendered on your web page, and all form submissions will be rejected.
12. Set up a Thank You Email for those who submit the form
You can create a new journey using the “Marketing Form Submitted” trigger. This will automatically go into motion and send a "Thank you" response to everyone who submits the form. You can learn more about trigger-based journeys on our blog.
That’s the process. If you follow these steps, you will have effective forms that will help you capture important client and prospect data and segment and prioritize leads to drive conversions and boost sales.
Want to Learn More About Enhancing Your Marketing Efforts with Dynamics 365 Customer Insights – Journeys?
Talk to the Stoneridge experts today! Our team can help you harness the power of Dynamics 365 Customer Insights – Journeys to empower your marketing team to drive more leads and reach more prospects.

Under the terms of this license, you are authorized to share and redistribute the content across various mediums, subject to adherence to the specified conditions: you must provide proper attribution to Stoneridge as the original creator in a manner that does not imply their endorsement of your use, the material is to be utilized solely for non-commercial purposes, and alterations, modifications, or derivative works based on the original material are strictly prohibited.
Responsibility rests with the licensee to ensure that their use of the material does not violate any other rights.