


How to Email Invoices With AX Print Management
Print Management in AX gives users control of print settings for selected reports. This is a great time saver as you don't have to set each of the settings based on the customers needs. For example, some customer's want their Sales Invoice emailed to them and some want a hard copy. With the use of Print Management, you can set these options up per customer, and anytime you invoice the customer you can select Print Management. Based on the settings for that particular customer it will either email, print a hardcopy, or whatever other method you have chosen.
Print Management gives you the ability to specify print settings at various levels of the application. For example, module-level print settings apply to all documents in a given module, while customer-level print settings only apply to specific customers and transaction-level print settings apply only to specific transactions. In addition, you have the ability to override or add to the settings from higher levels in the application. For example, module-level settings can be overridden at the customer or transaction level if not desirable.
How to email Sales Invoices
In this blog we will go over an example of how to email Sales Invoices in AX 2012 from the Sales Invoice form during invoicing (Uses your local outlook profile) as well how to use the Batch Server to send emails (Uses SMTP).
Pre-requisites:
- In order to email a Sales Invoice when posting the Invoice and not sending to batch you will need to have Outlook installed on this machine where AX resides and have an active profile.
- In order to email a Sales Invoice from a Batch you will need to have SMTP installed.
Configure Print Management to email invoices:
- Navigate to Accounts Receivable | Setup | Forms | Forms Setup
- On the Form Setup page click on the Print Management button
- Click on the plus sign to expand Customer Invoice
- Select Original <Default>
- Click the arrow on the Destination field and select Printer Setup
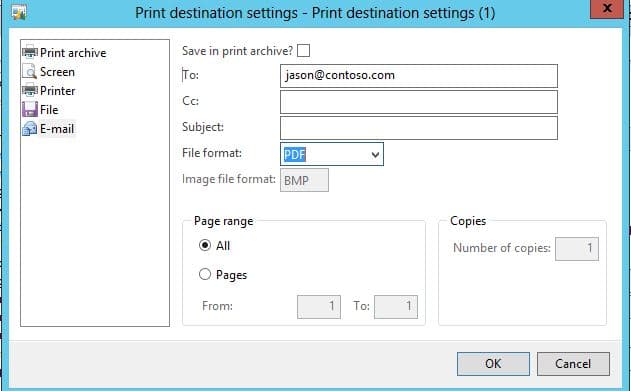
- Click the Save in Print Archive checkbox
- Click E-mail and enter the email address in the To field
- In the Subject field enter in a subject
- Select file format of the attachment
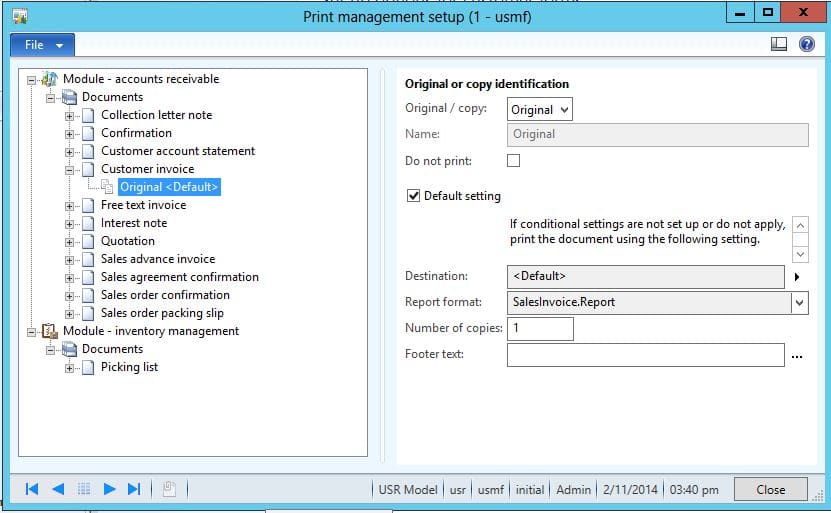
What we have completed above is the module-level print management for the Sales Invoice. The next set of steps is to setup print management at the Customer level which is the most common.
Configure Customer setup for E-mail
- Navigate to Accounts Receivable | Common | Customers | All Customers
- Select a Customer and click on the Edit button
- Click on the General Tab
- Click on Print Management
- Click on the plus sign and expand the Customer Invoice
- Right click on the Original <Default> and select Override
- Click the arrow on the Destination Field and select Printer Setup
- Click the "Save in Print Archive" checkbox
- Click E-mail and enter an email address for the customer in the To field
- In the Subject field enter in a subject
- Select a File Format of the attachment
Once you have completed the above you are at a point now where you can use Print Management when invoicing the client. During the Invoicing process you would select the box for Print Management and based on this customer print management settings it will send the an email to the customer that has a pdf attachment of the invoice. If you send the invoice to batch instead of using your local Outlook Profile it will use the SMTP settings you specified in the E-mail Parameters.
In Cumulative Update 7 for Dynamics AX 2012 R2 you now have the use of Tokens which allows you to use a token as a proxy for a record type in the system. This allows you to send emails to all people in your organization with a particular job title. It also allows you to use a token for a customer or vendor contact with a defined “purpose” in the system. (More to come on this in a future blog!)
The print capabilities of Dynamics AX provide a ton of flexibility to adapt to your business needs.

Under the terms of this license, you are authorized to share and redistribute the content across various mediums, subject to adherence to the specified conditions: you must provide proper attribution to Stoneridge as the original creator in a manner that does not imply their endorsement of your use, the material is to be utilized solely for non-commercial purposes, and alterations, modifications, or derivative works based on the original material are strictly prohibited.
Responsibility rests with the licensee to ensure that their use of the material does not violate any other rights.