


Optimize Your Dynamics 365 or Dynamics Solutions Distribution Strategy with Power BI
Learning how to enhance your Dynamics 365 or Dynamics Suite Distribution strategy with Power BI can take your business intelligence and reporting to the next level.
The best part is it’s very easy to navigate.
In broad terms, you take your data from Dynamics 365 and Dynamics business solutions and create a report in Power BI Desktop. From there, you can publish it to Power BI Service and then access it on any device connected to the internet.
While that may sound easy, there are some things you need to know and steps you need to follow to get this done. That is where this blog post and Stoneridge Software come in.
Let’s start by talking about how Power BI works, and how it can help you package and utilize your data innovatively.
Where to Work on and Share Power BI Reports
Once you have created a report, there are four main ways for you to share it with various stakeholders. Let’s analyze them.
Using My Workspace
This is a personal workspace for Power BI users to work on their content. Only one user has access to this workspace. While this workspace is limited to one person, you can still share reports from it.
There are a few things you should know about using My Workspace:
- It is best used for personal development, proof of concept, learning, temporary analysis, and testing – not for working on and publishing public reports
- Only the owner can manage content
- The owner does not need a license to manage content in My Workspace but will need a license to share content
- You can share reports with other individuals using the Share function. It is important to note, however, that all users in that situation will need a pro license
- Critical company content SHOULD NOT be stored in Personal Workspace – DO NOT publish content or allow users to publish content here that is meant to be shared with internal and external stakeholders
Using Shared Workspaces
This is a collaborative workspace where you can share content and work with other members of your team. You can add team members to these workspaces and collaborate on dashboards, reports, apps, and datasets.
Workspace is best used for collaboration and small distribution and has two purposes:
- The primary purpose is to group content and collaborate in the development process – For example, two developers who are working on similar or related content can create a report together
- The secondary purpose is to distribute content to smaller teams – For example, you might have a report that you only want to share with your sales staff, not the entire company or your customers
In Workspace, you can also easily define work and security roles such as data managers, report writers, or quality inspectors. For example, if you have a sale report, you might give your sales manager a report-writing role. Meanwhile, a person in finance who just need to double-check the numbers can be assigned a read-only role.
There is also no hierarchical folder structure in Workspace, so you will have to keep that in mind and try to narrow the scope of the content you keep in there. Power BI does not allow for sub-folders, so if you were to create 200 reports in Workspace, you would have to scroll through the entire list to find the one you’re looking for. This can be quite tedious, so we’ve developed a few hints to help you keep your space clean and find your reports faster:
- Use short, descriptive names for your workspaces and establish a naming convention – We see a lot of companies that create too many workspaces but don’t have consistency in terms of which datasets and reports are in certain workspaces
- Minimize the number of people who can edit a workspace – Too many people working on changing the same content will lead to confusion and errors. Try to keep your editing team to a select few individuals
Creating an App
Using an app is perfect if you build dashboards, reports, and other content you will broadly deliver to various people, including employees in your organization and customers. Only those on your team with the proper security permissions can edit the apps.
Here are a few things to know about Apps:
- You can only have one app per workspace – The apps are intended to group things in your workspace and distribute them to others
- Published apps are always read-only for users – If you create an app, most users can just download it, meaning you won’t have to manage the access for every person who downloads is
- Published apps can be downloaded by the users based on permissions
- Changes made to reports WILL NOT automatically update in the app – This means if you make a change to your report you will have to re-publish it for it to update in the app
- However, changes made to the dataset WILL automatically update in the app
Using the Share Button
This button is the easiest way to give people access to your reports and dashboards through Power BI Service. You can share content with people both inside and outside of your organization.
This method is great for granting read-only access to individual reports and dashboards and sharing content with small groups of participants who work closely together. While it’s the easiest method, it’s also the most overused. As a rule of thumb, we recommend using workspaces or app permissions to distribute content before using the share button. However, that doesn’t mean it can’t be useful in a variety of ways:
- It allows you to give access to one piece of content
- You can also limit access to other things in the workspace or app
When a report or dashboard is shared, all the recipients of that content will see changes reflected right away.
How to Publish and Share Power BI Reports – A Step-by-Step Guide
Now that you know the ins and outs of where to work on and share your Power BI reports containing data from your D365 Business Central and Dynamics NAV systems, you can start trying it out yourself!
Note: Power BI Desktop is a free application that anyone can use. If you want to share your content though, you will need to buy a Power BI license. Stoneridge Software has a team of licensing experts ready and willing to help you with any questions you need regarding licensing.
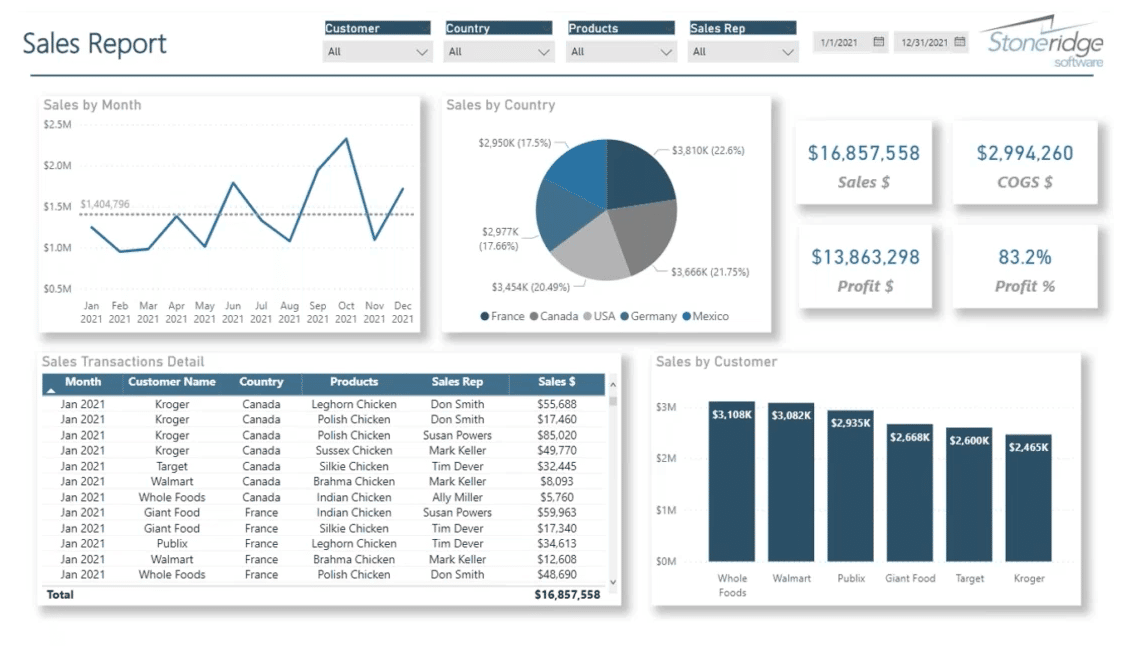
Let’s start with how to publish and share a Power BI report. For this blog post, we are going to use the example of creating and sharing a sales report.
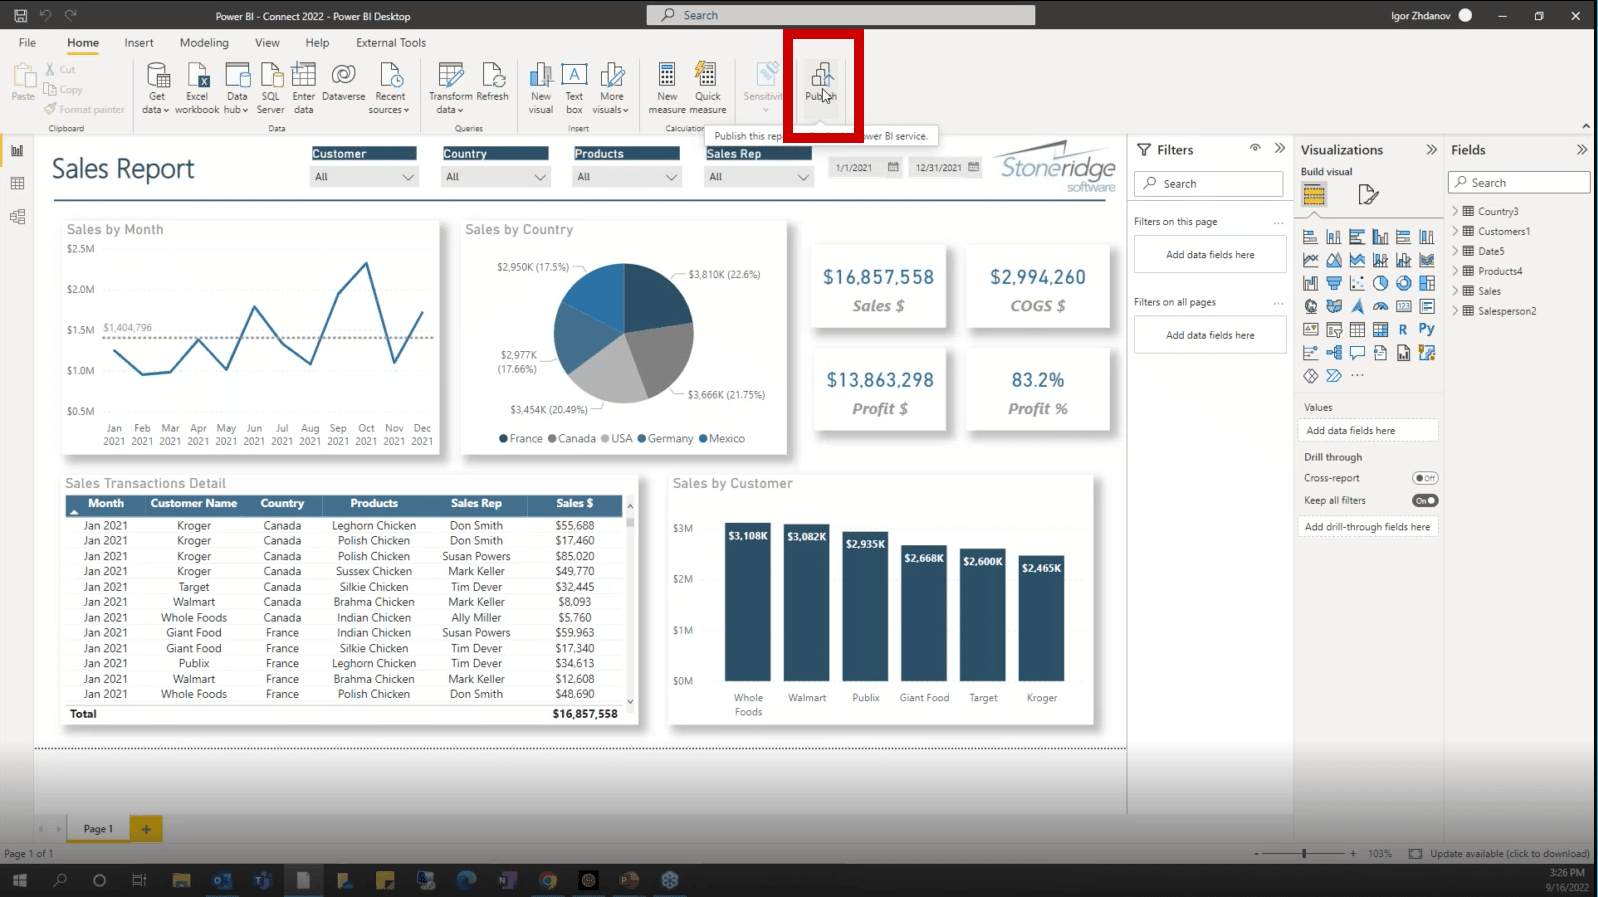
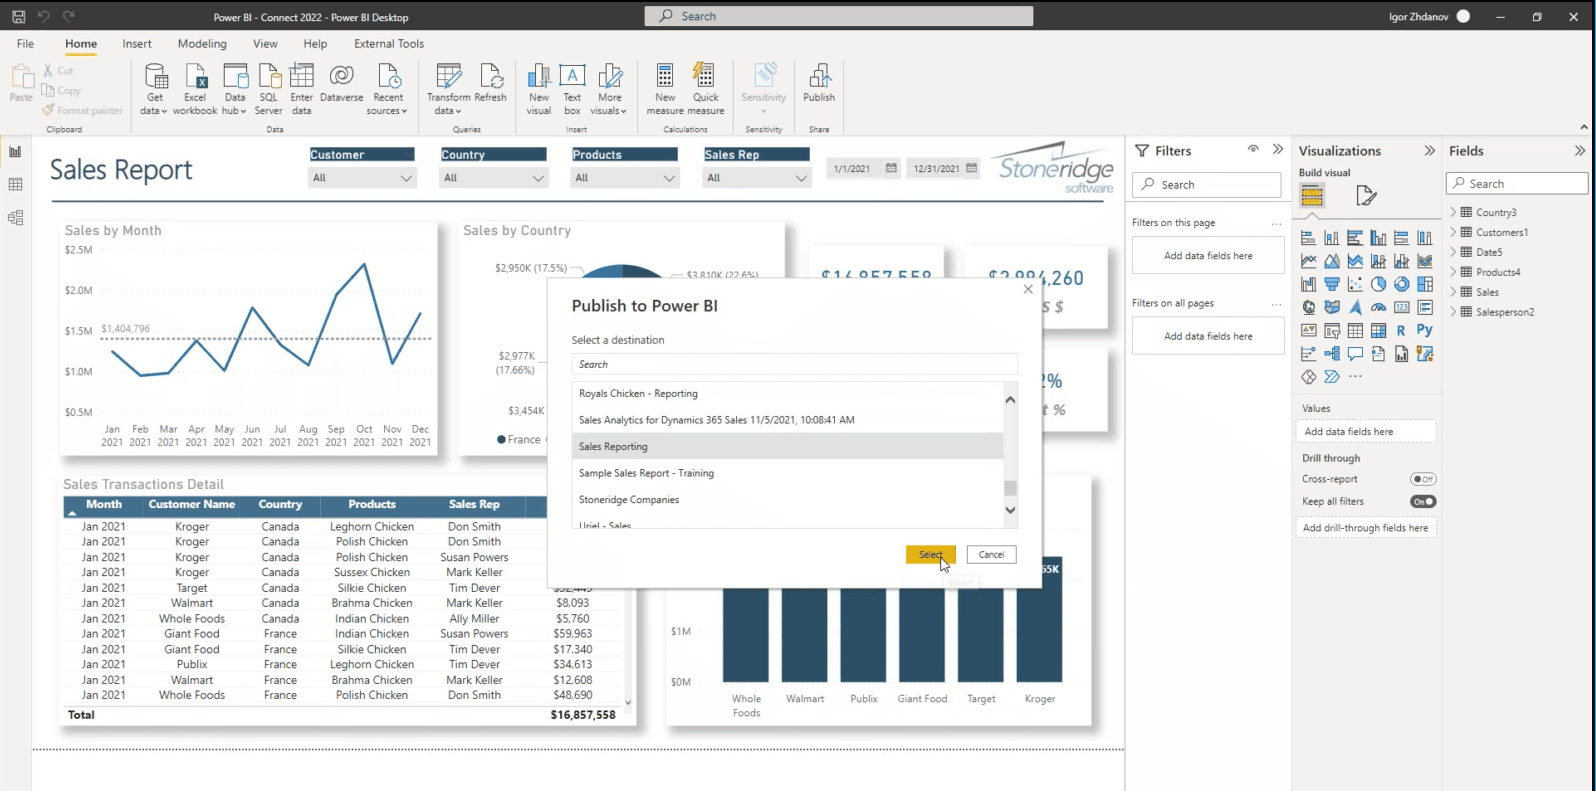
1 – Once you have created and finished your report, simply hit the Publish Button in the top Home ribbon and save your latest changes
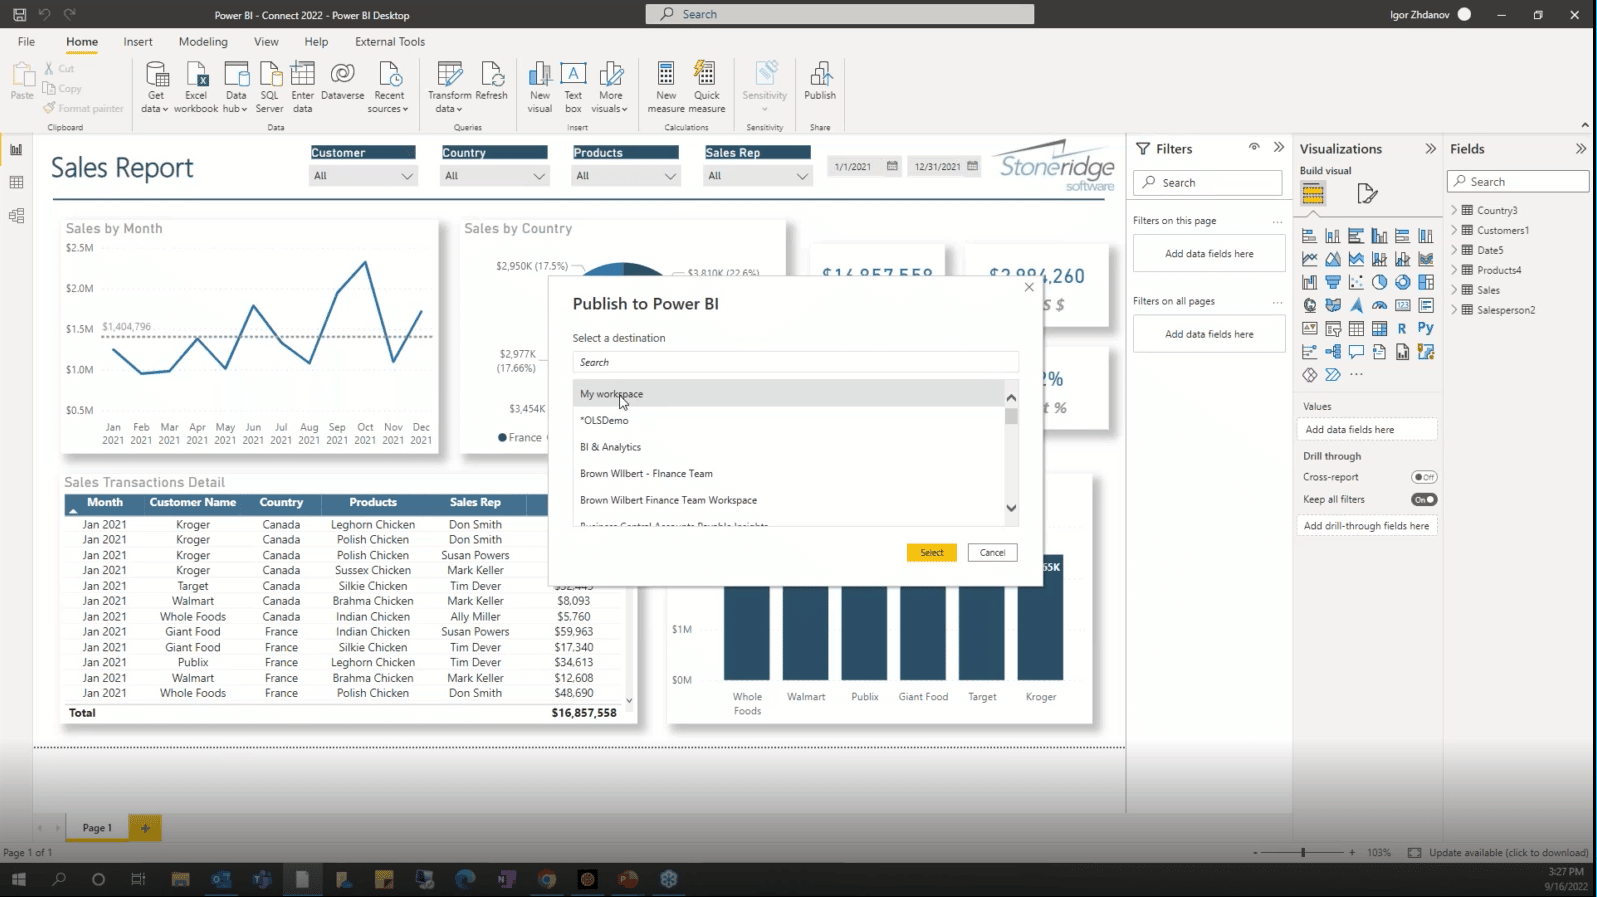
2 – If you are logged into Power BI Service, a list of workspaces will come up. Click on the workspace you want to share the report to and click "Select"
3 – Click the link to access the workspace with your new report
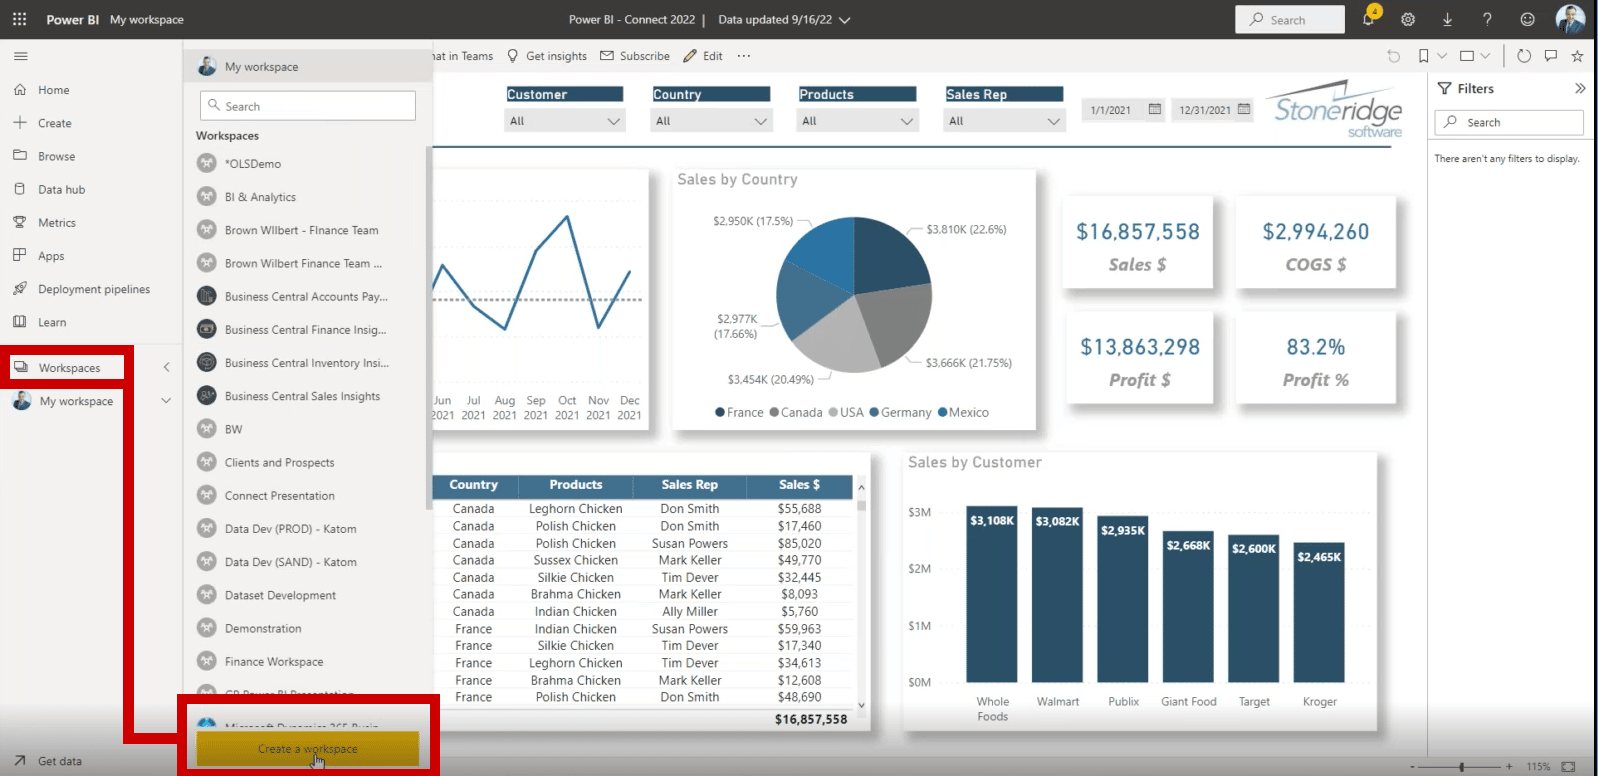
From here, you can log into app.powerbi.com and go to “My Workspace” on the left-hand side of your screen, or you can view it using an app.
Just a reminder that this is for personal workspaces where you can adjust and work on your report. We do not recommend sharing this workspace with anyone else.
If you do need to collaborate, you can create a new workspace specifically designed for that. Below are the steps for that.
1 – The first thing you need to do is create the workspace by following these steps:
- Navigate to the lefthand side of your screen and go to “Workspaces”
- Select “Create a Workspace”
- Then, on the right-hand side, give your workspace a short and specific title (Note: make sure you fill out the description field to let people know what the workspace is about (Be specific here so only people who work with relevant data go in here)

2 – Once your workspace is created, go back into your report and republish it to that new workspace
In this case, the new workspace is called Sales Reporting. Unfortunately, you cannot drag and drop your reports from your workspace to the shared one.
3 – Assign access to the people in your organization who will be interacting with this report. There are four types of access including:
- Admin
- Member
- Contributor
- Viewer
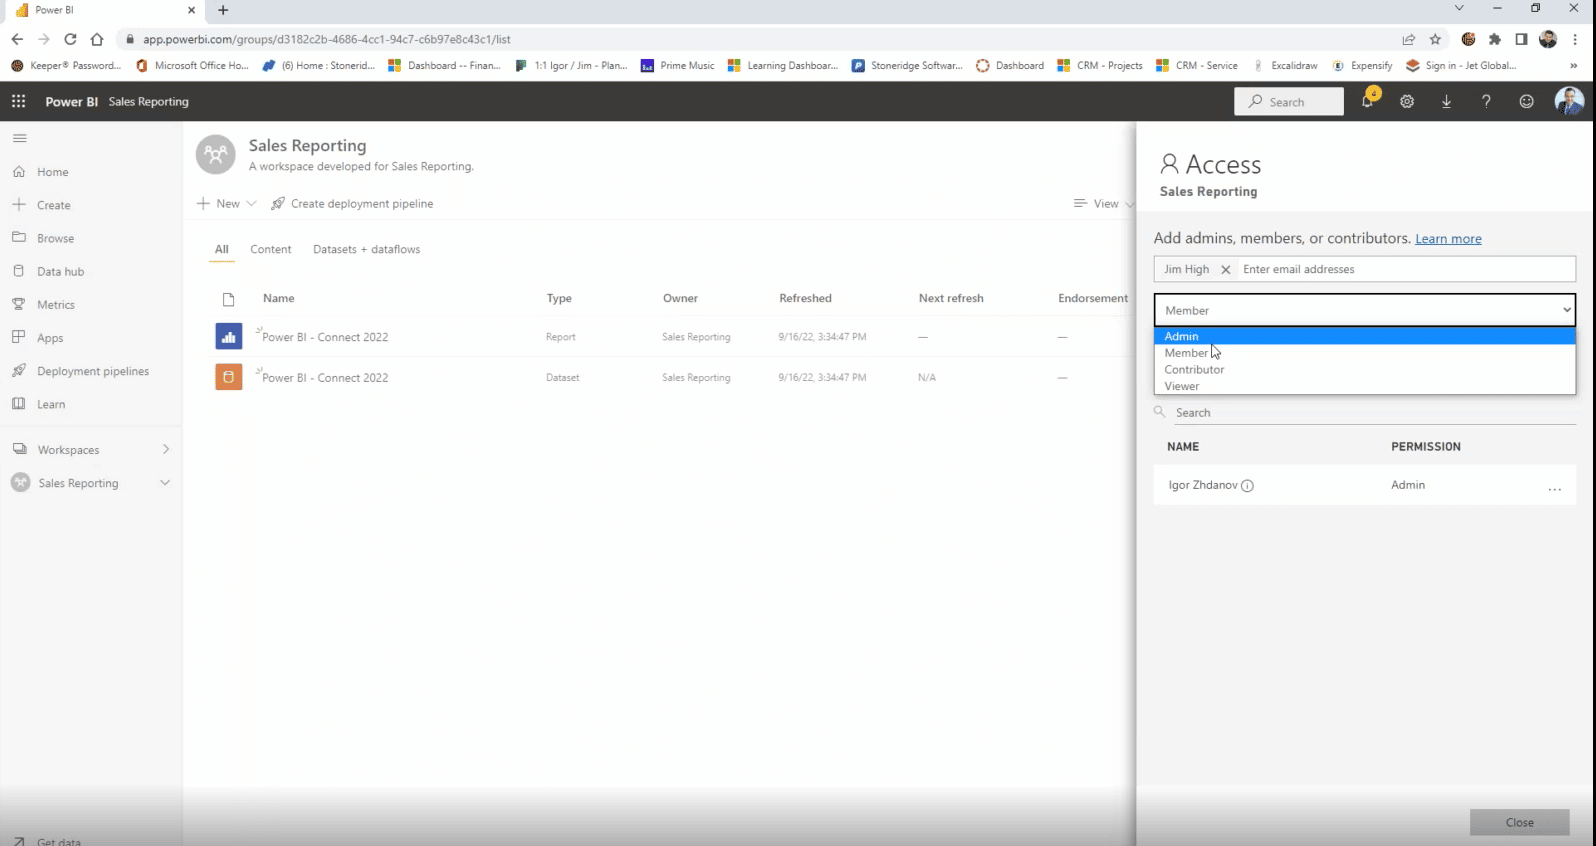
Click here to learn more about the security roles.
Tip: When creating a collaborative workspace, make sure you assign multiple admins to it. The reason for this is if someone who is the only admin leaves the company, that will create some headaches for you and your team. It’s nothing you can’t workaround, but it is tedious.
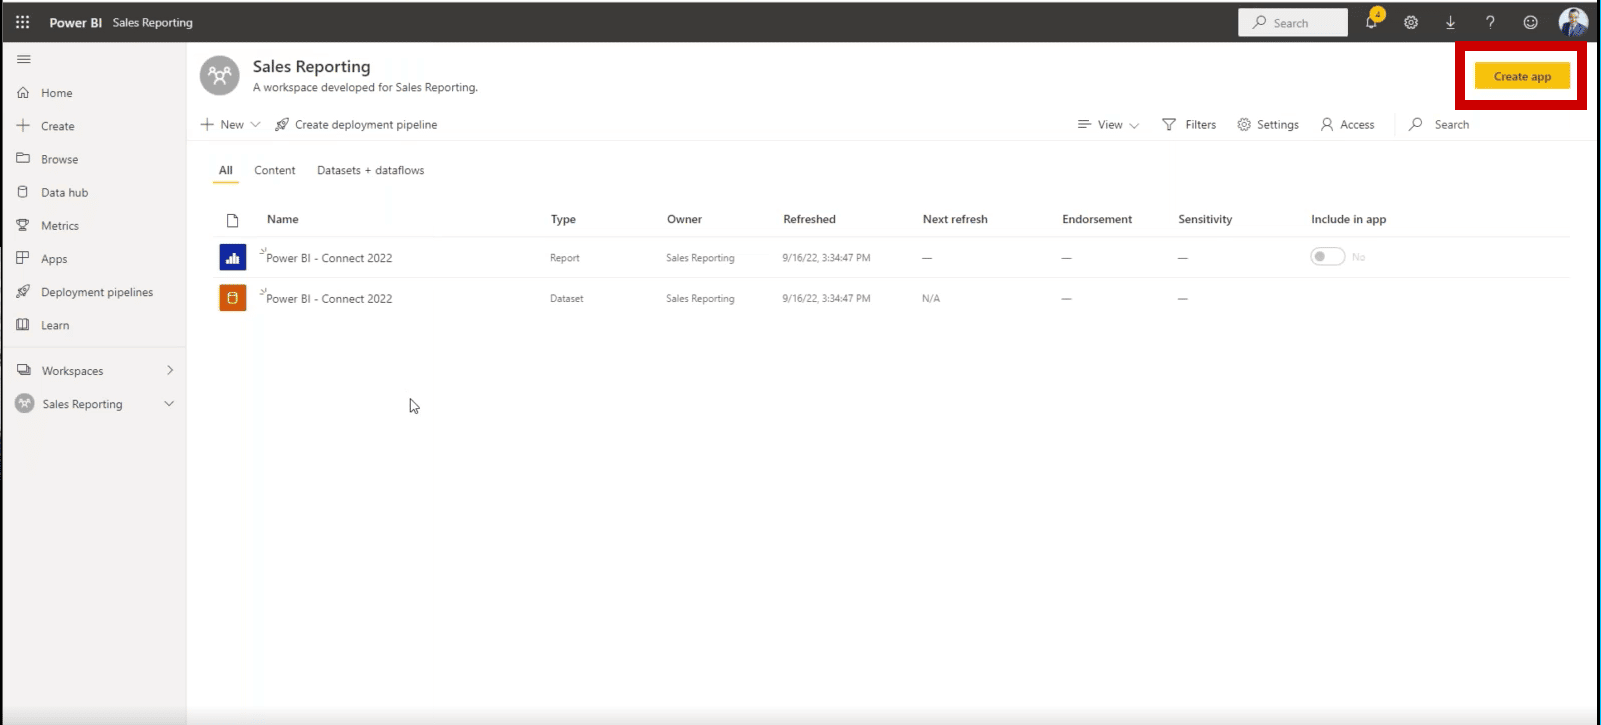
Finally, the last way you can share your content is to create an app.
After navigating back to the content list for your workspace, follow these steps if you want to create an app that works within your workspace.
1 – Select the Create App function in the upper right-hand corner of your content screen
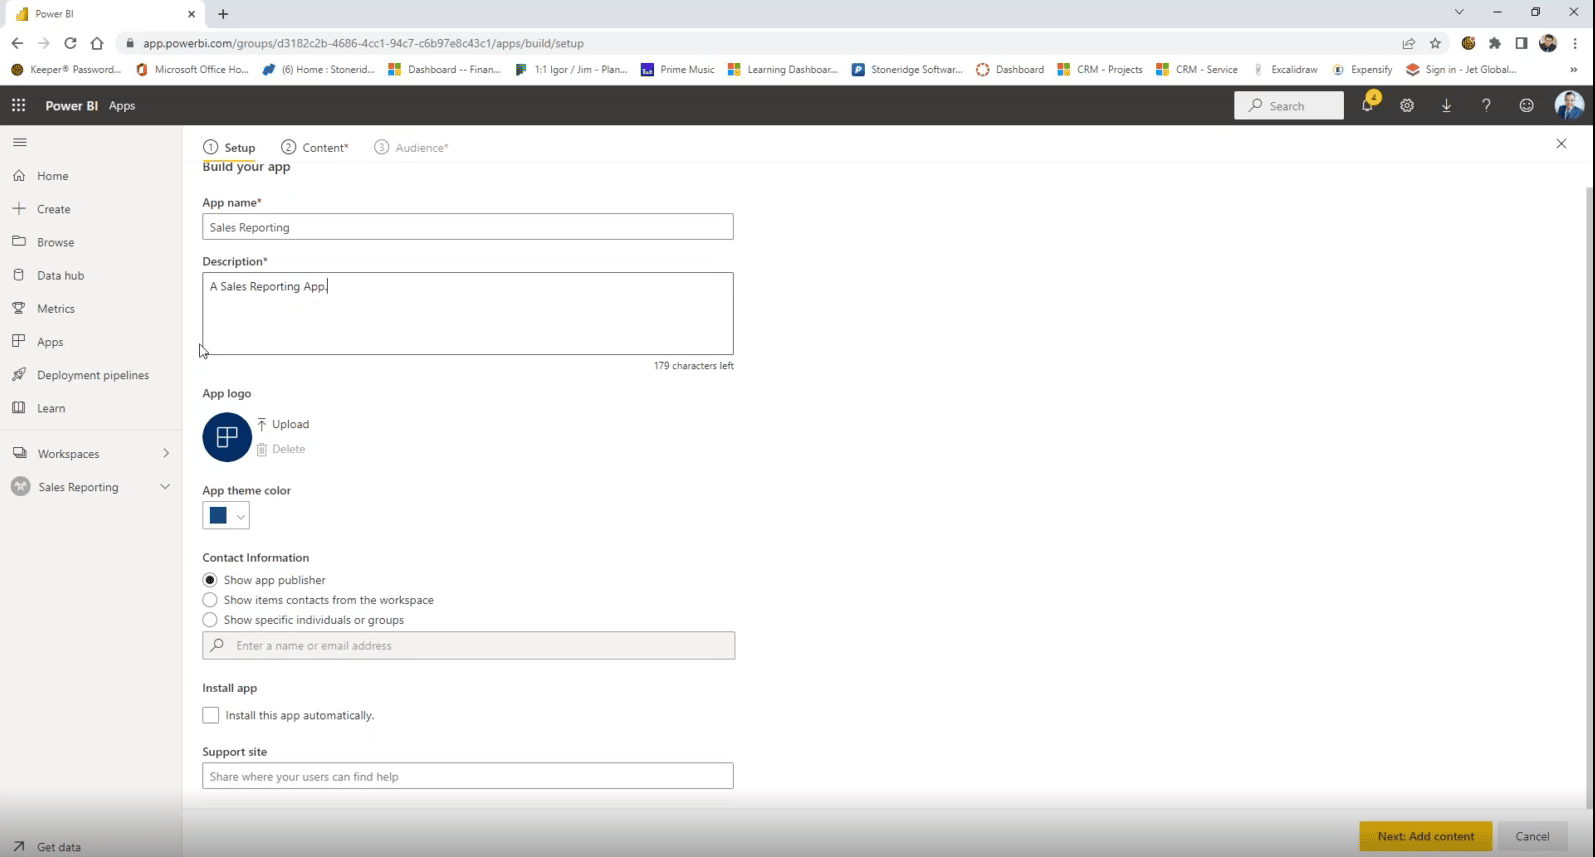
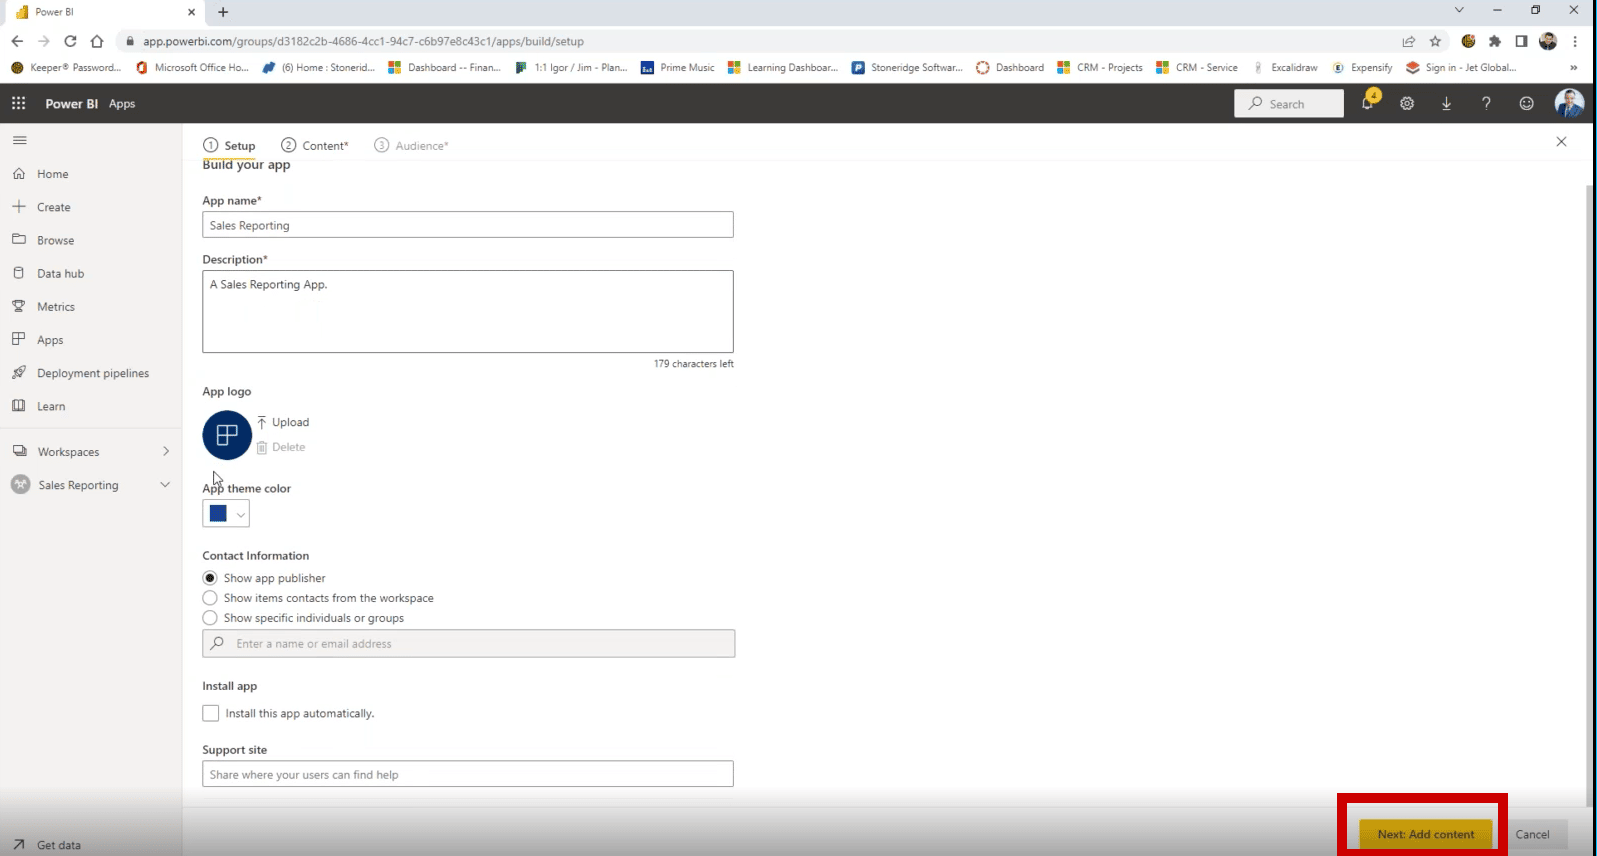
2 – Customize Your App – For this example, we’ll call it a Sales Reporting app
You can give the app a descriptive name, a description that tells people working with it what it's all about, upload a logo, and add other information as well.
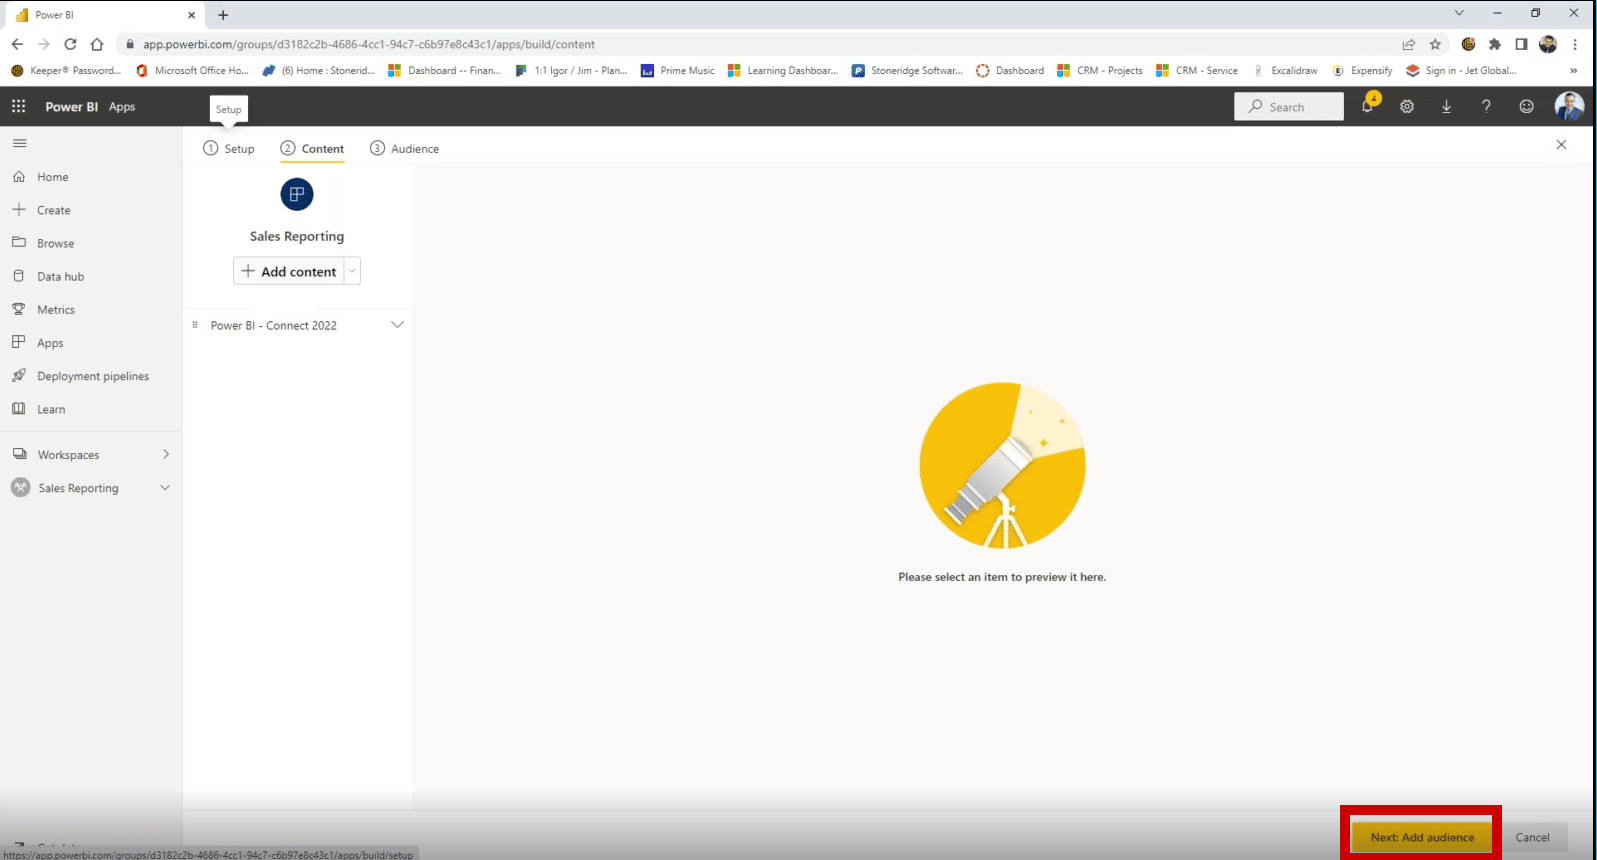
3 – Click on Add Content, find your report, and publish it to the app
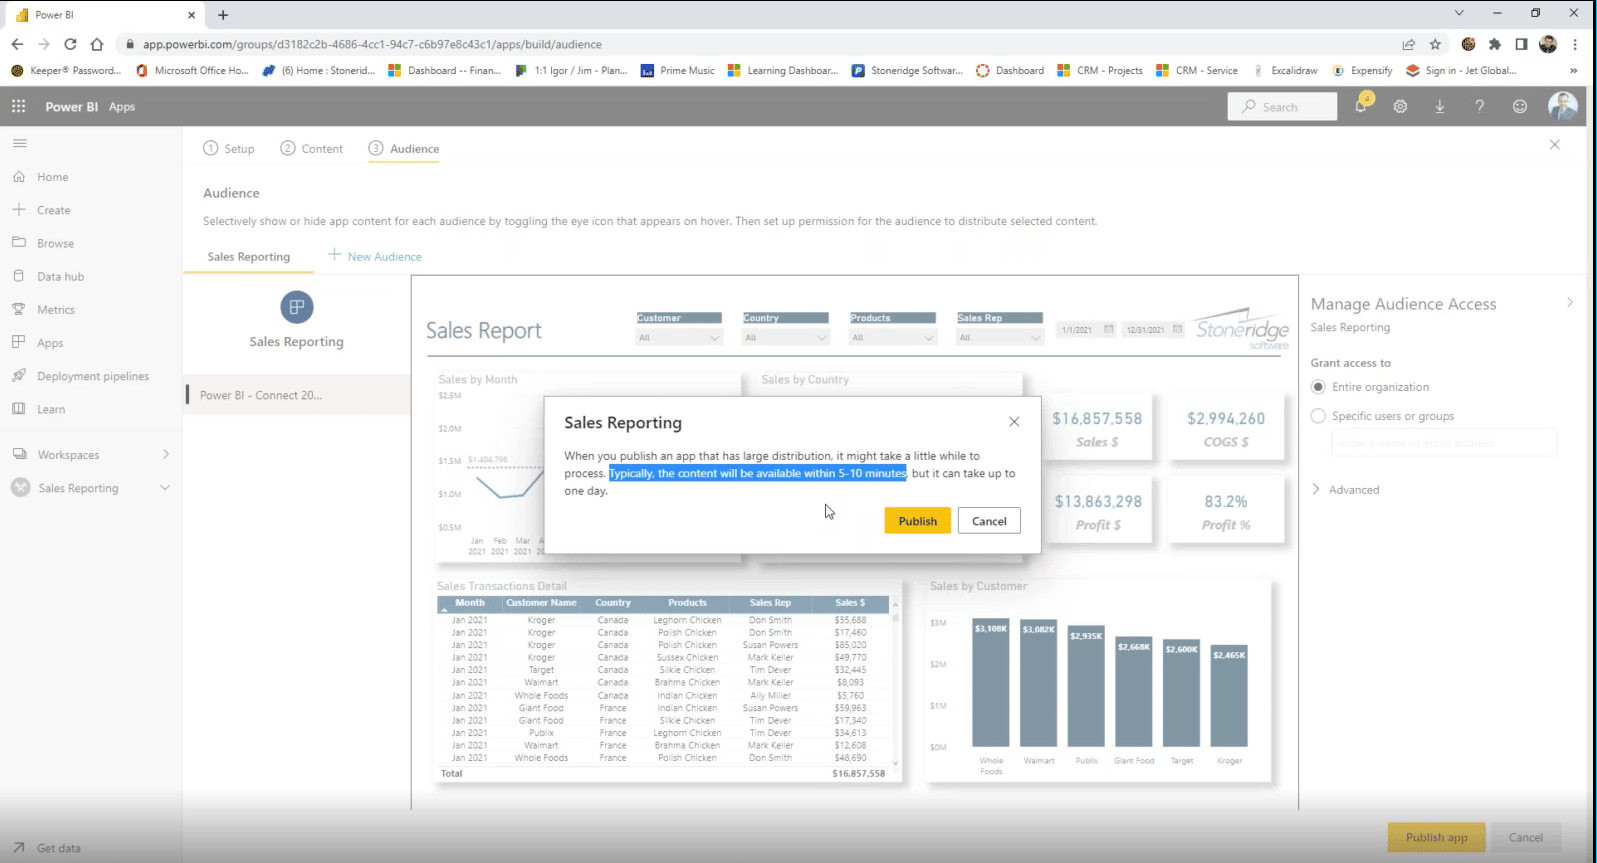
4 – Click on Add Audience
Here you can select a specific user or group of users. You can also add your entire organization.
5 – Publish the app
Once the app is published, you can work from it, use it for reporting or presenting purposes, or share it with others.
Questions?
Please reach out to us! Whether you are on Dynamics 365 Business Central, Dynamics NAV, or any other Microsoft business solution, Power BI can help take it to the next level!

Under the terms of this license, you are authorized to share and redistribute the content across various mediums, subject to adherence to the specified conditions: you must provide proper attribution to Stoneridge as the original creator in a manner that does not imply their endorsement of your use, the material is to be utilized solely for non-commercial purposes, and alterations, modifications, or derivative works based on the original material are strictly prohibited.
Responsibility rests with the licensee to ensure that their use of the material does not violate any other rights.