Optimize Your Dynamics 365 Implementation for Continuous Growth
Going through a Dynamics 365 implementation is an exciting milestone for your organization. However, there is a lot you can do to not only ensure the implementation goes smoothly but continues to grow and improve in the future.
Optimizing your solution post-implementation ensures it scales with your evolving business needs and adapts to future challenges. This proactive approach can transform your investment into a powerhouse that drives sustained success and innovation.
The Three Phases of Optimizing Your Dynamics 365 Implementation
In this blog, we’ll cover three overarching phases you will go through to optimize your Dynamics 365 implementation. They include:
- Managing release cadence
- Understanding when to use personal versus system data reporting
- Scheduling biannual wave release from Microsoft
Additionally, we'll share valuable system maintenance tips to help you maintain peak performance both immediately after implementation and as your system accumulates more data.
1. Managing Release Cadence to Equip Your Team with the Latest Dynamics 365 Features
Determining the optimal release cadence for your system changes is important for ensuring timely updates, smooth operations, and continuous growth within your organization. It's important to consider several factors to find the right balance between frequency and impact:
- Expected Change Volume: Assess the volume of changes needed post-implementation. If there are many high-priority items, you may opt for more frequent, smaller releases to address these quickly. Alternatively, larger, less frequent releases might be more suitable if there are fewer changes.
- Number of Affected Users: Consider how many users or departments will be impacted by the changes. A higher number of affected users often necessitates a longer release window to ensure thorough testing and communication, minimizing disruption.
- System Complexity: The more complex your system, the more time you'll need to test and integrate changes. Complex systems with numerous integrations and customizations require extended-release windows to ensure all components function correctly post-update.
- Time for Testing: Allocate adequate time for testing based on the volume and complexity of changes. Thorough testing helps catch issues early and ensures a smoother transition from sandbox to production, reducing the risk of disruptions.
- Urgency of Changes: Urgent changes, such as critical bug fixes or high-priority updates, may require a shortened release window. In some cases, special releases might be necessary to address these issues promptly and maintain system stability.
Communication is Key: Talk to Your Team About Your Dynamics 365 Implementation
Effective communication helps mitigate confusion, ensures everyone is on the same page, and provides a smoother transition during each release. Here are some key tips to consider:
- Notify Users of the Release Cadence: Inform users about the expected release cadence, including when it will take effect and what to anticipate before and after each release. Clear communication sets expectations and reduces uncertainty.
- Advance Notice: Provide users with several days' notice before a scheduled release. Include details about what the release will entail and who to contact with any questions or issues both before and after the release.
- Day-of Release Notification: Send a reminder on the day of the release to keep everyone informed. This should include a summary of the changes and a confirmation that the release is proceeding as planned.
- Post-Release Confirmation: Once the release has been successfully implemented in the production environment, send another notification to confirm the update. Reiterate the changes made and provide any necessary follow-up instructions or contact points for support.
- Continuous Feedback Loop: Encourage users to provide feedback on the release process and any issues they encounter. This ongoing communication helps improve future releases and addresses any concerns promptly.
2. Data Reporting: System Vs Personal
Understanding when to use the system versus personal views and dashboards is crucial for effective data reporting. Generally, it's best to favor system components for consistency and accessibility, but there are specific cases where personal views are appropriate. Here’s a closer look at both options:
System Reporting
Err on the side of using system views and dashboards whenever possible. System components are accessible to anyone with the proper security permissions, ensuring a uniform method of reporting across the organization. Here are a few other considerations:
- Consistency and Standards: System views and dashboards help maintain reporting standards and consistency. This top-down approach ensures that everyone adheres to the same metrics and reporting formats.
- Accessibility and Continuity: When a view or dashboard is part of the system, it remains accessible even if users are deactivated or removed. This prevents disruption in reporting and data access.
- Maintenance and Adjustments: System components can be easily adjusted by administrators, reducing the risk of losing access or the ability to modify reports if the creator leaves the organization.
Personal Reporting
Personal views and dashboards are most suitable for temporary or one-off needs or a very small group of users with niche requirements. Here are some additional thoughts regarding personal reporting:
- Temporary Needs: If you need to monitor a specific set of data for a short period, a personal view is ideal. Create it, use it for your specific need, and then delete it once it's no longer necessary.
- Limited Audience: When the report is only useful to a few users, a personal view prevents cluttering the system with reports that most users don’t need.
- Visibility and Maintenance: Personal views are invisible to system administrators unless shared. This can complicate maintenance and adjustments if the creator leaves without granting permission to others.
3. Plan for Bi-Annual Dynamics 365 Release Waves
Bi-annual wave releases are essential for empowering your Dynamics 365 systems with the latest features and improvements. Installing these updates promptly ensures your system remains secure, efficient, and capable of leveraging new functionalities.
Twice a year, Microsoft puts out release waves that detail upcoming features and functionalities in Dynamics 365 solutions like:
- Dynamics 365 Business Central
- Dynamics 365 Finance and Operations
- Dynamics 365 Customer Engagement and the following solutions:
- Sales
- Customer Insights - Journeys
- Field Service
- Customer Service
- Power Platform
Installing a Wave Release
You can see if your system has a pending wave release update available by following these steps:
- Navigate to the Power Platform Admin Center: Go to Power Platform Admin Center.
- Click into an Environment: Select the environment you want to update.
- Check the Updates Section: Look for the Updates section within the environment settings.
- Click the Manage Button: If an update is available, click the Manage button to install the update in this environment.
Note: Previously, it was possible to schedule these releases, but now, you need to manually initiate the installation by pressing the manage button.
Successful Wave Release Tips
Ensuring a smooth and successful wave release for your Dynamics 365 system involves careful planning and execution. Here are some practical tips to help you manage wave releases effectively:
- Test in Sandbox First: Always install a wave release in your sandbox environment(s) first. This allows you to test new functionality and identify any potential bugs before rolling it out to your production environment.
- Disable or Hide Unused Features: If there are new functionalities that you won’t use immediately, disable or hide them to prevent confusion.
- Bundle Fixes and Workarounds: Identify any bugs or issues in the sandbox and create fixes or workarounds. Bundle these into a solution so you can easily move them to your production environment after installing the wave release.
Implementing these tips can significantly enhance the efficiency and stability of your wave release process, helping you maintain a robust and reliable system.
System Maintenance: How Table Relationships Ensure Data Integrity
Maintaining table relationships is a critical aspect of system maintenance in D365. Specifically, focusing on parental relationship types between one-to-many relationships is essential to avoiding operational disruptions.
The primary tables to check are the "Big 5":
- Accounts
- Contacts
- Leads
- Opportunities
- Cases
By default, many out-of-the-box table relationships are set to “Parental.” This means actions on the parent record, such as delete or reassignment, will cascade down to the related child records. Here are the significant considerations and potential consequences:
- Cascading Delete: Deleting a parent record will delete all related child records. This can lead to data loss if not carefully managed.
- Reassignment: Reassigning a parent record will reassign all related child records to the new owner.
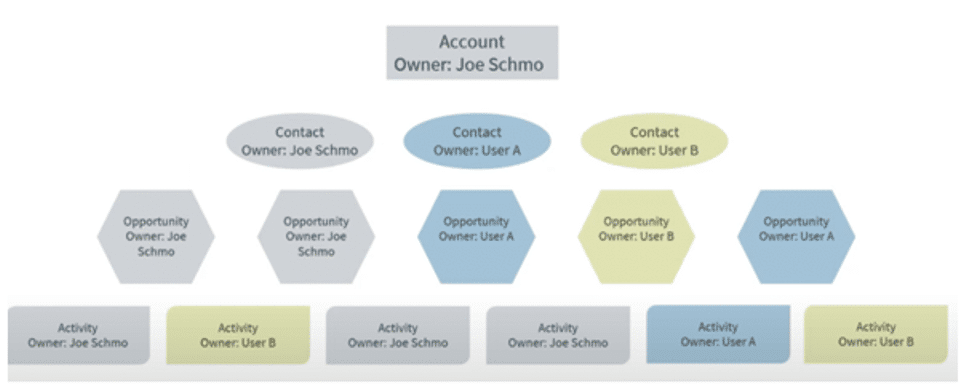
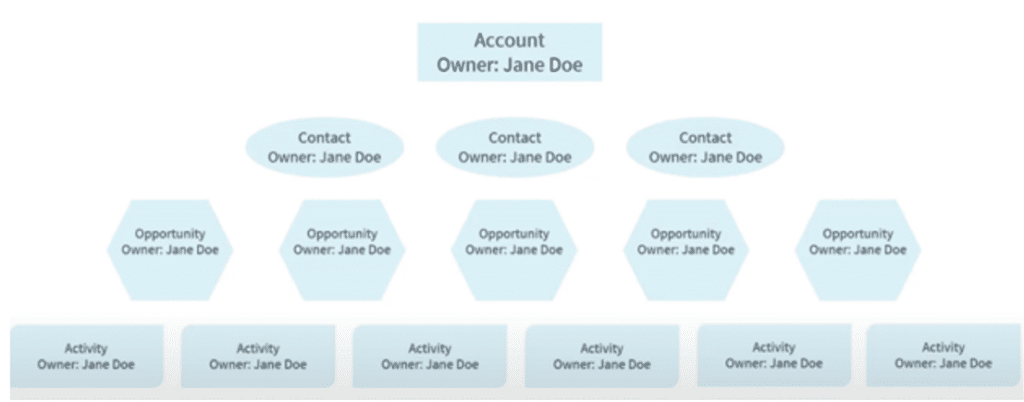
Imagine you have an account owned by user Joe Schmoe, and you reassign it to user Jane Doe. With default parental relationship types in place, all related activities, contacts, opportunities, quotes, orders, invoices, and more will be reassigned to Jane Doe. This happens regardless of who originally owned these child records.
Joe Schmoe owns an account, and various other users own the related child records.
Upon reassigning the account to Jane Doe, all related child records are also reassigned to her.
This reassignment behavior can lead to a variety of significant issues, including:
- User Confusion
- Data Integrity
- Operational Disruption
Properly managing these relationships and understanding the implications of parental behavior types is crucial. Reviewing and adjusting these settings as needed can help maintain a stable and efficient system.
Adjusting Table Relationships to Avoid Issues
To prevent the issues listed above, it is important to adjust these settings appropriately. Following these steps ensures data integrity and will reduce confusion among users:
1. Access Advanced Settings
Open your sandbox environment and navigate to the gear icon in the top corner. From here, select "Advanced settings."
2. Create a New Solution
In the new tab that opens, go to Solutions and create a new solution to house your changes. Add the tables whose Parental behaviors you want to change.
It is recommended to include at least the “Big 5" tables: Accounts, Contacts, Leads, Opportunities, and Cases.
3. Add Parental Relationships to the Solution
Expand each table and navigate to the 1 Relationships section. Then add the Parental relationships to your solution.
4. Switch to Configurable Cascading
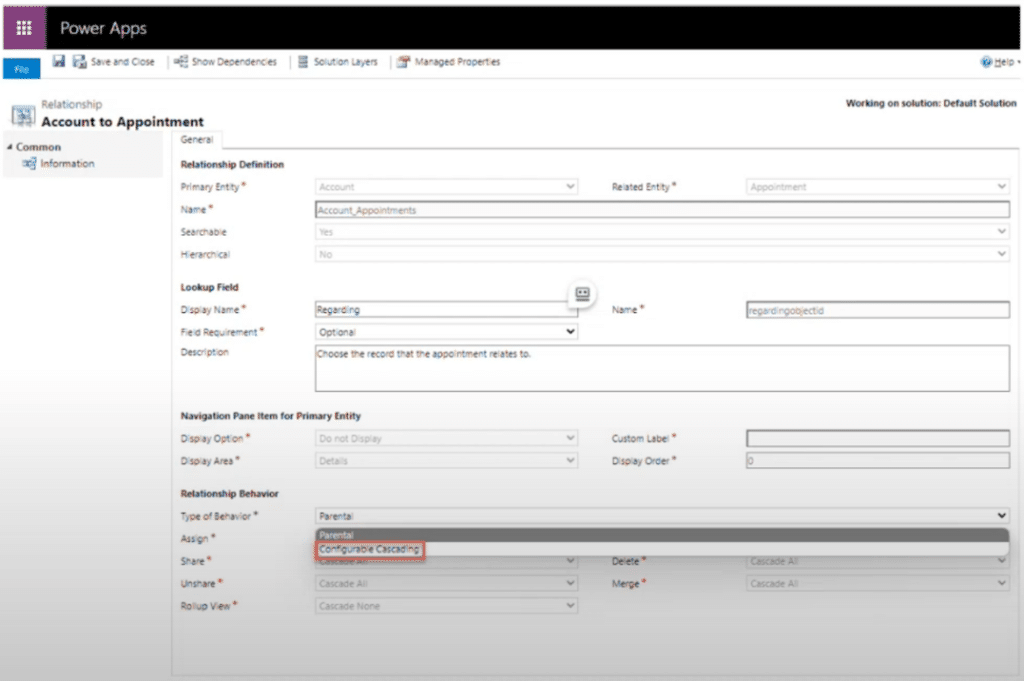
Open each Parental relationship and change the behavior to Configurable Cascading. This will unlock additional options for customizing the relationship behaviors.
5. Adjust Relationship Behaviors
Click the "Assign" dropdown and select the desired behavior:
- Cascade Active: Only reassign child records that are currently in an Active or Open status. Useful for ensuring only relevant records are reassigned.
- Cascade User-Owned: Only reassign child records that were owned by the original owner of the parent record. For example, this would only reassign child records that were originally owned by Joe Schmo.
- Cascade None: No ownership changes will cascade from the parent to the child records. This is the most commonly selected option to maintain original ownership.
System Maintenance: Managing Storage Capacity Maintains Optimal Performance
Managing your storage capacity effectively is crucial for maintaining optimal performance and ensuring smooth operations within your Power Platform environment. Understanding where your storage is allocated and how it's utilized can help prevent unexpected costs and performance issues down the line.
Definitions
Before delving into management strategies, it's important to clarify what each storage category entails. Here are a few terms to be familiar with:
- Database: This includes the actual data entered into your CE records. It represents the space occupied by the values in your database tables.
- File: This category encompasses attachments such as email attachments and notes, as well as any files stored within fields like image or file data types.
- Log: Logs store audit logs and plugin trace logs, providing a history of system activities and diagnostics.
Checking Storage Usage
To monitor and manage your storage usage effectively, follow these steps:
- Access the Power Platform Admin Center:
- Navigate to the Power Platform Admin Center.
- Expand the left-hand menu, select Resources, and then click on Capacity.
- View Overall Capacity Usage:
- In the Capacity section, you'll see an overview of database, file, and log usage across all environments in your tenant.
- Drill Down by Environment:
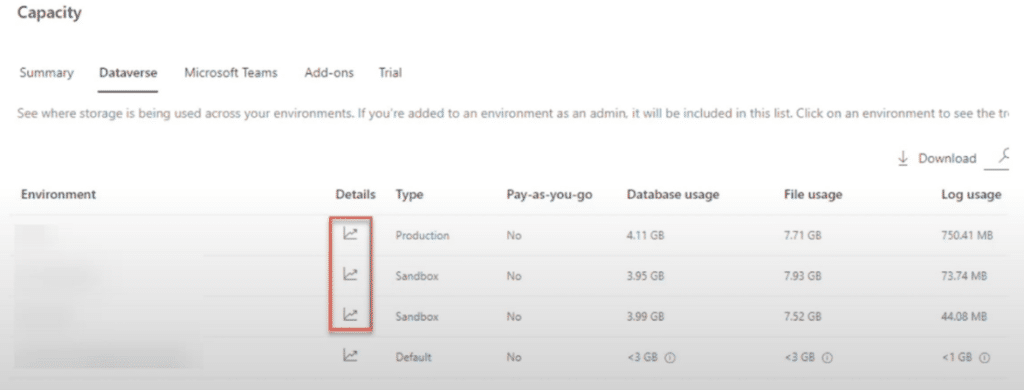
- Click on the Dataverse tab to view detailed storage breakdowns per environment.
- Use the hyperlinks to drill down further into specific categories (database, file, log) for each environment.
When you click on the Dataverse tab, you'll encounter a detailed breakdown by environment, visually represented in graphs and tables.
This interface allows you to:
- Track Usage Over Time: View trends in storage consumption over the past 28 days, helping you identify potential issues early.
- Identify Top Consumers: Identify which tables are consuming the most storage space. Hovering over each node provides insights into usage patterns by date.
Downloading Detailed Data
For deeper analysis, utilize the “hamburger-looking” icon in the top-right corner of the database usage section:
- Click Download All Tables to export detailed storage usage data for every table in your environment.
- This export includes information on how much space each table occupies, enabling comprehensive analysis and proactive management of your storage resources.
By following these steps and leveraging the provided visuals, you can effectively manage your storage capacity, optimize resource allocation, and maintain the performance of your Power Platform environment.
Determine the Best Approach as You Read Your Storage Limit
As your organization approaches storage limitations within your Power Platform environment, it becomes crucial to make informed decisions to manage and optimize your resources effectively.
Here are key determinations to consider:
- Identify High-Impact Tables: Use insights from storage analytics to pinpoint which tables are consuming the most storage capacity.
- Assess Data Needs: Determine if users require access to the entire dataset within these tables or if only subsets of data are necessary for daily operations.
- Explore Data Extraction: Evaluate whether certain data can be extracted from the CE system and stored elsewhere without impacting operational needs. Options range from simple exports to Excel for archival purposes to more complex integrations with data lakes or storage blobs, considering cost implications and accessibility requirements.
- Consider Storage Expansion: Assess whether expanding your storage capacity is the most cost-effective solution. Consult with a licensing partner like Stoneridge Software to learn more.
By systematically addressing these determinations, you can proactively manage storage limitations, optimize resource allocation, and maintain the performance and scalability of your Power Platform environment.
Consequences of Exceeding Storage Capacity
If you exceed your allocated storage capacity within the Power Platform environment, the impact is primarily on environment-related actions rather than day-to-day operations. Your system will continue functioning normally without disruption to daily activities.
However, exceeding storage capacity will prevent you from performing several critical environment actions, including creating new environments, copying or restoring environments, converting trials into paid environments, recovering environments, and adding Dataverse databases to existing environments. While some of these limitations may not immediately affect your operations, they can become crucial in scenarios requiring environment recovery or expansion.
Maintaining compliance with storage limits ensures uninterrupted access to essential environment management functionalities when needed.
Want to Learn More About What a Dynamics 365 Implementation Looks Like For You?
Reach out to us today to learn more. Our experts will work with you from pre-planning to post-implementation support to ensure you have a trusted partner at your side every step of the way. Your implementation will be unique, and Stoneridge can help you plan it so it's fully optimized for your business.
Under the terms of this license, you are authorized to share and redistribute the content across various mediums, subject to adherence to the specified conditions: you must provide proper attribution to Stoneridge as the original creator in a manner that does not imply their endorsement of your use, the material is to be utilized solely for non-commercial purposes, and alterations, modifications, or derivative works based on the original material are strictly prohibited.
Responsibility rests with the licensee to ensure that their use of the material does not violate any other rights.


