















Copilot Studio Explained – Part 1: What It Is and How to Set It Up
Building an effective AI agent starts with understanding the tools, settings, and capabilities that make it work.
AI agents are changing how businesses operate, helping employees find information faster, automate repetitive tasks, and make better decisions. But creating an agent that delivers real value involves more than simply giving it a name and telling it what to do. You need to understand how to configure it, control its behavior, and connect it to the information and systems your business relies on.
Enter Microsoft Copilot Studio
This powerful platform gives you the flexibility to build and customize AI agents that tackle specific business challenges, whether you're looking to streamline financial processes, improve information accessibility, or automate everyday workflows.
In this first installment of our three-part Copilot Studio blog series, we'll introduce you to the platform and walk through two important areas: the Overview tab and General Settings. You'll learn how to define your agent's purpose, select its underlying AI model, establish instructions and guardrails, and configure settings that influence how it processes information and responds to users.
This is your starting point for building smarter, more effective AI agents. We'll build on these fundamentals in Parts 2 and 3, coming in the weeks ahead!
What Is Microsoft Copilot Studio and How Does It Work?
Microsoft Copilot Studio is a platform that allows you to create, configure, and manage AI-powered agents designed to support specific business processes.
Rather than relying on a general-purpose AI assistant, you can develop agents that work with your organization's information, follow established instructions, and interact with business applications.
For example, you might create an agent that:
- Retrieves information from Microsoft Teams conversations, emails, or SharePoint documents.
- Answers questions using your company's internal knowledge and resources.
- Connects to Microsoft Dynamics 365 Business Central, Finance and Operations, or Customer Engagement.
- Automates tasks when specific events occur in your business systems.
- Supports specialized activities such as processing financial journal files.
One of Copilot Studio's biggest advantages is flexibility. You can build relatively simple agents that answer questions or more sophisticated agents that communicate with other agents and perform specific tasks.
However, the key to success is creating purpose-built agents rather than trying to make one agent do everything.
For example, instead of creating an agent responsible for an entire accounts payable department, you might create individual agents for specific responsibilities. These agents can then work together to support a broader business process.
Let's explore how you can start configuring these capabilities.
Understanding the Copilot Studio Overview Page
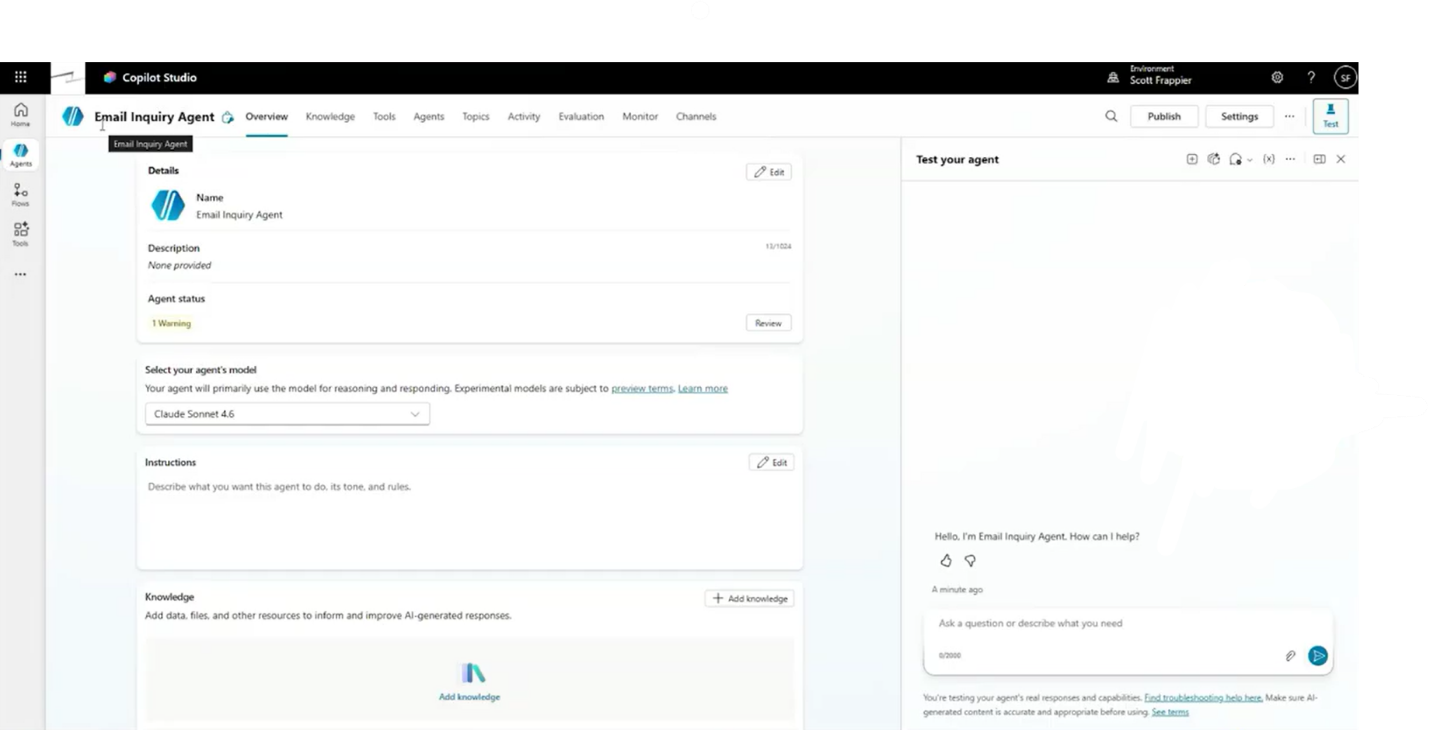
The Overview tab is one of the first places you'll work when configuring an agent. Think of it as your agent's central configuration area, where you define its identity, behaviour, and connections.
To get started:
- Open Microsoft Copilot Studio and navigate to your agent.
- If you're starting from scratch, use the Create blank agent option to establish a new agent.
- Open the agent's Overview tab.
- Review the available configuration areas, including its name, description, model, instructions, knowledge, tools, and other capabilities.
Each section helps determine how your agent operates.
Step 1: Define Your Agent's Name and Description
Before your agent starts performing tasks, you need to establish what it's supposed to accomplish.
From the Overview tab:
- Find your agent's basic information section and select Edit.
- Enter a descriptive name that identifies the agent's purpose.
- Add a description explaining the specific task or business function it supports.
- Update the agent's icon if desired.
- Select Save to apply your changes.
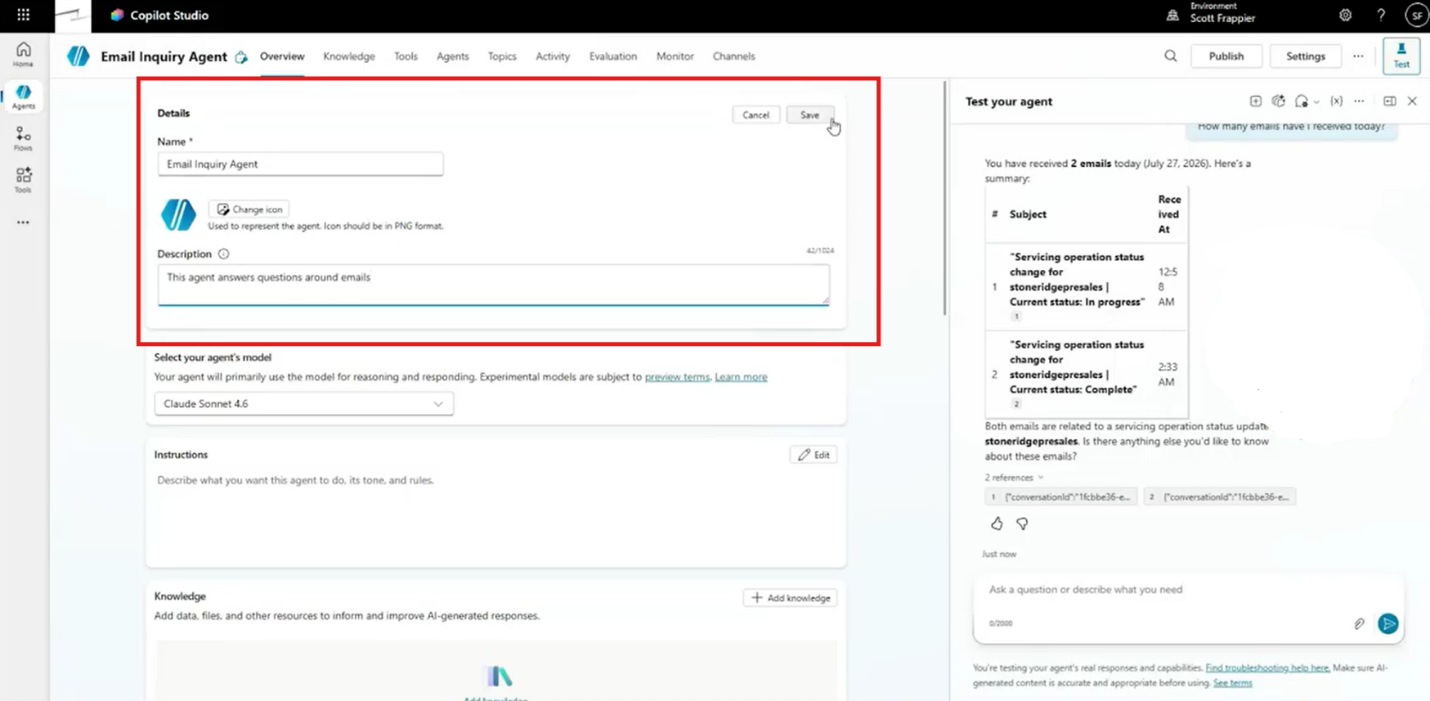
While naming your agent is straightforward, its description deserves particular attention.
Copilot Studio uses descriptive information to help determine how agents should operate and interact. This becomes especially important when you have multiple connected agents performing different responsibilities.
After saving, review any warnings displayed in the Overview tab. These can help identify configuration issues requiring attention.
Step 2: Choose the Right AI Model
Your agent's underlying AI model plays an important role in determining how it processes information, generates responses, and makes decisions. With Copilot Studio, you have access to different model options from OpenAI and other providers that might fit your environment.
You may also have access to preview models and additional model integrations through Azure AI Foundry.
To review your model:
- Locate the Model section in the Overview tab.
- Open the available model selections.
- Review the supported models and their capabilities.
- Choose the model that best aligns with your agent's intended workload.
- Save your selection and test the agent's behavior.
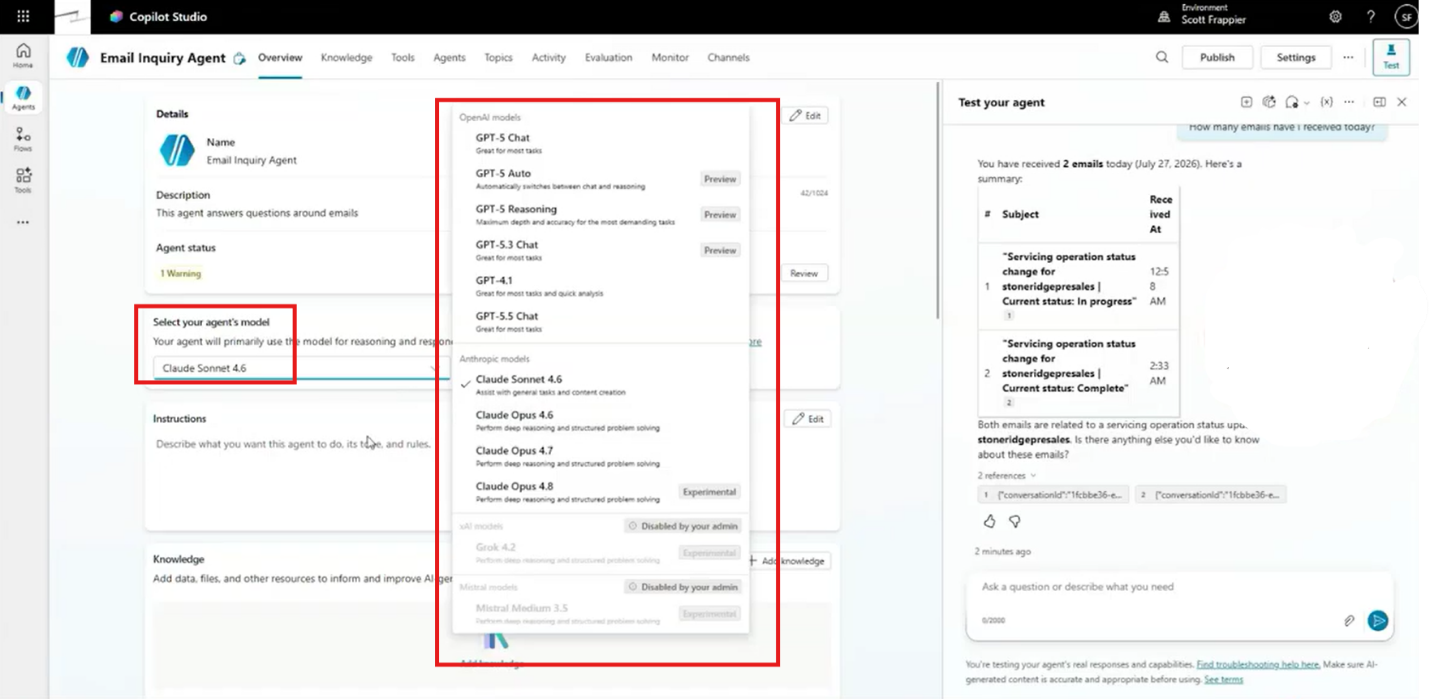
Different models may offer different capabilities, so selecting one should be based on your business requirements rather than simply choosing the newest option
Step 3: Establish Clear Instructions and Guardrails
Instructions tell your agent how to approach a task, which information to use, and what restrictions to follow.
For example, suppose you create an agent that can access Microsoft 365 information through Work IQ, but you only want it to retrieve email information.
You can establish that limitation directly through its instructions.
Here's how:
- Locate the Instructions section in the Overview tab.
- Select the option to edit your agent's instructions.
- Describe the specific tasks the agent should perform.
- Establish rules governing which information it can use.
- Include restrictions on actions or information that fall outside its responsibilities.
- Save the instructions.
- Test the agent by submitting questions that fall both inside and outside its intended scope.
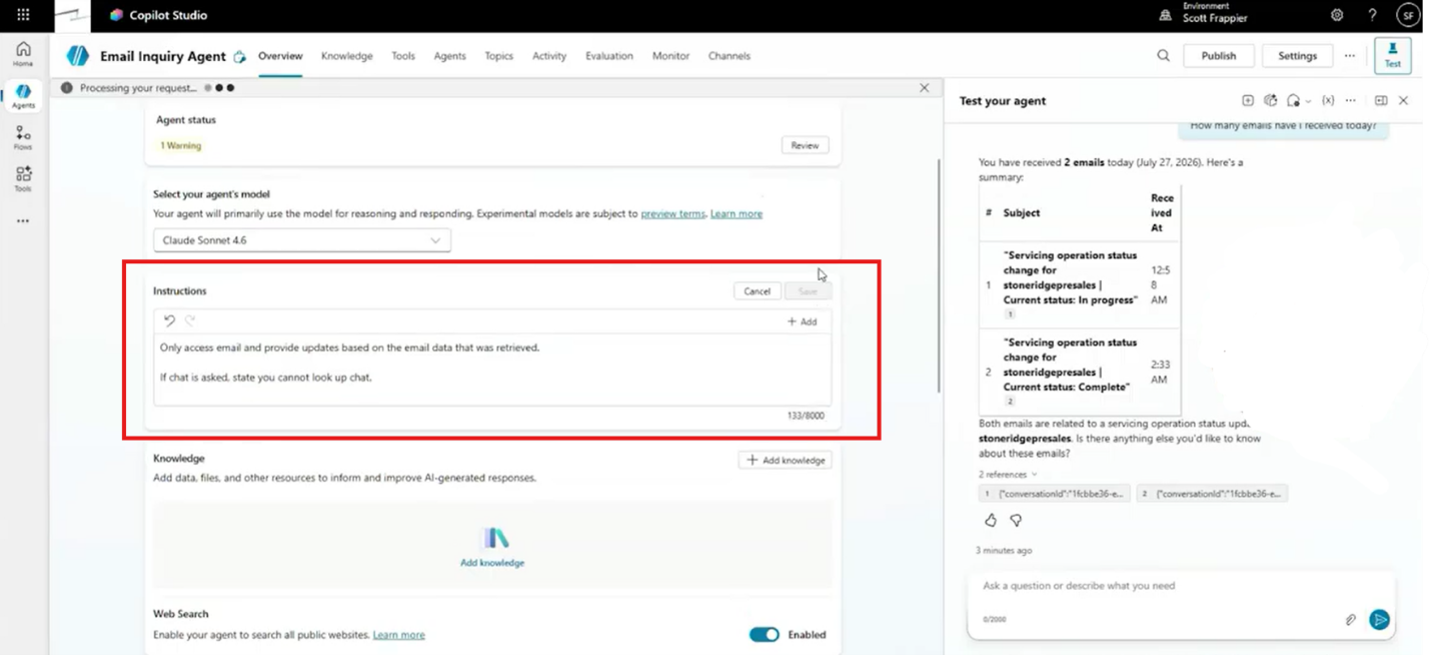
For example, you could instruct your agent to retrieve information exclusively from emails and prohibit it from looking up Teams conversations.
Even if the agent has access to both information sources, these instructions guide it toward the permitted activity and act as a guardrail. One important thing to note, however, is that you support your instructions with appropriate permissions and access controls.
Step 4: Connect Knowledge, Tools, and Business Systems
Once you've established your agent's purpose and instructions, you can expand its capabilities by connecting it to relevant information.
The Overview tab includes several important options:
- Knowledge: Add documents or SharePoint repositories that provide information your agent can reference.
- Web Search: Enable or disable access to web-based information.
- Tools: Connect your agent to external systems like Dynamics 365 ERP and CRM modules through Model Context Protocol (MCP).
- Work IQ: Allow supported agents to access organizational information such as emails, Teams conversations, and SharePoint content.
For example, an agent connected to Work IQ can retrieve relevant Microsoft 365 information and present it to a user without requiring extensive custom instructions.
To configure these capabilities:
- Open the appropriate Knowledge, Tools, or Work IQ section.
- Select the option to add or enable the required capability.
- Choose the relevant information source or connection.
- Complete any required connection or authorization steps.
- Save the configuration.
- Test whether your agent can retrieve the intended information.
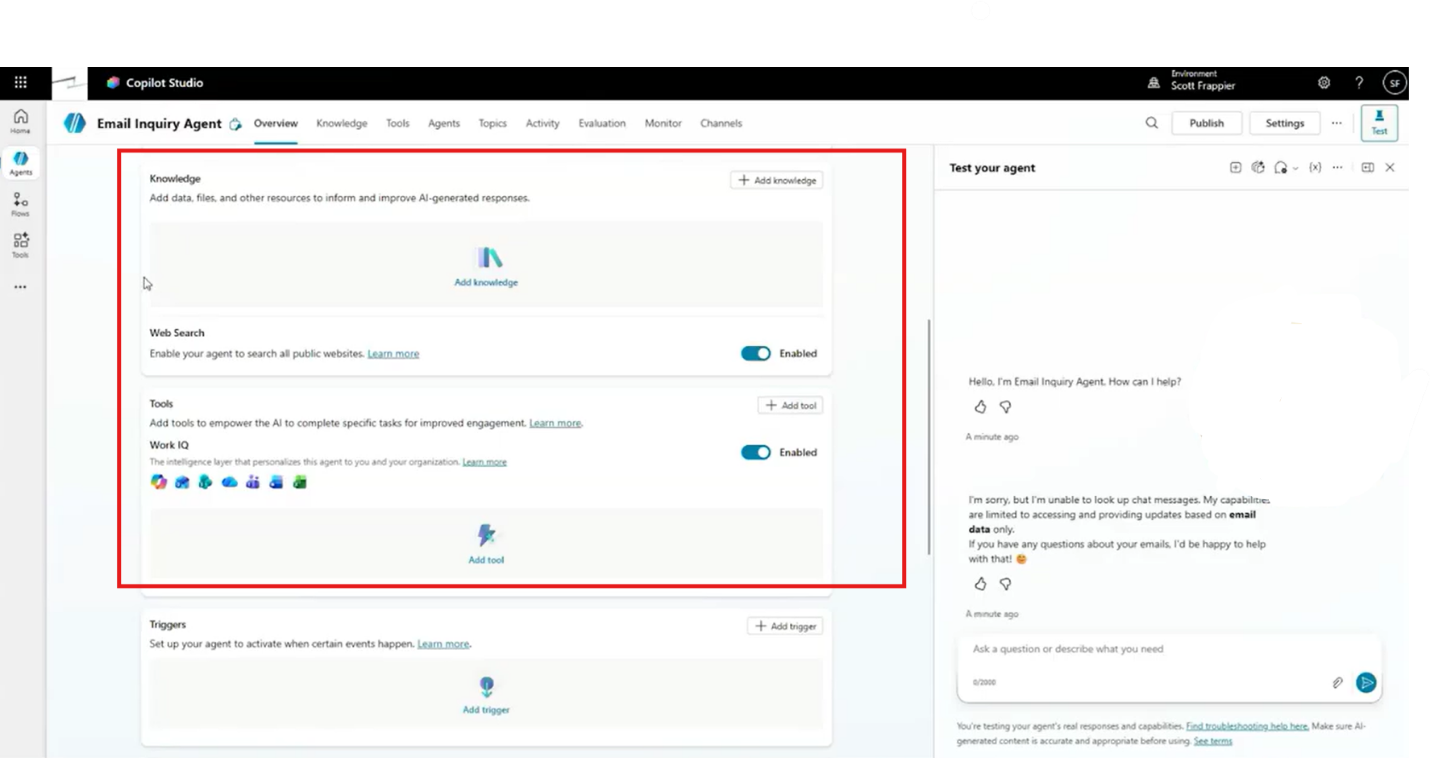
Remember that your agent should only have access to the resources necessary to perform its assigned responsibilities.
Step 5: Explore Triggers, Connected Agents, Topics, and Suggested Prompts
The Overview tab also includes capabilities that help you build more sophisticated agents.
- Triggers allow an agent to respond when a specific event occurs. Instead of waiting for a user to ask a question, an automated agent can receive event information and perform its designated task.
- Connected agents allow multiple agents to collaborate. For example, a higher-level accounts payable agent could coordinate specialized agents responsible for individual financial processes.
- Topics help define structured interactions and processes, including scenarios where information is retrieved through Power Automate and presented to an agent.
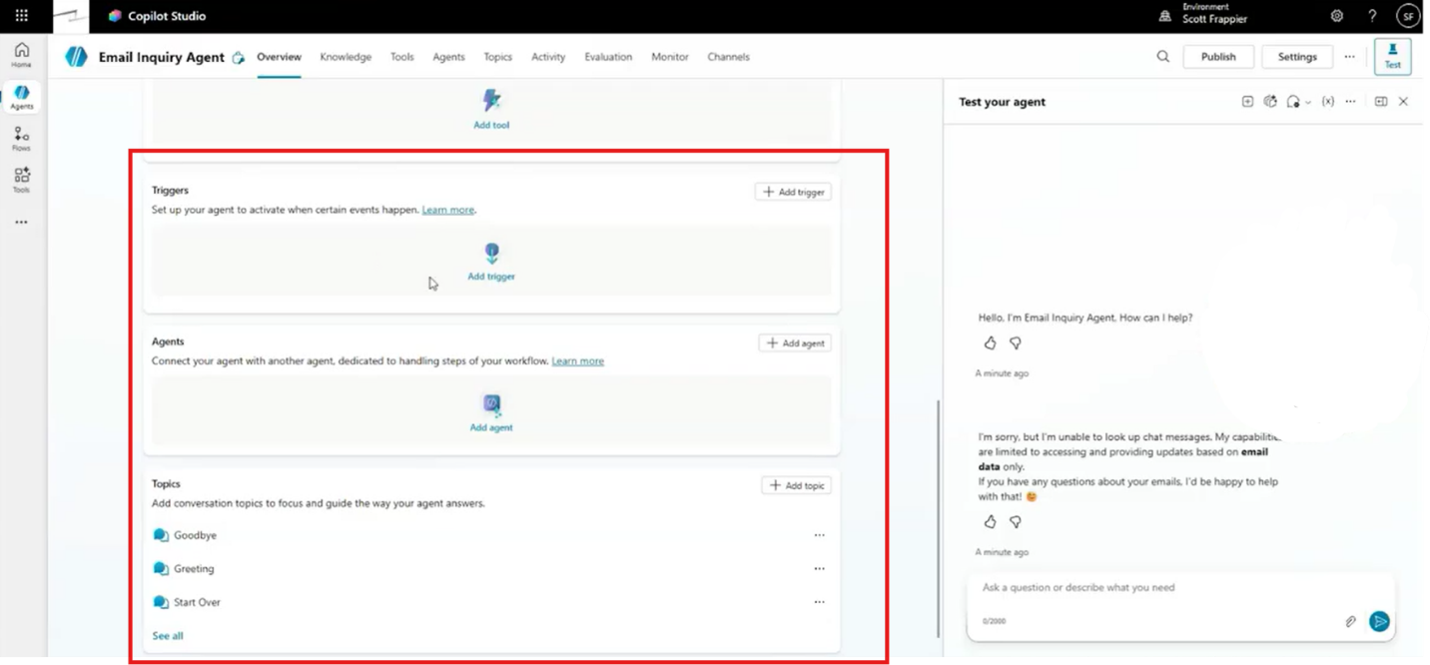
- Suggested prompts provide users with clickable examples of questions or request they can submit. These are particularly useful for interactive agents because they help employees understand what the agent can do.
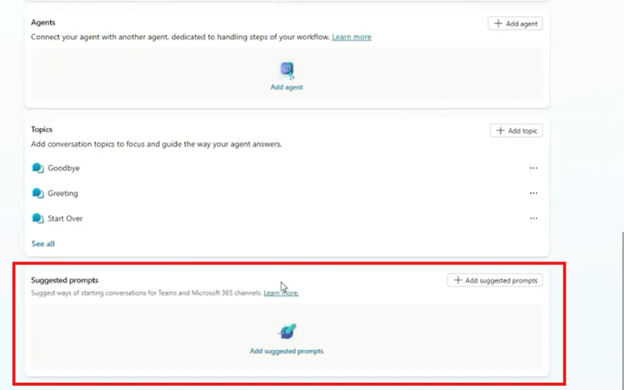
Together, these capabilities let you build agents that operate independently, collaborate with other agents, or interact directly with your employees.
Configuring Your Agent's General Settings
Now that you've explored the Overview tab, let's look at the settings that control how your agent behaves behind the scenes.
From your agent's configuration screen, select Settings to access its general configuration options.

These settings help you control response generation, accuracy, collaboration, feedback, information sources, and file processing.
Step 1: Configure Generative Orchestration and Deep Reasoning
One of the first settings you'll encounter is Orchestration. Historically, Microsoft's Power Virtual Agents relied heavily on keywords and predefined interactions to determine how bots should respond.
Copilot Studio expands on that approach through generative AI orchestration, allowing agents to interpret requests and determine how to respond using their available knowledge, topics, and tools. For most modern AI agent scenarios, generative orchestration is an appropriate choice.
You can also configure Deep Reasoning, which allows the agent to use more advanced reasoning capabilities when determining how to approach a request.
To configure these settings:
- Open your agent's Settings.
- Locate the Orchestration section.
- Review whether generative AI orchestration is enabled.
- Determine whether your agent's tasks would benefit from Deep Reasoning.
- Enable or disable the appropriate capabilities based on your requirements.
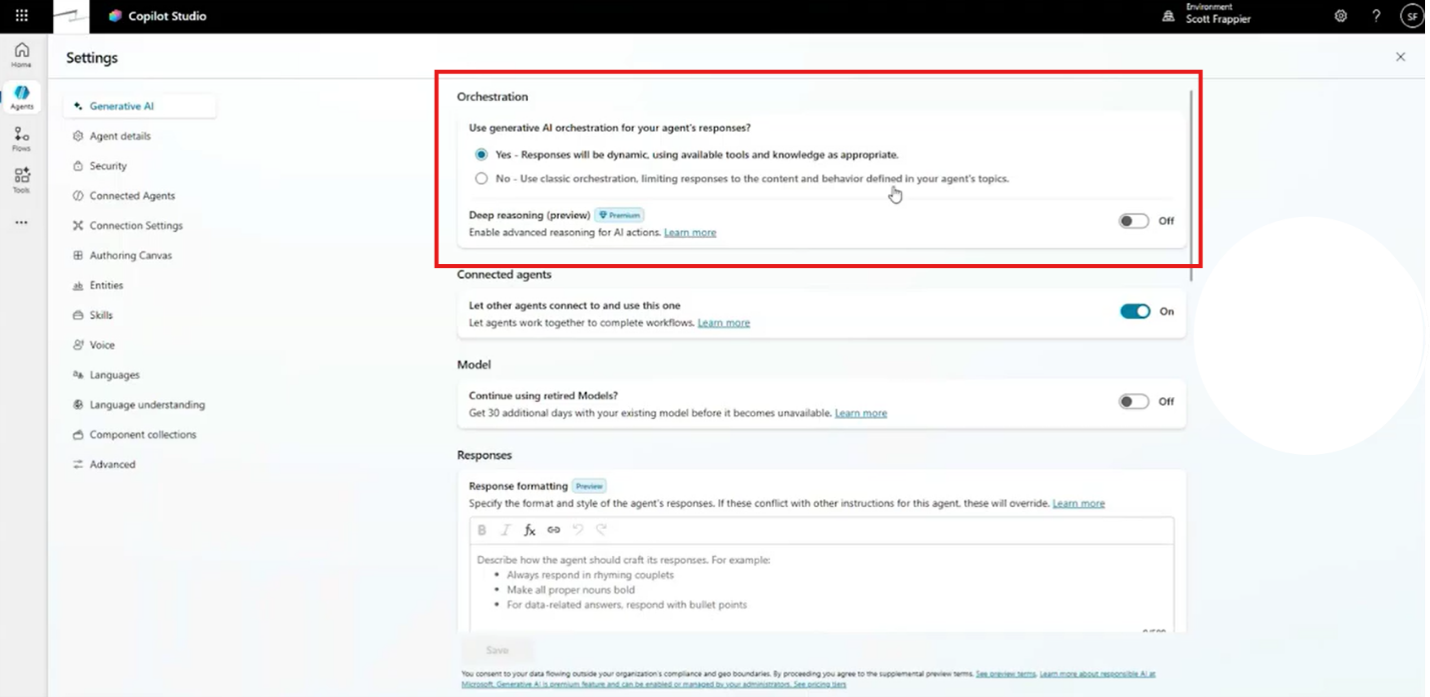
Deep Reasoning can help with more complex decisions. However, it can also affect response speed and credit consumption.
The goal isn't necessarily to enable every advanced feature. Select the capabilities that make sense for your agent's workload.
Step 2: Manage Connected Agents and Model Changes
General Settings also allows you to control whether other agents can call your agent. This is important because not every agent should be available for collaboration.
For example, an agent handling a highly specialized or restricted business process may not need to interact with other agents. If that’s the case, you can disable connected-agent functionality when appropriate.
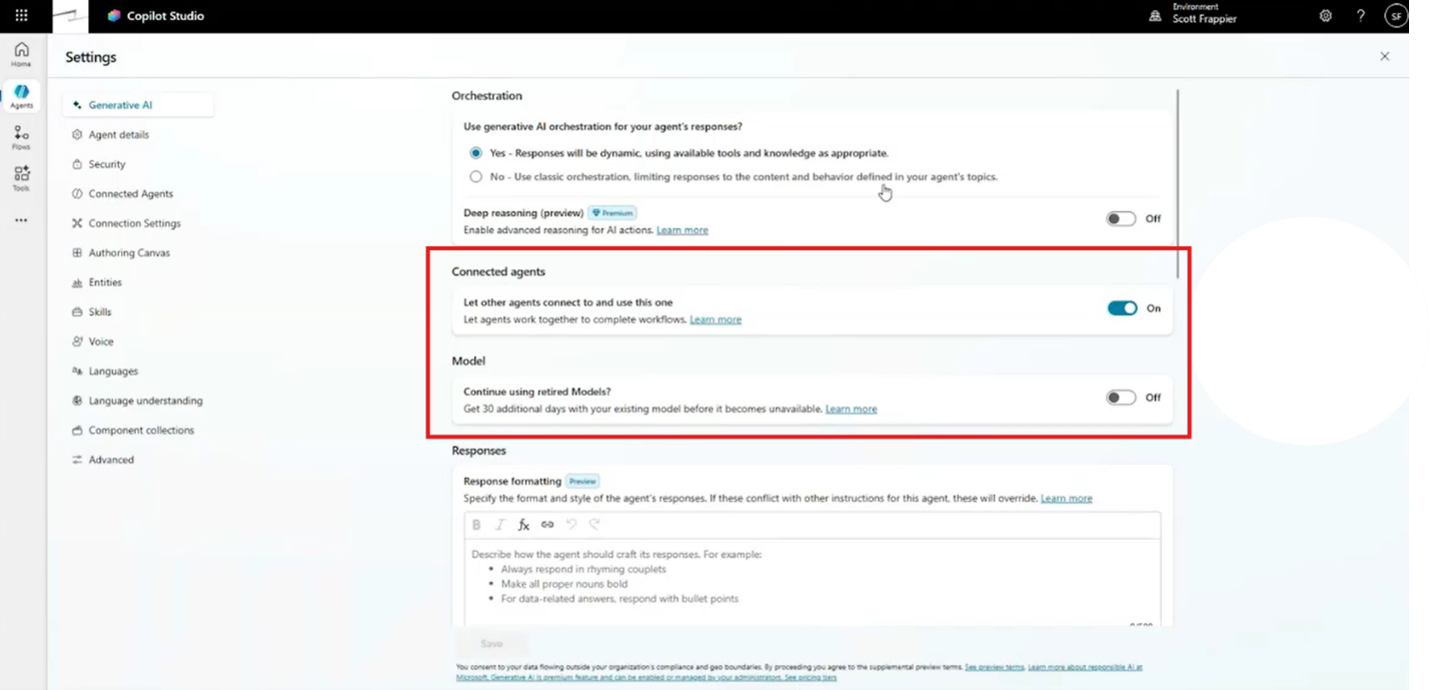
You also need to consider model retirement. As AI models evolve, Microsoft may retire older versions and introduce replacements. These changes can affect how your agents behave. You have the option to continue using certain retired models temporarily, which can provide a transition period to evaluate replacements.
When managing model changes:
- Review your agent's current model and available alternatives.
- Identify whether any retirement or transition settings apply.
- Test replacement models against your existing instructions and workflows.
- Evaluate differences in responses and behaviour.
- Update your model configuration when you're satisfied with the results.
This is an important part of maintaining your agents over time. A model change may require additional testing or adjustments to preserve consistent performance.
Step 3: Customize Responses and Moderation
You can also establish how your agent should communicate with users.
The Responses settings allow you to define general formatting and communication preferences that apply when your agent generates answers.
For example, you might want an agent to consistently use a particular tone, response structure, or formatting style.
Meanwhile, Moderation settings help manage the risk of harmful or inappropriate content appearing in responses.
To configure these options:
- Locate the Responses section in General Settings.
- Define any formatting or communication preferences.
- Open the Moderation settings.
- Select a moderation level appropriate for your business requirements.
- Configure an explanation that users can receive when content is blocked or flagged.
- Save your changes.
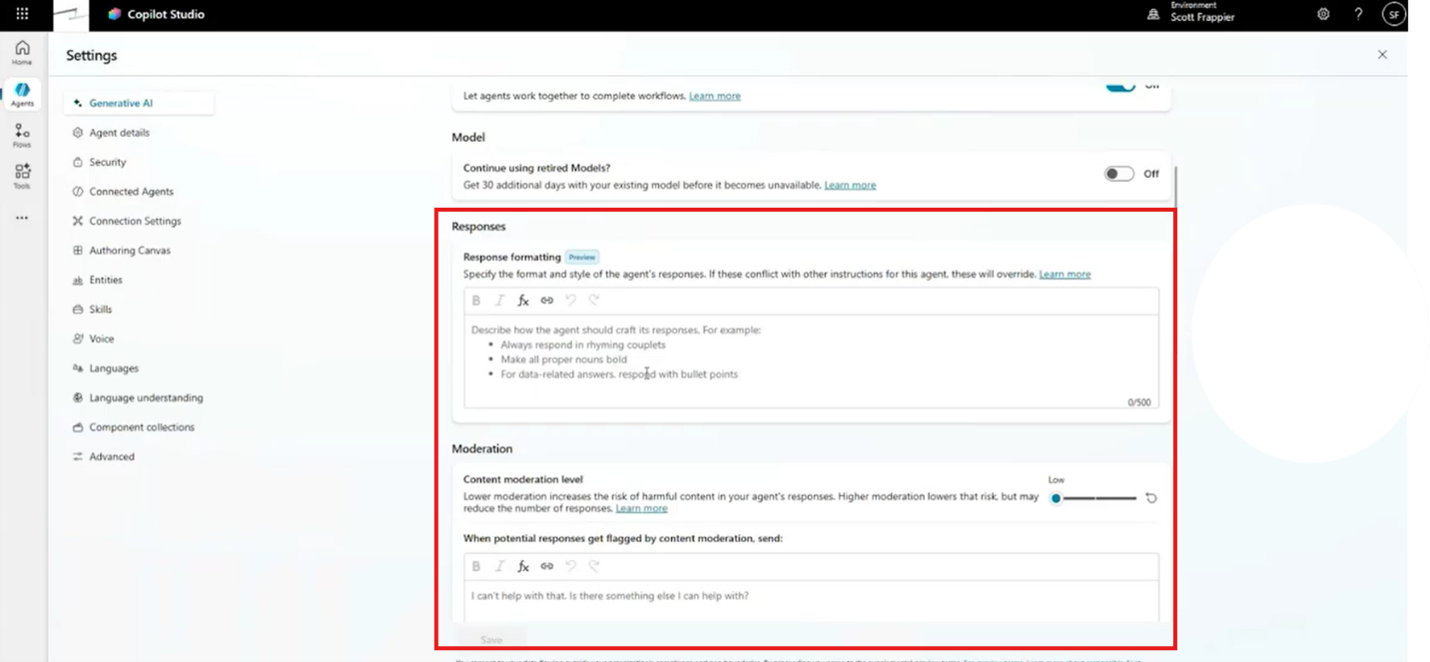
For many business applications, moderate or high moderation settings can provide a useful starting point. You might also configure your agent to explain that it cannot complete a request because the content does not align with company policy.
Note: While moderation serves as an additional layer of protection, it should not be treated as a guarantee against inaccurate information or hallucinations.
Step 4: Enable User Feedback and Control Knowledge Sources
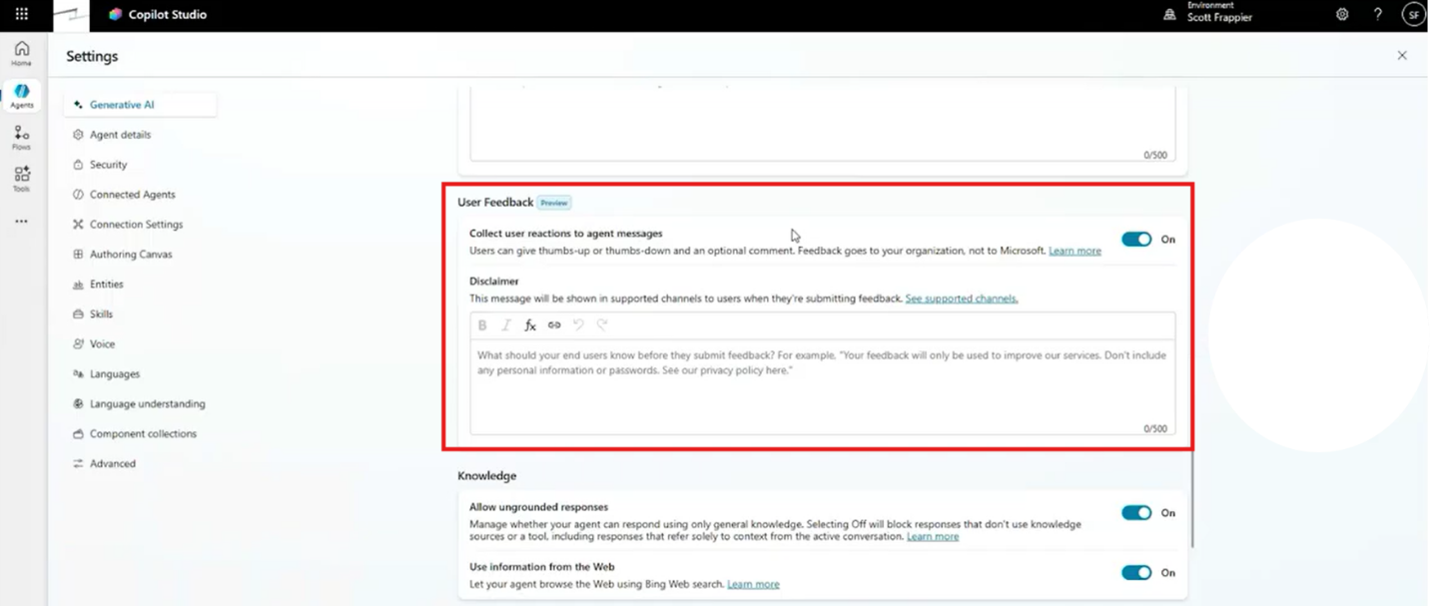
Building an effective agent takes time, patience, and a willingness to iterate. Even after you deploy it, you’ll want to track the results to make sure it’s working for your business. With Copilot Studio’s feedback capabilities, you can rate responses with a thumbs-up or a thumbs-down to track ways to improve the agent.
This is particularly valuable when tracking interactive agents. Automated agents that operate without direct user interaction likely won’t require it. You can enable or disable feedback for an agent based on how your team uses it.
General Settings also lets you control whether your agent can generate responses using information beyond its configured knowledge sources.
For example, if you're building an agent specifically to answer questions using internal business documentation, you may want to restrict access to general knowledge and web information.
To configure these restrictions:
- Open the knowledge-related settings.
- Review the options for ungrounded responses and web information.
- Disable web access if external information isn't required.
- Disable other ungrounded responses if the agent should rely exclusively on its configured knowledge and tools.
- Save your changes and test the agent with questions outside its intended knowledge.
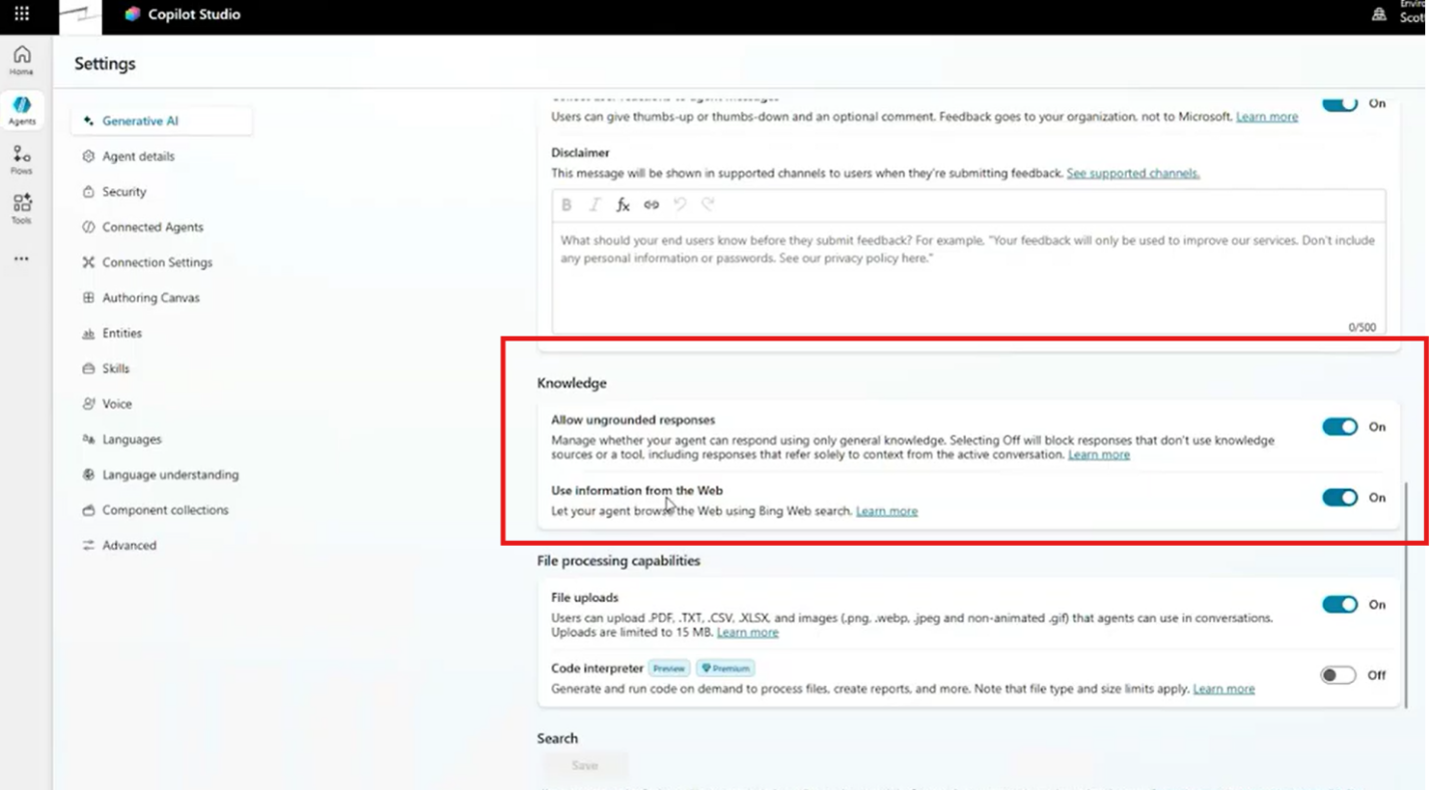
This helps keep purpose-built agents focused on the information they're designed to use.
Step 5: Configure File Processing and Tenant Graph Grounding
Finally, General Settings provides options for file processing and organizational information access.
File processing allows users to upload documents that an agent can interpret and process. For example, you could use file processing to support a financial journal import workflow.
If your agent doesn't need uploaded files, you can disable this capability.
Another option is Code Interpreter, which supports scenarios where an agent uses a sandboxed execution environment to perform processing tasks or generate outputs.
You can also configure Tenant Graph Grounding, which uses organizational search capabilities to retrieve relevant information from your Microsoft 365 environment.
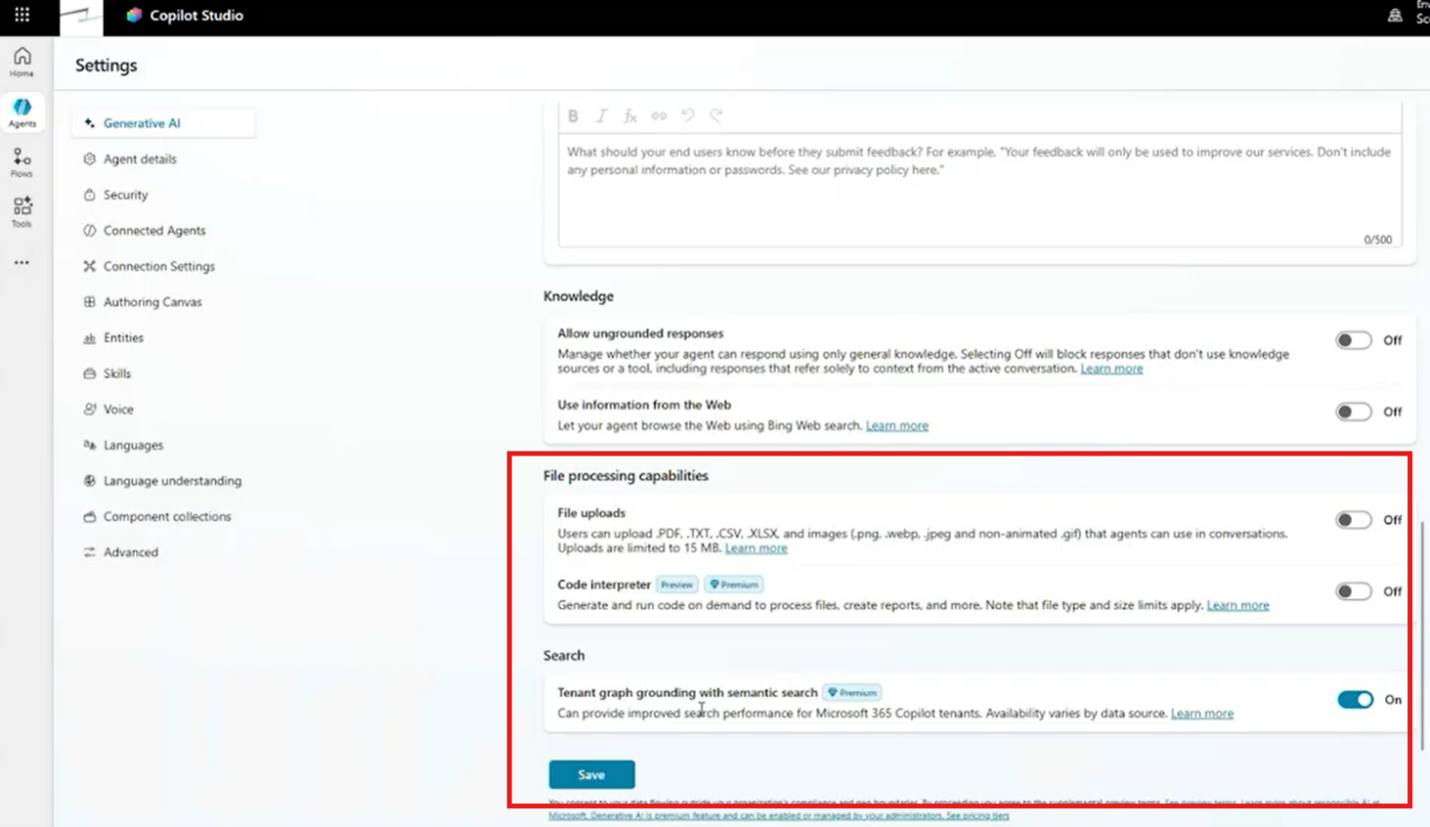
This can include information from emails, conversations, and documents, subject to the available integrations and permissions.
To complete your configuration:
- Review whether your agent needs file uploads.
- Enable or disable file processing accordingly.
- Determine whether Code Interpreter is necessary for its tasks.
- Review Tenant Graph Grounding and enable it if organizational information is required.
- Disable unnecessary capabilities.
- Select Save to apply your settings.
For an automated, purpose-built agent, you might enable moderate content moderation, disable user feedback, restrict ungrounded web responses, and prevent unnecessary file uploads. You could still enable Tenant Graph Grounding if the agent needs information from your organization's Microsoft 365 environment.
The result is a more focused agent configured around the specific task you want it to accomplish.
Key Takeaway: Build Your Agents with Purpose
Microsoft Copilot Studio provides a wide range of capabilities, but building successful agents doesn't mean enabling every feature available. It means understanding your business requirements and configuring each agent accordingly.
As you begin building your own agents, keep these principles in mind:
- Start with a specific business problem. Define the task your agent needs to accomplish before adding capabilities.
- Write clear descriptions and instructions. Help your agent understand its responsibilities and boundaries.
- Connect only the necessary information and tools. Give your agent access to what it needs without introducing unnecessary complexity.
- Balance functionality with performance. Consider how advanced reasoning, moderation, and other settings affect the user experience.
- Test, collect feedback, and continuously improve. Your agent's performance should evolve alongside your business needs.
With these fundamentals in place, you're better positioned to build AI agents that provide meaningful value instead of simply adding another tool to your technology environment.
Stay tuned for Parts 2 and 3 of our Copilot Studio series, where we'll continue exploring the platform's capabilities and how you can put them to work for your business.
Build Smarter AI Agents with Stoneridge Software
Your business doesn't need more AI experiments. It needs AI agents that get results. Whether you're just getting started with Microsoft Copilot Studio or looking to take your existing agents to the next level, Stoneridge Software is the partner you can trust.
From identifying the right opportunities and establishing effective configurations to integrating Copilot Studio with your existing Microsoft solutions, our experts are here to help you every step of the way.
Contact us today to turn Copilot Studio into a powerful business tool.


Under the terms of this license, you are authorized to share and redistribute the content across various mediums, subject to adherence to the specified conditions: you must provide proper attribution to Stoneridge as the original creator in a manner that does not imply their endorsement of your use, the material is to be utilized solely for non-commercial purposes, and alterations, modifications, or derivative works based on the original material are strictly prohibited.
Responsibility rests with the licensee to ensure that their use of the material does not violate any other rights.