


Creating a List Panel for a Field Lookup in Dynamics AX
I recently had a scenario where we had to create a new vendor attribute that could have one or more values assigned to a vendor. The requirement wanted a drop-down field that opened a form and showed which values had been selected and which ones are still available. The lookup form should also allow the user to add/remove values. I was able to use an extension of the SysListPanel to accomplish this. I referenced form SysUserGroupInfo (Sys admin > Users > User groups). There are also list panels specific for financial dimensions. Form DimensionFocus (General ledger > Chart of accounts > Dimensions > Financial dimension sets) is an example. Here's how you would go about creating a list panel for a field lookup in Dynamics AX.
Prerequisites
- EDT created for the new attribute field
- New table created to store the new attribute values and relation to the parent. For example, VendAccount if this is a new attribute for vendors. In this example, the new table has tow fields - VendAccount and CombinedCode.
- The new field is added to the ‘parent’ form. Example VendTable if the new field is an attribute of a vendor. In my scenario, I also added the table in #2 as a datasource of the form.
- New table created to store the new attribute values that are available. Similar to VendGroup. This table should be set to the Form Help of the new EDT in #1. This is like a setup form that will store categories that can be assigned to the vendor.
First, we need to create a form that will be used as the lookup form. This will be what is displayed when the drop down of the field is clicked.
Lookup form:
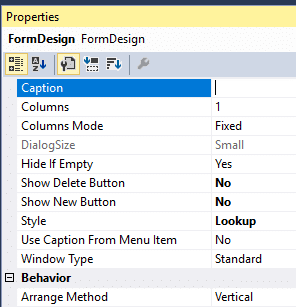
1. I used the Custom patter type since this form really won’t have any grids, action pain, etc. I set the Style property to Lookup and set the Show Delete / New Button to No. These properties are on the Design.
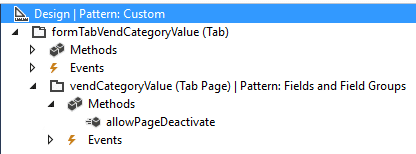
2. I set the auto declaration of the tab page control to Yes.
3. Add a datasource. This will be the new table that is created to store the new attribute values.
There is very little coding needed for this. You need to override the Init and close methods of the form and I created a Validate method. You will need to override the Active method of the datasource as well.
There is very little coding needed for this. You need to override the Init and close methods of the form and I created a Validate method. You will need to override the Active method of the datasource as well.
Override the init method of form
1. In the init method is where you initialize the SysListPanel. I used the SysListPanelRelationTableCallBack
        public void init()
    {
	 // create new panel that will show the selected and available categories
        sysListPanel = SysListPanelRelationTableCallback::newForm(element,
                             element.controlId(formControlStr(SSIVendCategoryValueTable, vendCategoryValue)),
                             "@SYS24159", "@SYS30545", 0, //#ImageUser,
                             tablenum(SSIVendCategoryValueTable),
                             fieldnum(SSIVendCategoryValueTable, CombinedCode),
                             fieldnum(SSIVendCategoryValueTable, CombinedCode),
                             tablenum(SSICategoryValueTable),
                             fieldnum(SSICategoryValueTable, DeptCatCode),
                             [fieldnum(SSICategoryValueTable, DeptCatCode), fieldNum(SSICategoryValueTable, DepartmentCategoryDesc)],
                             0, '',
                             identifierstr(Validate), '', '');

        super();

	 //set the record from the caller
        ssiVendCategoryValueTableRec = element.args().record();
        sysListPanel.init();
    }
2. Details of SysListPanelRelationTableCallback::newForm()
- The first few parameters are for the form and the form id.
- Then you can set captions for the Selected and Available columns.
- You can use an image for the form but I did not in this example.
- Then you list the table that will be the source of the new data. In this example, it is called SSIVenCategoryValueTable. This would be the table that is created in the prerequisites. In my example, the relation and range field was the same.
- After that, the ‘source’ table and fields are defined. This is the ‘parent’ relation. The table that will be the source of the caller. In my example, there is a relationship between the CombinedCode and DeptCatCode between the two tables.
- After that, it is a container that will have the fields that will appear in the list panel. In my example, I have two. The Code and Description.
- In my example, I did not set the range field or value here. That is done in the Active method of the form datasource.
- I did create a Validate method but did not create selectedMethod or availableMethod.
3. In the last part of the init method, I set the caller recId and then the init method of the list panel.
Override the close method of form
All that I put in the close method of the form is a call to the finalize method of the list panel. This will ensure all actions have been completed of the list panel to help ensure no errors occur when the form closes.
         public void close()
    {
        sysListPanel.finalize();
        super();
 }
New validate method
I didn’t need any special validation for this solution. I just return a true value. This is similar to how the sysUserGroupInfo form does it.
boolean validate(userId _userId, AddRemove _addRemove, SysListPanelRelationTable _listViewHandler)
    {
        return true;
    }
Override the active method of datasource
This is where I added the ranges for the list panel and also where the call to fill the list panel happens. We need to make sure that we are only returning the new attribute values for the vendor that has been selected in the caller form.
[DataSource]
    class SSIVendCategoryValueTable
    {
        /// <summary>
        /// active method for datasource SSIVendCategoryValueTable
        /// </summary>
        /// <returns>
        /// int
	 /// </returns>
        public int active()
        {
            int ret;

            ret = super();

			// set parms for range field and value
            sysListPanel.parmRelationRangeField(fieldNum(SSIVendCategoryValueTable, Vendor));
            sysListPanel.parmRelationRangeValue(ssiVendCategoryValueTableRec.Vendor);
            sysListPanel.fill();

            return ret;
        }

    }
Tab page method allowPageDeactivate
The last piece of coding on the form is to add some logic to the allowPageDeactivate of the tab page control. This will handle any updates that are needed based on changes made to the list panel.
[Control("TabPage")]
    class vendCategoryValue
    {
        /// <summary>
        /// saves any changes made to record values
        /// </summary>
        /// <returns>
	 /// boolean
	 /// </returns>
        public boolean allowPageDeactivate()
        {
            boolean ret;

            ret = super();

			// create new record if one doesn't already exists
            if (!SSIVendCategoryValueTable.RecId)
            {
                if (SSIVendCategoryValueTable_ds.validateWrite())
                {
                    SSIVendCategoryValueTable_ds.write();
                }
                else
                {
                    return false;
                }
            }

            return ret;
        }
That is all the coding that is needed for this functionality. The List panel will handle adding/removing any records from the tables. After all of this, you get something like the below.
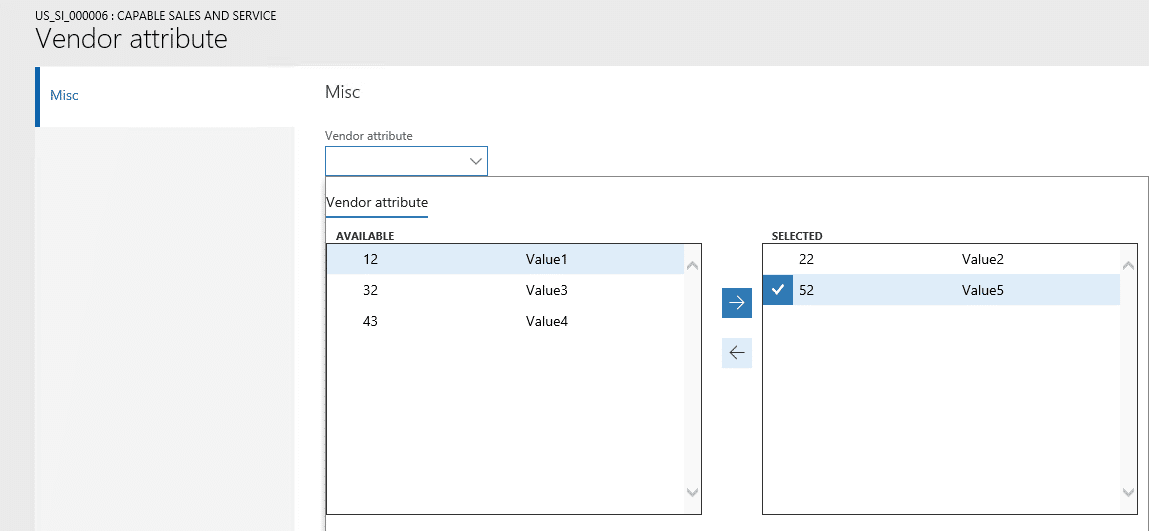
When you click the drop down of the new vendor attribute field the lookup form appears. You can use the left/right arrows to add/remove values. The selected values are the records that are stored in the new table created in the prerequisites. It will store the value and the vendor. The values listed in the Available are from the table of the new EDT.

Under the terms of this license, you are authorized to share and redistribute the content across various mediums, subject to adherence to the specified conditions: you must provide proper attribution to Stoneridge as the original creator in a manner that does not imply their endorsement of your use, the material is to be utilized solely for non-commercial purposes, and alterations, modifications, or derivative works based on the original material are strictly prohibited.
Responsibility rests with the licensee to ensure that their use of the material does not violate any other rights.