


Set Up Your Relevance Search in Dynamics 365 CRM
Dynamics 365 Relevance Search is a tool you want to be using. If you haven't already made the transition, now is the time. Formerly, people remember using the "wildcard" search within the traditional Categorized Search (inserting an asterisk before every search they made to widen the search parameters). Not only does Relevance Search in Dynamics 365 CRM remove that need, but it also displays results in a more flexible way to users.
Steps to Setting Up Relevance Search
First, Relevance Search needs to be enabled from a Global Settings level for all Users:
- Click on the Gear Icon in the Navigation bar.
- Navigate to Advanced Settings
- Navigate to System Settings > Administration
- On the General tab, scroll down to Set Up Search and select the box to Enable Relevance Search.
- Click OK.
Once Relevance Search is enabled, an individual User can set their individual search settings to Default to Relevance Search. Here they can select whether they want to see Categorized Search or Relevance Search. They can also determine which fields they want to see as a part of the Search (so long as those fields are available within the Quick Find View).
1. Click on the Gear Icon in the Navigation bar.
2. Click on Personalization Settings.
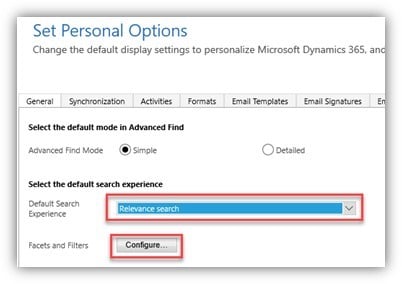
3. On the General tab, scroll down to Select the default search experience.
4. To adjust the Facets and Filters for each entity, click on Configure.
5. In the Select Entity dropdown, choose the Entity you would like to adjust, and Add or Remove fields, as well as choose the order in which the display by using the Move Up an Move Down functionality.
6. If a certain field is not available, it can be added to the Default Solution to the Quick Find View for that entity.
7. Once the Selected Fields match the Order in which you care to see, click OK.
8. Click OK once more to finalize your Personal Options.
Using Relevance Search
Relevance Search is accessed from the familiar location in the command bar, and can be toggled between Categorized and Relevance as needed.
You can use a "+" as an "and" function within your search, and a "|" as an "or" function within your search. Results will display in italicized text within each record type.
Users can sort record type by clicking on the Record Type in the left hand navigation area.
Users can also search for exact values with parentheses, just as they would expect to in any other web-based application. There is also a box in which they can search within all related Notes & Activities.
Overall, the look and feel of the new searching feels much more streamlined, and eliminates the bulky columns in the Categorized Search.
Happy Searching!
Contact Stoneridge to Learn More About Optimizing Dynamics 365
Stoneridge experts can help you get the most out of your software solutions by helping you set up and configure solutions and then optimize them so they fit your business. Get in touch for more information.

Under the terms of this license, you are authorized to share and redistribute the content across various mediums, subject to adherence to the specified conditions: you must provide proper attribution to Stoneridge as the original creator in a manner that does not imply their endorsement of your use, the material is to be utilized solely for non-commercial purposes, and alterations, modifications, or derivative works based on the original material are strictly prohibited.
Responsibility rests with the licensee to ensure that their use of the material does not violate any other rights.