


Tracking Refrigerant Usage and Leaks in Microsoft Dynamics GP and Key2Act
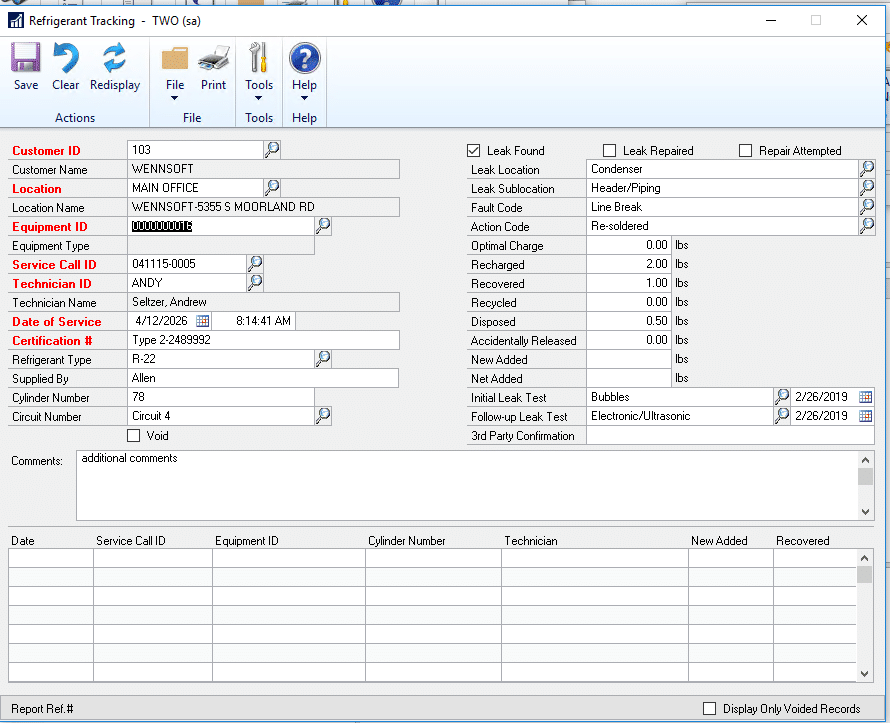
Organizations are required to report annual refrigerant usage and track leak rates to the EPA. In Signature Service Management from Key2Act, refrigerant usage and leak information can be entered in the Refrigerant Tracking window, accessed from the equipment record attached to the service call.
Tracking Refrigerant Usage and Leaks Rates
Refrigerant tracking data is entered and tracked for equipment included on a service call. You can also print a report that can be submitted to the appropriate agency for approval.
- Choose Cards > Service Management > Service Manager. The Service Manager window opens.
- Select a customer and service call and use the Refrigerant Tracking button to open the Refrigerant Tracking window. You can also zoom on the Equipment ID and open the Refrigerant Tracking window from the equipment record.
- Several fields populate directly from the equipment record and/or service call. The Date of Service defaults to today’s date and the time that this window was opened.
- Complete the following refrigerant fields, as necessary.
- Certification # -- Enter the certification number required to work on refrigeration systems, as specified under Section 608 of the Clean Air Act.
- Refrigerant Type -- Use the lookup to choose the type of refrigerant. Depending on the equipment, this can be one of several primary types. Refer to the National Refrigeration Safety Code catalog for more This value may default from the equipment record. The unit of measure for the selected refrigerant type, for example, lbs., defaults next to the Optimal Charge, Refrigerant Added, and Refrigerant Recovered fields.
- Supplied By
- Cylinder Number -- Enter the number of the refrigerant cylinder, and/or a short (30-character) description.
- Circuit Number -- Use the lookup to choose the refrigerant circuit.
- Leak Found, Leak Repaired, Repair Attempted -- If a leak has been found, mark the appropriate check box to indicate general discovery and action Marking the Leak Found check box enables the Leak Location and Leak Sublocation fields.
- Leak Location and Leak Sublocation -- Use the lookups to choose the general (e.g. Condenser, Compressor) and specific (e.g. Ball Valve, Coil) areas where the leak has occurred.
- Fault Code -- Use the lookup to choose the fault code that best describes the condition discovered, for example, a leaky pipe or corrosion. If the condition does not adequately match one of the other values, choose Other. You must explain the fault if you choose Other.
- Action Code -- Use the lookup to choose the action code that best describes the steps taken to alleviate or fix the
- Optimal Charge -- Enter the optimal refrigerant charge necessary to maintain safe cooling levels. This is often a manufacturers’ initial value and may default from the equipment record.
- Recharged, Recovered, Recycled, Disposed, Accidentally Released -- For each of these fields, enter the amounts of old refrigerant that is recharged, recovered, recycled, disposed, and/or accidentally released. The unit of measure defaults from the refrigerant type.
- New Added, Net Added -- Enter the amount of new refrigerant that is added and the net amount of total refrigerant added. The unit of measure defaults from the refrigerant type.
- Initial Leak Test, Follow-up Leak Test -- If action was taken to verify the refrigerant leak, choose the method that was used and the date of the initial test. If a follow-up test was performed, choose an additional method and date. If no verification was performed, select N/A in both fields.
- Third Party Confirmation -- If a third-party agency was used to manage and verify refrigeration safety, enter the verification number here. This value is not validated by the software.
- Void (check box) -- If for some reason you need to void this record, mark this check box.
- When you are finished, choose Save. The printer button allows you to view a printable SSRS report with the information from a refrigerant tracking record.
- If you opened the Refrigerant Tracking window from the service call, you can use the scrolling window to select existing refrigerant tracking records for the service call.
- If you opened the Refrigerant Tracking window from the equipment record, you can use the scrolling window to select existing refrigerant tracking records for the equipment.
Refrigerant Tracking Lookup Data
If you have the Refrigerant Management feature registered, you can set up pre-existing data for refrigerant types, leak locations, and refrigerant codes. Setting up refrigerant types allows users to select predefined refrigerant types from a lookup window when creating a refrigerant tracking record. The unit of measure will default based on the refrigerant type.
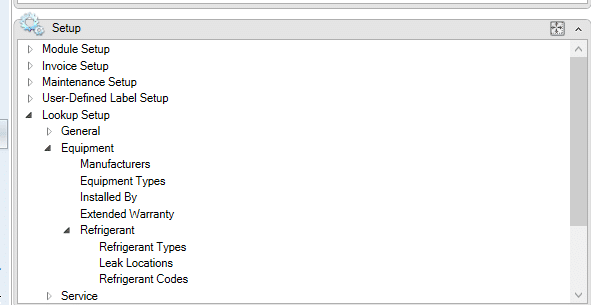
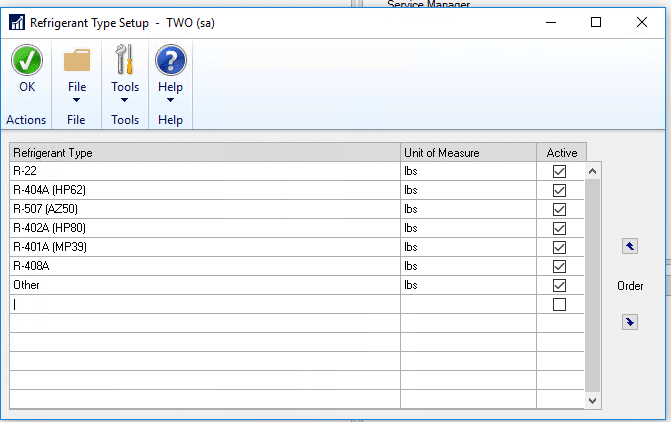
- Choose Tools > Setup > Service Management > Lookup Setup > Equipment > Refrigerant > Refrigerant Types.
- Enter a Refrigerant Type, for example, Puron or Freon.
- Enter the Unit of Measure that will be used to measure this type of refrigerant. This unit of measure will default on the Refrigerant Tracking window when this Refrigerant Type is selected. Once you enter a refrigerant type and unit of measure and tab off the field, the refrigerant type is saved.
- The Active check box is marked by default, indicating that this is an active refrigerant type that you want to appear on the Refrigerant Type lookup window. Unmark this check box if you want to inactivate the refrigerant type and exclude it from the lookup window. You can use the up and down arrow buttons to change the order of the refrigerant types, as they will appear in the lookup window.
- Choose OK when you are done.
Setting Up Leak Locations and Sublocations
Creating leak locations with sublocations allows the user to choose these values from a lookup window when creating a refrigerant tracking record
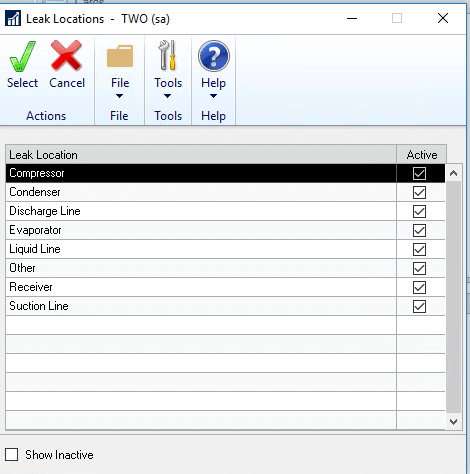
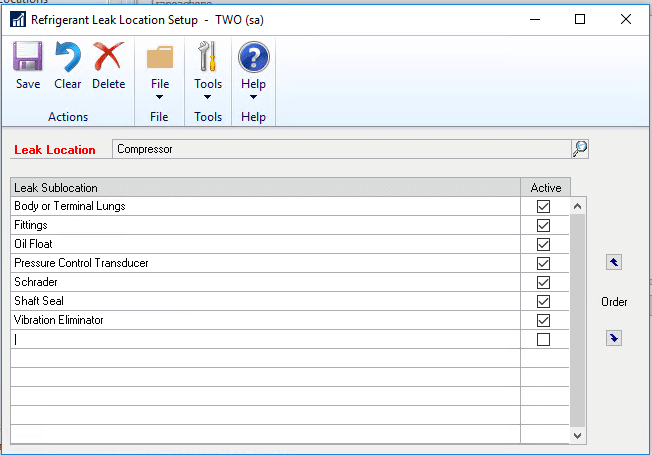
- Choose Tools > Setup > Service Management > Lookup Setup > Equipment > Refrigerant > Leak Locations.
- Select or enter a Leak Location, for example, Condenser or Evaporator. If you select an existing leak location, the scrolling window populates with sublocations. If this is a new leak location, the scrolling window is empty.
- If you are adding a new leak location, choose Save. The leak location must be saved before you can enter a leak sublocation.
- To create sublocations for the selected leak location, enter a Leak Sublocation, for example, Valve or Coil. The sublocation is saved when you tab off the field.
- Mark the Active check box if this is an active sublocation that you want to appear on the Leak Sublocation lookup window. Unmark this check box if you want to inactivate the sublocation and exclude it from the lookup window. You can use the up and down arrow buttons to change the order of the sublocations, as they will appear in the lookup window.
- Exit the window when you are done.
Setting Up Refrigerant Codes
You can create codes to be used in the Fault Code, Action Code, Verification Method, Second Verification Method, and Circuit Number fields on the Refrigerant Tracking window.
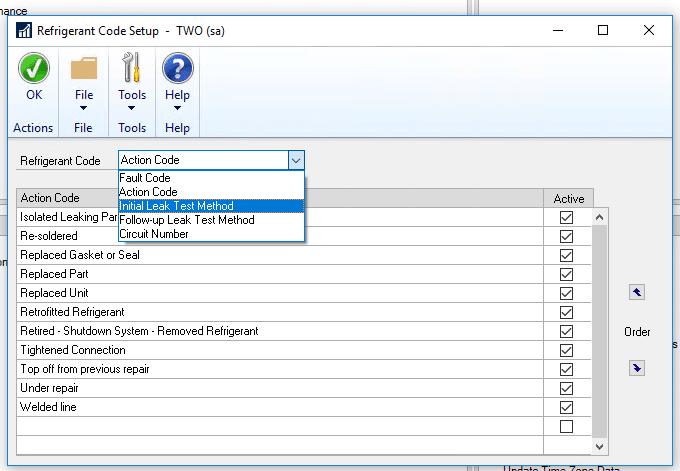
- Choose Tools > Setup > Service Management > Lookup Setup > Equipment > Refrigerant > Refrigerant Codes.
- Use the drop-down menu to select the type of Refrigerant Code you are creating. Choose whether you are setting up a Fault Code, Action Code, Verification Method, Second Verification Method, or Circuit Number.
- In the scrolling window, enter the name of the code. For example, if you are creating lookup data for the Action Code field, you may enter action codes such as Replaced Part or Tightened Connection. The code is saved when you tab off the field.
- The Active check box is marked by default, indicating that this is an active code that you want to appear on the code lookup window. Unmark this check box if you want to inactivate the code and exclude it from the lookup window. You can use the up and down arrow buttons to change the order of the codes, as they will appear in the lookup window.
- Choose OK when you are done.
Setting Up Technician Refrigerant Certification #
- Choose Microsoft Dynamics GP > Tools > Setup > Service Management > Lookup Setup > Technicians > Technicians.
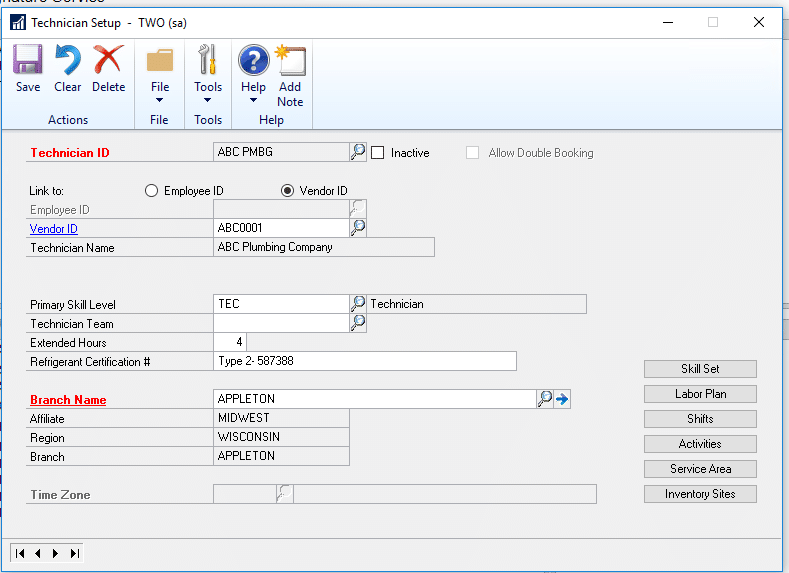
- Refrigerant Certification # -- Enter the certification number required to work on refrigeration systems, as specified under Section 608 of the Clean Air Act.
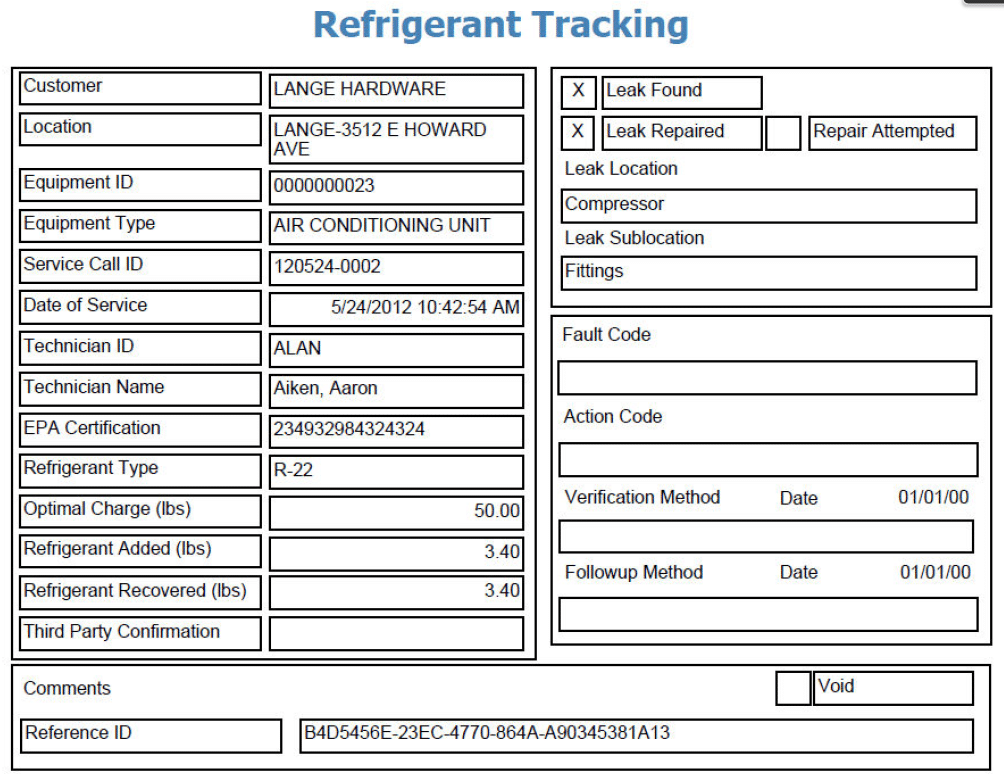
Refrigerant Tracking Reports
If you are using the refrigerant tracking feature, it’s easy to view a report with all of your refrigerant usage and leak information for equipment on a service call. This report contains information such as the certification number required to perform work, the equipment and leak or fault, and information about the work performed.
In Report Manager, enter a Reference ID to print the report. This report can also be printed after creating a record on the Refrigerant Tracking window (Cards > Service Management > Service Manager > Customer > Service Call > Refrigerant Tracking button). You can also print this report from Microsoft Dynamics GP by opening the Administration page and locating this report on the Custom Report List.
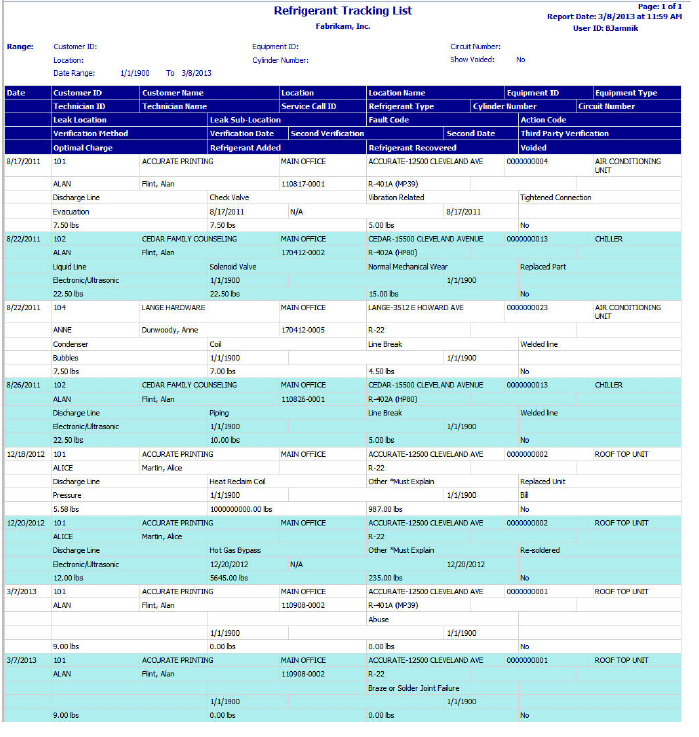
Refrigerant Tracking List
If you are using Refrigerant Tracking, you can print a report that displays all refrigerant tracking records. This report can only be printed from Report Manager. The refrigerant tracking records on this report can be filtered by Customer, Location, Equipment ID, Cylinder Number, or Circuit Number. You can also choose whether to display voided records and filter the list of records by date.
The Signature Service Management from Key2Act integrates directly with Microsoft Dynamics GP and allows users an easy way to track refrigerant information for the EPA. To learn more, reach out to the professionals at Stoneridge Software.

Under the terms of this license, you are authorized to share and redistribute the content across various mediums, subject to adherence to the specified conditions: you must provide proper attribution to Stoneridge as the original creator in a manner that does not imply their endorsement of your use, the material is to be utilized solely for non-commercial purposes, and alterations, modifications, or derivative works based on the original material are strictly prohibited.
Responsibility rests with the licensee to ensure that their use of the material does not violate any other rights.