















Improving Shop Floor Efficiency with the Built-In MES in Dynamics 365 Finance & Supply Chain Management
For many manufacturers, the gap between planning and execution is where inefficiencies quietly pile up.
Whether it’s missed labor tracking, inaccurate material consumption, or disconnected shop-floor processes, you might be overlooking a powerful solution that is already sitting inside your Dynamics 365 ERP system.
The built-in Manufacturing Execution System (MES) in Dynamics 365 Finance and Supply Chain Management (FSCM) is an underutilized capability that can dramatically improve visibility and control without requiring additional third-party tools.
Let’s break down how it works, what it takes to get started, and what it looks like in action.
What is the Manufacturing Execution System (MES) in Dynamics 365?
At its core, the MES in Dynamics 365 FSCM – often referred to as the Production Floor Execution Workspace – is a shop floor-facing workspace designed to simplify how production teams interact with the system.
Rather than requiring workers to navigate the full ERP interface, this streamlined console allows them to:
- Clock in and out of work
- Start and stop production jobs
- Record labor time against operations
- Track material consumption
- Request maintenance
- Report production progress and completion
All of this happens without ever entering the traditional Dynamics 365 interface.
Why MES in Dynamics 365 Finance and Supply Chain Management Matters
All actions users perform in the MES automatically feed into Dynamics 365 journals behind the scenes. It provides you and your team with an easy-to-use interface that allows you to interact with Production and Batch Orders. The benefits of this include:
- Labor is accurately captured
- Material usage is recorded in real time
- Production reporting becomes far more reliable
For organizations that still rely on manual updates without detailed tracking, this is a major step forward. It eliminates the common scenario where teams “just mark it done later” without capturing the true cost or effort of production.
While some external MES systems may offer more in-depth features, the main benefit of this system is that it’s already included in your Dynamics 365 subscription and requires no add-ons.
Prerequisites for Setting Up MES
Before you roll out MES to the shop floor, however, there are a few foundational elements you’ll need to put in place.
1. Production Setup
If you’re already using the production module, you’re off to a strong start. MES relies on:
- Production orders or batch orders
- Routes and operations
- Resource assignments
These elements ultimately determine what appears on the shop floor interface.
2. Worker Configuration and Set Up
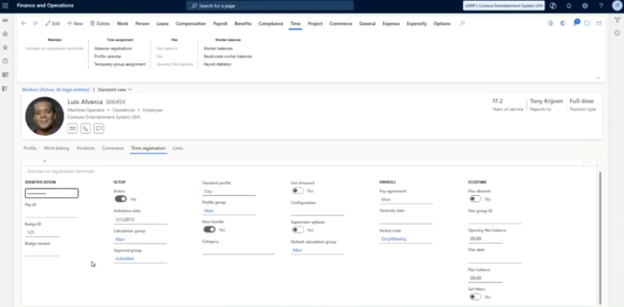
You must set up workers in the Human Resources module to use MES. You can do that by following these steps:
- On the Time Registration tab, click on the “Activate on Registration Terminals” (If the button is greyed out, then you already have this setup.)
- Assign a Badge ID to be used for login
- Define whether you require a password
The badge ID becomes the primary way operators authenticate at the production terminal.
3. Run and Optimize the Terminal
Users need appropriate permissions; specifically, you need to have the “Maintain time supervision” duty. This access is required to run the production floor interface.
You will also need to do the following:
- Hide the Dynamics 365 navigation bar by adding “\&limitednav=true” to the end of the URL.
- Hide the URL by using full-screen browser mode
- Configure dedicated terminals or touchscreens

Demo: From Setup to Production
Once the groundwork is in place and you have created workers and assigned terminals to them, the production floor execution interface becomes the central hub for shop floor activity.
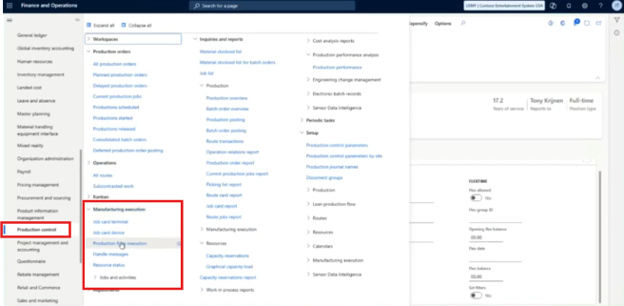
Accessing the Interface
Navigate to: Production Control → Manufacturing Execution → Production Floor Execution. From here, you can configure each workstation.
Key Configuration Options
When setting up a terminal, you’ll define:
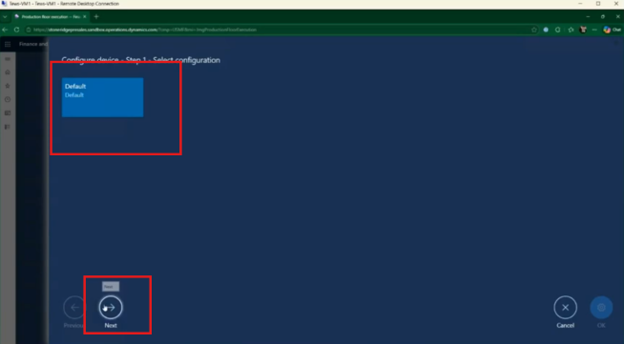
Terminal configuration profile: Different workstations can have different behaviors – For example, “with or without job instructions.” In this example, we will just select the default configuration and then click “Next.”
- Production context: You can assign the terminal to a production unit, a resource group, or a specific resource.
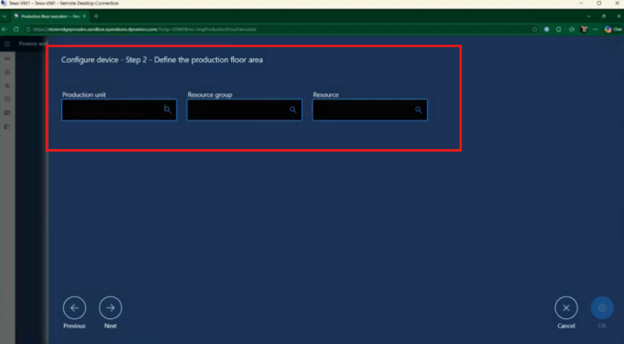
- For our example, we will select Resource Group 1110. What happens now is that any time a production order has a route that is assigned to a resource group will show on this terminal.
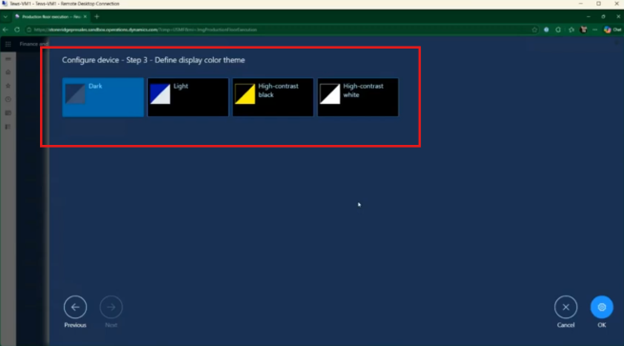
- Click Next and then choose your color theme.
How Jobs Appear
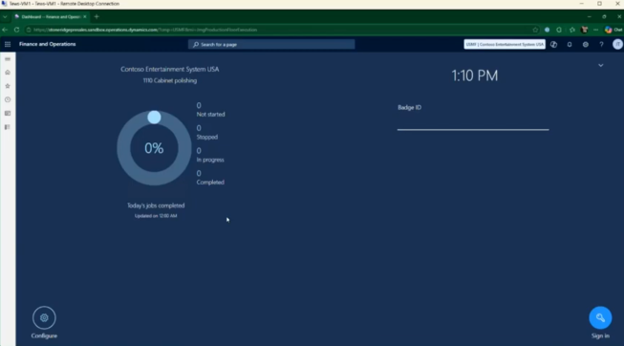
Jobs displayed on the terminal are driven by route configuration and resource assignments. If a production order includes a route tied to a resource within the selected group, it will automatically appear in the queue.
If nothing shows up, the issue is almost always tied to route setup.
User Experience
Once configured, the interface provides:
- A real-time job queue
- Visual job details
- Touchscreen-friendly controls
- Options to bundle jobs or view instructions
It’s designed for speed, clarity, and ease of use—especially in fast-paced manufacturing environments.
Creating and Releasing a Production Order
To see MES in action, everything starts with a production (or batch) order. Back in Dynamics 365, navigate to Production Control > All Production Orders.
Step 1: Create the Order
For our example, we will create a batch order (you can also do this with regular production orders as well).
- Select your item number
- Define quantity (For example: When producing bulk flower, you will define the weight)
- Confirm site and warehouse
- Choose a batch number
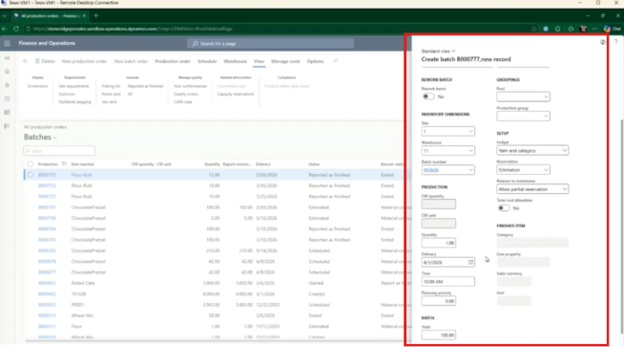
Once you do this, the system will automatically pull in the Formula or BOM and the Route information. Most of the remaining information will be consistent across all orders that you create.
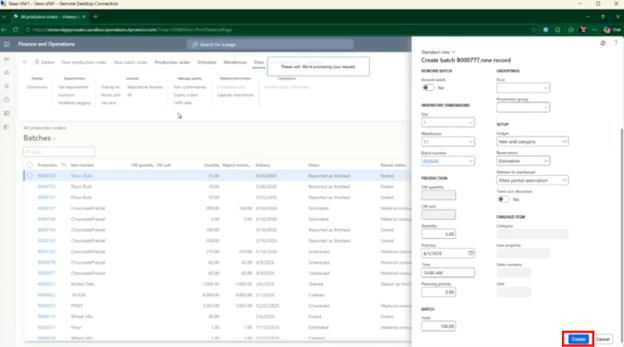
Once you’re done, click “Create” to finalize your order.
Step 2: Estimate and Review
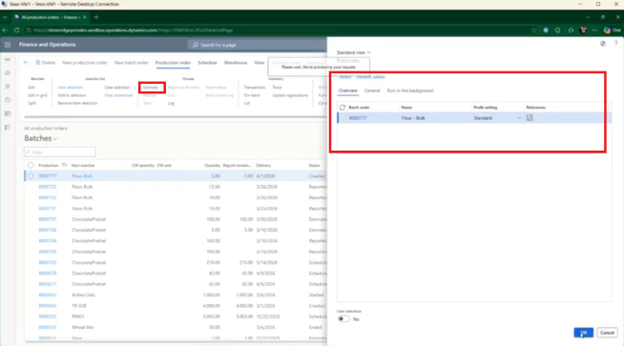
Before release, the order is estimated to be validated. In the top navigation area, click on “Estimate”.
On the next screen, click “OK”.
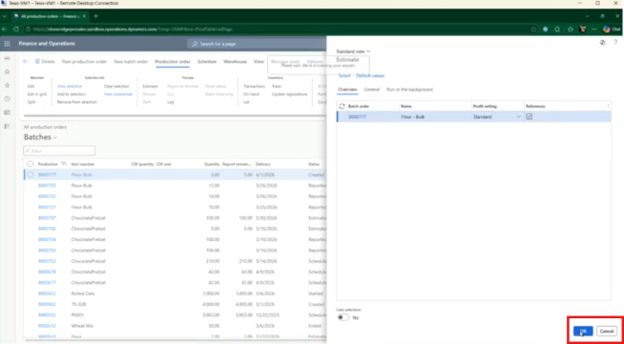
Once it is estimated, you can see the formula (material requirements), routing steps, and resource assignment defined for the order.
Routes are especially important, as they determine which jobs are created and where they appear in MES. To view the Route, go back to the same navigation area where you clicked “Estimate” and instead click on “Route”.
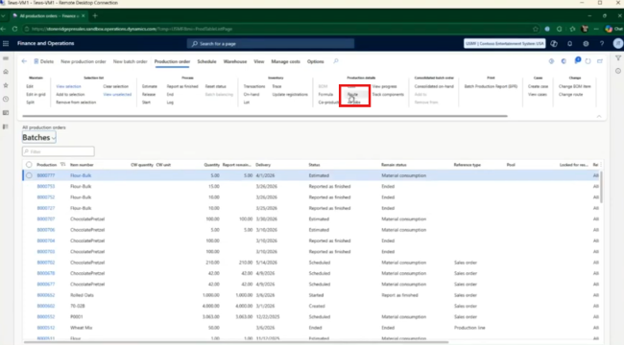
When reviewing the route, you should see your Resource type. If you don’t see anything there then it means the route likely wasn’t set up properly.
Step 3: Release to the Shop Floor
Go back to the main screen and click on “Release”, then “OK” on the next screen.
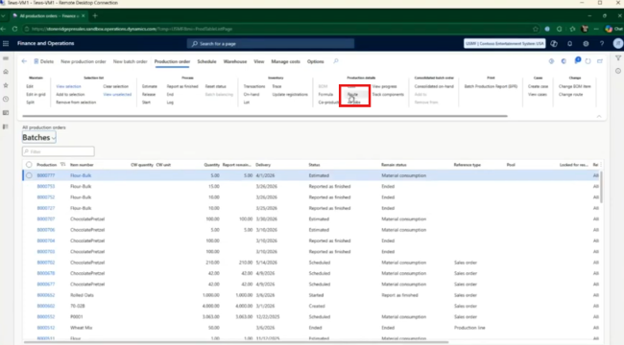
Once released:
- The system schedules the order
- Jobs are created based on route operations
- Those jobs are immediately visible in the MES interface (if aligned to the configured resource/group)
At this point, the shop floor team can begin execution without any additional ERP navigation required. At this point, you should be able to see the order as a job in the Production Flood Execution screen with all the key details and other information.
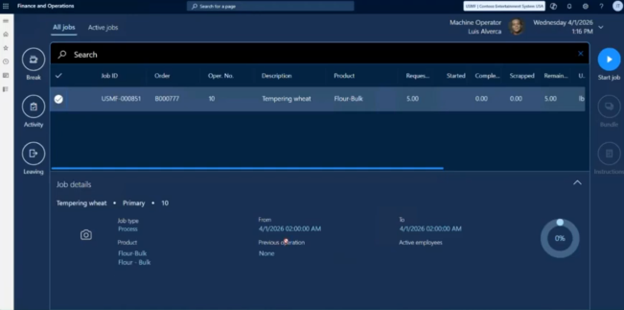
Once the user is ready, they can click on “Start Job” on the right side of the screen.
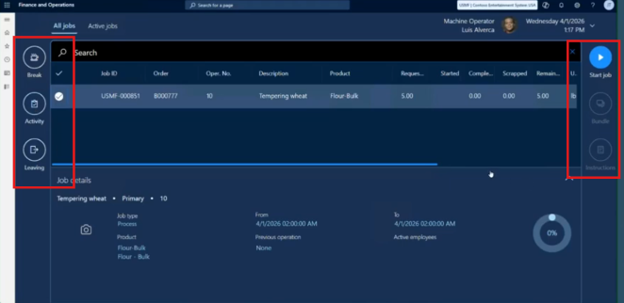
Although it’s not relevant for this example, there are some other handy options you can use. They are:
- Bundle: Users who want to work on multiple jobs at the same time can bundle them together.
- Instructions: If the manager or approvers want to include instructions for the people completing the job, they can do it here.
- Break: You can also schedule breaks for jobs, especially the ones that will take a long time. This also helps track Clock In and Clock Out.
- Activity: If you have non-manufacturing activities planned (like a meeting), you can track those in there as well.
- Leaving: If the user wants to leave their workstation (at the end of the day or week)
Starting Jobs and Tracking Production Progress
Starting the job with MES brings real-time execution directly to your shop floor.
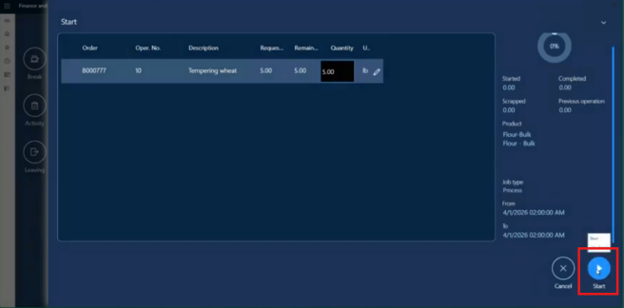
1) Starting a Job
Operators will log into production floor execution and select an available job. This will allow them to review job details like the item, timing, and operation. They can also start the job with a defined quantity. The system tracks:
- Requested quantity
- Remaining quantity
- Actual started quantity
After you review the details, click on “Start”.
2) Tracking Real-Time Visibility
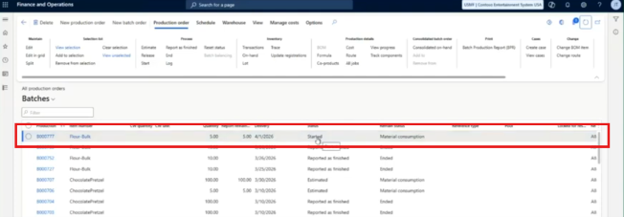
Once you start the job, it will automatically update the production order in Dynamics 365 and appear on the operator’s “active jobs list.” Additionally, time tracking will begin automatically.
3) Reporting Progress
Moving back to the production floor execution view, operators can report progress as they move along by clicking the button on the right hand side of the screen. For example, they can report progress on partial completion, full completion, adjusted material usage, and more.
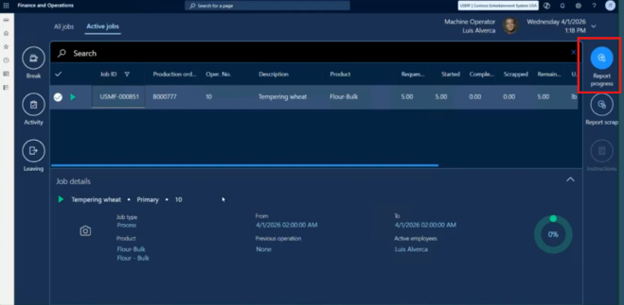
The system captures labor time (start > report), material consumption (default or adjusted), and production output.
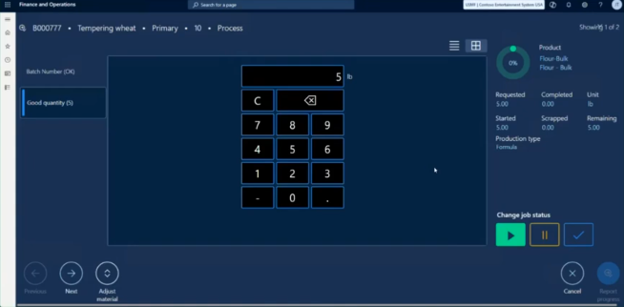
You update the job by inputting the batch number (032626 in this example) and inputting the “Good quantity”. The nice thing about this view is that it is touch-screen enabled, which makes it easy for workers to update the progress of a report from the production floor.
You can then adjust the material usage if need be.
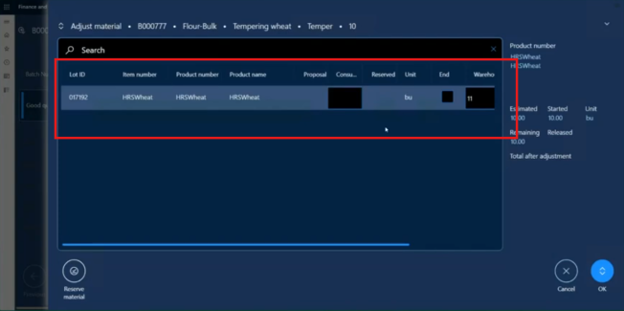
This feature is nice in that it helps you handle variability. MES supports various real-work manufacturing scenarios, including:
- Overproduction or underproduction (within tolerances)
- Material substitutions or adjustments
- Scrap reporting
MES also allows process manufacturers to track main output, byproducts, and co-products to report them in the same workflow.
Job Status Control
Operators can also use this view to quickly updated a job status to either in progress, stopped (end of shift), or completed.
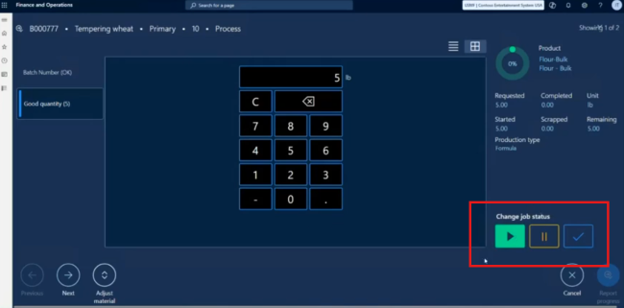
Automatic System Updates
Now that you’ve completed the job, you can change the job status to completed and then click “Report progress.”
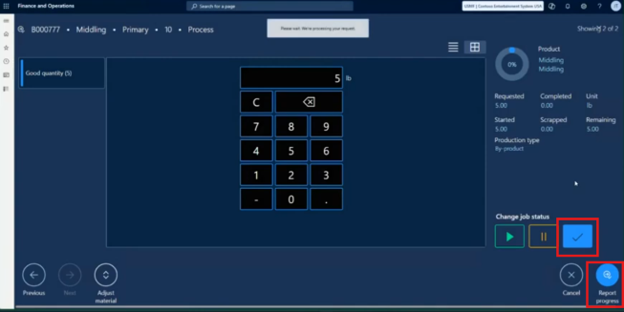
When a job is completed, the system will automatically create your “Report as Finished journal.” Inventory is automatically updated, and the production order status will progress accordingly. At this point, accounting can step in to finalize the postings.
End-to-End Without Leaving MES
Essentially, you’ve just completed an entire job without having to go into Dynamics 365. Despite that, the vital information attached to the job is still updated in D365. This is perhaps the most powerful benefit of this job. Not having to switch systems or do manual updates every time a step is complete is a massive time saver for your organization.
Why This Matters for Manufacturers
The built-in MES capability in Dynamics 365 FSCM offers a compelling combination of:
- Simplicity – Easy for operators to adopt
- Accuracy – Real-time tracking of labor and materials
- Visibility – Immediate feedback into production performance
- Cost efficiency – No need for additional MES tools in many scenarios
While there are more advanced MES solutions on the market, many organizations find that the native functionality covers their needs—especially when implemented thoughtfully.
Ready to Put MES to Work?
The difference between “having the feature” and “driving value from it” comes down to implementation, configuration, and alignment with your production processes. That’s where the right partner makes all the difference.
At Stoneridge Software, we specialize in helping manufacturers unlock the full potential of Dynamics 365—especially when it comes to leveraging built-in capabilities like MES to improve efficiency, accuracy, and visibility across the shop floor.
Contact us today to transform your production floor capabilities.

Under the terms of this license, you are authorized to share and redistribute the content across various mediums, subject to adherence to the specified conditions: you must provide proper attribution to Stoneridge as the original creator in a manner that does not imply their endorsement of your use, the material is to be utilized solely for non-commercial purposes, and alterations, modifications, or derivative works based on the original material are strictly prohibited.
Responsibility rests with the licensee to ensure that their use of the material does not violate any other rights.