


How to Correct Purchase Order Invoices Sent to the Wrong Vendor in Dynamics 365 Finance and Operations
In Dynamics 365 Finance and Operations, you cannot change the vendor on a Purchase Order once an invoice has been created. The system is designed this way for data integrity and fraud prevention reasons.
If you realize that the wrong vendor was on the Purchase Order after an invoice is posted, you need to back out the invoice and the receiving. Then, you must enter a new Purchase Order, confirm it, receive it, and invoice it.
If the invoice was paid to the wrong vendor, you will also need to void that payment and create a new payment for the correct vendor.
Steps to Correct the Invoice:
- Create a New Purchase Order as a Credit Note for the vendor who received the incorrect invoice.
- Confirm and Receive the New Purchase Order. Note that the quantity will be negative.
- Create the Credit Note Invoice for the incorrect invoice's previous quantities and unit price.
- Unsettle (or Void) Any Payments Made against the original invoice.
- Settle the New Negative Invoice against the original invoice.
- Process a New Purchase Order for the correct vendor.
STEP 1: Create a New Purchase Order as a Credit Note
- Go to Procurement and Sourcing> Purchase orders > All purchase orders. The first step is to create a new purchase order to be used as the purchase return order.
- Select New.
- In the Vendor account field, specify the vendor you're returning to.
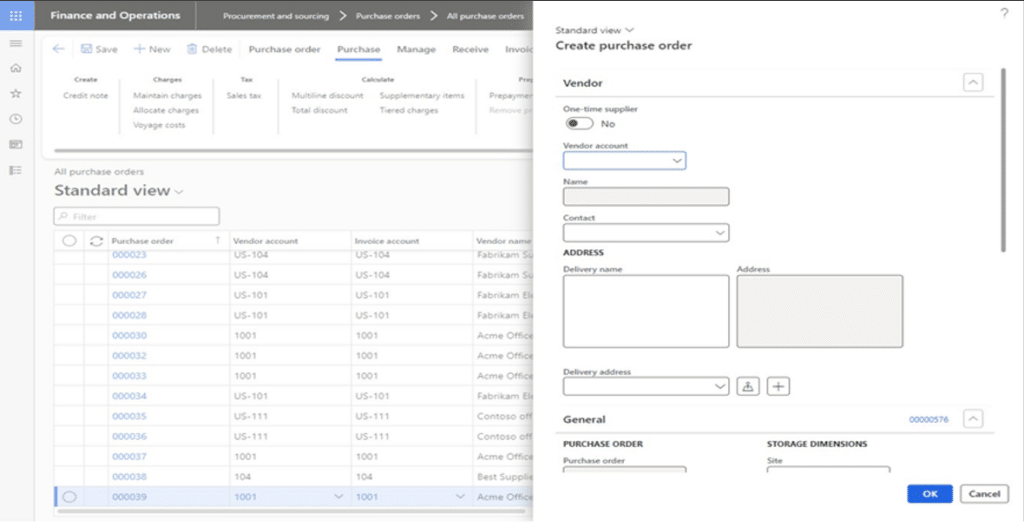
- Select OK.
- On the Action Pane, select Purchase.
- Select Credit note. This is the page from which you can copy from an existing vendor invoice to your return order. This is the same page that's used for other copy actions. But because we've opened it from the Credit note action, the page is configured to support the creation of a return order that offsets vendor invoices.

- Expand the Parameters section.
- The Invert sign option is automatically selected and can't be changed. This ensures that the sign is changed for the quantities, and that order lines that are added will offset the vendor invoice.
- The Copy charges option is automatically selected and can't be changed. This means that charges from the vendor invoice are added to the purchase return order to offset the original charge. It's possible to modify the changes on the order header and lines later.
- The Copy precisely option is automatically selected and can't be changed. This ensures that an exact copy is made of the values in all the fields on the vendor invoice header and lines. This means that a purchase return order is created with values that match all terms used with the vendor invoice document.
- The Delete Purchase Lines option deletes any purchase order lines that already exist on the purchase order before adding the new lines. In this example we haven't yet added any lines to the purchase return order, so there wouldn't be any effect. Use this option with caution, as it deletes all existing lines without further warning.
- The Copy order header option is automatically selected and can't be changed. This ensures that information is copied from the vendor invoice and applied to the purchase return order header. This is useful because it helps to ensure that the purchase return order offsets the invoice by using similar terms.

- Collapse the Parameters section.
- Expand the Invoices section. The page has been opened from the Credit note action, so the only option available is to copy information from vendor invoices. This tab shows all the available invoices for the vendor account that's specified on the purchase return order that you created earlier. The invoices are identified by the invoice voucher or the purchase order IDs.
- Locate the vendor invoice that includes the items you want to return and highlight it by selecting any field in that line.
- Select the check box for the line. Notice that the lines available on the vendor invoice are automatically selected together with the order.
- Highlight the line for the item you want to return by selecting any field in that line. In the Quantity field, enter the quantity that you want to return to the vendor.
- Clear the check box for each line that you don't want to return items for. Only the lines that you've selected will be copied to your order.

- Collapse the Invoices section.
- Expand the Selected lines or header to be copied section. This view shows a summary of all the documents and lines that you've selected to be copied to your order.

- Collapse the Selected lines or header to be copied section.
- Select OK. The line that you selected has now been copied to your purchase return order. The Quantity field should show a negative value for each item you're returning.

- In the Purchase Order line section, select Inventory.
- Select Marking.

- Note: The order line that was created is marked against the inventory transaction from the vendor invoice. This ensures that the inventory that's returned to the vendor is the same as the inventory that was received from them earlier. There are some situations where marking doesn't occur, for example, if the inventory has already been marked as Consumed, or if the product is one that doesn't use marking.

- Select OK.


STEP 2: Confirm and record the shipment of goods
- From the newly created Purchase Order, select Actions > Confirm.

- On the Action Pane, select Receive.
- Select Product receipt.
- This page is used to record product receipts for purchase orders and to process the return of goods back to the vendor. Order lines with a negative quantity mean that goods are to be returned to the vendor; the document that can be generated from this page can be used as a packing slip
- In the Quantity field, ensure that the shipment will be processed for the full ordered quantity that the order lines were created with.
- This page is used to record product receipts for purchase orders and to process the return of goods back to the vendor. Order lines with a negative quantity mean that goods are to be returned to the vendor; the document that can be generated from this page can be used as a packing slip
- In the Product receipt field, type a value. This field is used to enter a reference that will be used as a voucher for the product receipt journal.

- Select OK. The goods have now been recorded as shipped on the purchase return order, and a product receipt journal has been created.


You can use the Product receipt action to review the journals created with the purchase order and see what was received or returned, and when.
STEP 3: Create the ‘Credit note’ invoice for the incorrect invoice's previous quantities and unit price)
- On the Action Pane, click Invoice.

- In the Number field, type a value.
- In the Invoice description field, type a value.
- Click Update match status.

- Click Post.


STEP 4: Unsettle any Payments made against the original invoice
- From the Vendor account form, in the Vendor group select Transactions.

- In the list, select the Invoice that was created incorrectly, at the top click Settlements > Undo settlements.
- Select the Mark check box for that invoice.

- Click Reverse.


NOTE: If the payment needs to be reversed, follow these steps:
Voiding Checks
Dynamics 365 Finance and Operations offers two methods for voiding payments:
- A two-step process requiring two different users with two different security settings to complete the void. One user will initiate the process and then the second individual will approve and post the void. This process adds an additional layer of security layer by preventing the same person from completing the entire process.
- A one-step process, where one person can void a check without an additional approval step.
In this example, the two-step process will be discussed. To void a check, navigate to Cash and Bank Management> Payment reversals > Checks.

- In the list, highlight the check to be voided and then click Payment reversal in the top ribbon.

- On the pop-up form, enter a Date for the transaction. By default, the date will be the date of the original transaction. This can be edited if desired. By voiding this check, the associated invoice will be opened again in Account Payable, making it available to be settled against the new credit memo (covered in the next section). General ledger transactions will be made to debit cash and credit Accounts payable, and the check will not be shown as an unreconciled item in the bank reconciliation.
- In the Reason code field, select an appropriate value for why the reversing. Verify that a Journal name has been supplied, if not, enter one. In the Reconcile field. Select this option to designate the check as reconciled when the payment reversal is posted. When the settings are selected, click OK.

- NOTE: If not utilizing the two-step process, the check is now voided, and all entries have been posted.
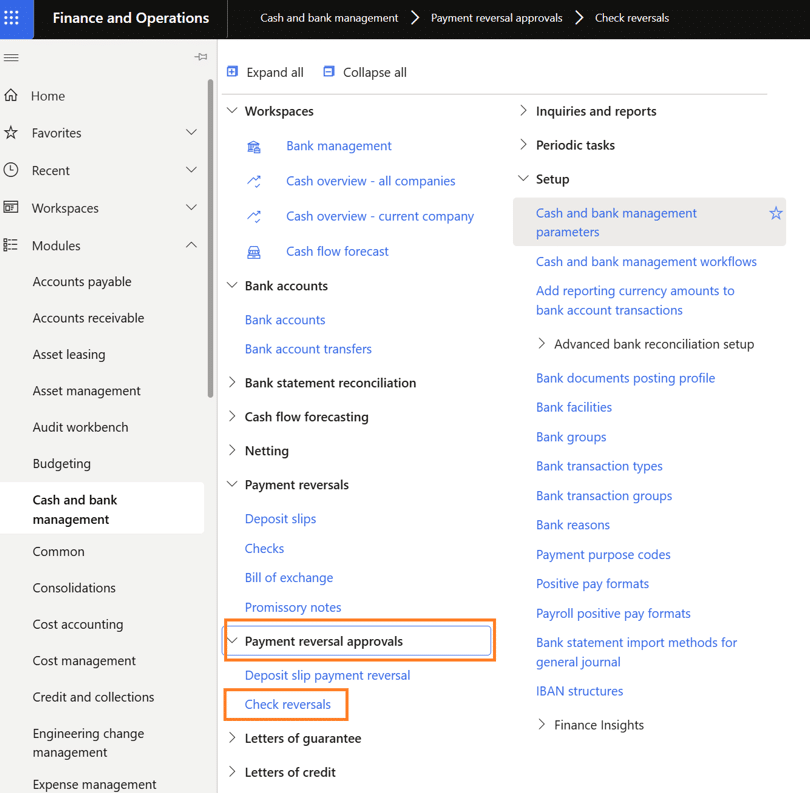
- Now that the first step is completed, an unposted transaction exists that needs to be approved and thus posted. This is typically a different staff member from the one who did the original reversal. Navigate to Cash and Bank management > Payment reversal approvals > Check reversals.

- On the form, all voided checks awaiting approval will be displayed. Highlight the void to be approved/posted and select Post.


Reversing an Electronic Payment
Electronic payments can't be reversed after they have been posted. Instead, a new transaction must be created for the amount of the payment to get the liability back on the vendor's account.
STEP 5: Settle the new negative invoice against the original invoice.
- From the Vendor account form, select Vendor, Transactions.

- In the list, mark the Credit Note previously created and select Settlement > Settle transactions.

- In the list, find and Mark the Credit note invoice and the original invoice.
- Click Post.


By following these steps, you can correct Purchase Orders processed and invoiced for the wrong vendor, ensuring accurate inventory values, purchase history, and vendor balances. To enter the invoice for the correct vendor simply create a new purchase order and process it normally – ensuring the vendor is correct this time.
Get in touch with Stoneridge Software to Learn More About Optimizing Dynamics 365 Finance and Operations
Our experts can help you with processes like this and many more that can help you streamline operations and address issues in your Finance and Operations environment. Reach out to us to learn more.

Under the terms of this license, you are authorized to share and redistribute the content across various mediums, subject to adherence to the specified conditions: you must provide proper attribution to Stoneridge as the original creator in a manner that does not imply their endorsement of your use, the material is to be utilized solely for non-commercial purposes, and alterations, modifications, or derivative works based on the original material are strictly prohibited.
Responsibility rests with the licensee to ensure that their use of the material does not violate any other rights.