


How to Use Filter Criteria for Dynamics 365 Portal Actions
If you've been working with Dynamics Portals for any amount of time, you're probably well aware that there are myriad of ways to design, configure, and customize how your portal users interact with data. Considering what you're exposing to portal users, how your entity permissions are established, the general flow of creating and editing records, and so many other things to manage, granular details like how or when users should interact with data might slip by.
Maybe you've found yourself in this kind of exchange with customers or stakeholders in the past:
- Sales Manager: "Hey! We're seeing some weird Orders come into the system…it seems like people on the portal are messing with some of the Order Products."
- Dynamics 365 Owner: "Hmm…well, I know we have it set up so they can delete those lines. Do the portal users need to be able to delete Order Products at all?"
- Sales Manager: "We shouldn't be allowing that if the Order is in a Submitted status. Is there a way to set that up?"
Luckily for us, there is a way to restrict those actions! Here's how to use filter criteria for Dynamics 365 Portal Actions.
When you're configuring a list or subgrid actions (things such as create, download, details, edit, delete, etc.), navigate to your View or Item Actions on the record. By default, 'Advanced Settings' is not checked. Check Advanced Settings to open up more action options:

Once you have Advanced Settings opened up, you'll notice a 'Filter Criteria' area within each action. This is what allows us to control how and to whom these actions appear. In simple terms, we're telling the system to only allow this action under certain circumstances, and we define those circumstances using a FetchXML query.
If you've been working in Dynamics 365 CE and aren't familiar with how to write FetchXML queries directly, no worries! You've probably been building them in the system for quite a while and don't even know it. Whenever we use Advanced Find in Dynamics 365 CE, we're building searches, creating views, and analyzing data- all of which is done through the Advanced Find UI (which desperately needs an update), but built on FetchXML behind the scenes.
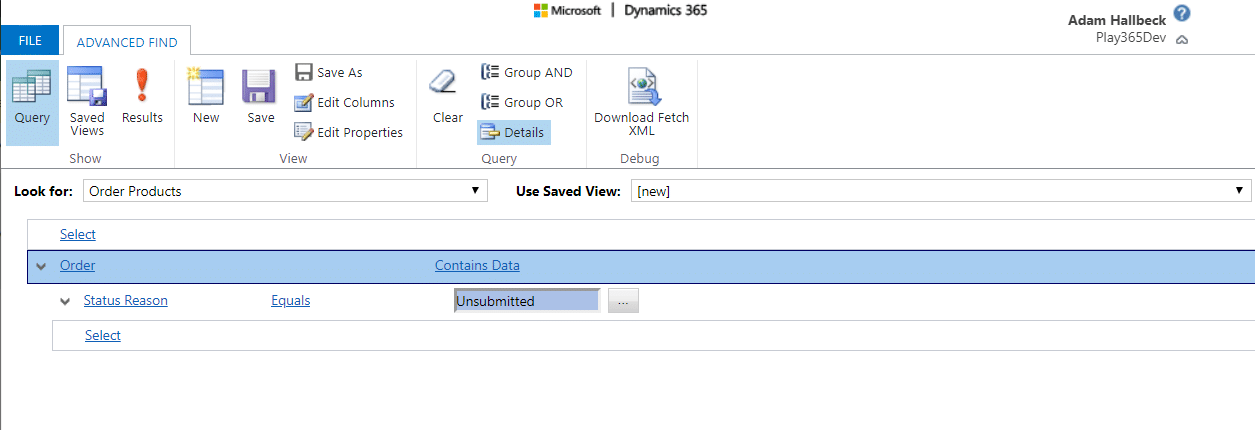
To use that background FetchXML for controlling our portal actions, first, build your query. In this example, our hypothetical portal pros above want to restrict delete actions, and only open that up if the parent Order is in a certain Status/Status Reason. We want to filter this action down to only be available when the parent Order is in an 'Unsubmitted' Status Reason. In Advanced Find, search for Order Products where the related Order is in that Unsubmitted Status Reason. It should look something like this:
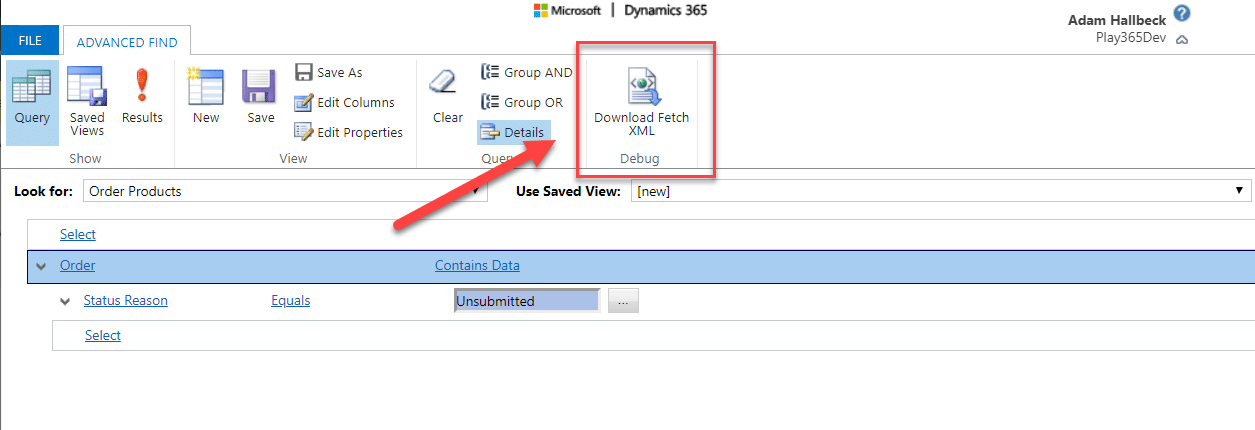
Once the query is set properly, click the 'Download FetchXML' to snag the XML we'll us in the portal action Filter Criteria:
Save the file locally and open it up with your preferred app (mine is Notepad++):
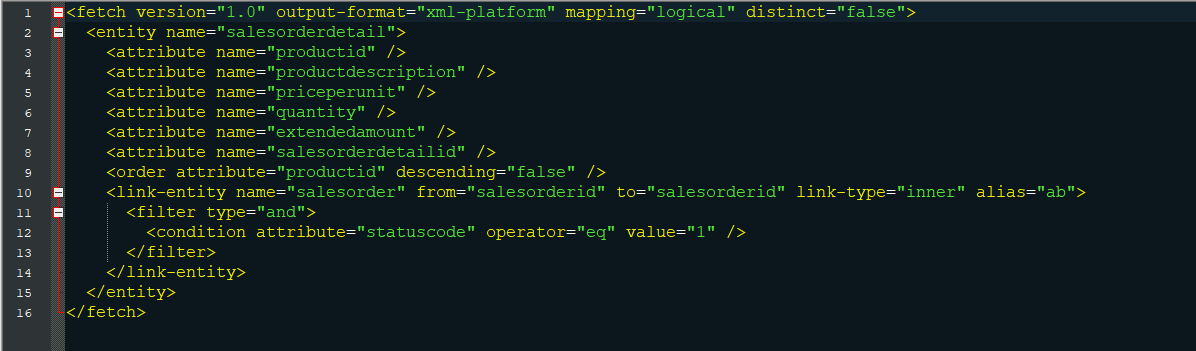
See those 'attribute name=' lines in there? Those are the view columns you have set up in whichever view was set in Advanced Find when you pulled down the FetchXML. Those, as well as the line that contains the Advanced Find view sorting (here, it's the line with "productid" descending="false"), can be removed from the query since they aren't relevant to portal actions. Here's our cleaned up, final version:

Once we save the Entity List/Metadata record where your action is located, it's a good idea to clear your portal cache before going to scope out the new functionality. You can access your portal cache and search index rebuild options by navigating to [your portal URL]/_services/about (it's a good idea to bookmark that full URL):

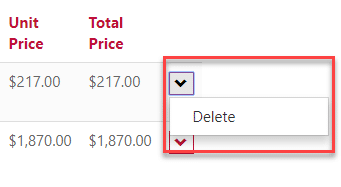
Once the cache is cleared, we can now access our portal Order form and test it out. This is a screen of Order Product actions in an Unsubmitted Status Reason:
And this is a screen of Order Product actions in Submitted Status Reason:
And there you have it. Leveraging the portal action feature in Dynamics 365 CRM is an awesome way to provide certain actions and features to portal users only under certain circumstances or at certain points.
Enhancing Dynamics 365 Portal Actions with Microsoft Copilot
Integrating Microsoft Copilot can significantly enhance the use of filter criteria for Dynamics 365 Portal Actions in several ways:
- Natural Language Processing: Users can describe their desired filter criteria in natural language, allowing Copilot to generate the corresponding FetchXML query. This simplifies the process for those who may not be familiar with coding.
- Automated Query Generation: Copilot can assist in building complex FetchXML queries by suggesting options based on user inputs, which helps reduce the learning curve associated with manual query writing.
- Real-Time Suggestions: As users configure portal actions, Copilot can provide real-time best practice suggestions for setting filter criteria based on common scenarios.
- Error Checking: Copilot can analyze the setup to identify potential errors or conflicts in filter criteria, ensuring that users configure actions correctly.
- Documentation Assistance: Users can rely on Copilot to help generate documentation or training materials based on their configurations, making it easier for teams to understand the setup.
- Performance Insights: By analyzing usage patterns, Copilot can suggest optimizations for filter criteria, enhancing user experience and system performance.
- Integration with Other Tools: Copilot can recommend integrations with other Microsoft tools or services that enhance the functionality of Dynamics 365 portals based on configured actions.
Leveraging Microsoft Copilot allows users to streamline the configuration of portal actions, making the process more accessible and efficient.
If you have any more questions about using Portals in Dynamics CRM, feel free to reach out to the team at Stoneridge Software.

Under the terms of this license, you are authorized to share and redistribute the content across various mediums, subject to adherence to the specified conditions: you must provide proper attribution to Stoneridge as the original creator in a manner that does not imply their endorsement of your use, the material is to be utilized solely for non-commercial purposes, and alterations, modifications, or derivative works based on the original material are strictly prohibited.
Responsibility rests with the licensee to ensure that their use of the material does not violate any other rights.