


Set Up Syncing between D365 V9 On Premise and Exchange Online
Recently, I set up D365 V9 on-premise server-side sync with Exchange Online. I ran into some tricky areas in the process. I am going to document them here. My goal is to help you have a smoother experience. Oh, and so I have it documented for the next time I need it. It will be needed every time the SSL Certificate expires and is changed. Below are the links I used as a guide to accomplish this task. I will walk through the steps and highlight additional information. I am writing in August of 2020. I note this date since Microsoft makes changes on a regular basis.
Warning: This is a techy blog. Continue at your own risk.
This first page includes the steps to connect D365 on-prem to Exchange online. This page is dated 11/19/2018.
Here's how to get started with your sync:
1. Permission required
- This refers to the account you will use to remote to the D365 servers and execute the tasks in the documents. Ex: Contoso\D365InstallAcct
- D365 access with System Administrator Security Role
- Local Admin on all D365 Servers
- Full Control access to SSL Certificates on all D365 Servers
- Office 365 Global Administrator Membership
- Required to run PowerShell commands that access Office 365, Azure and Exchange online.
- This is a temporary requirement and can be removed once the setup is complete.
2. Prerequisites
- The D365 instance you are working with must be configured for IFD (Internet Facing Deployment). It must be available outside your organization’s network. The following link will get you started.
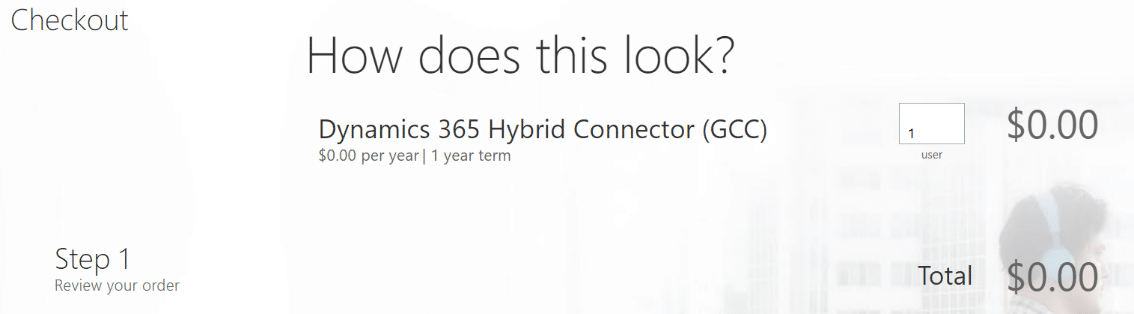
- Microsoft Dynamics 365 Hybrid Connector.
- This is a free item that must be “purchased” in your Office 365 tenant.
- An x509 digital certificate. I recommend a wild card cert. Ex: *.contoso.com
- The SSL certificate must be installed on all D365 Servers. Your D365 Asysnc service account and the D365 Application service account must have read access to the certificate.
- Install MS Online Service Sign-In Assistant.
- This gives you the ability to login to O365 Online. It is a download and install action. https://www.microsoft.com/en-us/download/details.aspx?id=39267
- Install the Azure Active Directory Module for Windows PowerShell
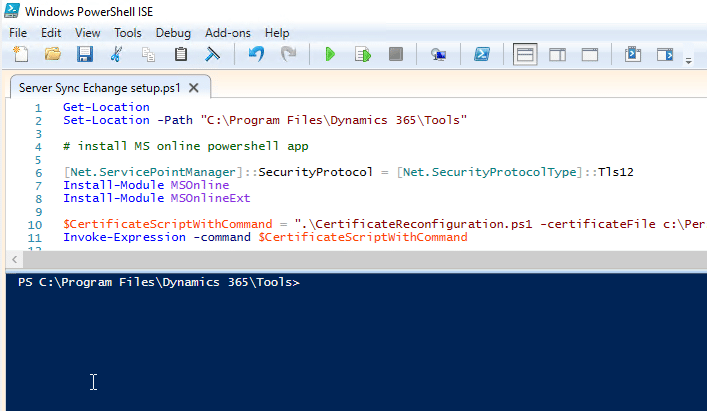
- This is a PowerShell Module. I recommend you use PowerShell ISE on the D365 server. As you can see in the image, PS ISE gives you a script pane and execution pane. It also allows you to run snippets from your script. Save the whole script for later reference and when you need to run it to update the SSL Certificate.
- You will see the command is
- Install-Module MSOnline
- You will get prompted for approval to install. You need to approve it or nothing will work.
- Install-Module MSOnline
3. Set up server-based authentication
- Again, I recommend using PowerShell ISE. This should be run on the D365 front end server. The first thing after opening PS ISE is to set the location to "C:\Program Files\Dynamics 365\Tools". This location is based on where you installed D365.
- Prepare the certificate.
- You need to export the certificate to a location on the hard drive. Such as C:. This is only needed for the scripts that follow and can be removed one complete. You will need the following files export from the certificate.
- Personalcerfile.cer
- Personalcertfile.pfx
- For this PowerShell command, you will also need the password for the certificate and the account to access it.
- replace “personal_certfile_password” with the actual password
- replace “consoto\administrator” with the account you setup as the D365 application service account. Make sure it is in the format, domain\account.
- You need to export the certificate to a location on the hard drive. Such as C:. This is only needed for the scripts that follow and can be removed one complete. You will need the following files export from the certificate.
- Prepare the Windows PowerShell session.
- There is a typo in this MS Script.
- Use “Install-Module MSOnlineExt -force” instead of “Install-Module MSOnlineExtended -force”
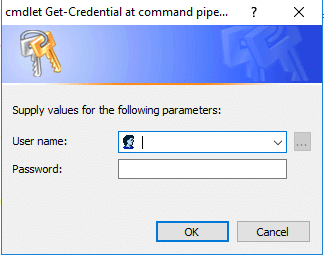
- Connect to Office 365
- When this portion of the script runs, it will open a windows credentials prompt. I had to use the email format of the account. Ex: D365InstallAcct@contoso.com
- Set the certificate
- Make user when copying PS commands from the web page to change the quotes in the command.
- “ and ” to "
- Make user when copying PS commands from the web page to change the quotes in the command.
- Set the Azure Active Directory Service Principal Name (SPN) in Exchange Online.
- Again, check to change the quotes when copying.
- In the first line, change “*.contoso.com” to “*.yourdomain.com”.
- it should match the @ portion of the accounts email format.
- Ex: D365InstallAcct@contoso.com
- it should match the @ portion of the accounts email format.
- Leave the 2nd line as it. Not need to change the guide.
- Configure the Microsoft Dynamics 365 Server for server-based authentication with Exchange Online.
- The only thing here is to change the quotes when copying the script.
4. Set the Exchange Online tenant ID
- Azure Active Directory module.
- These PS commands retrieve and display the Tenant GUID.
- This GUID is used in the next set of PS commands.
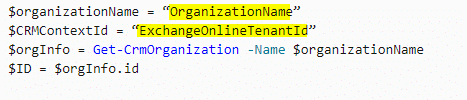
- Update S2STenantId
- Replace “Organizationname” with the name of the D365 Instance. This is the name that shows up in the D365 Deployment Manager in the D365 Server.

-
- Replace “ExchangeOnlineTenantID” with the Tenant Guide.
- See the highlighted text in the image below for text to be replaced.
-
- Nothing else in this snippet needs to be changed.
The next steps refer to the following link dated 12/13/2019. This is a good page to read through completely. For this blog, we will look at the following sections.
Configure Windows Server for Dynamics 365 Customer Engagement (on-premises) applications that use OAuth.
- Enable forms authentication
- This is done in ADFS. You may have already done this when setting up D365 to be externally facing.
- Configure the OAuth provider
- These commands can be run from the same PS IDE as all the previous commands. The commands will Enable OAuth for your D365 installation.
Now you are ready to set up the Email Server profile in D365.
1. Create Hybrid Email Server Profile
2. Configure User’s mailboxes
- Server-Side Sync or Email Router for Incoming and Outgoing Email
- Approve Email
- Test & Enable Mailbox
3. Settings > Dynamics 365 App for Outlook
- Run the command from the Setup section on the ADFS server
- Add-AdfsClient -Name "Dynamics 365 App for Outlook" -ClientId <Guid> -RedirectUri <D365 URL>/crmmailapp/code_auth.aspx
- <Guid> is the unique id of the D365 instance.
- <D365 URL> is the URL of D365
- Ex: https://d365.contoso.com
- Add-AdfsClient -Name "Dynamics 365 App for Outlook" -ClientId <Guid> -RedirectUri <D365 URL>/crmmailapp/code_auth.aspx
- Click Add App for all eligible users or Select users and click Add App to Outlook

-
- Thank can take some time. I have seen it take 15 minutes or more.
- The User may have to close outlook or logoff outlook.com.
Thank you for taking the time to read this blog. I hope you find it helpful and remember, you’ll need to run through this process each time you update your SSL Certificate.

Under the terms of this license, you are authorized to share and redistribute the content across various mediums, subject to adherence to the specified conditions: you must provide proper attribution to Stoneridge as the original creator in a manner that does not imply their endorsement of your use, the material is to be utilized solely for non-commercial purposes, and alterations, modifications, or derivative works based on the original material are strictly prohibited.
Responsibility rests with the licensee to ensure that their use of the material does not violate any other rights.